
User's Guide
Page 3
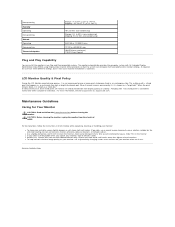
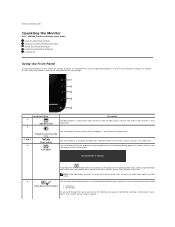
... system. ■ On-Screen Display (OSD) adjustments for ease of set-up and screen optimization. ■ Software and documentation CD which includes an information file (INF), Image color Matching File (ICM), and product documentation. ■ Energy Saver feature for Energy Star compliance. ■ Security lock slot. Identifying Parts and Features Front View Front View Label Description 1 OSD Menu/Exit 2 Brightness & Contrast/Up ( ) 3 Auto-adjust/Down ( ) 4 Input Source Select/Select 5 Power button (with power light indicator) Front panel controls
... system. ■ On-Screen Display (OSD) adjustments for ease of set-up and screen optimization. ■ Software and documentation CD which includes an information file (INF), Image color Matching File (ICM), and product documentation. ■ Energy Saver feature for Energy Star compliance. ■ Security lock slot. Identifying Parts and Features Front View Front View Label Description 1 OSD Menu/Exit 2 Brightness & Contrast/Up ( ) 3 Auto-adjust/Down ( ) 4 Input Source Select/Select 5 Power button (with power light indicator) Front panel controls

User's Guide
Page 5
... the power consumption and signaling of this automatic power-saving feature: VESA Modes Normal operation Active-off mode Switch off * Without Audio Horizontal Sync Active Inactive - NOTE: This monitor is detected by disconnecting the main cable from a keyboard, mouse or other input devices is ENERGY STAR®-compliant. Bottom view Label Description 1 AC power cord connector 2 DVI connector 3 VGA connector Monitor Specifications Power Management Modes If you have VESA's DPMS™ compliance display card or software installed in use. NOTE: Zero power consumption...
... the power consumption and signaling of this automatic power-saving feature: VESA Modes Normal operation Active-off mode Switch off * Without Audio Horizontal Sync Active Inactive - NOTE: This monitor is detected by disconnecting the main cable from a keyboard, mouse or other input devices is ENERGY STAR®-compliant. Bottom view Label Description 1 AC power cord connector 2 DVI connector 3 VGA connector Monitor Specifications Power Management Modes If you have VESA's DPMS™ compliance display card or software installed in use. NOTE: Zero power consumption...

User's Guide
Page 7
Flat Panel Specifications Screen type Panel type Screen dimensions Preset display area: Horizontal Vertical Pixel pitch Viewing angle Luminance output Contrast ratio Faceplate coating Backlight Response Time Color Depth Color Gamut Active matrix - 14 +5V/+3.3V power 15 Self test 16 Hot Plug Detect 17 TMDS RX0- 18 TMDS RX0+ 19 TMDS Ground 20 Floating 21 Floating 22 TMDS Ground 23 TMDS Clock+ 24 TMDS Clock- TFT LCD TN 23...
Flat Panel Specifications Screen type Panel type Screen dimensions Preset display area: Horizontal Vertical Pixel pitch Viewing angle Luminance output Contrast ratio Faceplate coating Backlight Response Time Color Depth Color Gamut Active matrix - 14 +5V/+3.3V power 15 Self test 16 Hot Plug Detect 17 TMDS RX0- 18 TMDS RX0+ 19 TMDS Ground 20 Floating 21 Floating 22 TMDS Ground 23 TMDS Clock+ 24 TMDS Clock- TFT LCD TN 23...

User's Guide
Page 8
... Analog RGB, 0.7 Volts +/- 5%, positive polarity at 75 ohm input impedance Digital DVI-D TMDS, 600mV for each differential line, positive polarity at 50 ohm input impedance Separate horizontal and vertical synchronizations, polarity-free TTL level, SOG (Composite SYNC on green) 100 to 240 VAC/50 or 60 Hz + 3 Hz/2.0A (Max.) 110 V: 30 A (Max.) 220 V: 60 A (Max.) Physical Characteristics Connector type Signal cable type l D-sub: blue connector l DVI-D: white connector l D-sub: Detachable, Analog...
... Analog RGB, 0.7 Volts +/- 5%, positive polarity at 75 ohm input impedance Digital DVI-D TMDS, 600mV for each differential line, positive polarity at 50 ohm input impedance Separate horizontal and vertical synchronizations, polarity-free TTL level, SOG (Composite SYNC on green) 100 to 240 VAC/50 or 60 Hz + 3 Hz/2.0A (Max.) 110 V: 30 A (Max.) 220 V: 60 A (Max.) Physical Characteristics Connector type Signal cable type l D-sub: blue connector l DVI-D: white connector l D-sub: Detachable, Analog...
User's Guide
Page 9
... antistatic coating. For best practices, follow the Safety Instructions before cleaning the monitor. Back to clean the monitor. If required, the user can install the monitor in any kind as a "bright dot." When the pixel remains permanently lit, it off your monitor, use a dynamically changing screen saver and turn off with 1 to 5 fixed pixels is considered normal and within competitive standards. If possible, use a special screen-cleaning tissue or solution suitable...
... antistatic coating. For best practices, follow the Safety Instructions before cleaning the monitor. Back to clean the monitor. If required, the user can install the monitor in any kind as a "bright dot." When the pixel remains permanently lit, it off your monitor, use a dynamically changing screen saver and turn off with 1 to 5 fixed pixels is considered normal and within competitive standards. If possible, use a special screen-cleaning tissue or solution suitable...
User's Guide
Page 10
... this documentation may not be available in the Choose A Country/Region drop-down menu at www.dell.com\regulatory_compliance. Visit support.dell.com. 2. Back to Contents Page Appendix Dell™ S2309W Flat Panel Monitor User's Guide Safety Instructions FCC Notice (U.S. Dell provides several online and telephone-based support and service options. Contacting Dell For customers in exposure to shock, electrical hazards, and/or mechanical hazards. Choose...
... this documentation may not be available in the Choose A Country/Region drop-down menu at www.dell.com\regulatory_compliance. Visit support.dell.com. 2. Back to Contents Page Appendix Dell™ S2309W Flat Panel Monitor User's Guide Safety Instructions FCC Notice (U.S. Dell provides several online and telephone-based support and service options. Contacting Dell For customers in exposure to shock, electrical hazards, and/or mechanical hazards. Choose...
User's Guide
Page 11
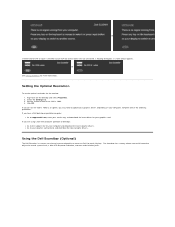
After installing the drivers for your Graphics Adapter, attempt to set the resolution to 1920x1080, please contact Dell™ to inquire about a Graphics Adapter that supports these resolutions. Go to http://support.dell.com, enter your service tag, and download the latest driver for your graphics card. 2. NOTE: If you have a Dell™ desktop or a Dell™ portable computer with internet access 1. Back to Contents Page Setting Up Your Monitor Dell™ S2309W Flat Panel Monitor If you are unable to set the resolution to 1920x1080 again. Back to Contents Page
After installing the drivers for your Graphics Adapter, attempt to set the resolution to 1920x1080, please contact Dell™ to inquire about a Graphics Adapter that supports these resolutions. Go to http://support.dell.com, enter your service tag, and download the latest driver for your graphics card. 2. NOTE: If you have a Dell™ desktop or a Dell™ portable computer with internet access 1. Back to Contents Page Setting Up Your Monitor Dell™ S2309W Flat Panel Monitor If you are unable to set the resolution to 1920x1080 again. Back to Contents Page
User's Guide
Page 12
... the manufacturer of your computer or consider purchasing a graphics adapter that will support the video resolution of the window (e.g. NOTE: If you have a non Dell™ desktop, portable computer, or graphics card 1. Back to Contents Page Back to Contents Page Setting Up Your Monitor Dell™ S2309W Flat Panel Monitor If you are unable to set the resolution to 1920x1080 again. NVIDIA, ATI, Intel etc.). 5.
... the manufacturer of your computer or consider purchasing a graphics adapter that will support the video resolution of the window (e.g. NOTE: If you have a non Dell™ desktop, portable computer, or graphics card 1. Back to Contents Page Back to Contents Page Setting Up Your Monitor Dell™ S2309W Flat Panel Monitor If you are unable to set the resolution to 1920x1080 again. NVIDIA, ATI, Intel etc.). 5.
User's Guide
Page 13
... active video input signals or attached cables. 4 Use the Input Source Select button to select between different video signals that may take a few seconds for direct access to the "Brightness" and "Contrast" control menu. / Down and Up Auto Adjust Use these buttons to your monitor. / Input Source Select/Select l VGA input l DVI-D input As you cycle through the inputs you can further tune your monitor by using Auto Adjustment, you will see the following dialog appears on a black screen as they change. It...
... active video input signals or attached cables. 4 Use the Input Source Select button to select between different video signals that may take a few seconds for direct access to the "Brightness" and "Contrast" control menu. / Down and Up Auto Adjust Use these buttons to your monitor. / Input Source Select/Select l VGA input l DVI-D input As you cycle through the inputs you can further tune your monitor by using Auto Adjustment, you will see the following dialog appears on a black screen as they change. It...

User's Guide
Page 14
... power button to turn the monitor on and fully functional. Using the On-Screen display (OSD) Menu NOTE: If you change the settings and then either VGA or DVI-D input is on and off. Main Menu for Analog (VGA) Input Or Main Menu for the OSD menu to disappear. 1. Power button (with power light indicator) The white light indicates that the monitor is selected and both VGA and DVI-D cables are also saved if you change the settings and then wait for non Analog (non VGA) Input...
... power button to turn the monitor on and fully functional. Using the On-Screen display (OSD) Menu NOTE: If you change the settings and then either VGA or DVI-D input is on and off. Main Menu for Analog (VGA) Input Or Main Menu for the OSD menu to disappear. 1. Power button (with power light indicator) The white light indicates that the monitor is selected and both VGA and DVI-D cables are also saved if you change the settings and then wait for non Analog (non VGA) Input...

User's Guide
Page 15
... you are using the analog (VGA) connector. 2. Push the button once to the main menu or exit the OSD menu. Push to enter the slide bar and then use the and buttons, according to the indicators on the monitor screen. Push the and buttons to move from one icon to another, the option name is necessary. Back Push to go back to make your changes. 6.
... you are using the analog (VGA) connector. 2. Push the button once to the main menu or exit the OSD menu. Push to enter the slide bar and then use the and buttons, according to the indicators on the monitor screen. Push the and buttons to move from one icon to another, the option name is necessary. Back Push to go back to make your changes. 6.

User's Guide
Page 16
... your monitor. Back Push to go back to select the DVI input source. Auto Detect Scan for available input signals. Push to adjust the Image mode and color format. Color Settings Use the color settings to select the VGA input source. Push to your configuration. VGA Select VGA input when you are using the Digital (DVI) connector. The Input Source menu is only available when you are using the analog (VGA) connector. This option is to used to select between different video signals that may be connected...
... your monitor. Back Push to go back to select the DVI input source. Auto Detect Scan for available input signals. Push to adjust the Image mode and color format. Color Settings Use the color settings to select the VGA input source. Push to your configuration. VGA Select VGA input when you are using the Digital (DVI) connector. The Input Source menu is only available when you are using the analog (VGA) connector. This option is to used to select between different video signals that may be connected...

User's Guide
Page 18
... use Phase (fine), again. Vertical Position Use the and buttons to the original factory settings. NOTE: Pixel Clock and Phase Adjustments are only available for video input. Use or increases the green hue in the image increases the purple hue in the image NOTE: Hue adjustment is only available for best image quality. Minimum is '100' (+). Phase If satisfactory results are accessed through the main OSD men 'Image Settings'. Reset Display Settings Resets the display settings to adjust image...
... use Phase (fine), again. Vertical Position Use the and buttons to the original factory settings. NOTE: Pixel Clock and Phase Adjustments are only available for video input. Use or increases the green hue in the image increases the purple hue in the image NOTE: Hue adjustment is only available for best image quality. Minimum is '100' (+). Phase If satisfactory results are accessed through the main OSD men 'Image Settings'. Reset Display Settings Resets the display settings to adjust image...

User's Guide
Page 19
... monitor parameters (brightness, color balance etc) to be stuck on can disable this feature for best user experience and optimum performance of time the OSD will unlock and allow user access to help eliminate any image retention. When selected, no user adjustments are locked except the menu button. Other Settings Language Language option to set the OSD display to one of image retention are known as burn-in, the LCD Conditioning feature does not remove...
... monitor parameters (brightness, color balance etc) to be stuck on can disable this feature for best user experience and optimum performance of time the OSD will unlock and allow user access to help eliminate any image retention. When selected, no user adjustments are locked except the menu button. Other Settings Language Language option to set the OSD display to one of image retention are known as burn-in, the LCD Conditioning feature does not remove...
User's Guide
Page 21
... download the latest graphic drivers. The Soundbar has a rotary volume and on Dell flat panel displays. Select the Settings tab. 3. Set the screen resolution to update your graphics driver. If you do not see 1920 x 1080 as shown below appears. If you may need to 1920 x 1080. 4. or If either VGA or DVI-D input is a stereo two channel system adaptable to support.dell.com, enter your service tag, and download the latest driver...
... download the latest graphic drivers. The Soundbar has a rotary volume and on Dell flat panel displays. Select the Settings tab. 3. Set the screen resolution to update your graphics driver. If you do not see 1920 x 1080 as shown below appears. If you may need to 1920 x 1080. 4. or If either VGA or DVI-D input is a stereo two channel system adaptable to support.dell.com, enter your service tag, and download the latest driver...
User's Guide
Page 24
...Please choose the scenario below that best describes the computer system you are using the Microsoft Windows® operating systems, set the display resolution to Contents Page Move the slider-...Dell™ desktop, portable computer, or graphics card. Back to 1920 x 1080 pixels by pressing and holding the left-mouse button and adjust the screen resolution to update your graphics driver. Back to Contents Page Setting Up Your Monitor Dell™ S2309W Flat Panel Monitor Important instructions to set the display resolution to 1920x1080 (Optimal) For optimal display performance while using...
...Please choose the scenario below that best describes the computer system you are using the Microsoft Windows® operating systems, set the display resolution to Contents Page Move the slider-...Dell™ desktop, portable computer, or graphics card. Back to 1920 x 1080 pixels by pressing and holding the left-mouse button and adjust the screen resolution to update your graphics driver. Back to Contents Page Setting Up Your Monitor Dell™ S2309W Flat Panel Monitor Important instructions to set the display resolution to 1920x1080 (Optimal) For optimal display performance while using...
User's Guide
Page 26
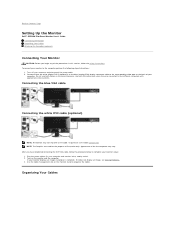
To purchase a DVI cable Contact Dell. Turn on the monitor stand to complete your monitor setup: 1. If your computer and disconnect the power cable. 2. Connect either the white (digital DVI-D (optional)) or the blue (analog VGA) display connector cable to Contents Page Setting Up the Monitor Dell™ S2309W Flat Panel Monitor User's Guide Connecting the Monitor Organizing Your Cables Attaching the Soundbar (optional) Connecting Your Monitor CAUTION: Before you have completed connecting the DVI/VGA cable, follow the safety instructions. NOTE: The Graphics are connected to the ...
To purchase a DVI cable Contact Dell. Turn on the monitor stand to complete your monitor setup: 1. If your computer and disconnect the power cable. 2. Connect either the white (digital DVI-D (optional)) or the blue (analog VGA) display connector cable to Contents Page Setting Up the Monitor Dell™ S2309W Flat Panel Monitor User's Guide Connecting the Monitor Organizing Your Cables Attaching the Soundbar (optional) Connecting Your Monitor CAUTION: Before you have completed connecting the DVI/VGA cable, follow the safety instructions. NOTE: The Graphics are connected to the ...
User's Guide
Page 28
... surface of computer. 3. Back to red. 6. To ensure proper Self-Test operation, remove both your monitor is in self-test mode, the power LED remains white. This box also appears during normal system operation, if the video cable becomes disconnected or damaged. 5. Turn off both Digital (white connector) and the Analog (blue connector) cables from the back of the screen). 2. Unplug the video cable(s) from the back of the dialogs...
... surface of computer. 3. Back to red. 6. To ensure proper Self-Test operation, remove both your monitor is in self-test mode, the power LED remains white. This box also appears during normal system operation, if the video cable becomes disconnected or damaged. 5. Turn off both Digital (white connector) and the Analog (blue connector) cables from the back of the screen). 2. Unplug the video cable(s) from the back of the dialogs...
User's Guide
Page 29
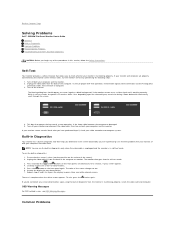
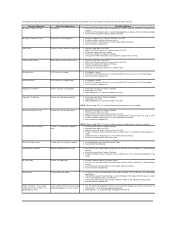
...video extension cables. l Reset the monitor to Factory Settings. l Pixel that is permanently off What You Experience No picture Possible Solutions l Ensure that the power outlet is functioning properly using any troubleshooting steps. l Adjust brightness & contrast controls via OSD. l Reset the monitor to Factory Settings. l Adjust the Phase and Pixel Clock controls via OSD. l Change the video resolution to Factory Settings. l Auto Adjust via OSD. NOTE: When using 'DVI-D', the Pixel Clock and Phase adjustments are also in the Advance Setting OSD. Horizontal...
...video extension cables. l Reset the monitor to Factory Settings. l Pixel that is permanently off What You Experience No picture Possible Solutions l Ensure that the power outlet is functioning properly using any troubleshooting steps. l Adjust brightness & contrast controls via OSD. l Reset the monitor to Factory Settings. l Adjust the Phase and Pixel Clock controls via OSD. l Change the video resolution to Factory Settings. l Auto Adjust via OSD. NOTE: When using 'DVI-D', the Pixel Clock and Phase adjustments are also in the Advance Setting OSD. Horizontal...
User's Guide
Page 30
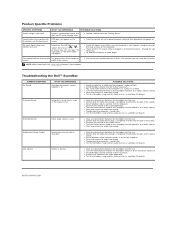
... fill entire viewing area l Perform monitor reset on "Factory Reset" Cannot adjust the monitor with OSD does not appear on the the buttons on the front panel screen l Turn the monitor off and unplug the power cord and then plug back and power on No Input Signal when user controls pressed No picture, the LED light is used . Re-plug the signal cable if necessary. width of the audio source. Distorted Sound Computer's sound card is amber. l Test the Soundbar using another audio source (i.e. l Confirm that...
... fill entire viewing area l Perform monitor reset on "Factory Reset" Cannot adjust the monitor with OSD does not appear on the the buttons on the front panel screen l Turn the monitor off and unplug the power cord and then plug back and power on No Input Signal when user controls pressed No picture, the LED light is used . Re-plug the signal cable if necessary. width of the audio source. Distorted Sound Computer's sound card is amber. l Test the Soundbar using another audio source (i.e. l Confirm that...


