
User's Guide
Page 1
... this document to refer to change without the written permission of Dell Inc. Microsoft and Windows are trademarks of Dell Inc.; Other trademarks and trade names may be used in this text: Dell and the DELL logo are either the entities claiming the marks and names or their products. Dell™ S2230MX/S2330MX monitor User's Guide Setting the display resolution to 1920 x 1080 (Maximum) Information...
... this document to refer to change without the written permission of Dell Inc. Microsoft and Windows are trademarks of Dell Inc.; Other trademarks and trade names may be used in this text: Dell and the DELL logo are either the entities claiming the marks and names or their products. Dell™ S2230MX/S2330MX monitor User's Guide Setting the display resolution to 1920 x 1080 (Maximum) Information...
User's Guide
Page 2
... used in trademarks and trade names other countries. As an ENERGY STAR partner, Dell Inc. Microsoft and Windows are either the entities claiming the marks and names or their products. is a registered trademark of Microsoft Corporation in this text: Dell and the DELL logo are not followed. Dell™ S2230MX/S2330MX Monitor User's Guide About Your Monitor Setting Up the Monitor Operating the Monitor Troubleshooting...
... used in trademarks and trade names other countries. As an ENERGY STAR partner, Dell Inc. Microsoft and Windows are either the entities claiming the marks and names or their products. is a registered trademark of Microsoft Corporation in this text: Dell and the DELL logo are not followed. Dell™ S2230MX/S2330MX Monitor User's Guide About Your Monitor Setting Up the Monitor Operating the Monitor Troubleshooting...
User's Guide
Page 3
... option, you are using the Microsoft Windows operating systems, set the display resolution to 1920 x 1080 pixels by performing the following steps: In Windows XP: 1. Select the Settings tab. 3. Move the slider-bar to the right by pressing and holding the left -mouse button and adjust the screen resolution to update your graphics driver. Click Change Display Settings. 3. Please choose the scenario below that best describes the computer...
... option, you are using the Microsoft Windows operating systems, set the display resolution to 1920 x 1080 pixels by performing the following steps: In Windows XP: 1. Select the Settings tab. 3. Move the slider-bar to the right by pressing and holding the left -mouse button and adjust the screen resolution to update your graphics driver. Click Change Display Settings. 3. Please choose the scenario below that best describes the computer...
User's Guide
Page 4
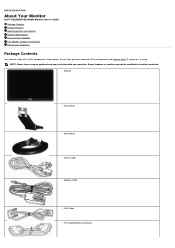
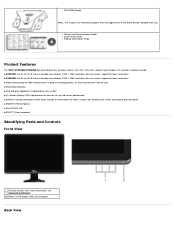
Monitor Stand Riser Stand Base Power Cable Adapter Cable VGA Cable DVI Cable(optional purchase) NOTE: Some items may not ship with all the components and Contact Dell™ if anything is missing. Back to Contents Page About Your Monitor Dell™ S2230MX/S2330MX Monitor User's Guide Package Contents Product Features Identifying Parts and Controls Monitor Specifications Plug and Play Capability LCD Monitor Quality & Pixel Policy Maintenance Guidelines Package Contents Your monitor ships with your monitor. Some features or media...
Monitor Stand Riser Stand Base Power Cable Adapter Cable VGA Cable DVI Cable(optional purchase) NOTE: Some items may not ship with all the components and Contact Dell™ if anything is missing. Back to Contents Page About Your Monitor Dell™ S2230MX/S2330MX Monitor User's Guide Package Contents Product Features Identifying Parts and Controls Monitor Specifications Plug and Play Capability LCD Monitor Quality & Pixel Policy Maintenance Guidelines Package Contents Your monitor ships with your monitor. Some features or media...
User's Guide
Page 5
Drivers and Documentation media Quick Setup Guide Product Information Guide Product Features The Dell™ S2230MX/S2330MX flat panel display has an active matrix, Thin-Film Transistor, Liquid Crystal Display. Function buttons (For more information, see Operating the Monitor) 2. Power On/Off button (with LED indicator) Back View The monitor's features include: ■ S2230MX: 54.61 cm (21.5 inches) viewable area display. 1920 x 1080 resolution, plus full-screen support for lower resolutions. ■ S2330MX: 58.42...
Drivers and Documentation media Quick Setup Guide Product Information Guide Product Features The Dell™ S2230MX/S2330MX flat panel display has an active matrix, Thin-Film Transistor, Liquid Crystal Display. Function buttons (For more information, see Operating the Monitor) 2. Power On/Off button (with LED indicator) Back View The monitor's features include: ■ S2230MX: 54.61 cm (21.5 inches) viewable area display. 1920 x 1080 resolution, plus full-screen support for lower resolutions. ■ S2330MX: 58.42...

User's Guide
Page 6
... display card or software installed in use. This is referred to as Power Save Mode. To connect your monitor. Power Management Modes If you need to contact Dell for transition. If the computer detects input from keyboard, mouse, or other input devices, the monitor automatically resumes functioning. Refer to this automatic power saving feature: S22330MX: Label Description 1 Security lock slot 2 Barcode serial number label 3 Adapter connector 4 DVI connector 5 VGA connector 6 Regulatory rating label Side View Use Use a security lock with the slot to help...
... display card or software installed in use. This is referred to as Power Save Mode. To connect your monitor. Power Management Modes If you need to contact Dell for transition. If the computer detects input from keyboard, mouse, or other input devices, the monitor automatically resumes functioning. Refer to this automatic power saving feature: S22330MX: Label Description 1 Security lock slot 2 Barcode serial number label 3 Adapter connector 4 DVI connector 5 VGA connector 6 Regulatory rating label Side View Use Use a security lock with the slot to help...
User's Guide
Page 9
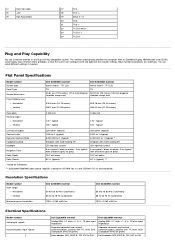
... LED light bar system 5 ms typical ( black to white); 2 ms typical with its Extended Display Identification Data (EDID) using Display Data Channel (DDC) protocols so that the system can configure itself and optimize the monitor settings. Flat Panel Specifications Model number Screen type Panel Type Screen dimensions Preset display area: Horizontal Vertical Dell S2230MX monitor Active matrix - The monitor automatically provides the computer with overdrive (grey to 240 Most monitor installations are automatic. Resolution Specifications Model number Scan range Horizontal Vertical...
... LED light bar system 5 ms typical ( black to white); 2 ms typical with its Extended Display Identification Data (EDID) using Display Data Channel (DDC) protocols so that the system can configure itself and optimize the monitor settings. Flat Panel Specifications Model number Screen type Panel Type Screen dimensions Preset display area: Horizontal Vertical Dell S2230MX monitor Active matrix - The monitor automatically provides the computer with overdrive (grey to 240 Most monitor installations are automatic. Resolution Specifications Model number Scan range Horizontal Vertical...

User's Guide
Page 10
... Compatible AC/DC adapters: CAUTION: To avoid damage to use only the adapter designed for which Dell guarantees image size and centering: S2230MX: Display Mode VESA, 720 x 400 VESA, 640 x 480 VESA, 640 x 480 VESA, 800 x 600 VESA, 800 x 600 VESA, 1024 x 768 VESA, 1024 x 768 VESA, 1152 x 864 VESA, 1280 x 1024 VESA, 1280 x 1024 VESA, 1920 x 1080 Horizontal Frequency (kHz) 31.5 31.5 37.5 37.9 46.9 48.4 60.0 67.5 64.0 80.0 67.5 Vertical Frequency (Hz...
... Compatible AC/DC adapters: CAUTION: To avoid damage to use only the adapter designed for which Dell guarantees image size and centering: S2230MX: Display Mode VESA, 720 x 400 VESA, 640 x 480 VESA, 640 x 480 VESA, 800 x 600 VESA, 800 x 600 VESA, 1024 x 768 VESA, 1024 x 768 VESA, 1152 x 864 VESA, 1280 x 1024 VESA, 1280 x 1024 VESA, 1920 x 1080 Horizontal Frequency (kHz) 31.5 31.5 37.5 37.9 46.9 48.4 60.0 67.5 64.0 80.0 67.5 Vertical Frequency (Hz...

User's Guide
Page 11
... with stand) Height Width Depth Dell S2230MX monitor Dell S2330MX monitor D-subminiature, blue connector; The visible result is a fixed pixel that appears as an extremely tiny dark or bright discolored spot.When the pixel remains permanently lit, it is known as a "dark dot." For more pixels to the monitor Digital: Detachable, DVI-D, Solid pins, shipped detached from the monitor (optional) Digital: Detachable, DVI-D, Solid pins, shipped detached from display quality or...
... with stand) Height Width Depth Dell S2230MX monitor Dell S2330MX monitor D-subminiature, blue connector; The visible result is a fixed pixel that appears as an extremely tiny dark or bright discolored spot.When the pixel remains permanently lit, it is known as a "dark dot." For more pixels to the monitor Digital: Detachable, DVI-D, Solid pins, shipped detached from the monitor (optional) Digital: Detachable, DVI-D, Solid pins, shipped detached from display quality or...
User's Guide
Page 17
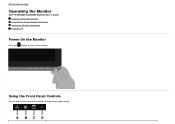
Using the Front Panel Controls Use the keys on the monitor. Back to Contents Page Operating the Monitor Dell™ S2230MX/S2330MX Monitor User's Guide Using the Front Panel Controls Using the On-Screen Display (OSD) Menu Setting the Maximum Resolution Using the Tilt Power On the Monitor Press the button to turn on the front of the monitor to adjust the image settings.
Using the Front Panel Controls Use the keys on the monitor. Back to Contents Page Operating the Monitor Dell™ S2230MX/S2330MX Monitor User's Guide Using the Front Panel Controls Using the On-Screen Display (OSD) Menu Setting the Maximum Resolution Using the Tilt Power On the Monitor Press the button to turn on the front of the monitor to adjust the image settings.

User's Guide
Page 18
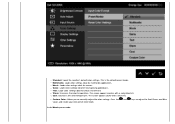
... Menu key to exit on -screen display (OSD). A Front panel Key Up B Description Use the Up key to the "Brightness" and "Contrast" control menu. Menu D Use the Exit key to open the on -screen display (OSD) from a list of the monitor to choose from menu and sub-menus. Exit Front panel Key Use the keys on the front of preset color modes. See Using the OSD Menu. Front panel Key A Description Use the Preset modes key to adjust the image settings...
... Menu key to exit on -screen display (OSD). A Front panel Key Up B Description Use the Up key to the "Brightness" and "Contrast" control menu. Menu D Use the Exit key to open the on -screen display (OSD) from a list of the monitor to choose from menu and sub-menus. Exit Front panel Key Use the keys on the front of preset color modes. See Using the OSD Menu. Front panel Key A Description Use the Preset modes key to adjust the image settings...

User's Guide
Page 22
NOTE: Auto Adjust does not occur if you can further tune your monitor. Use the Input Source menu to select between different video signals that may be connected to the incoming video signal. Input Source Auto Adjustment allows the monitor to self-adjust to your monitor by using Auto Adjustment, you press the button while there are no active video input signals or attached cables. After using the Pixel Clock (Coarse) and Phase (Fine) controls under Image Settings.
NOTE: Auto Adjust does not occur if you can further tune your monitor. Use the Input Source menu to select between different video signals that may be connected to the incoming video signal. Input Source Auto Adjustment allows the monitor to self-adjust to your monitor by using Auto Adjustment, you press the button while there are no active video input signals or attached cables. After using the Pixel Clock (Coarse) and Phase (Fine) controls under Image Settings.
User's Guide
Page 25
... a blue tint. Multimedia: Loads color settings ideal for movies. Custom Color: Allows you to adjust the Red, Green, and Blue values and create your own preset color mode. Cool: Decreases the color temperature. Press the and keys to manually adjust the color settings. Warm: Increases the color temperature. Movie: Loads color settings ideal for multimedia applications. This is the default preset mode. Standard: Loads the monitor's default color settings. The screen appears cooler with a red/yellow...
... a blue tint. Multimedia: Loads color settings ideal for movies. Custom Color: Allows you to adjust the Red, Green, and Blue values and create your own preset color mode. Cool: Decreases the color temperature. Press the and keys to manually adjust the color settings. Warm: Increases the color temperature. Movie: Loads color settings ideal for multimedia applications. This is the default preset mode. Standard: Loads the monitor's default color settings. The screen appears cooler with a red/yellow...

User's Guide
Page 29
... user adjustments are locked except key. Enable (Default): Optimizes the performance of bright areas). All keys are allowed. Disable: Disables the DDC/CI option and the following message appears on the monitor. Controls user access to the OSD settings menu, with 'OSD Lock' pre-selected on your monitor and provides a better customer experience. Dynamic dimming activated (The Dynamic dimming feature automatically reduces the screen-brightness level when the displayed image contains...
... user adjustments are locked except key. Enable (Default): Optimizes the performance of bright areas). All keys are allowed. Disable: Disables the DDC/CI option and the following message appears on the monitor. Controls user access to the OSD settings menu, with 'OSD Lock' pre-selected on your monitor and provides a better customer experience. Dynamic dimming activated (The Dynamic dimming feature automatically reduces the screen-brightness level when the displayed image contains...

User's Guide
Page 31
LCD Conditioning feature cannot remove severe cases of image retention or burn-in. If an image appears to be stuck on the monitor, select LCD Conditioning to help eliminate any image retention. Using the LCD Conditioning feature may take some time. NOTE: Use LCD Conditioning only when you experience a problem with image retention. The below warning message appears once user selects "Enable" LCD Conditioning.
LCD Conditioning feature cannot remove severe cases of image retention or burn-in. If an image appears to be stuck on the monitor, select LCD Conditioning to help eliminate any image retention. Using the LCD Conditioning feature may take some time. NOTE: Use LCD Conditioning only when you experience a problem with image retention. The below warning message appears once user selects "Enable" LCD Conditioning.
User's Guide
Page 38
... Change Display Settings. 3. If you may need to the support site for the most comfortable viewing angle. Depending on your graphics card website and download the latest graphic drivers. See Solving Problems for the monitor: Windows XP: 1. Click OK. Using the Tilt Tilt With the stand assembly, you are using a non-Dell computer (portable or desktop): Go to update your computer and download the latest graphic drivers. Windows Vista® or Windows® 7: 1. Setting the...
... Change Display Settings. 3. If you may need to the support site for the most comfortable viewing angle. Depending on your graphics card website and download the latest graphic drivers. See Solving Problems for the monitor: Windows XP: 1. Click OK. Using the Tilt Tilt With the stand assembly, you are using a non-Dell computer (portable or desktop): Go to update your computer and download the latest graphic drivers. Windows Vista® or Windows® 7: 1. Setting the...

User's Guide
Page 40
... an inherent problem with your monitor, or with your computer and video card. Turn on both Digital (white connector) and the Analog (blue connector) cables from the back of computer. 3. Turn off both your computer and the monitor. 2. The floating dialog box should appear on-screen (against a black background) if the monitor cannot sense a video signal and is in diagnostics only when the video cable is unplugged and the monitor is working correctly...
... an inherent problem with your monitor, or with your computer and video card. Turn on both Digital (white connector) and the Analog (blue connector) cables from the back of computer. 3. Turn off both your computer and the monitor. 2. The floating dialog box should appear on-screen (against a black background) if the monitor cannot sense a video signal and is in diagnostics only when the video cable is unplugged and the monitor is working correctly...
User's Guide
Page 41
... Dell Monitor Quality and Pixel Policy, see Dell Support site at : support.dell.com. To exit, press the Button 4 again. Turn on -off . The demo mode continues as long as the monitor remains powered. 6. Note: If a video cable is a natural defect that the power button is powered off is inserted while in green, blue, black, white screens. Ensure that can occur in LCD technology. Reset the monitor to Factory Settings. Adjust the Phase and Pixel Clock controls via the Input Source Select menu. Check...
... Dell Monitor Quality and Pixel Policy, see Dell Support site at : support.dell.com. To exit, press the Button 4 again. Turn on -off . The demo mode continues as long as the monitor remains powered. 6. Note: If a video cable is a natural defect that the power button is powered off is inserted while in green, blue, black, white screens. Ensure that can occur in LCD technology. Reset the monitor to Factory Settings. Adjust the Phase and Pixel Clock controls via the Input Source Select menu. Check...

User's Guide
Page 42
... No picture, the LED light is secure. Perform monitor self-test feature check and determine if these lines are not available. Ensure that the video cable connecting the monitor to No Input Signal when user controls are not available. Try different Color Preset Settings in properly. Change the Input Color Format to turn on the keyboard. Check the signal source. Back to Factory Settings. Auto Adjust via OSD. Reset the monitor to Contents Page Turn off the monitor, unplug the power cord, plug back...
... No picture, the LED light is secure. Perform monitor self-test feature check and determine if these lines are not available. Ensure that the video cable connecting the monitor to No Input Signal when user controls are not available. Try different Color Preset Settings in properly. Change the Input Color Format to turn on the keyboard. Check the signal source. Back to Factory Settings. Auto Adjust via OSD. Reset the monitor to Contents Page Turn off the monitor, unplug the power cord, plug back...
User's Guide
Page 45
... at the top of the window (e.g. NOTE: If you have a non Dell™ desktop, portable computer, or graphics card In Windows XP: 1. Click Advanced Settings. 4. NVIDIA, ATI, Intel etc.). 5. Please refer to the graphics card provider website for updated driver (for your computer or consider purchasing a graphics adapter that will support the video resolution of the window (e.g. After installing the drivers for example, http://www...
... at the top of the window (e.g. NOTE: If you have a non Dell™ desktop, portable computer, or graphics card In Windows XP: 1. Click Advanced Settings. 4. NVIDIA, ATI, Intel etc.). 5. Please refer to the graphics card provider website for updated driver (for your computer or consider purchasing a graphics adapter that will support the video resolution of the window (e.g. After installing the drivers for example, http://www...


