
User Guide
Page 1
... trademarks of Microsoft Corporation; Dell Precision™ Mobile Workstation M90 User's Guide Finding Information About Your Computer Transferring Information to a New Computer Using a Battery Using the Keyboard and Touch Pad Using the Display Using Multimedia Using Networks Using Cards Securing Your Computer Troubleshooting System Setup Program Reinstalling Software Adding and Replacing Parts Dell™ QuickSet Traveling...
... trademarks of Microsoft Corporation; Dell Precision™ Mobile Workstation M90 User's Guide Finding Information About Your Computer Transferring Information to a New Computer Using a Battery Using the Keyboard and Touch Pad Using the Display Using Multimedia Using Networks Using Cards Securing Your Computer Troubleshooting System Setup Program Reinstalling Software Adding and Replacing Parts Dell™ QuickSet Traveling...
User Guide
Page 8
... mode when it is provided by the speakers. Docking-device connector - See the Dell documentation that allows you greatly increase the chances of the drive before any operating system or programs are installed. For more information, see Replacing the Battery. battery - NOTICE: Your computer features Undock & Go™ technology that came with Bluetooth®...
... mode when it is provided by the speakers. Docking-device connector - See the Dell documentation that allows you greatly increase the chances of the drive before any operating system or programs are installed. For more information, see Replacing the Battery. battery - NOTICE: Your computer features Undock & Go™ technology that came with Bluetooth®...
User Guide
Page 10
... U.S. Use of the disc (the unlabeled side) in the drive. Only) Cleaning Your Computer CAUTION: Before you begin any installed batteries. Computer, Keyboard, and Display CAUTION: Before you notice problems, such as skipping, with water and wipe the computer and keyboard....Reverse engineering or disassembly is prohibited. Do not use compressed air to Contents Page Appendix Dell Precision™ M90 User's Guide Cleaning Your Computer Macrovision Product Notice FCC Notice (U.S. See Replacing the Battery. 4. Only use on the keyboard and to the outer edge of the touch pad...
... U.S. Use of the disc (the unlabeled side) in the drive. Only) Cleaning Your Computer CAUTION: Before you begin any installed batteries. Computer, Keyboard, and Display CAUTION: Before you notice problems, such as skipping, with water and wipe the computer and keyboard....Reverse engineering or disassembly is prohibited. Do not use compressed air to Contents Page Appendix Dell Precision™ M90 User's Guide Cleaning Your Computer Macrovision Product Notice FCC Notice (U.S. See Replacing the Battery. 4. Only use on the keyboard and to the outer edge of the touch pad...
User Guide
Page 12
... configure power management settings. You can operate the computer) decreases over time. Back to Contents Page Using a Battery Dell Precision™ M90 User's Guide Battery Performance Checking the Battery Charge Conserving Battery Power Power Management Modes Configuring Power Management Settings Charging the Battery Replacing the Battery Storing a Battery Battery Performance NOTE: For information about the Dell warranty for your computer, see Checking the...
... configure power management settings. You can operate the computer) decreases over time. Back to Contents Page Using a Battery Dell Precision™ M90 User's Guide Battery Performance Checking the Battery Charge Conserving Battery Power Power Management Modes Configuring Power Management Settings Charging the Battery Replacing the Battery Storing a Battery Battery Performance NOTE: For information about the Dell warranty for your computer, see Checking the...

User Guide
Page 13
... gauge to the same operating state it was in Dell QuickSet. Check the Battery Charge To check the battery charge, press the status button on the battery, you should consider replacing the battery. If no lights appear, the battery has no lights appear, the battery is approximately 90 percent depleted. When the computer exits standby mode, it is...
... gauge to the same operating state it was in Dell QuickSet. Check the Battery Charge To check the battery charge, press the status button on the battery, you should consider replacing the battery. If no lights appear, the battery has no lights appear, the battery is approximately 90 percent depleted. When the computer exits standby mode, it is...

User Guide
Page 15
... an extended period of fire or explosion. See Charging the Battery. A battery discharges during prolonged storage. Replacing the Battery CAUTION: Before performing these procedures, turn off . 3. Replace the battery only with a compatible battery purchased from the computer to Contents Page NOTICE: You must remove all external cables from Dell. Do not use it . After a long storage period, recharge...
... an extended period of fire or explosion. See Charging the Battery. A battery discharges during prolonged storage. Replacing the Battery CAUTION: Before performing these procedures, turn off . 3. Replace the battery only with a compatible battery purchased from the computer to Contents Page NOTICE: You must remove all external cables from Dell. Do not use it . After a long storage period, recharge...
User Guide
Page 59
... not touch the components or contacts on the cable itself. Back to Contents Page Adding and Replacing Parts Dell Precision™ M90 User's Guide Before You Begin Hard Drive Memory Modem Mini-Card Hinge Cover Keyboard Coin-Cell Battery Optical Drive Internal Card With Bluetooth® Wireless Technology Before You Begin This chapter provides procedures...
... not touch the components or contacts on the cable itself. Back to Contents Page Adding and Replacing Parts Dell Precision™ M90 User's Guide Before You Begin Hard Drive Memory Modem Mini-Card Hinge Cover Keyboard Coin-Cell Battery Optical Drive Internal Card With Bluetooth® Wireless Technology Before You Begin This chapter provides procedures...
User Guide
Page 60
...and all attached devices from their electrical outlets. 5. Disconnect your computer and then unplug it from sources other than Dell. Slide and hold the battery-bay latch release on the back of the hard drive. Do not remove the hard drive while the computer is... system board, you must remove the battery before you begin any telephone or network cables from a source other than Dell, you service the computer. 4. Hard Drive CAUTION: If you begin working inside the computer. To replace the hard drive: 1. Remove the battery. NOTE: If you are extremely fragile...
...and all attached devices from their electrical outlets. 5. Disconnect your computer and then unplug it from sources other than Dell. Slide and hold the battery-bay latch release on the back of the hard drive. Do not remove the hard drive while the computer is... system board, you must remove the battery before you begin any telephone or network cables from a source other than Dell, you service the computer. 4. Hard Drive CAUTION: If you begin working inside the computer. To replace the hard drive: 1. Remove the battery. NOTE: If you are extremely fragile...

User Guide
Page 62
... the notch in the module edge connector with the tab in Before You Begin. 2. NOTICE: To avoid damaging the system board, you must remove the battery before you are replacing a memory module, remove the existing module: a.
... the notch in the module edge connector with the tab in Before You Begin. 2. NOTICE: To avoid damaging the system board, you must remove the battery before you are replacing a memory module, remove the existing module: a.

User Guide
Page 63
Replace the memory module cover. Reinstall the optical drive. b. Reinstall the hard drive. NOTICE: To avoid damaging the system board, you must remove the battery before you begin working inside the computer. 1. Turn the computer over and loosen the captive screws from the Mini-Card/modem ...up on the attached pull-tab to remove it detects the additional memory and automatically updates the system configuration information. Insert the battery into the battery bay, or connect the AC adapter to close may damage your finger under the cover at the indentation, and lift the cover...
Replace the memory module cover. Reinstall the optical drive. b. Reinstall the hard drive. NOTICE: To avoid damaging the system board, you must remove the battery before you begin working inside the computer. 1. Turn the computer over and loosen the captive screws from the Mini-Card/modem ...up on the attached pull-tab to remove it detects the additional memory and automatically updates the system configuration information. Insert the battery into the battery bay, or connect the AC adapter to close may damage your finger under the cover at the indentation, and lift the cover...

User Guide
Page 64
...computer, the card is already installed. If you begin working inside the computer. 1. Replace the screw that secures the modem to the modem. NOTICE: To avoid damaging the system board, you must remove the battery before you ordered a Mini-Card with the screw holes and press the modem into ...the modem cable to the system board. 6. Turn the computer over and loosen the captive screws from the Mini-Card/modem cover. 3. Install the replacement modem: a. Align the modem with your finger under the cover at the indentation, and lift the cover to ensure correct insertion. 1 modem 2 modem...
...computer, the card is already installed. If you begin working inside the computer. 1. Replace the screw that secures the modem to the modem. NOTICE: To avoid damaging the system board, you must remove the battery before you ordered a Mini-Card with the screw holes and press the modem into ...the modem cable to the system board. 6. Turn the computer over and loosen the captive screws from the Mini-Card/modem cover. 3. Install the replacement modem: a. Align the modem with your finger under the cover at the indentation, and lift the cover to ensure correct insertion. 1 modem 2 modem...

User Guide
Page 66
... You Begin. 2. Follow the procedures in Before You Begin. Open the display all the way (180 degrees) so that it . 1 hinge cover When replacing the hinge cover, first insert the left edge and then press from left to right until the cover snaps into the indent to left, and... cover up, moving from right to lift the hinge cover on your work surface. NOTICE: To avoid damaging the system board, you must remove the battery before you begin working inside the computer. 1. Remove the hinge cover: a. Keyboard CAUTION: Before you begin any of the computer). NOTICE: To avoid...
... You Begin. 2. Follow the procedures in Before You Begin. Open the display all the way (180 degrees) so that it . 1 hinge cover When replacing the hinge cover, first insert the left edge and then press from left to right until the cover snaps into the indent to left, and... cover up, moving from right to lift the hinge cover on your work surface. NOTICE: To avoid damaging the system board, you must remove the battery before you begin working inside the computer. 1. Remove the hinge cover: a. Keyboard CAUTION: Before you begin any of the computer). NOTICE: To avoid...

User Guide
Page 67
...3. Remove the keyboard. Open the display and remove the hinge cover. Lift the keyboard and hold it up on the connector to disconnect the battery cable from the keyboard connector on the system board. 1 keyboard 3 keyboard cable 5 keyboard tabs 2 keyboard screws (2) 4 keyboard connector latch ...NOTICE: To avoid scratching the palm rest when replacing the keyboard, hook the five tabs along the front edge of the keyboard. Slide the keyboard cable out of the keyboard connector on the...
...3. Remove the keyboard. Open the display and remove the hinge cover. Lift the keyboard and hold it up on the connector to disconnect the battery cable from the keyboard connector on the system board. 1 keyboard 3 keyboard cable 5 keyboard tabs 2 keyboard screws (2) 4 keyboard connector latch ...NOTICE: To avoid scratching the palm rest when replacing the keyboard, hook the five tabs along the front edge of the keyboard. Slide the keyboard cable out of the keyboard connector on the...

User Guide
Page 68
... the computer. Turn the computer over. 3. Follow the procedures in Before You Begin. 2. Remove the battery. Insert the battery at a 30-degree angle under the release latch with your computer, it from the computer. 4. See Replacing the Battery. 3. Replace the hinge cover (see Keyboard). 7. Slide the drive out of the procedures in this section, follow...
... the computer. Turn the computer over. 3. Follow the procedures in Before You Begin. 2. Remove the battery. Insert the battery at a 30-degree angle under the release latch with your computer, it from the computer. 4. See Replacing the Battery. 3. Replace the hinge cover (see Keyboard). 7. Slide the drive out of the procedures in this section, follow...

User Guide
Page 69
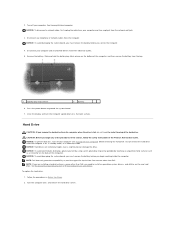
To replace the card, connect the card to Contents Page Replace the card cover and tighten the screw. 7. Replace the battery. Back to the cable and then carefully insert it into the compartment. 6. 1 cable connector 2 card 3 card cover 4 cover screw 5.
To replace the card, connect the card to Contents Page Replace the card cover and tighten the screw. 7. Replace the battery. Back to the cable and then carefully insert it into the compartment. 6. 1 cable connector 2 card 3 card cover 4 cover screw 5.
User Guide
Page 90
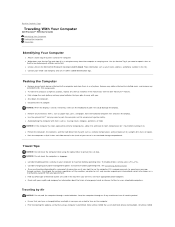
... Page Traveling With Your Computer Dell Precision™ M90 User's Guide Identifying Your Computer Packing the Computer Travel Tips Identifying Your Computer l Attach a name tag or business card to room temperature for information about the kinds of data. Place information such as possible, replace any external devices attached to maximize battery operating time. l Protect the...
... Page Traveling With Your Computer Dell Precision™ M90 User's Guide Identifying Your Computer Packing the Computer Travel Tips Identifying Your Computer l Attach a name tag or business card to room temperature for information about the kinds of data. Place information such as possible, replace any external devices attached to maximize battery operating time. l Protect the...

User Guide
Page 99
... Run the Windows error-checking utility to charge the battery. A chip on the system board may be malfunctioning. If the message reappears, contact Dell. See System Setup Program. A chip on the system board may require replacing. See Dell Diagnostics. Otherwise, activate hibernate mode or shut down the... x:\ is not ready - The device is not accessible. Insert a disk into the drive and try again. Warning: Battery is missing an essential file. Replace the battery, or connect the computer to open . ExpressCard Problems CAUTION: Before you are corrupted.
... Run the Windows error-checking utility to charge the battery. A chip on the system board may be malfunctioning. If the message reappears, contact Dell. See System Setup Program. A chip on the system board may require replacing. See Dell Diagnostics. Otherwise, activate hibernate mode or shut down the... x:\ is not ready - The device is not accessible. Insert a disk into the drive and try again. Warning: Battery is missing an essential file. Replace the battery, or connect the computer to open . ExpressCard Problems CAUTION: Before you are corrupted.
Service Manual
Page 2
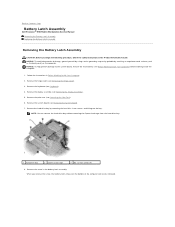
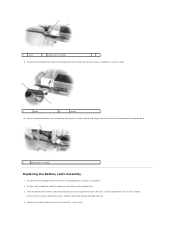
...To help prevent damage to Contents Page Battery Latch Assembly Dell Precision™ M90 Mobile Workstation Service Manual Removing the Battery Latch Assembly Replacing the Battery Latch Assembly Removing the Battery Latch Assembly CAUTION: Before you remove the screw, the battery latch release on the computer. Remove... M2 x 3-mm screws (4) 8. Follow the instructions in the Product Information Guide. Back to the system board, remove the main battery (see Removing the Palm Rest). 6. Remove the display assembly (see Keyboard). 4. Remove the hard drive bay by periodically touching an...
...To help prevent damage to Contents Page Battery Latch Assembly Dell Precision™ M90 Mobile Workstation Service Manual Removing the Battery Latch Assembly Replacing the Battery Latch Assembly Removing the Battery Latch Assembly CAUTION: Before you remove the screw, the battery latch release on the computer. Remove... M2 x 3-mm screws (4) 8. Follow the instructions in the Product Information Guide. Back to the system board, remove the main battery (see Removing the Palm Rest). 6. Remove the display assembly (see Keyboard). 4. Remove the hard drive bay by periodically touching an...
Service Manual
Page 3
Remove the spring from the computer base. 1 battery latch assembly Replacing the Battery Latch Assembly 1. Insert the latch assembly into the channel on the computer base, and press it up and away with the hole in the base, and then replace the screw in the assembly. Using a ...the hook on the computer base. 3. 1 screw 2 battery latch assembly 9. Ensure that the newly installed latch moves smoothly and freely when pushed and released. 4. Place the battery latch release under the computer base, line it into place. 2. Replace the hard drive bay and reinsert the four M2 x ...
Remove the spring from the computer base. 1 battery latch assembly Replacing the Battery Latch Assembly 1. Insert the latch assembly into the channel on the computer base, and press it up and away with the hole in the base, and then replace the screw in the assembly. Using a ...the hook on the computer base. 3. 1 screw 2 battery latch assembly 9. Ensure that the newly installed latch moves smoothly and freely when pushed and released. 4. Place the battery latch release under the computer base, line it into place. 2. Replace the hard drive bay and reinsert the four M2 x ...

Service Manual
Page 13
... holds it in place. 1 coin-cell battery 2 release latch 3 battery cable connector Replacing the Coin-Cell Battery 1. Back to Contents Page Coin-Cell Battery Dell Precision™ M90 Mobile Workstation Service Manual Removing the Coin-Cell Battery Replacing the Coin-Cell Battery Removing the Coin-Cell Battery CAUTION: Before you lift the battery because of the coin-cell battery compartment, and lift up , insert...
... holds it in place. 1 coin-cell battery 2 release latch 3 battery cable connector Replacing the Coin-Cell Battery 1. Back to Contents Page Coin-Cell Battery Dell Precision™ M90 Mobile Workstation Service Manual Removing the Coin-Cell Battery Replacing the Coin-Cell Battery Removing the Coin-Cell Battery CAUTION: Before you lift the battery because of the coin-cell battery compartment, and lift up , insert...


