
Owner's Manual (M4600)
Page 3
... (SIM) Card 19 Installing The Subscriber Identity Module (SIM) Card 20 6 Bluetooth Card 21 Removing The Bluetooth Card 21 Installing The Bluetooth Card 22 7 Base Cover 23 Removing The Base...
... (SIM) Card 19 Installing The Subscriber Identity Module (SIM) Card 20 6 Bluetooth Card 21 Removing The Bluetooth Card 21 Installing The Bluetooth Card 22 7 Base Cover 23 Removing The Base...
Owner's Manual (M4600)
Page 4
Installing The Base Cover 24 8 Keyboard Trim 25 Removing The Keyboard Trim 25 Installing The Keyboard Trim 26 9 Keyboard...27 Removing The Keyboard 27 Installing The Keyboard 29 10 ...
Installing The Base Cover 24 8 Keyboard Trim 25 Removing The Keyboard Trim 25 Installing The Keyboard Trim 26 9 Keyboard...27 Removing The Keyboard 27 Installing The Keyboard 29 10 ...

Owner's Manual (M4600)
Page 9
...before you pull connectors apart, keep them evenly aligned to ensure your warranty. Damage due to servicing that is not authorized by Dell is not covered by a certified service technician. As you disconnect the cable. Hold a component such as a processor by its edges, not... Computer. • You have connectors with the product. For additional safety best practices information, see the Regulatory Compliance Homepage at www.dell.com/regulatory_compliance. CAUTION: To avoid electrostatic discharge, ground yourself by using a wrist grounding strap or by its pins. Working on Your...
...before you pull connectors apart, keep them evenly aligned to ensure your warranty. Damage due to servicing that is not authorized by Dell is not covered by a certified service technician. As you disconnect the cable. Hold a component such as a processor by its edges, not... Computer. • You have connectors with the product. For additional safety best practices information, see the Regulatory Compliance Homepage at www.dell.com/regulatory_compliance. CAUTION: To avoid electrostatic discharge, ground yourself by using a wrist grounding strap or by its pins. Working on Your...

Owner's Manual (M4600)
Page 10
... their electrical outlets. 6. Close the display and turn the computer upside-down on a flat work , periodically touch an unpainted metal surface to prevent the computer cover from being scratched. 2. NOTE: To avoid damaging the system board, you must remove the main battery before you begin working inside your computer (see Battery...
... their electrical outlets. 6. Close the display and turn the computer upside-down on a flat work , periodically touch an unpainted metal surface to prevent the computer cover from being scratched. 2. NOTE: To avoid damaging the system board, you must remove the main battery before you begin working inside your computer (see Battery...

Owner's Manual (M4600)
Page 23
Follow the procedures in Before Working On Your Computer. 2. Remove the screws that secure the base cover to disengage the bottom door. 5. Press the rubber feet towards the rear of the system to the computer. 4. Remove the base cover from the computer. 23 Remove the Battery. 3. Base Cover 7 Removing The Base Cover 1.
Follow the procedures in Before Working On Your Computer. 2. Remove the screws that secure the base cover to disengage the bottom door. 5. Press the rubber feet towards the rear of the system to the computer. 4. Remove the base cover from the computer. 23 Remove the Battery. 3. Base Cover 7 Removing The Base Cover 1.

Owner's Manual (M4600)
Page 24
Installing The Base Cover 1. Slide the bottom door downwards and towards the front of the system. 2. Tighten the screws that secure the base cover to the computer. 3. Install the Battery. 4. Follow the procedures in After Working Inside Your Computer. 24
Installing The Base Cover 1. Slide the bottom door downwards and towards the front of the system. 2. Tighten the screws that secure the base cover to the computer. 3. Install the Battery. 4. Follow the procedures in After Working Inside Your Computer. 24

Owner's Manual (M4600)
Page 31
Optical Drive 10 Removing The Optical Drive 1. Remove the screws securing the optical drive bracket. 31 Follow the procedures in place. 5. Remove the battery. 3. Remove the base cover. 4. Remove the screw securing the optical drive in Before Working On Your Computer. 2. Remove the optical drive from the computer. 6.
Optical Drive 10 Removing The Optical Drive 1. Remove the screws securing the optical drive bracket. 31 Follow the procedures in place. 5. Remove the battery. 3. Remove the base cover. 4. Remove the screw securing the optical drive in Before Working On Your Computer. 2. Remove the optical drive from the computer. 6.

Owner's Manual (M4600)
Page 32
Slide the optical drive into the compartment on the right side of the optical drive. 2. Follow the procedures in After working inside your computer. 32 Install the base cover. 5. Installing The Optical Drive 1. Tighten the screw to secure the optical drive to the back of the chassis. 3. Install the battery. 6. 7. Tighten the screws to secure the bracket to the computer. 4. Remove the optical drive bracket from the drive.
Slide the optical drive into the compartment on the right side of the optical drive. 2. Follow the procedures in After working inside your computer. 32 Install the base cover. 5. Installing The Optical Drive 1. Tighten the screw to secure the optical drive to the back of the chassis. 3. Install the battery. 6. 7. Tighten the screws to secure the bracket to the computer. 4. Remove the optical drive bracket from the drive.
Owner's Manual (M4600)
Page 33
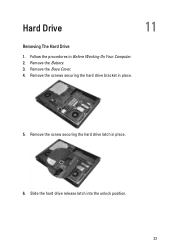
Remove the Base Cover. 4. Remove the screw securing the hard drive latch in Before Working On Your Computer. 2. Remove the Battery. 3. Slide the hard drive release latch into the unlock position. 33 Follow the procedures in place. 6. Remove the screws securing the hard drive bracket in place. 5. Hard Drive 11 Removing The Hard Drive 1.
Remove the Base Cover. 4. Remove the screw securing the hard drive latch in Before Working On Your Computer. 2. Remove the Battery. 3. Slide the hard drive release latch into the unlock position. 33 Follow the procedures in place. 6. Remove the screws securing the hard drive bracket in place. 5. Hard Drive 11 Removing The Hard Drive 1.

Owner's Manual (M4600)
Page 35
Installing The Hard Drive 1. Slide the hard drive onto its compartment towards the connector on the system board. 4. Tighten the screw securing the hard drive latch in place. 6. Slide the hard drive into the hard drive bracket. 3. Install the Battery. 8. Install the Base Cover. 7. Tighten the screws securing the hard drive in place. 5. Align the hard drive to the hard drive bracket. 2. Follow the procedures in After working inside your computer. 35
Installing The Hard Drive 1. Slide the hard drive onto its compartment towards the connector on the system board. 4. Tighten the screw securing the hard drive latch in place. 6. Slide the hard drive into the hard drive bracket. 3. Install the Battery. 8. Install the Base Cover. 7. Tighten the screws securing the hard drive in place. 5. Align the hard drive to the hard drive bracket. 2. Follow the procedures in After working inside your computer. 35

Owner's Manual (M4600)
Page 37
Remove the WLAN card. 37 Disconnect any antennas that secures the WLAN card to the WLAN card. 5. Wireless Local Area Network (WLAN) Card 12 Removing The Wireless Local Area Network (WLAN) Card 1. Remove the screw that may be connected to the computer. 6. Remove the Base Cover. 4. Remove the Battery. 3. Follow the procedures in Before Working On Your Computer. 2.
Remove the WLAN card. 37 Disconnect any antennas that secures the WLAN card to the WLAN card. 5. Wireless Local Area Network (WLAN) Card 12 Removing The Wireless Local Area Network (WLAN) Card 1. Remove the screw that may be connected to the computer. 6. Remove the Base Cover. 4. Remove the Battery. 3. Follow the procedures in Before Working On Your Computer. 2.

Owner's Manual (M4600)
Page 38
Tighten the single screw securing the WLAN card in After Working Inside Your Computer. 38 Install the Base Cover. 5. Follow the procedures in place. 3. Slide the WLAN card into its slot. 2. Connect the antennas according to the color code on the WLAN card. 4. Install the Battery. 6. Installing The Wireless Local Area Network (WLAN) Card 1.
Tighten the single screw securing the WLAN card in After Working Inside Your Computer. 38 Install the Base Cover. 5. Follow the procedures in place. 3. Slide the WLAN card into its slot. 2. Connect the antennas according to the color code on the WLAN card. 4. Install the Battery. 6. Installing The Wireless Local Area Network (WLAN) Card 1.

Owner's Manual (M4600)
Page 39
Disconnect any antennas that may be connected to the Wireless Wide Area Network (WWAN) card. 5. Remove the Battery. 3. Remove the Base Cover. 4. Remove the screw securing the WWAN in Before Working On Your Computer. 2. Remove the WWAN card. 39 Wireless Wide Area Network (WWAN) Card 13 Removing The Wireless Wide Area Network (WWAN) Card 1. Follow the procedures in place. 6.
Disconnect any antennas that may be connected to the Wireless Wide Area Network (WWAN) card. 5. Remove the Battery. 3. Remove the Base Cover. 4. Remove the screw securing the WWAN in Before Working On Your Computer. 2. Remove the WWAN card. 39 Wireless Wide Area Network (WWAN) Card 13 Removing The Wireless Wide Area Network (WWAN) Card 1. Follow the procedures in place. 6.

Owner's Manual (M4600)
Page 40
Installing The Wireless Wide Area Network (WWAN) Card 1. Install the Base Cover. 5. Connect the antennas according to the color code on the WWAN card. 4. Slide the Wireless Wide Area Network (WWAN) card into its slot. 2. Follow the procedures in place. 3. Install the Battery. 6. Tighten the screw securing the WWAN card in After Working Inside Your Computer. 40
Installing The Wireless Wide Area Network (WWAN) Card 1. Install the Base Cover. 5. Connect the antennas according to the color code on the WWAN card. 4. Slide the Wireless Wide Area Network (WWAN) card into its slot. 2. Follow the procedures in place. 3. Install the Battery. 6. Tighten the screw securing the WWAN card in After Working Inside Your Computer. 40

Owner's Manual (M4600)
Page 41
Gently pry the retention clips away from the computer. 41 Primary Memory 14 Removing The Primary Memory 1. Remove the memory modules from the memory modules. 5. Remove the Battery. 3. Remove the Base Cover. 4. Follow the procedures in Before Working On Your Computer. 2.
Gently pry the retention clips away from the computer. 41 Primary Memory 14 Removing The Primary Memory 1. Remove the memory modules from the memory modules. 5. Remove the Battery. 3. Remove the Base Cover. 4. Follow the procedures in Before Working On Your Computer. 2.

Owner's Manual (M4600)
Page 42
Install the Battery. 6. Insert the memory into the memory socket. 3. Installing The Primary Memory 1. Locate the memory slot in place. 4. Press down on the memory module until the securing clips secure the memory module in the system. 2. Install the Base Cover. 5. Follow the procedures in After Working Inside Your Computer. 42
Install the Battery. 6. Insert the memory into the memory socket. 3. Installing The Primary Memory 1. Locate the memory slot in place. 4. Press down on the memory module until the securing clips secure the memory module in the system. 2. Install the Base Cover. 5. Follow the procedures in After Working Inside Your Computer. 42

Owner's Manual (M4600)
Page 45
Disconnect the CPU fan cable. 5. Remove the Battery. 3. Remove the screws securing the CPU fan in Before Working On Your Computer. 2. Remove the CPU fan from the system. 45 Follow the procedures in place. 6. Remove the Base Cover. 4. CPU Fan 16 Removing The CPU Fan 1.
Disconnect the CPU fan cable. 5. Remove the Battery. 3. Remove the screws securing the CPU fan in Before Working On Your Computer. 2. Remove the CPU fan from the system. 45 Follow the procedures in place. 6. Remove the Base Cover. 4. CPU Fan 16 Removing The CPU Fan 1.

Owner's Manual (M4600)
Page 46
Connect the CPU fan cable. 4. Install the Battery. 5. Install the Base Cover. 6. Locate the CPU fan compartment in After Working Inside Your Computer. 46 Follow the procedures in the system. 2. Tighten the screws securing the CPU fan in place. 3. Installing The CPU Fan 1.
Connect the CPU fan cable. 4. Install the Battery. 5. Install the Base Cover. 6. Locate the CPU fan compartment in After Working Inside Your Computer. 46 Follow the procedures in the system. 2. Tighten the screws securing the CPU fan in place. 3. Installing The CPU Fan 1.

Owner's Manual (M4600)
Page 47
Follow the procedures in place. 6. Remove the graphics card fan from the system. 47 Remove the battery. 3. Remove the base cover. 4. Remove the screws securing the graphics card fan in Before Working On Your Computer 2. Disconnect the graphics card fan cable. 17 5. Graphics Card Fan Removing The Graphics Card Fan 1.
Follow the procedures in place. 6. Remove the graphics card fan from the system. 47 Remove the battery. 3. Remove the base cover. 4. Remove the screws securing the graphics card fan in Before Working On Your Computer 2. Disconnect the graphics card fan cable. 17 5. Graphics Card Fan Removing The Graphics Card Fan 1.

Owner's Manual (M4600)
Page 48
Tighten the two screws securing the graphics card fan in the system. 2. Install the base cover. 6. Locate the graphics card fan compartment in place. 3. Connect the graphics card fan cable. 4. Install the battery. 5. Installing The Graphics Card Fan 1. Follow the procedures in After Working Inside Your Computer. 48
Tighten the two screws securing the graphics card fan in the system. 2. Install the base cover. 6. Locate the graphics card fan compartment in place. 3. Connect the graphics card fan cable. 4. Install the battery. 5. Installing The Graphics Card Fan 1. Follow the procedures in After Working Inside Your Computer. 48


