Mobile Precision Re-Image Guide
Page 42
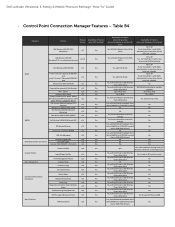
...Dell Wireless LAN 1397, 1510 (Broadcom) Dell Wireless LAN 1520 (Broadcom TGV - Catcher Hardware Radio Switch Enterprise Extension for WLAN - 802.1x, WPA-Enterprise/WPA2-Enterprise, CCKM (CCX5, TTLS not available for Win 7) Dell Wireless Mobile Broadband 5720 Minicard Dell Wireless 5600 EV/HSPA (GOBI) Dell Wireless 5530 HSPA Minicard (Helmsley) Dell Wirless 5620 EV/HSPA (GOBI2) Dell Wireless...v1.0 Availablity of Feature when DCP Installed? No for XP Yes for Vista & Win 7, with WLAN AutoConfig, but No DCP App? Dell Latitude Ultrabook, E-Family & Mobile Precision Reimage "How-To" Guide -
...Dell Wireless LAN 1397, 1510 (Broadcom) Dell Wireless LAN 1520 (Broadcom TGV - Catcher Hardware Radio Switch Enterprise Extension for WLAN - 802.1x, WPA-Enterprise/WPA2-Enterprise, CCKM (CCX5, TTLS not available for Win 7) Dell Wireless Mobile Broadband 5720 Minicard Dell Wireless 5600 EV/HSPA (GOBI) Dell Wireless 5530 HSPA Minicard (Helmsley) Dell Wirless 5620 EV/HSPA (GOBI2) Dell Wireless...v1.0 Availablity of Feature when DCP Installed? No for XP Yes for Vista & Win 7, with WLAN AutoConfig, but No DCP App? Dell Latitude Ultrabook, E-Family & Mobile Precision Reimage "How-To" Guide -

Service Manual
Page 16
... under the wireless switch actuators, then lowering the left ) edge of the card, then withdrawing the right edge of the card from the I/O board. 4. Replace the system board (see Removing the System Board Assembly). 3. Back to Contents Page I/O Board Dell Precision™ Service...installing the I/O board into the base assembly by first raising the inside (left edge of the card under the wireless switch actuators. 1 I/O board 3 M2 x 3-mm screw (2) 2 wireless switch actuator Replacing the I /O board, it functions without any obstruction. 4. Remove the system board (see Replacing the...
... under the wireless switch actuators, then lowering the left ) edge of the card, then withdrawing the right edge of the card from the I/O board. 4. Replace the system board (see Removing the System Board Assembly). 3. Back to Contents Page I/O Board Dell Precision™ Service...installing the I/O board into the base assembly by first raising the inside (left edge of the card under the wireless switch actuators. 1 I/O board 3 M2 x 3-mm screw (2) 2 wireless switch actuator Replacing the I /O board, it functions without any obstruction. 4. Remove the system board (see Replacing the...

Service Manual
Page 45
... the system board. 13. If you encounter resistance, gently flex or apply pressure to the I /O board. Lift up on www.dell.com at: www.dell.com/regulatory_compliance. 1. Position the palm rest assembly over the computer and attach the cable from the system board. 16. Before lifting the... palm rest free of the computer, disconnect the suspend-switch cable attached to the palm rest, or move along the edge, working inside your computer, read the safety information that shipped with your computer. Disconnect the wireless catcher cable from the system board. 15.
... the system board. 13. If you encounter resistance, gently flex or apply pressure to the I /O board. Lift up on www.dell.com at: www.dell.com/regulatory_compliance. 1. Position the palm rest assembly over the computer and attach the cable from the system board. 16. Before lifting the... palm rest free of the computer, disconnect the suspend-switch cable attached to the palm rest, or move along the edge, working inside your computer, read the safety information that shipped with your computer. Disconnect the wireless catcher cable from the system board. 15.

Service Manual
Page 46
... the hard drive (see Display Assembly). 16. Place the thermal plate into place. 5. Connect the contactless smartcard cable, the touchpad cable, the speaker cable, the wireless switch cable, and the fingerprint reader cable (optional) to secure it. 8. Turn the computer topside up . 7. Turn the computer over and replace the ten M2.5 x 5.5-mm...
... the hard drive (see Display Assembly). 16. Place the thermal plate into place. 5. Connect the contactless smartcard cable, the touchpad cable, the speaker cable, the wireless switch cable, and the fingerprint reader cable (optional) to secure it. 8. Turn the computer topside up . 7. Turn the computer over and replace the ten M2.5 x 5.5-mm...

Setup and Quick Reference Guide
Page 3
Contents 1 About Your Computer 7 Front View 7 Back View 9 Battery Removal 10 Wireless Switch and Dell™ Wi-Fi Catcher™ Network Locator 11 2 Setting Up Your Computer 13 Quick Setup 13 Connecting to the Internet 16 Setting Up Your Internet Connection 16 Transferring Information to a New Computer 17 Microsoft® Windows® XP Operating System . . . 17 Microsoft Windows Vista 21 3 Specifications 23 4 Troubleshooting 33 Tools 33 Power Lights 33 Beep Codes 34 Contents 3
Contents 1 About Your Computer 7 Front View 7 Back View 9 Battery Removal 10 Wireless Switch and Dell™ Wi-Fi Catcher™ Network Locator 11 2 Setting Up Your Computer 13 Quick Setup 13 Connecting to the Internet 16 Setting Up Your Internet Connection 16 Transferring Information to a New Computer 17 Microsoft® Windows® XP Operating System . . . 17 Microsoft Windows Vista 21 3 Specifications 23 4 Troubleshooting 33 Tools 33 Power Lights 33 Beep Codes 34 Contents 3

Setup and Quick Reference Guide
Page 8
5 keyboard 6 volume control buttons 7 Dell ControlPoint (DCP) button 8 power button 9 USB connectors (2) 10 audio (line-out) and microphone (line-in) connectors 11 smart card slot 12 IEEE 1394a connector 13 wireless switch and 14 speaker Dell™ Wi-Fi Catcher™ Network Locator button 15 fingerprint reader (optional) 16 media bay 17 PC Card slot 18 contactless smart-card-reader 19 track stick 20 display latch release 21 track stick buttons/touch pad buttons 22 touch pad 23 speaker 24 device status lights 25 ambient light sensor 8 About Your Computer
5 keyboard 6 volume control buttons 7 Dell ControlPoint (DCP) button 8 power button 9 USB connectors (2) 10 audio (line-out) and microphone (line-in) connectors 11 smart card slot 12 IEEE 1394a connector 13 wireless switch and 14 speaker Dell™ Wi-Fi Catcher™ Network Locator button 15 fingerprint reader (optional) 16 media bay 17 PC Card slot 18 contactless smart-card-reader 19 track stick 20 display latch release 21 track stick buttons/touch pad buttons 22 touch pad 23 speaker 24 device status lights 25 ambient light sensor 8 About Your Computer

Setup and Quick Reference Guide
Page 11
For information about the wireless switch and the Wi-Fi Catcher Network Locator, see "Connecting to locate networks. About Your Computer 11 Wireless Switch and Dell™ Wi-Fi Catcher™ Network Locator wireless switch icon Dell Wi-Fi Catcher Network Locator icon Use the wireless switch to enable or disable wireless network devices and the Wi-Fi Catcher Network Locator to the Internet" on your computer or at support.dell.com. For more information about connecting to the Internet, see the Dell Technology Guide on page 16.
For information about the wireless switch and the Wi-Fi Catcher Network Locator, see "Connecting to locate networks. About Your Computer 11 Wireless Switch and Dell™ Wi-Fi Catcher™ Network Locator wireless switch icon Dell Wi-Fi Catcher Network Locator icon Use the wireless switch to enable or disable wireless network devices and the Wi-Fi Catcher Network Locator to the Internet" on your computer or at support.dell.com. For more information about connecting to the Internet, see the Dell Technology Guide on page 16.


