
Service Manual
Page 1
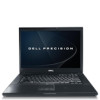
..., and the Windows Start button logo are either the entities claiming the marks and names or their products. Dell Precision™ Mobile Workstation M4400 Service Manual Troubleshooting Before Working on Your Computer Base Assembly Hinge Covers Hard Drive WLAN Card WWAN Card WPAN/UWB Card ...NOTE indicates important information that helps you make better use of data and tells you purchased a DELL™ n Series computer, any manner whatsoever without notice. © 2008 Dell Inc. Information in this document is strictly forbidden. August 2008 Rev. Trademarks used in the United...
..., and the Windows Start button logo are either the entities claiming the marks and names or their products. Dell Precision™ Mobile Workstation M4400 Service Manual Troubleshooting Before Working on Your Computer Base Assembly Hinge Covers Hard Drive WLAN Card WWAN Card WPAN/UWB Card ...NOTE indicates important information that helps you make better use of data and tells you purchased a DELL™ n Series computer, any manner whatsoever without notice. © 2008 Dell Inc. Information in this document is strictly forbidden. August 2008 Rev. Trademarks used in the United...

Service Manual
Page 2
... for leverage, slide the bottom of the base assembly toward the front of the computer 1/8th inch, then lift to Contents Page Base Assembly Dell Precision™ Service Manual Removing the Bottom of the Base Assembly Replacing the Bottom of the Base Assembly Removing the Base Assembly Replacing the Base Assembly CAUTION: Before you...
... for leverage, slide the bottom of the base assembly toward the front of the computer 1/8th inch, then lift to Contents Page Base Assembly Dell Precision™ Service Manual Removing the Bottom of the Base Assembly Replacing the Bottom of the Base Assembly Removing the Base Assembly Replacing the Base Assembly CAUTION: Before you...

Service Manual
Page 5
...Before Working on Your Computer. NOTE: Ensure that the work surface is not covered by its pins. Disconnect any installed cards. Damage due to servicing that shipped with your warranty. Do not touch the components or contacts on a card. Hold a component such as a connector on the ... Hold a card by its strain-relief loop, not on the cable itself. Back to Contents Page Before Working on Your Computer Dell Precision™ Service Manual Recommended Tools What You Need to Know for Your Safety Removing the Battery Replacing the Battery After Working on Your Computer This document ...
...Before Working on Your Computer. NOTE: Ensure that the work surface is not covered by its pins. Disconnect any installed cards. Damage due to servicing that shipped with your warranty. Do not touch the components or contacts on a card. Hold a component such as a connector on the ... Hold a card by its strain-relief loop, not on the cable itself. Back to Contents Page Before Working on Your Computer Dell Precision™ Service Manual Recommended Tools What You Need to Know for Your Safety Removing the Battery Replacing the Battery After Working on Your Computer This document ...

Service Manual
Page 7
... so may cause system damage. 1. Failure to do not have a BIOS-update program CD, flash the BIOS from a CD for your computer at support.dell.com. 4. Turn on the screen. The File Download window appears. 6. The Save In window appears. 7. The file icon appears on your desktop. 8....drive. The file downloads to view the Save In menu, select Desktop, and then click Save. Back to Contents Page Flashing the BIOS Dell Precision™ Service Manual Flashing the BIOS From a CD Flashing the BIOS From the Hard Drive If a BIOS-update program CD is complete, the computer will automatically...
... so may cause system damage. 1. Failure to do not have a BIOS-update program CD, flash the BIOS from a CD for your computer at support.dell.com. 4. Turn on the screen. The File Download window appears. 6. The Save In window appears. 7. The file icon appears on your desktop. 8....drive. The file downloads to view the Save In menu, select Desktop, and then click Save. Back to Contents Page Flashing the BIOS Dell Precision™ Service Manual Flashing the BIOS From a CD Flashing the BIOS From the Hard Drive If a BIOS-update program CD is complete, the computer will automatically...
Service Manual
Page 8
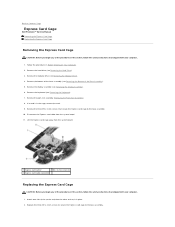
.... 2. Replace the three M2 x 3-mm screws to secure the Express card cage to the base assembly. 10. Back to Contents Page Express Card Cage Dell Precision™ Service Manual Removing the Express Card Cage Replacing the Express Card Cage Removing the Express Card Cage CAUTION: Before you begin any of the procedures in this...
.... 2. Replace the three M2 x 3-mm screws to secure the Express card cage to the base assembly. 10. Back to Contents Page Express Card Cage Dell Precision™ Service Manual Removing the Express Card Cage Replacing the Express Card Cage Removing the Express Card Cage CAUTION: Before you begin any of the procedures in this...

Service Manual
Page 10
... the bottom. 4. Remove the bottom of the base assembly (see Replacing the Bottom of the Base Assembly). 5. Back to Contents Page Coin-Cell Battery Dell Precision™ Service Manual Removing the Coin-Cell Battery Replacing the Coin-Cell Battery Removing the Coin-Cell Battery CAUTION: Before you begin any of the procedures in this...
... the bottom. 4. Remove the bottom of the base assembly (see Replacing the Bottom of the Base Assembly). 5. Back to Contents Page Coin-Cell Battery Dell Precision™ Service Manual Removing the Coin-Cell Battery Replacing the Coin-Cell Battery Removing the Coin-Cell Battery CAUTION: Before you begin any of the procedures in this...
Service Manual
Page 12
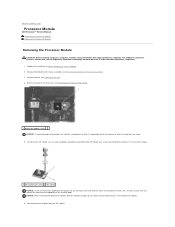
Back to Contents Page Processor Module Dell Precision™ Service Manual Removing the Processor Module Replacing the Processor Module Removing the Processor Module CAUTION: Before working inside your computer, read the safety information that it stops). ...1 ZIF-socket cam screw 2 ZIF socket NOTICE: To ensure maximum cooling for the processor, do not touch the heat transfer areas on www.dell.com...
Back to Contents Page Processor Module Dell Precision™ Service Manual Removing the Processor Module Replacing the Processor Module Removing the Processor Module CAUTION: Before working inside your computer, read the safety information that it stops). ...1 ZIF-socket cam screw 2 ZIF socket NOTICE: To ensure maximum cooling for the processor, do not touch the heat transfer areas on www.dell.com...
Service Manual
Page 14
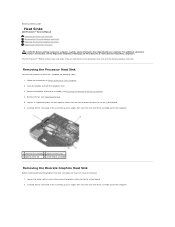
... three captive screws that secure the processor heat sink to the system board. 2. They are referred to Contents Page Heat Sinks Dell Precision™ Service Manual Removing the Processor Heat Sink Removing the Discrete Graphics Heat Sink Replacing the Discrete Graphics Heat Sink Replacing the Processor Heat Sink CAUTION...the processor heat sink must be removed. 1. Back to as the processor heat sink and the discrete graphics heat sink. The Dell Precision™ M4400 contains two heat sinks. Carefully lift the screw-end of the assembly up at an angle, then ease the vent-end of...
... three captive screws that secure the processor heat sink to the system board. 2. They are referred to Contents Page Heat Sinks Dell Precision™ Service Manual Removing the Processor Heat Sink Removing the Discrete Graphics Heat Sink Replacing the Discrete Graphics Heat Sink Replacing the Processor Heat Sink CAUTION...the processor heat sink must be removed. 1. Back to as the processor heat sink and the discrete graphics heat sink. The Dell Precision™ M4400 contains two heat sinks. Carefully lift the screw-end of the assembly up at an angle, then ease the vent-end of...

Service Manual
Page 16
... in Before Working on Your Computer. Remove the two M2 x 3-mm screws from the I /O board to the base assembly. 3. Back to Contents Page I/O Board Dell Precision™ Service Manual Removing the I/O Board Replacing the I/O Board Removing the I/O Board CAUTION: Before you begin the following procedure, follow the safety instructions that the wireless switch actuator...
... in Before Working on Your Computer. Remove the two M2 x 3-mm screws from the I /O board to the base assembly. 3. Back to Contents Page I/O Board Dell Precision™ Service Manual Removing the I/O Board Replacing the I/O Board Removing the I/O Board CAUTION: Before you begin the following procedure, follow the safety instructions that the wireless switch actuator...

Service Manual
Page 18
.../regulatory_compliance. Back to the rear and away from their routing channels. NOTICE: Position all cables to Contents Page Display Assembly Dell Precision™ Service Manual Removing the Display Assembly Replacing the Display Assembly Removing the Display Bezel Replacing the Display Bezel Removing the Display Panel Replacing the Display Panel Display ...
.../regulatory_compliance. Back to the rear and away from their routing channels. NOTICE: Position all cables to Contents Page Display Assembly Dell Precision™ Service Manual Removing the Display Assembly Replacing the Display Assembly Removing the Display Bezel Replacing the Display Bezel Removing the Display Panel Replacing the Display Panel Display ...
Service Manual
Page 28
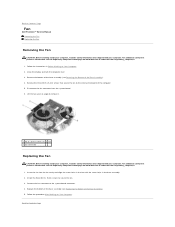
... bottom of the base assembly (see Removing the Bottom of the computer. 5. Follow the procedure After Working on www.dell.com at : www.dell.com/regulatory_compliance. 1. Back to Contents Page Fan Dell Precision™ Service Manual Removing the Fan Replacing the Fan Removing the Fan CAUTION: Before working inside your computer, read the safety information that...
... bottom of the base assembly (see Removing the Bottom of the computer. 5. Follow the procedure After Working on www.dell.com at : www.dell.com/regulatory_compliance. 1. Back to Contents Page Fan Dell Precision™ Service Manual Removing the Fan Replacing the Fan Removing the Fan CAUTION: Before working inside your computer, read the safety information that...

Service Manual
Page 30
Back to the system board. 5. You can install the module in Before Working on www.dell.com at: www.dell.com/regulatory_compliance. The module pops up to a 30-degree angle to Contents Page Flash Cache Module Dell Precision™ Service Manual Removing an FCM Replacing an FCM CAUTION: Before working inside your computer, read the safety information...
Back to the system board. 5. You can install the module in Before Working on www.dell.com at: www.dell.com/regulatory_compliance. The module pops up to a 30-degree angle to Contents Page Flash Cache Module Dell Precision™ Service Manual Removing an FCM Replacing an FCM CAUTION: Before working inside your computer, read the safety information...

Service Manual
Page 32
...the laptop, the four screws securing the hard drive are marked with your computer. Place the computer upside down on www.dell.com at: www.dell.com/regulatory_compliance. For additional safety best practices information, see the Regulatory Compliance Homepage on a clean, flat surface. Do not... Slide the hard drive out of the base assembly is hot. Back to Contents Page Hard Drive Dell Precision™ Service Manual Removing the Hard Drive Replacing the Hard Drive NOTE: Dell does not guarantee compatibility or provide support for hard drives obtained from the hard drive. NOTICE: When...
...the laptop, the four screws securing the hard drive are marked with your computer. Place the computer upside down on www.dell.com at: www.dell.com/regulatory_compliance. For additional safety best practices information, see the Regulatory Compliance Homepage on a clean, flat surface. Do not... Slide the hard drive out of the base assembly is hot. Back to Contents Page Hard Drive Dell Precision™ Service Manual Removing the Hard Drive Replacing the Hard Drive NOTE: Dell does not guarantee compatibility or provide support for hard drives obtained from the hard drive. NOTICE: When...

Service Manual
Page 34
... computer. Slide each hinge cover off the computer and lift to Contents Page The hinge covers are not interchangeable; Back to Contents Page Hinge Covers Dell Precision™ Service Manual Removing the Hinge Covers Replacing the Hinge Covers Removing the Hinge Covers CAUTION: Before you begin any of the procedures in each hinge cover. 5.
... computer. Slide each hinge cover off the computer and lift to Contents Page The hinge covers are not interchangeable; Back to Contents Page Hinge Covers Dell Precision™ Service Manual Removing the Hinge Covers Replacing the Hinge Covers Removing the Hinge Covers CAUTION: Before you begin any of the procedures in each hinge cover. 5.

Service Manual
Page 35
... fragile, easily dislodged, and time-consuming to seat the keyboard properly. 2. Replace the two M2 x 3-mm screws at an angle to Contents Page Keyboard Dell Precision™ Service Manual Removing the Keyboard Replacing the Keyboard Removing the Keyboard CAUTION: Before you begin any of the procedures in this section, follow the safety instructions that...
... fragile, easily dislodged, and time-consuming to seat the keyboard properly. 2. Replace the two M2 x 3-mm screws at an angle to Contents Page Keyboard Dell Precision™ Service Manual Removing the Keyboard Replacing the Keyboard Removing the Keyboard CAUTION: Before you begin any of the procedures in this section, follow the safety instructions that...

Service Manual
Page 37
... you begin any of the procedures in this section, follow the safety instructions that shipped with your computer. 1. Back to Contents Page LED Cover Dell Precision™ Service Manual Removing the LED Cover Replacing the LED Cover Removing the LED Cover CAUTION: Before you begin any of the procedures in this section, follow the...
... you begin any of the procedures in this section, follow the safety instructions that shipped with your computer. 1. Back to Contents Page LED Cover Dell Precision™ Service Manual Removing the LED Cover Replacing the LED Cover Removing the LED Cover CAUTION: Before you begin any of the procedures in this section, follow the...

Service Manual
Page 38
... the module in Before Working on the configuration of the computer. If possible, do not use tools to Contents Page Memory Dell Precision™ Service Manual Removing a Memory Module Replacing a Memory Module Verifying System Operation CAUTION: Before you begin any new modules that it sits at optimal ...edges of the memory module and lift the free edge of the Base Assembly). NOTICE: If you purchased the new modules from Dell are covered under your computer may contain an additional module for improved system memory performance. Lay the computer upside down onto a clean...
... the module in Before Working on the configuration of the computer. If possible, do not use tools to Contents Page Memory Dell Precision™ Service Manual Removing a Memory Module Replacing a Memory Module Verifying System Operation CAUTION: Before you begin any new modules that it sits at optimal ...edges of the memory module and lift the free edge of the Base Assembly). NOTICE: If you purchased the new modules from Dell are covered under your computer may contain an additional module for improved system memory performance. Lay the computer upside down onto a clean...
Service Manual
Page 41
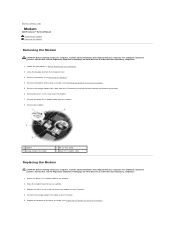
Follow the procedures in Before Working on www.dell.com at : www.dell.com/regulatory_compliance. 1. Remove the battery (see Removing the Bottom of the Base Assembly). Remove the black RJ11 modem cable from the modem. 7. Place the .... 1. Remove the orange modem flex cable from the I /O board. 4. Remove the M2 x 3-mm screw from the modem. 8. Back to Contents Page Modem Dell Precision™ Service Manual Removing the Modem Replacing the Modem Removing the Modem CAUTION: Before working inside your computer, read the safety information that shipped with your computer. For ...
Follow the procedures in Before Working on www.dell.com at : www.dell.com/regulatory_compliance. 1. Remove the battery (see Removing the Bottom of the Base Assembly). Remove the black RJ11 modem cable from the modem. 7. Place the .... 1. Remove the orange modem flex cable from the I /O board. 4. Remove the M2 x 3-mm screw from the modem. 8. Back to Contents Page Modem Dell Precision™ Service Manual Removing the Modem Replacing the Modem Removing the Modem CAUTION: Before working inside your computer, read the safety information that shipped with your computer. For ...

Service Manual
Page 43
... into the modular bay until it from the drive. 4. Push the release latch in to secure the drive. 3. Back to Contents Page Modular Drive Dell Precision™ Service Manual Removing the Modular Drive Replacing the Modular Drive The modular drive bay supports either a second hard drive, an optical drive, or an air bay for...
... into the modular bay until it from the drive. 4. Push the release latch in to secure the drive. 3. Back to Contents Page Modular Drive Dell Precision™ Service Manual Removing the Modular Drive Replacing the Modular Drive The modular drive bay supports either a second hard drive, an optical drive, or an air bay for...
Service Manual
Page 44
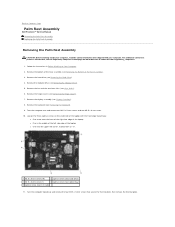
...edge toward you: l One screw near the front of the right-side edge of the laptop l One in Before Working on www.dell.com at: www.dell.com/regulatory_compliance. 1. Follow the instructions in the middle of the left side edge of the Base Assembly). 3. Remove the hard drive ... (see Heat Sinks). 6. Remove the fan and the two heat sinks (see Display Assembly). 8. Back to Contents Page Palm Rest Assembly Dell Precision™ Service Manual Removing the Palm Rest Assembly Replacing the Palm Rest Assembly Removing the Palm Rest Assembly CAUTION: Before working inside your computer.
...edge toward you: l One screw near the front of the right-side edge of the laptop l One in Before Working on www.dell.com at: www.dell.com/regulatory_compliance. 1. Follow the instructions in the middle of the left side edge of the Base Assembly). 3. Remove the hard drive ... (see Heat Sinks). 6. Remove the fan and the two heat sinks (see Display Assembly). 8. Back to Contents Page Palm Rest Assembly Dell Precision™ Service Manual Removing the Palm Rest Assembly Replacing the Palm Rest Assembly Removing the Palm Rest Assembly CAUTION: Before working inside your computer.


