

Dell Owners Manual
Page 4
Removing the Keyboard...27 Installing the Keyboard...29 Removing the Display Assembly ...29 Installing the Display Assembly...31 Removing the Palmrest Assembly 32 Installing the Palmrest Assembly...33 3 System Setup...35 Boot ... Setup Password 41 4 Diagnostics...43 Enhanced Pre-Boot System Assessment (ePSA) Diagnostics 43 Device Status Lights...44 Battery Status Lights...44 5 Technical Specifications 45 6 Contacting Dell...51
Removing the Keyboard...27 Installing the Keyboard...29 Removing the Display Assembly ...29 Installing the Display Assembly...31 Removing the Palmrest Assembly 32 Installing the Palmrest Assembly...33 3 System Setup...35 Boot ... Setup Password 41 4 Diagnostics...43 Enhanced Pre-Boot System Assessment (ePSA) Diagnostics 43 Device Status Lights...44 Battery Status Lights...44 5 Technical Specifications 45 6 Contacting Dell...51
Dell Owners Manual
Page 26
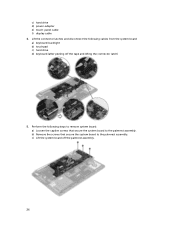
Perform the following cables from the system board: a) keyboard-backlight b) touchpad c) hard drive d) keyboard (after peeling off the palmrest assembly. 26 b) Remove the screws that secure the system board to the palmrest assembly. c) hard drive d) power-adapter e) touch-panel cable f) display cable 4. c) Lift the system board off the tape and lifting the connector latch) 5. Lift the connector latches and disconnect the following steps to remove system board: a) Loosen the captive screws that secure the system board to the palmrest assembly.
Perform the following cables from the system board: a) keyboard-backlight b) touchpad c) hard drive d) keyboard (after peeling off the palmrest assembly. 26 b) Remove the screws that secure the system board to the palmrest assembly. c) hard drive d) power-adapter e) touch-panel cable f) display cable 4. c) Lift the system board off the tape and lifting the connector latch) 5. Lift the connector latches and disconnect the following steps to remove system board: a) Loosen the captive screws that secure the system board to the palmrest assembly.
Dell Owners Manual
Page 27
...board to the palmrest assembly. 3. Install the: a) memory modules b) mSATA card c) heatsink d) fan e) battery f) base-cover assembly 9. Removing the Keyboard 1. Follow the procedures in After Working Inside Your Computer. Remove the: a) base cover b) battery c) hard drive d) system board 3. Route the following ... to secure the cable. 5. Connect the following cables on the system board and press down on the connector latches to the keyboard-cable connector. 6. Align the system board on the palmrest assembly. 2. Tighten the captive screws to secure the system board to...
...board to the palmrest assembly. 3. Install the: a) memory modules b) mSATA card c) heatsink d) fan e) battery f) base-cover assembly 9. Removing the Keyboard 1. Follow the procedures in After Working Inside Your Computer. Remove the: a) base cover b) battery c) hard drive d) system board 3. Route the following ... to secure the cable. 5. Connect the following cables on the system board and press down on the connector latches to the keyboard-cable connector. 6. Align the system board on the palmrest assembly. 2. Tighten the captive screws to secure the system board to...

Dell Owners Manual
Page 28
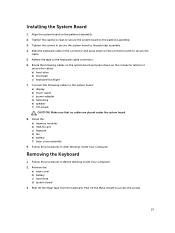
Lift and remove the keyboard from the palmrest assembly. 28 Remove the screws that secure the keyboard to the palmrest assembly. 5. 4.
Lift and remove the keyboard from the palmrest assembly. 28 Remove the screws that secure the keyboard to the palmrest assembly. 5. 4.
Dell Owners Manual
Page 29
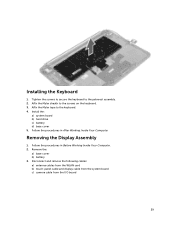
... Computer. Affix the Mylar tape to the palmrest assembly. 2. Removing the Display Assembly 1. Tighten the screws to secure the keyboard to the keyboard. 4. Follow the procedures in Before Working Inside Your Computer. 2. Installing the Keyboard 1. Disconnect and remove the following cables: a) antenna cables from the WLAN card b) touch-panel cable and display cable...
... Computer. Affix the Mylar tape to the palmrest assembly. 2. Removing the Display Assembly 1. Tighten the screws to secure the keyboard to the keyboard. 4. Follow the procedures in Before Working Inside Your Computer. 2. Installing the Keyboard 1. Disconnect and remove the following cables: a) antenna cables from the WLAN card b) touch-panel cable and display cable...

Dell Owners Manual
Page 32
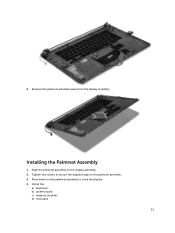
... Remove the: a) base cover b) battery c) hard drive d) speakers e) WLAN card f) coin-cell battery g) mSATA card h) fans i) heatsink j) power-adapter port k) I/O board l) memory modules m) system board n) keyboard 3. CAUTION: Lift the palmrest assembly slowly to the palmrest assembly. 4. Follow the procedures in After Working Inside Your Computer. Lift the palmrest assembly away from...
... Remove the: a) base cover b) battery c) hard drive d) speakers e) WLAN card f) coin-cell battery g) mSATA card h) fans i) heatsink j) power-adapter port k) I/O board l) memory modules m) system board n) keyboard 3. CAUTION: Lift the palmrest assembly slowly to the palmrest assembly. 4. Follow the procedures in After Working Inside Your Computer. Lift the palmrest assembly away from...
Dell Owners Manual
Page 33
Tighten the screws to secure the display hinges to close the display. 4. Remove the palmrest assembly away from the display assembly. Align the palmrest assembly on the palmrest assembly to the palmrest assembly. 3. Press down on the display assembly. 2. Installing the Palmrest Assembly 1. Install the: a) keyboard b) system board c) memory modules d) I/O board 33 5.
Tighten the screws to secure the display hinges to close the display. 4. Remove the palmrest assembly away from the display assembly. Align the palmrest assembly on the palmrest assembly to the palmrest assembly. 3. Press down on the display assembly. 2. Installing the Palmrest Assembly 1. Install the: a) keyboard b) system board c) memory modules d) I/O board 33 5.
Dell Owners Manual
Page 37
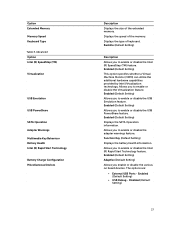
...to enable or disable the USB Emulation feature. Enabled (Default Setting) • USB Debug - Option Extended Memory Memory Speed Keyboard Type Table 3. Advanced Option Intel (R) SpeedStep (TM) Virtualization USB Emulation USB PowerShare SATA Operation Adapter Warnings Multimedia Key Behaviour ...Battery Health Intel (R) Rapid Start Technology Battery Charge Configuration Miscellaneous Devices Description Displays the size of keyboard. Displays the speed of the memory. Function Key (Default Setting) Displays the battery health information. Enabled (Default ...
...to enable or disable the USB Emulation feature. Enabled (Default Setting) • USB Debug - Option Extended Memory Memory Speed Keyboard Type Table 3. Advanced Option Intel (R) SpeedStep (TM) Virtualization USB Emulation USB PowerShare SATA Operation Adapter Warnings Multimedia Key Behaviour ...Battery Health Intel (R) Rapid Start Technology Battery Charge Configuration Miscellaneous Devices Description Displays the size of keyboard. Displays the speed of the memory. Function Key (Default Setting) Displays the battery health information. Enabled (Default ...

Dell Owners Manual
Page 46
... Feature Type Size Dimensions: Height Width Diagonal Specification NVIDIA Quadro K1100M , 2 GB GDDR5(4 Pcs 128Mx32), 1.5 V based Specification dual-channel High-Definition audio Specification Ethernet via keyboard wireless key • WLAN and Bluetooth BT 4.0 + LE combo card support • Bluetooth 2.1/3.0/4.0/4.1 with Wi-Fi combo module Specification • Microphone/Headphone Universal Audio jack...
... Feature Type Size Dimensions: Height Width Diagonal Specification NVIDIA Quadro K1100M , 2 GB GDDR5(4 Pcs 128Mx32), 1.5 V based Specification dual-channel High-Definition audio Specification Ethernet via keyboard wireless key • WLAN and Bluetooth BT 4.0 + LE combo card support • Bluetooth 2.1/3.0/4.0/4.1 with Wi-Fi combo module Specification • Microphone/Headphone Universal Audio jack...
Dell Owners Manual
Page 47
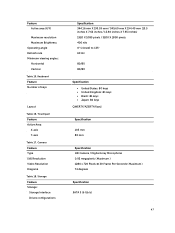
... 80 mm Specification HD Camera / Digital Array Microphone 0.92 megapixels ( Maximum ) 1280 x 720 Pixels @ 30 Frame Per Seconds ( Maximum ) 74 degrees Specification SATA 3 (6 Gb/s) 47 Keyboard Feature Number of keys Layout Table 16. Camera Feature Type Still Resolution Video Resolution Diagonal Table 18.
... 80 mm Specification HD Camera / Digital Array Microphone 0.92 megapixels ( Maximum ) 1280 x 720 Pixels @ 30 Frame Per Seconds ( Maximum ) 74 degrees Specification SATA 3 (6 Gb/s) 47 Keyboard Feature Number of keys Layout Table 16. Camera Feature Type Still Resolution Video Resolution Diagonal Table 18.

Dell Statement of Volatility
Page 1
Dell Precision M3800 CAUTION: A CAUTION indicates either potential damage to hardware or loss of panel assembly System BIOS UH2(8 MB) Non-volatile memory, 64 No Mbit (8 MB), System BIOS and Video BIOS for keyboard controller BIOS code. Part of data and tells you how ... two modules must be populated. Non-volatile memory 512 No Bytes. List of Non-Volatile Components on the Dell Precision M3800 system board. Table 1. The Dell Precision M3800 contains both volatile and non-volatile (NV) components. The following NV components are present on System Board Description...
Dell Precision M3800 CAUTION: A CAUTION indicates either potential damage to hardware or loss of panel assembly System BIOS UH2(8 MB) Non-volatile memory, 64 No Mbit (8 MB), System BIOS and Video BIOS for keyboard controller BIOS code. Part of data and tells you how ... two modules must be populated. Non-volatile memory 512 No Bytes. List of Non-Volatile Components on the Dell Precision M3800 system board. Table 1. The Dell Precision M3800 contains both volatile and non-volatile (NV) components. The following NV components are present on System Board Description...


