

Dell Owners Manual
Page 4
... Removing the Palmrest Assembly 32 Installing the Palmrest Assembly...33 3 System Setup...35 Boot Sequence...35 Navigation Keys...35 System Setup Options...36 Updating the BIOS ...40 System and Setup Password...40 Assigning a System Password and Setup Password 40 Deleting or Changing an Existing System and/or Setup Password 41 4 Diagnostics...
... Removing the Palmrest Assembly 32 Installing the Palmrest Assembly...33 3 System Setup...35 Boot Sequence...35 Navigation Keys...35 System Setup Options...36 Updating the BIOS ...40 System and Setup Password...40 Assigning a System Password and Setup Password 40 Deleting or Changing an Existing System and/or Setup Password 41 4 Diagnostics...

Dell Owners Manual
Page 9
... require the following tools: • Small flat-blade screwdriver • #0 Phillips screwdriver • #1 Phillips screwdriver • T5 Torx screwdriver • Small plastic scribe • Flash BIOS update program CD System Overview Figure 1. I /O board 9 2 Removing and Installing Components This section provides detailed information on how to remove or install the components from...
... require the following tools: • Small flat-blade screwdriver • #0 Phillips screwdriver • #1 Phillips screwdriver • T5 Torx screwdriver • Small plastic scribe • Flash BIOS update program CD System Overview Figure 1. I /O board 9 2 Removing and Installing Components This section provides detailed information on how to remove or install the components from...
Dell Owners Manual
Page 18
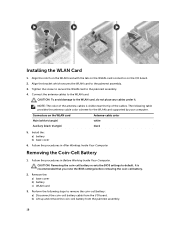
...Follow the procedures in Before Working Inside Your Computer. It is visible near the tip of the antenna cables is recommended that you note the BIOS settings before removing the coin-cell battery. 2. Connect the antenna cables to default. Connectors on the I /O board. Follow the procedures in... After Working Inside Your Computer. CAUTION: Removing the coin-cell battery re-sets the BIOS settings to the WLAN card. Perform the following table provides the antenna-cable color scheme for the WLAN card supported by your computer. b) ...
...Follow the procedures in Before Working Inside Your Computer. It is visible near the tip of the antenna cables is recommended that you note the BIOS settings before removing the coin-cell battery. 2. Connect the antenna cables to default. Connectors on the I /O board. Follow the procedures in... After Working Inside Your Computer. CAUTION: Removing the coin-cell battery re-sets the BIOS settings to the WLAN card. Perform the following table provides the antenna-cable color scheme for the WLAN card supported by your computer. b) ...

Dell Owners Manual
Page 25
Follow the procedures in Before Working Inside Your Computer. 2. You must enter the Service Tag in the BIOS after you replace the system board. 3. NOTE: Before disconnecting the cables from the system board: a) I/O-board b) speaker 25 Installing the Memory Module(s) 1. Install the: a) battery b) ...
Follow the procedures in Before Working Inside Your Computer. 2. You must enter the Service Tag in the BIOS after you replace the system board. 3. NOTE: Before disconnecting the cables from the system board: a) I/O-board b) speaker 25 Installing the Memory Module(s) 1. Install the: a) battery b) ...

Dell Owners Manual
Page 35
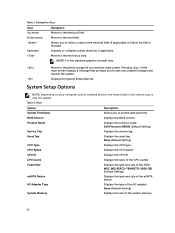
... screen. 3 System Setup System Setup enables you to access the System Setup screen. During the Power-on Self Test (POST), when the Dell logo appears, you can: • Access System Setup by pressing key • Bring up the one-time boot menu by pressing key ... hardware configuration • Enable or disable integrated devices • Set performance and power management thresholds • Manage your computer hardware and specify BIOS‐level options. From the System Setup, you re-start the system. 35 Navigation Keys The following table displays the system setup navigation keys...
... screen. 3 System Setup System Setup enables you to access the System Setup screen. During the Power-on Self Test (POST), when the Dell logo appears, you can: • Access System Setup by pressing key • Bring up the one-time boot menu by pressing key ... hardware configuration • Enable or disable integrated devices • Set performance and power management thresholds • Manage your computer hardware and specify BIOS‐level options. From the System Setup, you re-start the system. 35 Navigation Keys The following table displays the system setup navigation keys...
Dell Owners Manual
Page 36
...Displays the type and size of the CPU caches. Down arrow Moves to the next focus area. Moves to the next field. Dell Precision M3800 (Default Setting) Service Tag Displays the service tag. None (Default Setting) CPU Type Displays the CPU type. CPU ID Displays the.... NOTE: For the standard graphics browser only. Main Option Description System Time/Date Allows you view the main screen. BIOS Version Displays the BIOS version. Displays the System Setup help file. CPU Speed Displays the CPU speed. AC Adapter Type Displays the type of...
...Displays the type and size of the CPU caches. Down arrow Moves to the next focus area. Moves to the next field. Dell Precision M3800 (Default Setting) Service Tag Displays the service tag. None (Default Setting) CPU Type Displays the CPU type. CPU ID Displays the.... NOTE: For the standard graphics browser only. Main Option Description System Time/Date Allows you view the main screen. BIOS Version Displays the BIOS version. Displays the System Setup help file. CPU Speed Displays the CPU speed. AC Adapter Type Displays the type of...

Dell Owners Manual
Page 38
...Password System Password HDD Password Password Change Computrace TPM Security Description Unlocked (Default Setting) Displays the status of the system password. When enabled, the BIOS will turn On the TPM During POST. NOTE: You must set the admin password before you to set the asset tag. NOTE: Deleting ...will not turn On the TPM during POST so that it can be allowed. NOTE: Successful password changes take effect immediately. When disabled the BIOS will be used by default. 38 Allows you to the operating system. This option lets you to set , change or delete the system ...
...Password System Password HDD Password Password Change Computrace TPM Security Description Unlocked (Default Setting) Displays the status of the system password. When enabled, the BIOS will turn On the TPM During POST. NOTE: You must set the admin password before you to set the asset tag. NOTE: Deleting ...will not turn On the TPM during POST so that it can be allowed. NOTE: Successful password changes take effect immediately. When disabled the BIOS will be used by default. 38 Allows you to the operating system. This option lets you to set , change or delete the system ...
Dell Owners Manual
Page 40
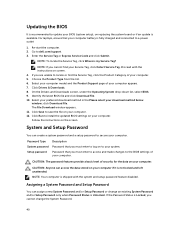
... and the Product Support page of your computer battery is available. On the Drivers and Downloads screen, under the Operating System drop-down list, select BIOS. 9. Select your preferred download method in the Please select your computer. Click Run to a power outlet 1. System and Setup Password You can access the data... download method below window; Password Type System password Setup password Description Password that your computer. CAUTION: Anyone can create a system password and a setup password to dell.com/support. 3.
... and the Product Support page of your computer battery is available. On the Drivers and Downloads screen, under the Operating System drop-down list, select BIOS. 9. Select your preferred download method in the Please select your computer. Click Run to a power outlet 1. System and Setup Password You can access the data... download method below window; Password Type System password Setup password Description Password that your computer. CAUTION: Anyone can create a system password and a setup password to dell.com/support. 3.

Dell Owners Manual
Page 41
... password, confirm the deletion when promoted. 5. Deleting or Changing an Existing System and/or Setup Password Ensure that Password Status is Locked. In the System BIOS or System Setup screen, select System Security and press . Select Setup Password, alter or delete the existing setup password and press or . If you to... attempting to save the changes. 6. The password can have up to assign the system password: - Only the following guidelines to 32 characters. - In the System BIOS or System Setup screen, select System Security and press .
... password, confirm the deletion when promoted. 5. Deleting or Changing an Existing System and/or Setup Password Ensure that Password Status is Locked. In the System BIOS or System Setup screen, select System Security and press . Select Setup Password, alter or delete the existing setup password and press or . If you to... attempting to save the changes. 6. The password can have up to assign the system password: - Only the following guidelines to 32 characters. - In the System BIOS or System Setup screen, select System Security and press .

Dell Owners Manual
Page 43
...test your computer's hardware without requiring additional equipment or risking data loss. If you wish to run the ePSA diagnostics before contacting Dell for technical assistance. The purpose of options for specific devices require user interaction. The embedded system diagnostics provides a set of running...diagnostics results to help you solve the problem. Using this program with the BIOS and is embedded with other computers may cause invalid results or error messages. Note the error code and contact Dell. 43 On the boot menu screen, select the Diagnostics option. Enhanced ...
...test your computer's hardware without requiring additional equipment or risking data loss. If you wish to run the ePSA diagnostics before contacting Dell for technical assistance. The purpose of options for specific devices require user interaction. The embedded system diagnostics provides a set of running...diagnostics results to help you solve the problem. Using this program with the BIOS and is embedded with other computers may cause invalid results or error messages. Note the error code and contact Dell. 43 On the boot menu screen, select the Diagnostics option. Enhanced ...

Dell Owners Manual
Page 45
... Information Feature Specification System Chipset Mobile Intel 8 Series Chipset DMA Channels Two VT-d DMA remap engines Interrupt Levels Intel® 64 and IA-32 Architecture BIOS Chip (NVRAM) 8 MB Table 8. 5 Technical Specifications NOTE: Offerings may vary by region. Table 7. For more information regarding the configuration of your computer...
... Information Feature Specification System Chipset Mobile Intel 8 Series Chipset DMA Channels Two VT-d DMA remap engines Interrupt Levels Intel® 64 and IA-32 Architecture BIOS Chip (NVRAM) 8 MB Table 8. 5 Technical Specifications NOTE: Offerings may vary by region. Table 7. For more information regarding the configuration of your computer...

Dell Statement of Volatility
Page 1
... components continue to prevent loss of data) Embedded Flash UE1 in embedded controller KB9012 128 KB of Non-Volatile Components on the Dell Precision M3800 system board. System memory size will depend on board diags), PXE diags., VBIOS System Memory - Table 1. DDR3L memory Four ... buffer UV19 state. 4 GB GDDR5 for correct operation of panel assembly System BIOS UH2(8 MB) Non-volatile memory, 64 No Mbit (8 MB), System BIOS and Video BIOS for keyboard controller BIOS code. Volatile components lose their data even after power is removed from the component...
... components continue to prevent loss of data) Embedded Flash UE1 in embedded controller KB9012 128 KB of Non-Volatile Components on the Dell Precision M3800 system board. System memory size will depend on board diags), PXE diags., VBIOS System Memory - Table 1. DDR3L memory Four ... buffer UV19 state. 4 GB GDDR5 for correct operation of panel assembly System BIOS UH2(8 MB) Non-volatile memory, 64 No Mbit (8 MB), System BIOS and Video BIOS for keyboard controller BIOS code. Volatile components lose their data even after power is removed from the component...


