

Owners Manual
Page 50
Replace the M2.5x4.0 screws to secure the display hinge. 3. Follow the procedure in Before working inside your computer. Install: a) eDP cable b) camera c) display hinge d) display bracket e) display panel 50 Disassembly and reassembly 2. Follow the procedure in After working inside your computer. 2. Remove the: a) battery cover b) battery c) base cover d) hard drive e) keyboard f) palmrest g) display...
Replace the M2.5x4.0 screws to secure the display hinge. 3. Follow the procedure in Before working inside your computer. Install: a) eDP cable b) camera c) display hinge d) display bracket e) display panel 50 Disassembly and reassembly 2. Follow the procedure in After working inside your computer. 2. Remove the: a) battery cover b) battery c) base cover d) hard drive e) keyboard f) palmrest g) display...

Owners Manual
Page 52
... d) hard drive e) keyboard f) palmrest g) display assembly h) display bezel 3. Camera Removing the camera 1. b) Lift the camera module from the computer [1]. Affix the eDP cable on the display cover. 2. Follow the procedure in After working inside your computer. 2. To remove camera: a) Peel the eDP cable and disconnect the camera cable from the computer [2]. 52 Disassembly and reassembly Follow...
... d) hard drive e) keyboard f) palmrest g) display assembly h) display bezel 3. Camera Removing the camera 1. b) Lift the camera module from the computer [1]. Affix the eDP cable on the display cover. 2. Follow the procedure in After working inside your computer. 2. To remove camera: a) Peel the eDP cable and disconnect the camera cable from the computer [2]. 52 Disassembly and reassembly Follow...

Owners Manual
Page 53
Install the: a) display bezel b) display assembly c) palmrest d) keyboard e) hard drive f) base cover g) battery h) battery cover 5. Installing the camera 1. Connect the camera cable. 3. Place the camera module in After working inside your computer. Disassembly and reassembly 53 Follow the procedure in its slot on the computer. 2. Affix the eDP cable. 4.
Install the: a) display bezel b) display assembly c) palmrest d) keyboard e) hard drive f) base cover g) battery h) battery cover 5. Installing the camera 1. Connect the camera cable. 3. Place the camera module in After working inside your computer. Disassembly and reassembly 53 Follow the procedure in its slot on the computer. 2. Affix the eDP cable. 4.

Owners Manual
Page 56
... present on USB 3.0/USB 3.1 Gen 1 cables and only come close to imagine that with high-definition video content, terabyte storage devices, high megapixel count digital cameras etc., USB 2.0 may not be fast enough. Single-link DVI requires almost 2Gbps throughput. With today's ever increasing demands placed on data transfers with 5-10...
... present on USB 3.0/USB 3.1 Gen 1 cables and only come close to imagine that with high-definition video content, terabyte storage devices, high megapixel count digital cameras etc., USB 2.0 may not be fast enough. Single-link DVI requires almost 2Gbps throughput. With today's ever increasing demands placed on data transfers with 5-10...
Owners Manual
Page 68
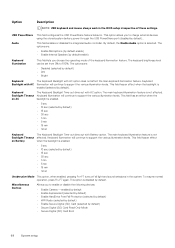
...keyboard illumination feature is not affected. This option is disabled by default). Option Description NOTE: USB keyboard and mouse always work in the system. This field enables or disables the integrated audio controller. This field has an effect when the on ... not affect the main keyboard illumination feature. Backlight Timeout Keyboard Illumination will continue to enable or disable the following devices: • Enable Camera -enabled by default • Enable Expresscard (selected by default) • Enable HardDrive Free Fall Protection (selected by default) •...
...keyboard illumination feature is not affected. This option is disabled by default). Option Description NOTE: USB keyboard and mouse always work in the system. This field enables or disables the integrated audio controller. This field has an effect when the on ... not affect the main keyboard illumination feature. Backlight Timeout Keyboard Illumination will continue to enable or disable the following devices: • Enable Camera -enabled by default • Enable Expresscard (selected by default) • Enable HardDrive Free Fall Protection (selected by default) •...


