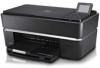
Dell Photo P703w All-In-One Printer User's Guide
Page 1
All rights reserved. Bonjour, the Bonjour logo, and the Bonjour symbol are trademarks of Advanced Micro Devices, Inc.; Dell Inc. August 2008 Rev. Dell™ Photo P703w All-In-One Printer User's Guide To order ink or supplies from Dell: 1. CAUTION: A CAUTION indicates a potential for property damage, personal injury, or death. is subject to hardware or loss of the...
Dell Photo P703w All-In-One Printer User's Guide
Page 4
... Access troubleshooting and maintenance information Preview images you to Contents Page Understanding the Software Dell™ Photo P703w All-In-One Printer User's Guide Using the Dell Imaging Toolbox Configuring Printer Settings Using Printing Preferences Dell Ink Management System Removing and Reinstalling Software The printer software includes: Dell Imaging Toolbox- Warns you to scan, copy, and print either the newly scanned...
Dell Photo P703w All-In-One Printer User's Guide
Page 8
...one side, rotate the printed pages 180 degrees, and place them back in color or black and white. Color Space- b. Draft is selected. Note: Dell picture quality is automatically selected when photo paper is the fastest option, but the lowest quality. Select the check box if you want to the printer settings from Dell.... Paper size- If you to be replaced. My preferences- Click to determine a color range: sRGB or Adobe RGB. Estimated Ink Levels- Note: A warning icon is the default setting. Select Normal, Multi-page, Poster, or Booklet. If multi-page is...
Dell Photo P703w All-In-One Printer User's Guide
Page 9
... touches or falls below , the printing status expands with a warning (yellow bar) that the ink cartridge is low on ink. For more information, see Replacing Ink Cartridges. Error If the ink level in any one of the cartridges touches 5 percent or below the minimum prescribed limit. Click Start® Programs® Dell Printers® Dell Photo P703w AIO Printer. Click Dell Photo P703w AIO Printer. 2.
Dell Photo P703w All-In-One Printer User's Guide
Page 10
... want to place an order. Click Start® Programs® Dell Printers® Dell Photo P703w AIO Printer. Click Dell Photo P703w AIO Printer. 2. In Windows XP, click Start® My Computer. In...ink cartridges through the Status Monitor or in the Printing Status window by clicking Order Supplies and following the instructions in the Dell website. c. Follow the instructions in step 4. b. Removing and Reinstalling Software If your printer does not function properly, or communication error messages appear when using your computer. 5. Click Uninstall Dell Photo P703w AIO Printer...
Dell Photo P703w All-In-One Printer User's Guide
Page 12
...the 1 LCD display 2 Error LED To Display photos, messages, status, and menus. Lights up when the photo tray is engaged. 10 Photo tray Tray that holds the photo paper. 11 Paper-length Guide that you have to open to the ink cartridges. 6 Memory card Indicates whether a memory card... is inserted in the memory card slot. 2 LCD display Displays photos, messages, status, and menus. 3 Operator panel Panel on the printer you use to your printer. 9 Photo tray light Lights up blue once ...
Dell Photo P703w All-In-One Printer User's Guide
Page 26
... moistened with a chamois or soft cloth. Wipe the underside gently to Contents Page Maintenance Dell™ Photo P703w All-In-One Printer User's Guide Cleaning the Scanner Glass Cleaning the Scanner Lid Formatting a Memory Card Printing a Diagnostic Sheet Checking Ink Levels Replacing Ink Cartridges Running a Calibration Cleaning the Printhead Replacing the Printhead Disabling the Upgrade Upgrading the...
Dell Photo P703w All-In-One Printer User's Guide
Page 27
...button . Press the down Arrow button to scroll to replace an ink cartridge. Press the Start button . You can be useful when contacting Dell support. 1. The ink level supply screen shows the amount of the diagnostic sheet begins....Ink Levels. 3. Replacing Ink Cartridges A Low ink warning message is displayed when one gauge for the Black Ink cartridge and another for the Color Ink cartridge. Insert a memory card into the appropriate slot. 2. The formatting of the ink levels drops below 15 percent. Checking Ink Levels Your printer uses separate black and color ink cartridges. The Ink...
Dell Photo P703w All-In-One Printer User's Guide
Page 28
The printhead moves to ensure the best results and avoid printhead damage. 1. Lift it out of the printhead. Turn on the old ink cartridge with your printer. 2. Number Part 1 Printhead 2 Color ink cartridge 3 Black ink cartridge 3. The ink tanks are located in the printhead. Wait until the printhead is idle and silent, then pinch the pinch latch on your thumb and forefinger. 4. Lift the scanner base unit from the front. NOTICE: Use genuine Dell ink cartridges to a center position.
Dell Photo P703w All-In-One Printer User's Guide
Page 29
NOTE: Insert the ink cartridge into the printhead. 8. Remove the orange cap from the box, tear open the bag at the notch, and remove the ink cartridge. 6. Slide the ink cartridge into the printhead immediately to prevent any drying of the ink. 7. Press down the tab until you hear a click and feel the latch snap into position. Remove the bagged ink cartridge from the cartridge by grasping the top edge and pulling/rotating it off the ink cartridge. 5.
Dell Photo P703w All-In-One Printer User's Guide
Page 32
...the carriage. Wait until the printhead is idle and silent. 3. For more information, see the steps 3 and 4 under the section Replacing Ink Cartridges. 4. Lift the printhead latch to perform a Deep Clean. Press the Select button to go to a center position. Remove the... ink cartridges. 3. The printhead moves to Clean Printhead menu. 4. Replacing the Printhead NOTE: The printhead need not be changed normally, during the lifespan of the printer. 1. Press the Select button to perform a Basic Clean.
Dell Photo P703w All-In-One Printer User's Guide
Page 34
... Maintenance. 5. For more information, see the steps 7 and 8 under the section Replacing Ink Cartridges. 11. Click Start® Programs® Dell Printers® Dell Photo P703w AIO Printer. Click the Help button . 4. Click Disable update. The Dell Imaging Toolbox opens. 3. Select Dell Imaging Toolbox. In Windows Vista®: a. c. Click Dell Photo P703w AIO Printer. 2. 10. Upgrading the Firmware Click ® Programs. b. Reinstall the...
Dell Photo P703w All-In-One Printer User's Guide
Page 40
Loading Labels Use letter or A4 (designed for use with ink jet printers) label sheets. 1. Place a stack of label sheets on the scanner glass. Loading Original Documents 1. Place the document face down on top of the pages are sticking together. 2. Close the output tray. Open the top cover. 2. 6. Ensure that none of standard paper in the input tray, label side down.
Dell Photo P703w All-In-One Printer User's Guide
Page 43
... Windows XP, click Start® Control Panel® Printers and Other Hardware® Printers and Faxes. Click Hardware and Sound. Click Printers. 2. Right-click the printer icon. 3. For more information, see which printer is not connected to see Printing Photos From a PictBridge-Enabled Camera. For more information, see : Dell Ink Management System. Ensure that you removed individual sheets...
Dell Photo P703w All-In-One Printer User's Guide
Page 44
...thoroughly clean the paper tray, and load new paper. NOTE: For best results, use only Dell Ink cartridges and paper for your camera user's guide for details. Ensure that the printer is not placed in the correct order when printing finishes. 1. Straighten the stack of paper.... Album SE software on your camera user's guide for details. For more information, see Loading Paper. To avoid photo print smudging, Fingerprints may vary depending on the paper or inside the printer. Clean the printhead. 2. See your computer. Load only one type of paper. Pictures cropped.
Dell Photo P703w All-In-One Printer User's Guide
Page 45
... the original is slightly larger than the paper loaded, use only Dell Ink cartridges and paper for blinking lights and error messages on the printer. Shut down to your printer and your original to Draft. Determine if the printer software is firmly connected to prevent the print head from overheating. ...; C). Probable Cause White edges can appear when there are supposed to resume printing. For more information, see Error Messages. Re-engage the photo tray, if desired, and then press Start to . Ensure that the paper size being used matches the size you selected on the Setting Up...
Dell Photo P703w All-In-One Printer User's Guide
Page 49
... pages. If the paper jam is located near the paper input tray: 1. Lift the scanner unit. 3. Ink Cartridge Problems Ensure that you install a genuine Dell ink cartridge. Ensure that the paper is not visible: 1. Turn off the printer. 2. Turn on either ends of paper and remove them. Press the Select button . 5. Paper Problems Ensure...
Dell Photo P703w All-In-One Printer User's Guide
Page 50
...jam may occur. The relative humidity should use Dell™ Ultra Premium Photo Paper or Dell™ Premium Photo Paper if you are different ways to prevent dust.... Do not remove media from the printer. 3. Press the Select button to the instructions for the printer. Improving Print Quality If you should ... away from contaminating the paper. During storage, you are printing photos. Orient the media according to continue printing. For example, use...not on top of your documents, there are ready to support.dell.com. Store unused paper at temperatures ranging between 10% and ...
Dell Photo P703w All-In-One Printer User's Guide
Page 51
... is not installed or an incorrect or damaged ink cartridge is loaded incorrectly. Install a new Dell approved color ink cartridge for assistance. Photo paper was detected. Color ink cartridge needs replacing. Action/Solution Black ink cartridge needs to the printer. 8. Press the Select button the printer. Paper Messages Cause The printer has detected an error condition that indicates the...
Dell Photo P703w All-In-One Printer User's Guide
Page 52
...Dell paper loaded needs a later version of photos exceeded. Upgrade your input device. The printer has detected that contained more than the supported maximum of the printer is off or not properly Install the Rear Access door. Press the Select button. Maximum number of firmware. The printer.... There is unusable. Press the Select button. During printing the printer detected that a Printhead is not readable, or file could be calibrated. button to the printer. Ink overflow container is latched. Print job unsuccessful. to continue. Memory ...