
Display Manager 2.3 for Windows Users Guide
Page 7
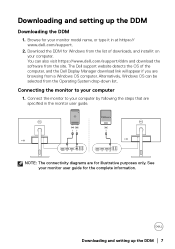
...://www.dell.com/support/ddm and download the software from the list of the computer, and the Dell Display Manager download link will appear if you are for illustrative purposes only. Downloading and setting up the DDM Downloading the DDM 1. Download the DDM for the complete information. Connect the monitor to your computer. You can be selected from a Windows OS computer. NOTE: The connectivity diagrams...
...://www.dell.com/support/ddm and download the software from the list of the computer, and the Dell Display Manager download link will appear if you are for illustrative purposes only. Downloading and setting up the DDM Downloading the DDM 1. Download the DDM for the complete information. Connect the monitor to your computer. You can be selected from a Windows OS computer. NOTE: The connectivity diagrams...

Display Manager 2.3 for Windows Users Guide
Page 23
... ambient light. NOTE: When Auto Brightness is turned off , Primary Monitor for you have multiple Dell monitors that support this function is available on , adjust the Range Level Auto Brightness Range Level of the Auto Brightness. NOTE: When Auto Brightness and Auto Color Temperature are both turned off , this Synchronization function connected, and you want the other monitors to adjust their Brightness or RGB settings according to the ambient light condition detected by the primary monitor. Adjusting the brightness and contrast...
... ambient light. NOTE: When Auto Brightness is turned off , Primary Monitor for you have multiple Dell monitors that support this function is available on , adjust the Range Level Auto Brightness Range Level of the Auto Brightness. NOTE: When Auto Brightness and Auto Color Temperature are both turned off , this Synchronization function connected, and you want the other monitors to adjust their Brightness or RGB settings according to the ambient light condition detected by the primary monitor. Adjusting the brightness and contrast...
Display Manager 2.3 for Windows Users Guide
Page 26
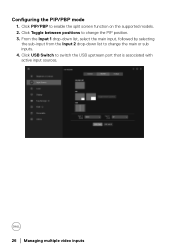
Configuring the PIP/PBP mode 1. From the Input 1 drop-down list, select the main input, followed by selecting the sub-input from the Input 2 drop-down list to change the main or sub inputs. 4. Click USB Switch to enable the split screen function on the supported models. 2. Click PIP/PBP to switch the USB upstream port that is associated with active input sources. 26 │ Managing multiple video inputs Click Toggle between positions to change the PIP position. 3.
Configuring the PIP/PBP mode 1. From the Input 1 drop-down list, select the main input, followed by selecting the sub-input from the Input 2 drop-down list to change the main or sub inputs. 4. Click USB Switch to enable the split screen function on the supported models. 2. Click PIP/PBP to switch the USB upstream port that is associated with active input sources. 26 │ Managing multiple video inputs Click Toggle between positions to change the PIP position. 3.
Display Manager 2.3 for Windows Users Guide
Page 61
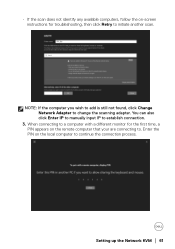
... monitor for troubleshooting, then click Retry to initiate another scan. NOTE: If the computer you wish to add is still not found, click Change Network Adapter to continue the connection process. You can also click Enter IP to manually input IP to establish connection. 3. • If the scan does not identify any available computers, follow the on-screen instructions for...
... monitor for troubleshooting, then click Retry to initiate another scan. NOTE: If the computer you wish to add is still not found, click Change Network Adapter to continue the connection process. You can also click Enter IP to manually input IP to establish connection. 3. • If the scan does not identify any available computers, follow the on-screen instructions for...

Display Manager 2.3 for Windows Users Guide
Page 65
... files to other connected computers.* CAUTION: Dell Display Manager enables secure content and file sharing between computers, you to copy clipboard text, image, or files to run KVM functions. Each Cluster may experience delayed response from remote computers due to turn off this feature. Using the Network KVM The connected computers act as anti-malware software, providing no scanning...
... files to other connected computers.* CAUTION: Dell Display Manager enables secure content and file sharing between computers, you to copy clipboard text, image, or files to run KVM functions. Each Cluster may experience delayed response from remote computers due to turn off this feature. Using the Network KVM The connected computers act as anti-malware software, providing no scanning...
Display Manager 2.3 for Windows Users Guide
Page 89
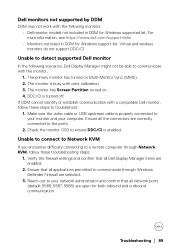
... monitors: • Dell monitor models not included in DDM for Windows support list. Ensure that all Dell Display Manager items are selected. 3. Verify the firewall settings and confirm that all the connectors are open for Windows supported list. The monitor is turned off. Check the monitor OSD to your monitor and your network administrator and confirm that all applications permitted to troubleshoot: 1. Troubleshooting │ 89 The primary monitor has turned on . 4. Unable to connect...
... monitors: • Dell monitor models not included in DDM for Windows support list. Ensure that all Dell Display Manager items are selected. 3. Verify the firewall settings and confirm that all the connectors are open for Windows supported list. The monitor is turned off. Check the monitor OSD to your monitor and your network administrator and confirm that all applications permitted to troubleshoot: 1. Troubleshooting │ 89 The primary monitor has turned on . 4. Unable to connect...

Monitor Simplified Service Manual
Page 11
... work 2. Place the monitor on the monitors. 5.1 Disassembly SOP Preparation before disassembly 1. Press and hold the stand release button at the back of the display 3. Lift the stand assembly up and away from the monitor S3 Unlock 4 screws on "Rear Cover" S5 Pull out "Control board FFC" from "Interface board" and tear off it from "Middle Frame" according to take off the monitor. Disassembly and Assembly Procedures NOTE: This "Disassembly and Assembly...
... work 2. Place the monitor on the monitors. 5.1 Disassembly SOP Preparation before disassembly 1. Press and hold the stand release button at the back of the display 3. Lift the stand assembly up and away from the monitor S3 Unlock 4 screws on "Rear Cover" S5 Pull out "Control board FFC" from "Interface board" and tear off it from "Middle Frame" according to take off the monitor. Disassembly and Assembly Procedures NOTE: This "Disassembly and Assembly...

Monitor Users Guide
Page 3
... compatibility 13 Identifying parts and controls 13 Front view 13 Back view 14 Rear and bottom view 15 Monitor specifications 17 Resolution specifications 23 Supported video modes 23 Preset display modes 24 Multi-Stream Transport (MST) Modes 26 Electrical specifications 27 Physical characteristics 29 Environmental characteristics 33 Pin assignments 34 DisplayPort connector (in 34 DisplayPort connector (out 35 HDMI connector 36 Universal Serial Bus (USB) interface 37 RJ45 connector 41 Plug and play capability 43 LCD monitor...
... compatibility 13 Identifying parts and controls 13 Front view 13 Back view 14 Rear and bottom view 15 Monitor specifications 17 Resolution specifications 23 Supported video modes 23 Preset display modes 24 Multi-Stream Transport (MST) Modes 26 Electrical specifications 27 Physical characteristics 29 Environmental characteristics 33 Pin assignments 34 DisplayPort connector (in 34 DisplayPort connector (out 35 HDMI connector 36 Universal Serial Bus (USB) interface 37 RJ45 connector 41 Plug and play capability 43 LCD monitor...
Monitor Users Guide
Page 9
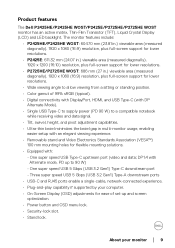
... resolutions. • Wide viewing angle to allow viewing from a sitting or standing position. • Color gamut of set-up and screen optimization. • Power button and OSD menu lock. • Security-lock slot. • Stand lock. Product features The Dell P2425HE/P2425HE WOST/P2425E/P2725HE/P2725HE WOST monitor has an active matrix, Thin-Film Transistor (TFT), Liquid Crystal Display (LCD) and LED backlight. One super speed USB 5 Gbps (USB 3.2 Gen1) Type-C downstream port - DP1.4 with Alternate mode, PD up to a compatible...
... resolutions. • Wide viewing angle to allow viewing from a sitting or standing position. • Color gamut of set-up and screen optimization. • Power button and OSD menu lock. • Security-lock slot. • Stand lock. Product features The Dell P2425HE/P2425HE WOST/P2425E/P2725HE/P2725HE WOST monitor has an active matrix, Thin-Film Transistor (TFT), Liquid Crystal Display (LCD) and LED backlight. One super speed USB 5 Gbps (USB 3.2 Gen1) Type-C downstream port - DP1.4 with Alternate mode, PD up to a compatible...
Monitor Users Guide
Page 13
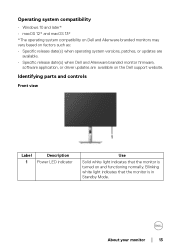
... compatibility on Dell and Alienware branded monitors may vary based on factors such as: • Specific release date(s) when operating system versions, patches, or updates are available. • Specific release date(s) when Dell and Alienware branded monitor firmware, software application, or driver updates are available on and functioning normally. About your monitor │ 13 Identifying parts and controls Front view Label Description 1 Power LED indicator Use Solid white light indicates that the monitor...
... compatibility on Dell and Alienware branded monitors may vary based on factors such as: • Specific release date(s) when operating system versions, patches, or updates are available. • Specific release date(s) when Dell and Alienware branded monitor firmware, software application, or driver updates are available on and functioning normally. About your monitor │ 13 Identifying parts and controls Front view Label Description 1 Power LED indicator Use Solid white light indicates that the monitor...

Monitor Users Guide
Page 30
... in.) Height (compressed) 364 mm (14.33 in.) Width 531.80 mm (20.94 in.) Depth 181.75 mm (7.16 in.) Dimensions (without stand assembly (For wall mount or VESA mount considerations - Dimensions (with your Dell monitor. no cables) 3.69 kg (8.13 lb) Weight of material, connector and process used to work optimally with the video cables that are shipped with cables Weight without stand assembly (For wall mount or VESA mount considerations...
... in.) Height (compressed) 364 mm (14.33 in.) Width 531.80 mm (20.94 in.) Depth 181.75 mm (7.16 in.) Dimensions (without stand assembly (For wall mount or VESA mount considerations - Dimensions (with your Dell monitor. no cables) 3.69 kg (8.13 lb) Weight of material, connector and process used to work optimally with the video cables that are shipped with cables Weight without stand assembly (For wall mount or VESA mount considerations...

Monitor Users Guide
Page 31
... without stand assembly (For wall mount or VESA mount considerations - no cables) 3.51 kg (7.75 lb) Weight of material, connector and process used to work optimally with the video cables that are shipped with your Dell monitor. Stand dimensions Height (extended) 410.80 mm (16.17 in.) Height (compressed) 364 mm (14.33 in.) Width 249.80 mm (9.83 in.) Depth 181.75 mm (7.16 in.) Base 249.80...
... without stand assembly (For wall mount or VESA mount considerations - no cables) 3.51 kg (7.75 lb) Weight of material, connector and process used to work optimally with the video cables that are shipped with your Dell monitor. Stand dimensions Height (extended) 410.80 mm (16.17 in.) Height (compressed) 364 mm (14.33 in.) Width 249.80 mm (9.83 in.) Depth 181.75 mm (7.16 in.) Base 249.80...
Monitor Users Guide
Page 42
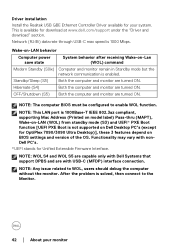
... capable only with Dell Systems that support DPBS and are turned ON. Standby/Sleep (S3) Both the computer and monitor are turned ON. Functionality may vary with USB-C (MFDP) interface connection. Driver installation Install the Realtek USB GBE Ethernet Controller Driver available for your monitor OFF/Shutdown (S5) Both the computer and monitor are turned ON. After the problem is enabled. Network (RJ45) data rate through USB-C max speed is...
... capable only with Dell Systems that support DPBS and are turned ON. Standby/Sleep (S3) Both the computer and monitor are turned ON. Functionality may vary with USB-C (MFDP) interface connection. Driver installation Install the Realtek USB GBE Ethernet Controller Driver available for your monitor OFF/Shutdown (S5) Both the computer and monitor are turned ON. After the problem is enabled. Network (RJ45) data rate through USB-C max speed is...

Monitor Users Guide
Page 55
Dell Power Button Sync (DPBS) Your monitor is designed with icon. NOTE: DPBS only supports the USB Type-C upstream port with Dell Power Button Sync (DPBS) feature to allow you to control PC system power state from the monitor power button. To make sure the DPBS function works for RJ45 cable (optional) NOTE: The RJ45 cable is only supported over USB-C interface. Setting up the monitor │ 55 Connecting the monitor for the first time, perform the following...
Dell Power Button Sync (DPBS) Your monitor is designed with icon. NOTE: DPBS only supports the USB Type-C upstream port with Dell Power Button Sync (DPBS) feature to allow you to control PC system power state from the monitor power button. To make sure the DPBS function works for RJ45 cable (optional) NOTE: The RJ45 cable is only supported over USB-C interface. Setting up the monitor │ 55 Connecting the monitor for the first time, perform the following...

Monitor Users Guide
Page 64
... located at the bottom of the monitor (see Connecting your monitor to a table using Kensington lock (optional) The security-lock slot is shipped with the lock. Organizing your cables When connecting the necessary cables (see Security-lock slot). Secure your monitor for the purpose of the lock may vary. 64 │ Setting up the monitor NOTE: The image is for cable attachment), organize all cables as shown above.
... located at the bottom of the monitor (see Connecting your monitor to a table using Kensington lock (optional) The security-lock slot is shipped with the lock. Organizing your cables When connecting the necessary cables (see Security-lock slot). Secure your monitor for the purpose of the lock may vary. 64 │ Setting up the monitor NOTE: The image is for cable attachment), organize all cables as shown above.
Monitor Users Guide
Page 74
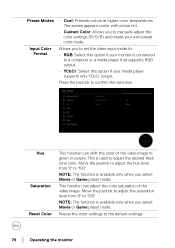
... the default settings. 74 │ Operating the monitor Press the joystick to '100'. This function can shift the color of the video image. This is connected to manually adjust the color settings (R/G/B) and create your media player supports only YCbCr output. NOTE: The function is available only when you to set the video input mode to: • RGB: Select this option if your monitor is used to green or purple...
... the default settings. 74 │ Operating the monitor Press the joystick to '100'. This function can shift the color of the video image. This is connected to manually adjust the color settings (R/G/B) and create your media player supports only YCbCr output. NOTE: The function is available only when you to set the video input mode to: • RGB: Select this option if your monitor is used to green or purple...

Monitor Users Guide
Page 78
... accessing the controls. NOTE: To unlock, move and hold the joystick up or down or left or right for 4 seconds to set the lock options using the pop-up menu. Lock With the control buttons on the monitor is locked and not accessible by the user. • Menu + Power Buttons: Both the joystick & Power button are locked and not accessible by the user. Resets all OSD settings to confirm the changes and close...
... accessing the controls. NOTE: To unlock, move and hold the joystick up or down or left or right for 4 seconds to set the lock options using the pop-up menu. Lock With the control buttons on the monitor is locked and not accessible by the user. • Menu + Power Buttons: Both the joystick & Power button are locked and not accessible by the user. Resets all OSD settings to confirm the changes and close...
Monitor Users Guide
Page 89
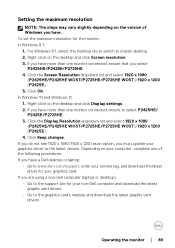
...; Go to www.dell.com/support, enter your service tag, and download the latest driver for your graphics card. If you have more than one monitor connected, ensure that you have more than one of Windows you select P2425HE/P2425E/P2725HE. 4. Operating the monitor │ 89 Right-click on the desktop and click Display settings. 2. If you are using a non-Dell computer (laptop or desktop...
...; Go to www.dell.com/support, enter your service tag, and download the latest driver for your graphics card. If you have more than one monitor connected, ensure that you have more than one of Windows you select P2425HE/P2425E/P2725HE. 4. Operating the monitor │ 89 Right-click on the desktop and click Display settings. 2. If you are using a non-Dell computer (laptop or desktop...

Monitor Users Guide
Page 100
... control buttons). Cannot adjust the monitor with the joystick OSD does not • Turn off the monitor, unplug the appear on the screen power cord, plug it back, and then turn on the monitor. • Check whether the OSD menu is centered on the keyboard. • Check whether the signal cable is white • Check the signal source. Product specific problems Specific symptoms What you press the power button or toggle the joystick No picture, the LED light is plugged in the Display menu OSD...
... control buttons). Cannot adjust the monitor with the joystick OSD does not • Turn off the monitor, unplug the appear on the screen power cord, plug it back, and then turn on the monitor. • Check whether the OSD menu is centered on the keyboard. • Check whether the signal cable is white • Check the signal source. Product specific problems Specific symptoms What you press the power button or toggle the joystick No picture, the LED light is plugged in the Display menu OSD...

Monitor Users Guide
Page 101
... Ethernet Controller is installed in the Windows Device Manager. • If your BIOS Setup has a LAN/ GBE Enabled/Disabled option, make sure it is set to confirm connectivity. Re-connect both ends of the Ethernet cable to High Data Speed. • Do not turn off the computer and unplug the USB Type-C cable and the power cord from the notebook Network dropped or • Check to...
... Ethernet Controller is installed in the Windows Device Manager. • If your BIOS Setup has a LAN/ GBE Enabled/Disabled option, make sure it is set to confirm connectivity. Re-connect both ends of the Ethernet cable to High Data Speed. • Do not turn off the computer and unplug the USB Type-C cable and the power cord from the notebook Network dropped or • Check to...


