
Monitor Users Guide
Page 4
... and USB cable 32 Connecting the HDMI cable (optional 33 Organizing cables 34 Securing your monitor using Kensington lock (optional) 35 Removing the monitor stand 36 VESA wall mounting (optional 37 Operating your monitor 38 Power on the monitor 38 Using the joystick control 38 Using the On-Screen Display (OSD) menu 39 Accessing the Menu Launcher 39 Using the navigation keys 40 Accessing the OSD menu 41 Menu and Power button lock 52 OSD warning messages 54 Setting the maximum resolution 58 Using the tilt, swivel, and vertical...
... and USB cable 32 Connecting the HDMI cable (optional 33 Organizing cables 34 Securing your monitor using Kensington lock (optional) 35 Removing the monitor stand 36 VESA wall mounting (optional 37 Operating your monitor 38 Power on the monitor 38 Using the joystick control 38 Using the On-Screen Display (OSD) menu 39 Accessing the Menu Launcher 39 Using the navigation keys 40 Accessing the OSD menu 41 Menu and Power button lock 52 OSD warning messages 54 Setting the maximum resolution 58 Using the tilt, swivel, and vertical...

Monitor Users Guide
Page 6
... crystal of the display. • Connect the power cable from potential damage and to use the monitor on monitor that support it is going to be wall mounted using the monitor, read the safety information that shipped with a sharp object. • Ensure that your monitor is electrically rated to a wall outlet that is near water. • Do not subject the monitor to remove any cover or touch the inside...
... crystal of the display. • Connect the power cable from potential damage and to use the monitor on monitor that support it is going to be wall mounted using the monitor, read the safety information that shipped with a sharp object. • Ensure that your monitor is electrically rated to a wall outlet that is near water. • Do not subject the monitor to remove any cover or touch the inside...
Monitor Users Guide
Page 9
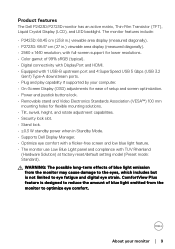
... screen optimization. • Power and joystick buttons lock. • Removable stand and Video Electronics Standards Association (VESA™) 100 mm mounting holes for lower resolutions. • Color gamut of blue light emission from the monitor to eye fatigue and digital eye strain. ComfortView Plus feature is not limited to optimize eye comfort. Product features The Dell P2423D/P2723D monitor has an active matrix, Thin-Film Transistor (TFT), Liquid Crystal Display (LCD), and LED backlight. The monitor...
... screen optimization. • Power and joystick buttons lock. • Removable stand and Video Electronics Standards Association (VESA™) 100 mm mounting holes for lower resolutions. • Color gamut of blue light emission from the monitor to eye fatigue and digital eye strain. ComfortView Plus feature is not limited to optimize eye comfort. Product features The Dell P2423D/P2723D monitor has an active matrix, Thin-Film Transistor (TFT), Liquid Crystal Display (LCD), and LED backlight. The monitor...
Monitor Users Guide
Page 11
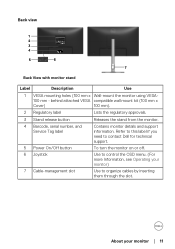
... View with monitor stand Label Description Use 1 VESA mounting holes (100 mm x Wall-mount the monitor using VESA- 100 mm - behind attached VESA compatible wall mount kit (100 mm x Cover) 100 mm). 2 Regulatory label Lists the regulatory approvals. 3 Stand release button 4 Barcode, serial number, and Service Tag label 5 Power On/Off button 6 Joystick 7 Cable-management slot Releases the stand from the monitor. Use to control the OSD menu. (For more Information, see Operating your monitor │ 11 About your monitor) Use to contact Dell...
... View with monitor stand Label Description Use 1 VESA mounting holes (100 mm x Wall-mount the monitor using VESA- 100 mm - behind attached VESA compatible wall mount kit (100 mm x Cover) 100 mm). 2 Regulatory label Lists the regulatory approvals. 3 Stand release button 4 Barcode, serial number, and Service Tag label 5 Power On/Off button 6 Joystick 7 Cable-management slot Releases the stand from the monitor. Use to control the OSD menu. (For more Information, see Operating your monitor │ 11 About your monitor) Use to contact Dell...

Monitor Users Guide
Page 12
...7 Bottom view without monitor stand Label Description Use 1 Security lock slot Secure your monitor using a security lock (based on Kensington (purchased separately) to prevent unauthorized Security Slot) movement of your monitor. 2 Power connector Connect the power cable (shipped with your monitor). 3 Stand lock To lock the stand to the monitor using a M3 x 6 mm screw (screw not included). 4 HDMI port Connect to your computer using a HDMI cable (purchased separately). 5 DisplayPort Connect to your computer using a DisplayPort cable (shipped with your monitor). 6 USB 3.2 Gen1...
...7 Bottom view without monitor stand Label Description Use 1 Security lock slot Secure your monitor using a security lock (based on Kensington (purchased separately) to prevent unauthorized Security Slot) movement of your monitor. 2 Power connector Connect the power cable (shipped with your monitor). 3 Stand lock To lock the stand to the monitor using a M3 x 6 mm screw (screw not included). 4 HDMI port Connect to your computer using a HDMI cable (purchased separately). 5 DisplayPort Connect to your computer using a DisplayPort cable (shipped with your monitor). 6 USB 3.2 Gen1...

Monitor Users Guide
Page 14
... mm Bottom 16.72 mm Adjustability Height adjustable stand 150 mm 17.77 mm Tilt -5° to 21° Swivel -45° to 45° Pivot Cable management Dell display manager compatibility Security -90° to 90° Yes Easy Arrange and other key features Security lock slot (cable lock optional purchase) Resolution specifications Model P2423D/P2723D Horizontal scan range Vertical scan range Maximum preset resolution 29 kHz to 113 kHz...
... mm Bottom 16.72 mm Adjustability Height adjustable stand 150 mm 17.77 mm Tilt -5° to 21° Swivel -45° to 45° Pivot Cable management Dell display manager compatibility Security -90° to 90° Yes Easy Arrange and other key features Security lock slot (cable lock optional purchase) Resolution specifications Model P2423D/P2723D Horizontal scan range Vertical scan range Maximum preset resolution 29 kHz to 113 kHz...
Monitor Users Guide
Page 29
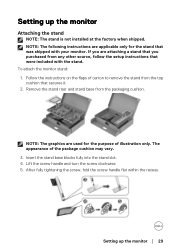
Remove the stand riser and stand base from the top cushion that was shipped with the stand. To attach the monitor stand: 1. Setting up the monitor Attaching the stand NOTE: The stand is not installed at the factory when shipped. If you are attaching a stand that you purchased from any other source, follow the setup instructions that were included with your monitor. Lift the screw handle and turn the screw clockwise. 5. NOTE...
Remove the stand riser and stand base from the top cushion that was shipped with the stand. To attach the monitor stand: 1. Setting up the monitor Attaching the stand NOTE: The stand is not installed at the factory when shipped. If you are attaching a stand that you purchased from any other source, follow the setup instructions that were included with your monitor. Lift the screw handle and turn the screw clockwise. 5. NOTE...

Monitor Users Guide
Page 30
b. Press the stand down till it snaps into place. 30 │ Setting up the monitor NOTE: Before attaching the stand assembly to the display, ensure that the front plate flap is opened to access the VESA area for assembly. 7. a. Lift the cover, as shown, to allow space for stand assembly. Fit the two tabs on the back of the display. 6. Attach the stand assembly to the groove on the upper part of the stand to the display.
b. Press the stand down till it snaps into place. 30 │ Setting up the monitor NOTE: Before attaching the stand assembly to the display, ensure that the front plate flap is opened to access the VESA area for assembly. 7. a. Lift the cover, as shown, to allow space for stand assembly. Fit the two tabs on the back of the display. 6. Attach the stand assembly to the groove on the upper part of the stand to the display.
Monitor Users Guide
Page 45
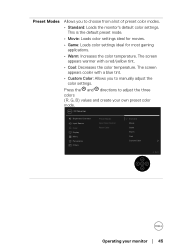
...; Warm: Increases the color temperature. The screen appears warmer with a blue tint. • Custom Color: Allows you to manually adjust the color settings. Preset Modes Allows you to choose from a list of preset color modes. • Standard: Loads the monitor's default color settings. Press the and directions to adjust the three colors (R, G, B) values and create your own preset color mode. 2X Monitor Brightness/Contrast Input Source Color Display Menu Personalize Others Preset Modes Input Color Format Reset Color Standard Movie Game Warm...
...; Warm: Increases the color temperature. The screen appears warmer with a blue tint. • Custom Color: Allows you to manually adjust the color settings. Preset Modes Allows you to choose from a list of preset color modes. • Standard: Loads the monitor's default color settings. Press the and directions to adjust the three colors (R, G, B) values and create your own preset color mode. 2X Monitor Brightness/Contrast Input Source Color Display Menu Personalize Others Preset Modes Input Color Format Reset Color Standard Movie Game Warm...
Monitor Users Guide
Page 46
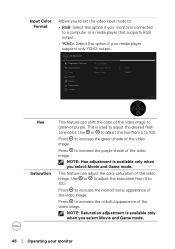
... Monitor Brightness/Contrast Input Source Color Display Menu Personalize Others Preset Modes Input Color Format Reset Color RGB YCbCr Exit Hue Saturation This feature can adjust the color saturation of the video image to green or purple. Press to 100. Use or to adjust the saturation from 0 to increase the purple shade of the video image. NOTE: Saturation adjustment is available only when you to set the video input mode to: • RGB: Select this option if your monitor is connected...
... Monitor Brightness/Contrast Input Source Color Display Menu Personalize Others Preset Modes Input Color Format Reset Color RGB YCbCr Exit Hue Saturation This feature can adjust the color saturation of the video image to green or purple. Press to 100. Use or to adjust the saturation from 0 to increase the purple shade of the video image. NOTE: Saturation adjustment is available only when you to set the video input mode to: • RGB: Select this option if your monitor is connected...

Monitor Users Guide
Page 47
... 5:4. Operating your monitor's color settings to the factory default. Use the display to adjust image. 2X Monitor Brightness/Contrast Input Source Color Display Menu Personalize Others Aspect Ratio Sharpness Response Time Reset Display 16 : 9 50 Normal Exit Aspect Ratio Adjusts the image ratio to 100. Response Time Allows you to set the Response Time to the factory default values. Reset Display Resets all display settings to Normal or Fast. Reset Color Display Resets your monitor │ 47 Sharpness This feature can make the image look sharper...
... 5:4. Operating your monitor's color settings to the factory default. Use the display to adjust image. 2X Monitor Brightness/Contrast Input Source Color Display Menu Personalize Others Aspect Ratio Sharpness Response Time Reset Display 16 : 9 50 Normal Exit Aspect Ratio Adjusts the image ratio to 100. Response Time Allows you to set the Response Time to the factory default values. Reset Display Resets all display settings to Normal or Fast. Reset Color Display Resets your monitor │ 47 Sharpness This feature can make the image look sharper...
Monitor Users Guide
Page 50
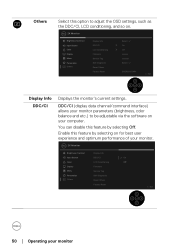
... best user experience and optimum performance of your monitor. 2X Monitor Brightness/Contrast Display Info Input Source DDC/CI On Color LCD Conditioning O Display Firmware Menu Service Tag Personalize Others Self-Diagnostic Reset Others Factory Reset Exit 50 │ Operating your monitor parameters (brightness, color balance and etc.) to adjust the OSD settings, such as the DDC/CI, LCD conditioning, and so on your computer. Others Select this option to be adjustable via the software on . 2X Monitor Brightness/Contrast Input Source Color Display Menu...
... best user experience and optimum performance of your monitor. 2X Monitor Brightness/Contrast Display Info Input Source DDC/CI On Color LCD Conditioning O Display Firmware Menu Service Tag Personalize Others Self-Diagnostic Reset Others Factory Reset Exit 50 │ Operating your monitor parameters (brightness, color balance and etc.) to adjust the OSD settings, such as the DDC/CI, LCD conditioning, and so on your computer. Others Select this option to be adjustable via the software on . 2X Monitor Brightness/Contrast Input Source Color Display Menu...

Monitor Users Guide
Page 54
...? Do you wish to unlock the buttons on the display. Recommended mode is activated: 54 │ Operating your monitor Unlocking the OSD menu and Power buttons: 1. Press and hold the Up or Down or Left or Right direction for the Horizontal and Vertical frequency ranges addressable by this monitor. OSD warning messages When the monitor does not support a particular resolution mode, the following message before the Lock function is 2560...
...? Do you wish to unlock the buttons on the display. Recommended mode is activated: 54 │ Operating your monitor Unlocking the OSD menu and Power buttons: 1. Press and hold the Up or Down or Left or Right direction for the Horizontal and Vertical frequency ranges addressable by this monitor. OSD warning messages When the monitor does not support a particular resolution mode, the following message before the Lock function is 2560...

Monitor Users Guide
Page 55
... to lock the Menu Buttons? Are you sure you want to the connected input signal. Yes No When the monitor goes into power-save mode, the following message appears: Going into Standby mode in 4 minutes. www.dell.com/P2X23D or No DP Cable The display will enter Standby Mode after 4 minutes if left at this state. The monitor will go into Standby mode in 4 minutes. No HDMI Cable The display will...
... to lock the Menu Buttons? Are you sure you want to the connected input signal. Yes No When the monitor goes into power-save mode, the following message appears: Going into Standby mode in 4 minutes. www.dell.com/P2X23D or No DP Cable The display will enter Standby Mode after 4 minutes if left at this state. The monitor will go into Standby mode in 4 minutes. No HDMI Cable The display will...
Monitor Users Guide
Page 58
... https://www.dell.com/support, enter your service tag, and download the latest driver for your graphics driver to switch toclassic desktop. 2. Right-click on the desktop and click Display settings. 2. Click the Display Resolution dropdown list and select 2560 x 1440. 4. Depending on your computer, complete one monitor connected, ensure that you have more than one of Windows you must update your graphics card. Click OK...
... https://www.dell.com/support, enter your service tag, and download the latest driver for your graphics driver to switch toclassic desktop. 2. Right-click on the desktop and click Display settings. 2. Click the Display Resolution dropdown list and select 2560 x 1440. 4. Depending on your computer, complete one monitor connected, ensure that you have more than one of Windows you must update your graphics card. Click OK...

Monitor Users Guide
Page 63
... power LED remains white. Also, depending upon the selected input, one of the procedures in this section, follow the Safety instructions. No HDMI Cable The display will go into Standby mode in 4 minutes. www.dell.com/P2X23D 4. This box also appears during normal system operation, if the video cable becomes disconnected or damaged. Troubleshooting │ 63 Turn off both your monitor and computer are properly connected...
... power LED remains white. Also, depending upon the selected input, one of the procedures in this section, follow the Safety instructions. No HDMI Cable The display will go into Standby mode in 4 minutes. www.dell.com/P2X23D 4. This box also appears during normal system operation, if the video cable becomes disconnected or damaged. Troubleshooting │ 63 Turn off both your monitor and computer are properly connected...

Monitor Users Guide
Page 64
... your monitor and reconnect the video cable; Press the Joystick buttton to launch the OSD Menu Launcher and move the Joystick up to select " " to initiate the selfdiagnostic process. 2X Monitor Brightness/Contrast Display Info Input Source DDC/CI Color LCD Conditioning Display Firmware Menu Personalize Service Tag Self-Diagnostic Select Others Reset Others Factory Reset Exit 64 │ Troubleshooting Move the Joystick to select Others > Self-Diagnostic to open Main Menu. Turn Off...
... your monitor and reconnect the video cable; Press the Joystick buttton to launch the OSD Menu Launcher and move the Joystick up to select " " to initiate the selfdiagnostic process. 2X Monitor Brightness/Contrast Display Info Input Source DDC/CI Color LCD Conditioning Display Firmware Menu Personalize Service Tag Self-Diagnostic Select Others Reset Others Factory Reset Exit 64 │ Troubleshooting Move the Joystick to select Others > Self-Diagnostic to open Main Menu. Turn Off...

Monitor Users Guide
Page 68
... Picture missing color Picture color not good • Reset the monitor to Factory Settings (Factory Reset). • Perform monitor self-test feature check to determine if the scrambled screen appears in self-test mode. • Check for bent or broken pins in the video cable connector. • Restart the computer in the safe mode. • Do not perform any troubleshooting steps. • Contact Dell immediately. • Ensure that the video cable connecting the monitor to...
... Picture missing color Picture color not good • Reset the monitor to Factory Settings (Factory Reset). • Perform monitor self-test feature check to determine if the scrambled screen appears in self-test mode. • Check for bent or broken pins in the video cable connector. • Restart the computer in the safe mode. • Do not perform any troubleshooting steps. • Contact Dell immediately. • Ensure that the video cable connecting the monitor to...
Monitor Users Guide
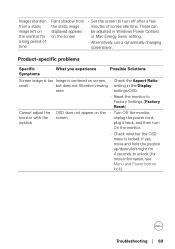
Page 69
... monitor to Factory Settings (Factory Reset). Cannot adjust the monitor with the joystick OSD does not appear on the screen • Turn Off the monitor, unplug the power cord, plug it back, and then turn off after a few the static image minutes of time Faint shadow from a static image left on the screen or Mac Energy Saver setting. • Alternatively, use a dynamically changing screensaver. Image retention from • Set the screen to turn On the monitor. • Check...
... monitor to Factory Settings (Factory Reset). Cannot adjust the monitor with the joystick OSD does not appear on the screen • Turn Off the monitor, unplug the power cord, plug it back, and then turn off after a few the static image minutes of time Faint shadow from a static image left on the screen or Mac Energy Saver setting. • Alternatively, use a dynamically changing screensaver. Image retention from • Set the screen to turn On the monitor. • Check...
Display Manager Users Guide
Page 20
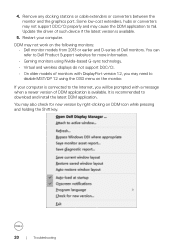
... application to disable MST/DP 1.2 using Nvidia-based G-sync technology. • Virtual and wireless displays do not support DDC/CI. • On older models of monitors with a message when a newer version of DDM application is connected to download and install the latest DDM application. If your computer. Remove any docking stations or cable extenders or converters between the monitor and the graphics port. Some low...
... application to disable MST/DP 1.2 using Nvidia-based G-sync technology. • Virtual and wireless displays do not support DDC/CI. • On older models of monitors with a message when a newer version of DDM application is connected to download and install the latest DDM application. If your computer. Remove any docking stations or cable extenders or converters between the monitor and the graphics port. Some low...


