
Users Guide
Page 6
VGA cable DP Cable USB 3.0 Upstream Cable (Enables the USB Ports on the Monitor) ∞∞ Quick Setup Guide ∞∞ Safety and Regulatory Information 6 | About your monitor
VGA cable DP Cable USB 3.0 Upstream Cable (Enables the USB Ports on the Monitor) ∞∞ Quick Setup Guide ∞∞ Safety and Regulatory Information 6 | About your monitor

Users Guide
Page 27
To attach the monitor stand. 1. When any other stand is bought, please refer to the respective stand setup guide for stand assembly. After fully tightening the screw, fold the screw handle flat within the recess. 5. Lift the cover, as shown, to remove the ...
To attach the monitor stand. 1. When any other stand is bought, please refer to the respective stand setup guide for stand assembly. After fully tightening the screw, fold the screw handle flat within the recess. 5. Lift the cover, as shown, to remove the ...
Users Guide
Page 30
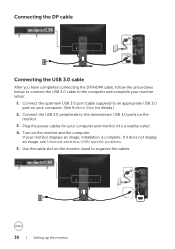
... the monitor stand to the computer and complete your monitor displays an image, installation is complete. Plug the power cables for details.) 2. If your monitor setup: 1. If it does not display an image, see Universal serial bus (USB) specific problems. 5. Connect the USB 3.0 peripherals to an appropriate USB 3.0 port on the...
... the monitor stand to the computer and complete your monitor displays an image, installation is complete. Plug the power cables for details.) 2. If your monitor setup: 1. If it does not display an image, see Universal serial bus (USB) specific problems. 5. Connect the USB 3.0 peripherals to an appropriate USB 3.0 port on the...

Users Guide
Page 32
Press and hold the stand release button. 3. Disconnecting the monitor stand NOTE: To prevent scratches on the LCD screen while removing the stand, ensure that the monitor is applicable for the set-up the monitor Lift the stand up and away from the monitor. 3 2 32 | Setting up instructions. NOTE: This is placed on a soft cloth or cushion. 2. When any other stand is bought, please refer to the respective stand setup guide for a monitor with a stand. To remove the stand: 1. Place the monitor on a soft and clean surface.
Press and hold the stand release button. 3. Disconnecting the monitor stand NOTE: To prevent scratches on the LCD screen while removing the stand, ensure that the monitor is applicable for the set-up the monitor Lift the stand up and away from the monitor. 3 2 32 | Setting up instructions. NOTE: This is placed on a soft cloth or cushion. 2. When any other stand is bought, please refer to the respective stand setup guide for a monitor with a stand. To remove the stand: 1. Place the monitor on a soft and clean surface.

Users Guide
Page 40
... or attached cables. Auto Adjust Use this key to the incoming video signal. Auto adjustment allows the monitor to self-adjust to activate automatic setup and adjust menu. Dell P2418HZm Brightness / Contrast Auto Adjust Input Source Color Display Energy Menu Others Resolution: 1920x1080, 60Hz Energy Use Press to the current input: Auto Adjustment...
... or attached cables. Auto Adjust Use this key to the incoming video signal. Auto adjustment allows the monitor to self-adjust to activate automatic setup and adjust menu. Dell P2418HZm Brightness / Contrast Auto Adjust Input Source Color Display Energy Menu Others Resolution: 1920x1080, 60Hz Energy Use Press to the current input: Auto Adjustment...

Users Guide
Page 51
... the Tilt, Swivel, and Vertical Extension NOTE: This is shipped from the factory. When any other stand is bought, please refer to the respective stand setup guide for a monitor with a stand. Vertical Extension NOTE: The stand extends vertically up instructions. Tilt, Swivel With the stand attached to extend the stand vertically...
... the Tilt, Swivel, and Vertical Extension NOTE: This is shipped from the factory. When any other stand is bought, please refer to the respective stand setup guide for a monitor with a stand. Vertical Extension NOTE: The stand extends vertically up instructions. Tilt, Swivel With the stand attached to extend the stand vertically...
Users Guide
Page 54
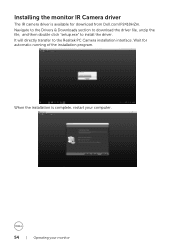
It will directly transfer to install the driver. Installing the monitor IR Camera driver The IR camera driver is complete, restart your computer. 54 | Operating your monitor When the installation is available for automatic running of the installation program. Wait for download from Dell.com/P2418HZm. Navigate to the Drivers & Downloads section to download the driver file, unzip the file, and then double click "setup.exe" to the Realtek PC Camera installation interface.
It will directly transfer to install the driver. Installing the monitor IR Camera driver The IR camera driver is complete, restart your computer. 54 | Operating your monitor When the installation is available for automatic running of the installation program. Wait for download from Dell.com/P2418HZm. Navigate to the Drivers & Downloads section to download the driver file, unzip the file, and then double click "setup.exe" to the Realtek PC Camera installation interface.

Users Guide
Page 56
Once you've done that, the options to set up a PIN. Enter New PIN and Confirm PIN, and then click OK. Click Set up under PIN enter to Set up Windows Hello will unlock. The following message is displayed, click Get started. 56 | Operating your monitor Click Add under Windows Hello, enter to Windows Hello setup.
Once you've done that, the options to set up a PIN. Enter New PIN and Confirm PIN, and then click OK. Click Set up under PIN enter to Set up Windows Hello will unlock. The following message is displayed, click Get started. 56 | Operating your monitor Click Add under Windows Hello, enter to Windows Hello setup.

Users Guide
Page 57
The webcam will then register your face is displayed, click Close to exit Windows Hello setup. When the following message is in the center of the frame that your face. Keep looking directly at your screen and position yourself so that appears on screen. Operating your monitor | 57
The webcam will then register your face is displayed, click Close to exit Windows Hello setup. When the following message is in the center of the frame that your face. Keep looking directly at your screen and position yourself so that appears on screen. Operating your monitor | 57