
Monitor Users Guide
Page 3
Contents About Your Monitor 5 Package Contents 5 Product Features 7 Identifying Parts and Controls 8 Monitor Specifications 12 Plug and Play Capability 23 Universal Serial Bus (USB) Interface 24 LCD Monitor Quality and Pixel Policy 26 Maintenance Guidelines 26 Setting Up the Monitor 27 Attaching the Stand 27 Connecting Your Monitor 29 Organizing Your Cables 31 Removing the Monitor Stand 31 Wall Mounting (Optional 32 Operating the Monitor 33 Power On the Monitor 33 Using the Front-Panel Controls 33 Using the On-Screen Display (OSD) Menu 35 Contents | 3
Contents About Your Monitor 5 Package Contents 5 Product Features 7 Identifying Parts and Controls 8 Monitor Specifications 12 Plug and Play Capability 23 Universal Serial Bus (USB) Interface 24 LCD Monitor Quality and Pixel Policy 26 Maintenance Guidelines 26 Setting Up the Monitor 27 Attaching the Stand 27 Connecting Your Monitor 29 Organizing Your Cables 31 Removing the Monitor Stand 31 Wall Mounting (Optional 32 Operating the Monitor 33 Power On the Monitor 33 Using the Front-Panel Controls 33 Using the On-Screen Display (OSD) Menu 35 Contents | 3

Monitor Users Guide
Page 5
NOTE: To set up with the components shown below. Monitor Stand Riser Stand Base About Your Monitor | 5 Ensure that you have received all the components and Contact Dell if something is missing. About Your Monitor Package Contents Your monitor ships with any other stand, please refer to the respective stand setup guide for setup instructions. NOTE: Some items may not ship with your monitor. Some features or media may not be optional and may be available in certain countries.
NOTE: To set up with the components shown below. Monitor Stand Riser Stand Base About Your Monitor | 5 Ensure that you have received all the components and Contact Dell if something is missing. About Your Monitor Package Contents Your monitor ships with any other stand, please refer to the respective stand setup guide for setup instructions. NOTE: Some items may not ship with your monitor. Some features or media may not be optional and may be available in certain countries.
Monitor Users Guide
Page 7
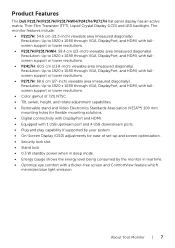
... lower resolutions. • Color gamut of 72% NTSC. • Tilt, swivel, height, and rotate adjustment capabilities. • Removable stand and Video Electronics Standards Association (VESA™) 100 mm mounting holes for flexible mounting solutions. • Digital connectivity with DisplayPort and HDMI...DisplayPort, and HDMI, with a flicker-free screen and ComfortView feature which minimizes blue light emission. Product Features The Dell P2217H/P2317H/P2317HWH/P2417H/P2717H flat panel display has an active matrix, Thin-Film Transistor (TFT), Liquid Crystal Display (LCD) and LED backlight...
... lower resolutions. • Color gamut of 72% NTSC. • Tilt, swivel, height, and rotate adjustment capabilities. • Removable stand and Video Electronics Standards Association (VESA™) 100 mm mounting holes for flexible mounting solutions. • Digital connectivity with DisplayPort and HDMI...DisplayPort, and HDMI, with a flicker-free screen and ComfortView feature which minimizes blue light emission. Product Features The Dell P2217H/P2317H/P2317HWH/P2417H/P2717H flat panel display has an active matrix, Thin-Film Transistor (TFT), Liquid Crystal Display (LCD) and LED backlight...
Monitor Users Guide
Page 9
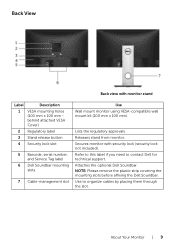
... monitor. Secures monitor with monitor stand Label Description 1 VESA mounting holes (100 mm x 100 mm behind attached VESA Cover) 2 Regulatory label 3 Stand release button 4 Security lock slot 5 Barcode, serial number, and Service Tag label 6 Dell Soundbar mounting slots 7 Cable-management ...slot Use Wall mount monitor using VESA-compatible wall mount kit (100 mm x 100 mm). Use to contact Dell for technical support...
... monitor. Secures monitor with monitor stand Label Description 1 VESA mounting holes (100 mm x 100 mm behind attached VESA Cover) 2 Regulatory label 3 Stand release button 4 Security lock slot 5 Barcode, serial number, and Service Tag label 6 Dell Soundbar mounting slots 7 Cable-management ...slot Use Wall mount monitor using VESA-compatible wall mount kit (100 mm x 100 mm). Use to contact Dell for technical support...

Monitor Users Guide
Page 11
.... Connect the USB cable (shipped with your computer. Connect USB device. About Your Monitor | 11 Bottom View Bottom view without monitor stand Label Description 1 Power cable connector 2 HDMI port 3 DisplayPort 4 Stand lock feature 5 VGA connector 6 USB upstream port 7 USB downstream port Use Connect the power cable. Connect your computer with HDMI cable...
.... Connect the USB cable (shipped with your computer. Connect USB device. About Your Monitor | 11 Bottom View Bottom view without monitor stand Label Description 1 Power cable connector 2 HDMI port 3 DisplayPort 4 Stand lock feature 5 VGA connector 6 USB upstream port 7 USB downstream port Use Connect the power cable. Connect your computer with HDMI cable...

Monitor Users Guide
Page 13
...1 (Dynamic) Anti-Glare with 3H hardness White LED edgelight system 6 ms (gray to 45° Pivot 90° (clockwise) Dell Display Manager Yes Compatibility Security Security lock slot (cable lock sold separately) Model Screen type Panel technology Aspect ratio Viewable image Diagonal Horizontal,... Contrast ratio Display screen coating Backlight Response time (typical) Color depth Color gamut Built-in devices P2417H P2717H Active matrix - Height adjustable stand 130 mm Tilt -5° to 21° Swivel -45° to gray) 16.7 million colors 82% NTSC (CIE1976)* •...
...1 (Dynamic) Anti-Glare with 3H hardness White LED edgelight system 6 ms (gray to 45° Pivot 90° (clockwise) Dell Display Manager Yes Compatibility Security Security lock slot (cable lock sold separately) Model Screen type Panel technology Aspect ratio Viewable image Diagonal Horizontal,... Contrast ratio Display screen coating Backlight Response time (typical) Color depth Color gamut Built-in devices P2417H P2717H Active matrix - Height adjustable stand 130 mm Tilt -5° to 21° Swivel -45° to gray) 16.7 million colors 82% NTSC (CIE1976)* •...
Monitor Users Guide
Page 14
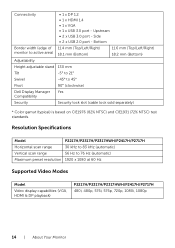
Resolution Specifications Model P2217H/P2317H/P2317HWH/P2417H/P2717H Horizontal scan range 30 kHz to 83 kHz (automatic) Vertical scan range 56 Hz to 45° Pivot 90° (clockwise) Dell Display Manager Yes Compatibility Security Security lock slot (cable lock sold separately) * Color gamut (typical) is based...(Top/Left/Right) monitor to active area) 18.1 mm (Bottom) 11.6 mm (Top/Left/Right) 18.2 mm (Bottom) Adjustability Height adjustable stand 130 mm Tilt -5° to 21° Swivel -45° to 76 Hz (automatic) Maximum preset resolution 1920 x 1080 at 60 Hz ...
Resolution Specifications Model P2217H/P2317H/P2317HWH/P2417H/P2717H Horizontal scan range 30 kHz to 83 kHz (automatic) Vertical scan range 56 Hz to 45° Pivot 90° (clockwise) Dell Display Manager Yes Compatibility Security Security lock slot (cable lock sold separately) * Color gamut (typical) is based...(Top/Left/Right) monitor to active area) 18.1 mm (Bottom) 11.6 mm (Top/Left/Right) 18.2 mm (Bottom) Adjustability Height adjustable stand 130 mm Tilt -5° to 21° Swivel -45° to 76 Hz (automatic) Maximum preset resolution 1920 x 1080 at 60 Hz ...
Monitor Users Guide
Page 16
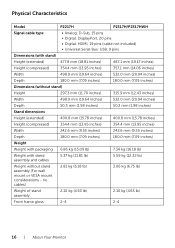
Physical Characteristics Model P2217H P2317H/P2317HWH Signal cable type • Analog: D-Sub, 15 pins • Digital: DisplayPort, 20 pins • Digital: HDMI, 19 pins (cable not included) • Universal Serial Bus: USB, 9 pins Dimensions (with stand) Height (extended) 477.8 mm (18.81 inches) 487.1 mm (19.17 inches)...12.43 inches) Width 498.9 mm (19.64 inches) 532.0 mm (20.94 inches) Depth 50.3 mm (1.98 inches) 50.3 mm (1.98 inches) Stand dimensions Height (extended) 400.8 mm (15.78 inches) 400.8 mm (15.78 inches) Height (compressed) 354.4 mm (13.95 inches) 354.4 mm ...
Physical Characteristics Model P2217H P2317H/P2317HWH Signal cable type • Analog: D-Sub, 15 pins • Digital: DisplayPort, 20 pins • Digital: HDMI, 19 pins (cable not included) • Universal Serial Bus: USB, 9 pins Dimensions (with stand) Height (extended) 477.8 mm (18.81 inches) 487.1 mm (19.17 inches)...12.43 inches) Width 498.9 mm (19.64 inches) 532.0 mm (20.94 inches) Depth 50.3 mm (1.98 inches) 50.3 mm (1.98 inches) Stand dimensions Height (extended) 400.8 mm (15.78 inches) 400.8 mm (15.78 inches) Height (compressed) 354.4 mm (13.95 inches) 354.4 mm ...
Monitor Users Guide
Page 17
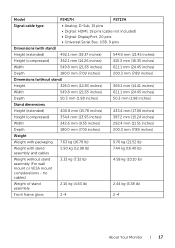
... D-Sub, 15 pins • Digital: HDMI, 19 pins (cable not included) • Digital: DisplayPort, 20 pins • Universal Serial Bus: USB, 9 pins Dimensions (with stand) Height (extended) 492.1 mm (19.37 inches) 544.9 mm (21.45 inches) Height (compressed) 362.1 mm (14.26 inches) 415.3 mm (16.35 inches) Width....1 mm (14.41 inches) Width 549.8 mm (21.65 inches) 621.1 mm (24.45 inches) Depth 50.3 mm (1.98 inches) 50.3 mm (1.98 inches) Stand dimensions Height (extended) 400.8 mm (15.78 inches) 433.4 mm (17.06 inches) Height (compressed) 354.4 mm (13.95 inches) 387.2 mm (15.24 ...
... D-Sub, 15 pins • Digital: HDMI, 19 pins (cable not included) • Digital: DisplayPort, 20 pins • Universal Serial Bus: USB, 9 pins Dimensions (with stand) Height (extended) 492.1 mm (19.37 inches) 544.9 mm (21.45 inches) Height (compressed) 362.1 mm (14.26 inches) 415.3 mm (16.35 inches) Width....1 mm (14.41 inches) Width 549.8 mm (21.65 inches) 621.1 mm (24.45 inches) Depth 50.3 mm (1.98 inches) 50.3 mm (1.98 inches) Stand dimensions Height (extended) 400.8 mm (15.78 inches) 433.4 mm (17.06 inches) Height (compressed) 354.4 mm (13.95 inches) 387.2 mm (15.24 ...

Monitor Users Guide
Page 27
...instructions on the flaps of carton to the respective stand setup guide for a monitor with a stand. Setting Up the Monitor | 27 NOTE: This is applicable for the set-up instructions. Setting Up the Monitor Attaching the Stand NOTE: The stand is detached when the monitor is shipped from the... top cushion that secures it. 2 Insert the stand base blocks fully into the stand slot. 3 Lift the screw handle and turn the screw clockwise. 4...
...instructions on the flaps of carton to the respective stand setup guide for a monitor with a stand. Setting Up the Monitor | 27 NOTE: This is applicable for the set-up instructions. Setting Up the Monitor Attaching the Stand NOTE: The stand is detached when the monitor is shipped from the... top cushion that secures it. 2 Insert the stand base blocks fully into the stand slot. 3 Lift the screw handle and turn the screw clockwise. 4...
Monitor Users Guide
Page 28
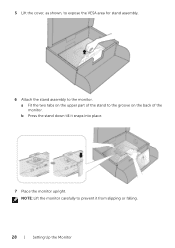
b Press the stand down till it from slipping or falling. 28 | Setting Up the Monitor NOTE: Lift the monitor carefully to prevent it snaps into place. 7 Place the monitor upright. a Fit the two tabs on the back of the monitor. 5 Lift the cover, as shown, to expose the VESA area for stand assembly. 6 Attach the stand assembly to the groove on the upper part of the stand to the monitor.
b Press the stand down till it from slipping or falling. 28 | Setting Up the Monitor NOTE: Lift the monitor carefully to prevent it snaps into place. 7 Place the monitor upright. a Fit the two tabs on the back of the monitor. 5 Lift the cover, as shown, to expose the VESA area for stand assembly. 6 Attach the stand assembly to the groove on the upper part of the stand to the monitor.

Monitor Users Guide
Page 30
...) to an appropriate USB 3.0 port on your computer. (See Bottom View for details.) 2 Connect the USB 3.0 peripherals to the downstream USB 3.0 ports on the monitor stand to organize the cables. 30 | Setting Up the Monitor If your monitor displays an image, installation is complete. Appearance of illustration only. Connecting the HDMI...
...) to an appropriate USB 3.0 port on your computer. (See Bottom View for details.) 2 Connect the USB 3.0 peripherals to the downstream USB 3.0 ports on the monitor stand to organize the cables. 30 | Setting Up the Monitor If your monitor displays an image, installation is complete. Appearance of illustration only. Connecting the HDMI...

Monitor Users Guide
Page 31
... (See Connecting Your Monitor for a monitor with a stand. When any other stand is applicable for cable attachment,) organize all cables as shown above. Removing the Monitor Stand NOTE: To prevent scratches on the LCD screen while removing the stand, ensure that the monitor is placed on a soft ...cloth or cushion. 2 Press and hold the stand release button. 3 Lift the stand up instructions. .To remove the stand: 1 Place the monitor on ...
... (See Connecting Your Monitor for a monitor with a stand. When any other stand is applicable for cable attachment,) organize all cables as shown above. Removing the Monitor Stand NOTE: To prevent scratches on the LCD screen while removing the stand, ensure that the monitor is placed on a soft ...cloth or cushion. 2 Press and hold the stand release button. 3 Lift the stand up instructions. .To remove the stand: 1 Place the monitor on ...
Monitor Users Guide
Page 32
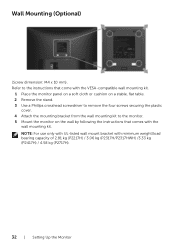
...come with the VESA-compatible wall mounting kit. 1 Place the monitor panel on a soft cloth or cushion on a stable, flat table. 2 Remove the stand. 3 Use a Phillips crosshead screwdriver to remove the four screws securing the plastic cover. 4 Attach the mounting bracket from the wall mounting kit to the .... 5 Mount the monitor on the wall by following the instructions that comes with minimum weight/load bearing capacity of 2.81 kg (P2217H) / 3.06 kg (P2317H/P2317HWH) /3.33 kg (P2417H) / 4.58 kg (P2717H). 32 | Setting Up the Monitor NOTE: For use only with UL-listed wall mount bracket with ...
...come with the VESA-compatible wall mounting kit. 1 Place the monitor panel on a soft cloth or cushion on a stable, flat table. 2 Remove the stand. 3 Use a Phillips crosshead screwdriver to remove the four screws securing the plastic cover. 4 Attach the mounting bracket from the wall mounting kit to the .... 5 Mount the monitor on the wall by following the instructions that comes with minimum weight/load bearing capacity of 2.81 kg (P2217H) / 3.06 kg (P2317H/P2317HWH) /3.33 kg (P2417H) / 4.58 kg (P2717H). 32 | Setting Up the Monitor NOTE: For use only with UL-listed wall mount bracket with ...

Monitor Users Guide
Page 51
Vertical Extension NOTE: The stand extends vertically up instructions. Tilt, Swivel With the stand attached to 130 mm. Using the Tilt, Swivel, and Vertical Extension NOTE: This is bought, please refer to the respective stand setup guide for set-up to the monitor, you can tilt and swivel the monitor for the most comfortable viewing angle. When any other stand is applicable for a monitor with a stand. The figure below illustrates how to extend the stand vertically. Operating the Monitor | 51 NOTE: The stand is detached when the monitor is shipped from the factory.
Vertical Extension NOTE: The stand extends vertically up instructions. Tilt, Swivel With the stand attached to 130 mm. Using the Tilt, Swivel, and Vertical Extension NOTE: This is bought, please refer to the respective stand setup guide for set-up to the monitor, you can tilt and swivel the monitor for the most comfortable viewing angle. When any other stand is applicable for a monitor with a stand. The figure below illustrates how to extend the stand vertically. Operating the Monitor | 51 NOTE: The stand is detached when the monitor is shipped from the factory.


