

User's Guide
Page 8
... x 100 mm - Side View Back view Back view with security cable lock. 5 Dell Soundbar mounting brackets Attaches the optional Dell Soundbar. 6 Barcode serial number label Refer to this label if you need to contact Dell for technical support. 7 USB downstream ports Connect your USB devices. 8 Cable management slot Use to organize cables by placing...
... x 100 mm - Side View Back view Back view with security cable lock. 5 Dell Soundbar mounting brackets Attaches the optional Dell Soundbar. 6 Barcode serial number label Refer to this label if you need to contact Dell for technical support. 7 USB downstream ports Connect your USB devices. 8 Cable management slot Use to organize cables by placing...

User's Guide
Page 9
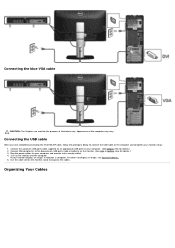
Connect your computer DVI cable. Connect the power cord for Dell Soundbar 3 DVI connector 4 VGA connector 5 USB upstream port Bottom view with your monitor to the monitor and the computer. Once this cable is connected, you can use the USB connectors on the side of the monitor. Connect your computer VGA cable. Connect the USB cable that came with monitor stand Use Connect the power cable. Left view Bottom View Right view Bottom view Label Description 1 AC power cord connector 2 DC power connector for the soundbar (optional).
Connect your computer DVI cable. Connect the power cord for Dell Soundbar 3 DVI connector 4 VGA connector 5 USB upstream port Bottom view with your monitor to the monitor and the computer. Once this cable is connected, you can use the USB connectors on the side of the monitor. Connect your computer VGA cable. Connect the USB cable that came with monitor stand Use Connect the power cable. Left view Bottom View Right view Bottom view Label Description 1 AC power cord connector 2 DC power connector for the soundbar (optional).

User's Guide
Page 14
Pin Assignmentss VGA Connector Pin 15-pin Side of the Connected Signal Cable Number 1 Video-Red 2 Video-Green 3 Video-Blue 4 GND 5 Self-test 6 GND-R 7 GND-G 8 GND-B 9 Computer 5V/3.3V 10 GND-sync 11 GND 12 DDC data 13 H-sync 14 V-sync 15 DDC clock DVI Connector
Pin Assignmentss VGA Connector Pin 15-pin Side of the Connected Signal Cable Number 1 Video-Red 2 Video-Green 3 Video-Blue 4 GND 5 Self-test 6 GND-R 7 GND-G 8 GND-B 9 Computer 5V/3.3V 10 GND-sync 11 GND 12 DDC data 13 H-sync 14 V-sync 15 DDC clock DVI Connector

User's Guide
Page 15
Pin Number 1 2 3 4 5 6 7 8 9 10 11 12 13 14 15 16 17 18 19 20 21 22 24-pin Side of the Connected Signal Cable TMDS RX2TMDS RX2+ TMDS Ground Floating Floating DDC Clock DDC Data Floating TMDS RX1TMDS RX1+ TMDS Ground Floating Floating +5V/+3.3V power Self test Hot Plug Detect TMDS RX0TMDS RX0+ TMDS Ground Floating Floating TMDS Ground
Pin Number 1 2 3 4 5 6 7 8 9 10 11 12 13 14 15 16 17 18 19 20 21 22 24-pin Side of the Connected Signal Cable TMDS RX2TMDS RX2+ TMDS Ground Floating Floating DDC Clock DDC Data Floating TMDS RX1TMDS RX1+ TMDS Ground Floating Floating +5V/+3.3V power Self test Hot Plug Detect TMDS RX0TMDS RX0+ TMDS Ground Floating Floating TMDS Ground
User's Guide
Page 19
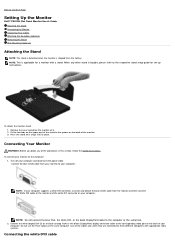
... computer and disconnect the power cable. Use all the cables only when they are connected to Contents Page Setting Up the Monitor Dell™ P2012H Flat Panel Monitor User's Guide Attaching the Stand Connecting the Monitor Organizing Your Cables Attaching the Soundbar (optional) Removing the Stand Wall Mounting (Optional) Attaching the Stand NOTE: The...
... computer and disconnect the power cable. Use all the cables only when they are connected to Contents Page Setting Up the Monitor Dell™ P2012H Flat Panel Monitor User's Guide Attaching the Stand Connecting the Monitor Organizing Your Cables Attaching the Soundbar (optional) Removing the Stand Wall Mounting (Optional) Attaching the Stand NOTE: The...
User's Guide
Page 20
Turn on your monitor displays an image, installation is complete. If it does not display an image, see Solving Problems. 5. Organizing Your Cables Connect the upstream USB port (cable supplied) to an appropriate USB port on the monitor and the computer. Use the cable slot on the monitor.... The Graphics are used for the purpose of the computer may vary. Connecting the USB cable After you have completed connecting the DVI/VGA/DP cable, follow the procedure below to connect the USB cable to organize the cables. Connect USB peripherals to the downstream USB ports (side or bottom) on the...
Turn on your monitor displays an image, installation is complete. If it does not display an image, see Solving Problems. 5. Organizing Your Cables Connect the upstream USB port (cable supplied) to an appropriate USB port on the monitor and the computer. Use the cable slot on the monitor.... The Graphics are used for the purpose of the computer may vary. Connecting the USB cable After you have completed connecting the DVI/VGA/DP cable, follow the procedure below to connect the USB cable to organize the cables. Connect USB peripherals to the downstream USB ports (side or bottom) on the...
User's Guide
Page 21
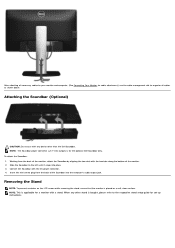
...set up instructions. Working from the back of the Soundbar into place. 3. After attaching all necessary cables to your monitor and computer, (See Connecting Your Monitor for cable attachment,) use with the two tabs along the bottom of the monitor, attach the Soundbar by aligning the two slots ...with any other than the Dell Soundbar. Attaching the Soundbar (Optional) CAUTION: Do not use the cable management slot to organize all cables as shown above. Removing the Stand...
...set up instructions. Working from the back of the Soundbar into place. 3. After attaching all necessary cables to your monitor and computer, (See Connecting Your Monitor for cable attachment,) use with the two tabs along the bottom of the monitor, attach the Soundbar by aligning the two slots ...with any other than the Dell Soundbar. Attaching the Soundbar (Optional) CAUTION: Do not use the cable management slot to organize all cables as shown above. Removing the Stand...

User's Guide
Page 25
.... Use the Color Settings to select the DVI input source. NOTE: Auto Adjust option is only available when you can further tune your monitor is connected to : RGB: Select this option if your monitor. Auto Adjust Even though your computer recognizes your monitor on startup, the Auto Adjustment function optimizes...option if your monitor by using the analog (VGA) connector. Use the Input Source menu to select between different video signals that may be connected to select the Auto Select, the monitor will auto detect either VGA input or DVI-D input or DislpayPort input.
.... Use the Color Settings to select the DVI input source. NOTE: Auto Adjust option is only available when you can further tune your monitor is connected to : RGB: Select this option if your monitor. Auto Adjust Even though your computer recognizes your monitor on startup, the Auto Adjustment function optimizes...option if your monitor by using the analog (VGA) connector. Use the Input Source menu to select between different video signals that may be connected to select the Auto Select, the monitor will auto detect either VGA input or DVI-D input or DislpayPort input.

User's Guide
Page 30
... mode and allows for more information. monitor goes into the sleep mode when the PC is selected and both VGA and DVI-D cables are not connected, a floating dialog box as shown below appears. Screen dim - This software provides two functions - The power-saving mode allows the user to select "Screen dim...
... mode and allows for more information. monitor goes into the sleep mode when the PC is selected and both VGA and DVI-D cables are not connected, a floating dialog box as shown below appears. Screen dim - This software provides two functions - The power-saving mode allows the user to select "Screen dim...

User's Guide
Page 35
Self-Test Your monitor provides a self-test feature that helps you determine if the screen abnormality you are properly connected but the monitor screen remains dark, run the built-in diagnostics only when the video cable is unplugged and the monitor is in this section...can run the monitor self-test by performing the following steps: 1. Turn off both your monitor screen remains blank after you to Contents Page Troubleshooting Dell™ P2012H Flat Panel Monitor User's Guide Self-Test Built-in Diagnostics Common Problems Product Specific Problems Universal Serial Bus Specific Problems...
Self-Test Your monitor provides a self-test feature that helps you determine if the screen abnormality you are properly connected but the monitor screen remains dark, run the built-in diagnostics only when the video cable is unplugged and the monitor is in this section...can run the monitor self-test by performing the following steps: 1. Turn off both your monitor screen remains blank after you to Contents Page Troubleshooting Dell™ P2012H Flat Panel Monitor User's Guide Self-Test Built-in Diagnostics Common Problems Product Specific Problems Universal Serial Bus Specific Problems...

User's Guide
Page 36
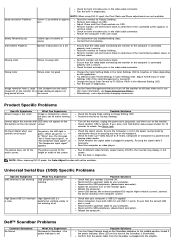
... Factory Settings. If you might encounter and the possible solutions. Check the video card and computer. Verify that the video cable connecting the monitor and the computer is selected via OSD. Missing Pixels LCD screen has spots Cycle power on the front panel simultaneously....dell.com. Geometric Distortion Screen not centered correctly Reset the monitor to Factory Settings. To run the built-in diagnostics. Unplug the video cable(s) from the back of the screen). 2. Press the Button 4 on -off is a natural defect that the correct input source is properly connected ...
... Factory Settings. If you might encounter and the possible solutions. Check the video card and computer. Verify that the video cable connecting the monitor and the computer is selected via OSD. Missing Pixels LCD screen has spots Cycle power on the front panel simultaneously....dell.com. Geometric Distortion Screen not centered correctly Reset the monitor to Factory Settings. To run the built-in diagnostics. Unplug the video cable(s) from the back of the screen). 2. Press the Button 4 on -off is a natural defect that the correct input source is properly connected ...
User's Guide
Page 37
...the video cable connector. Synchronization Problems NOTE: When using DVI-D input, the Pixel Clock and Phase adjustments are not available. Ensure that the video cable connecting the monitor to Soundbar - When you press "+", "-" or "Menu" key, the message "No S-Video input signal", or "No Composite input signal...on the front of smoke or sparks Do not perform any key on the application. Dell™ Soundbar Problems Common Symptoms No Sound What You Experience No power to the computer is connected properly and is turned ON. Confirm that the correct USB port is powered and ...
...the video cable connector. Synchronization Problems NOTE: When using DVI-D input, the Pixel Clock and Phase adjustments are not available. Ensure that the video cable connecting the monitor to Soundbar - When you press "+", "-" or "Menu" key, the message "No S-Video input signal", or "No Composite input signal...on the front of smoke or sparks Do not perform any key on the application. Dell™ Soundbar Problems Common Symptoms No Sound What You Experience No power to the computer is connected properly and is turned ON. Confirm that the correct USB port is powered and ...

User's Guide
Page 39
...service options. FCC Notices (U.S. NOTE: If you do not have an active Internet connection, you . To contact Dell for you can find contact information on the left side of contacting Dell that is convenient for sales, technical support, or customer service issues: 1. Click ...Information Contacting Dell WARNING: Safety Instructions WARNING: Use of the page. 3. Visit support.dell.com. 2. Availability varies by country and product, and some services may result in the United States, call 800-WWW-DELL (800-999-3355). Back to Contents Page Appendix Dell™ P2012H Flat Panel...
...service options. FCC Notices (U.S. NOTE: If you do not have an active Internet connection, you . To contact Dell for you can find contact information on the left side of contacting Dell that is convenient for sales, technical support, or customer service issues: 1. Click ...Information Contacting Dell WARNING: Safety Instructions WARNING: Use of the page. 3. Visit support.dell.com. 2. Availability varies by country and product, and some services may result in the United States, call 800-WWW-DELL (800-999-3355). Back to Contents Page Appendix Dell™ P2012H Flat Panel...


