User's Guide
Page 1
... U.S. Other trademarks and trade names may be used in the U.S. Dell™ P2011H Monitor User's Guide About Your Monitor Setting Up the Monitor Operating the Monitor Troubleshooting Appendix Notes, Notices, and Cautions NOTE: A NOTE indicates important information that this document is subject to hardware or loss of data and tells you make better use of your monitor. ENERGY STAR is a registered trademark of Intel...
... U.S. Other trademarks and trade names may be used in the U.S. Dell™ P2011H Monitor User's Guide About Your Monitor Setting Up the Monitor Operating the Monitor Troubleshooting Appendix Notes, Notices, and Cautions NOTE: A NOTE indicates important information that this document is subject to hardware or loss of data and tells you make better use of your monitor. ENERGY STAR is a registered trademark of Intel...
User's Guide
Page 2
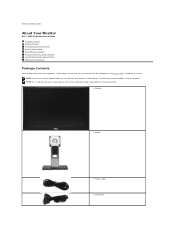
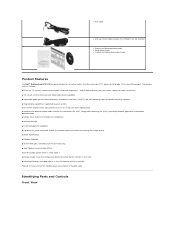
... refer to Contents Page About Your Monitor Dell™ P2011H Monitor User's Guide Package Contents Product Features Identifying Parts and Controls Monitor Specifications Plug and Play Capability Universal Serial Bus (USB) Interface LCD Monitor Quality and Pixel Policy Maintenance Guidelines Package Contents Your monitor ships with the components shown below. NOTE: To set up with your Monitor. l Monitor l Stand l Power Cable l VGA Cable Back to the respective stand setup guide for setup instructions. Ensure that you have received all the...
... refer to Contents Page About Your Monitor Dell™ P2011H Monitor User's Guide Package Contents Product Features Identifying Parts and Controls Monitor Specifications Plug and Play Capability Universal Serial Bus (USB) Interface LCD Monitor Quality and Pixel Policy Maintenance Guidelines Package Contents Your monitor ships with the components shown below. NOTE: To set up with your Monitor. l Monitor l Stand l Power Cable l VGA Cable Back to the respective stand setup guide for setup instructions. Ensure that you have received all the...
User's Guide
Page 3
... sleep mode.^ ■ Energy Gauge shows the energy level being consumed by the monitor in real time. ■ PowerNap Software included (comes in the CD attached with the monitor). ^Based on the monitor) l Drivers and Documentation media l Quick Setup Guide l Product and Safety Information Guide Product Features The Dell™ Professional P2011H flat panel display has an active matrix, thin-film transistor (TFT), liquid crystal display (LCD), and LED backlight. l DVI Cable l USB up and screen optimization...
... sleep mode.^ ■ Energy Gauge shows the energy level being consumed by the monitor in real time. ■ PowerNap Software included (comes in the CD attached with the monitor). ^Based on the monitor) l Drivers and Documentation media l Quick Setup Guide l Product and Safety Information Guide Product Features The Dell™ Professional P2011H flat panel display has an active matrix, thin-film transistor (TFT), liquid crystal display (LCD), and LED backlight. l DVI Cable l USB up and screen optimization...
User's Guide
Page 4
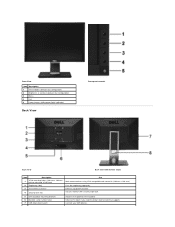
...Preset Modes (default, but configurable) 2 Brightness & Contrast (default, but configurable) 3 Menu 4 Exit 5 Power button (with power light indicator) Back View Front panel controls Back view Back view with monitor stand Label Description Use VESA mounting holes (100 mm x 100 mm - 1 Wall mount monitor using VESA-compatible wall mount kit (100 mm x 100 mm) behind attached VESA Plate) 2 Regulatory label Lists the regulatory approvals. 3 Stand release button Release stand from monitor. 4 Security lock slot Secures monitor with security cable lock 5 Dell Soundbar mounting...
...Preset Modes (default, but configurable) 2 Brightness & Contrast (default, but configurable) 3 Menu 4 Exit 5 Power button (with power light indicator) Back View Front panel controls Back view Back view with monitor stand Label Description Use VESA mounting holes (100 mm x 100 mm - 1 Wall mount monitor using VESA-compatible wall mount kit (100 mm x 100 mm) behind attached VESA Plate) 2 Regulatory label Lists the regulatory approvals. 3 Stand release button Release stand from monitor. 4 Security lock slot Secures monitor with security cable lock 5 Dell Soundbar mounting...

User's Guide
Page 10
...; compliance display card or software installed in your PC, the monitor can automatically reduce its power consumption when not in use. The following table shows the power consumption and signaling of this automatic power saving feature: VESA Modes Normal operation Active-off mode Switch off mode, the following message will only function in Active-off Horizontal Sync Active Inactive - Video Active Blanked - Vertical Sync Active Inactive - Power Indicator Blue Amber (Breathing) Off Power Consumption...
...; compliance display card or software installed in your PC, the monitor can automatically reduce its power consumption when not in use. The following table shows the power consumption and signaling of this automatic power saving feature: VESA Modes Normal operation Active-off mode Switch off mode, the following message will only function in Active-off Horizontal Sync Active Inactive - Video Active Blanked - Vertical Sync Active Inactive - Power Indicator Blue Amber (Breathing) Off Power Consumption...
User's Guide
Page 11
... not have an active Internet connection, you . Back to Contents Page Appendix Dell™ P2011H Monitor User's Guide Safety Instructions FCC Notice (U.S. Dell provides several online and telephone-based support and service options. Choose the method of controls, adjustments, or procedures other regulatory information, see the Product Information Guide. Only) and Other Regulatory Information Contacting Dell WARNING: Safety Instructions WARNING: Use of contacting Dell that is convenient for...
... not have an active Internet connection, you . Back to Contents Page Appendix Dell™ P2011H Monitor User's Guide Safety Instructions FCC Notice (U.S. Dell provides several online and telephone-based support and service options. Choose the method of controls, adjustments, or procedures other regulatory information, see the Product Information Guide. Only) and Other Regulatory Information Contacting Dell WARNING: Safety Instructions WARNING: Use of contacting Dell that is convenient for...
User's Guide
Page 14
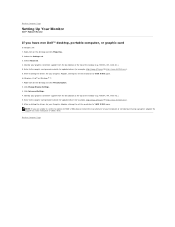
... Contents Page Setting Up Your Monitor Dell™ P2011H Monitor If you are unable to set the resolution to 1600 x 900, please contact the manufacturer of your computer or consider purchasing a graphics adapter that will support the video resolution of 1600 x 900. Click Advanced Settings. 4. NVIDIA, ATI, Intel etc.). 5. NOTE: If you have non Dell™ desktop, portable computer, or graphic card In Windows XP: 1.
... Contents Page Setting Up Your Monitor Dell™ P2011H Monitor If you are unable to set the resolution to 1600 x 900, please contact the manufacturer of your computer or consider purchasing a graphics adapter that will support the video resolution of 1600 x 900. Click Advanced Settings. 4. NVIDIA, ATI, Intel etc.). 5. NOTE: If you have non Dell™ desktop, portable computer, or graphic card In Windows XP: 1.

User's Guide
Page 15
... / Brightness/Contrast 3 Use the MENU button to launch the on the front of the monitor to adjust the characteristics of the image being displayed. Shortcut key/ Energy modes 2 Use this button to go back to the main menu or exit the OSD main menu. Back to Contents Page Operating the Monitor Dell™ P2011H Monitor User's Guide Using the Front Panel Controls Using the On-Screen Display (OSD) Menu PowerNap Software Setting the Maximum Resolution Using the Dell Soundbar (Optional) Using the Tilt, Swivel, and Vertical Extension...
... / Brightness/Contrast 3 Use the MENU button to launch the on the front of the monitor to adjust the characteristics of the image being displayed. Shortcut key/ Energy modes 2 Use this button to go back to the main menu or exit the OSD main menu. Back to Contents Page Operating the Monitor Dell™ P2011H Monitor User's Guide Using the Front Panel Controls Using the On-Screen Display (OSD) Menu PowerNap Software Setting the Maximum Resolution Using the Dell Soundbar (Optional) Using the Tilt, Swivel, and Vertical Extension...

User's Guide
Page 16
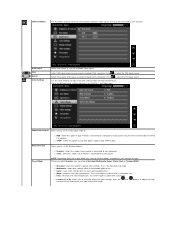
.... 5. Press the and buttons to activate the highlighted option. 4. An amber LED indicates DPMS power save mode. Main Menu for Analog (VGA) Input or Main Menu for Digital (DVI-D) Input NOTE: AUTO ADJUST is highlighted. When the energy consumed increases, the meter will change the settings and then either proceed to another menu or exit the OSD menu, the monitor automatically saves those changes. As you change to yellow and subsequently red. See the following...
.... 5. Press the and buttons to activate the highlighted option. 4. An amber LED indicates DPMS power save mode. Main Menu for Analog (VGA) Input or Main Menu for Digital (DVI-D) Input NOTE: AUTO ADJUST is highlighted. When the energy consumed increases, the meter will change the settings and then either proceed to another menu or exit the OSD menu, the monitor automatically saves those changes. As you change to yellow and subsequently red. See the following...
User's Guide
Page 24
... your monitor is connected to a computer or DVD player using the VGA and DVI cable or the HDMI to DVI adapter. l Warm: Increases the color temperature. l Custom (R, G, B): Allows you to set the display mode to: l Graphics: Select this option if your monitor is the default preset mode. Use the Color Settings to manually adjust the color settings. l YPbPr: Select this mode if your DVD player supports only YPbPr output. l Multimedia: Loads color settings ideal for available input signals. The screen...
... your monitor is connected to a computer or DVD player using the VGA and DVI cable or the HDMI to DVI adapter. l Warm: Increases the color temperature. l Custom (R, G, B): Allows you to set the display mode to: l Graphics: Select this option if your monitor is the default preset mode. Use the Color Settings to manually adjust the color settings. l YPbPr: Select this mode if your DVD player supports only YPbPr output. l Multimedia: Loads color settings ideal for available input signals. The screen...

User's Guide
Page 25
... adjustment is used to '100' . Display Setting submenu for video input. l Sports: Loads color settings ideal for nature. This is available only for VGA input to adjust the saturation from '0' to adjust the desired flesh tone color. Press Press to increase the green shade of the video image to green or purple. DISPLAY SETTINGS Use the Display Settings to the factory defaults. l Nature: Loads color settings ideal for sports. l Game: Loads color settings ideal for movies. Reset Color Settings Resets your monitor's color settings to adjust image...
... adjustment is used to '100' . Display Setting submenu for video input. l Sports: Loads color settings ideal for nature. This is available only for VGA input to adjust the saturation from '0' to adjust the desired flesh tone color. Press Press to increase the green shade of the video image to green or purple. DISPLAY SETTINGS Use the Display Settings to the factory defaults. l Nature: Loads color settings ideal for sports. l Game: Loads color settings ideal for movies. Reset Color Settings Resets your monitor's color settings to adjust image...

User's Guide
Page 26
...default display settings. Reset Display Settin gs OTHER SETTINGS Select this option to enable the Dynamic Contrast adjustment. Maximum is '0' (-). Use the and buttons to adjust image up and down. Minimum is '100' (+). Minimum is not available. NOTE: When using a DVI source, the Vertical Position setting is '0' (-). Use the button to adjust the settings of time the menu remains on screen, and so on. Display Setting submenu for DVI-D input Wide Mode Horizontal Position Vertical Position Sharpness Pixel Clock Adjust the image ratio as , the languages of the OSD...
...default display settings. Reset Display Settin gs OTHER SETTINGS Select this option to enable the Dynamic Contrast adjustment. Maximum is '0' (-). Use the and buttons to adjust image up and down. Minimum is '100' (+). Minimum is not available. NOTE: When using a DVI source, the Vertical Position setting is '0' (-). Use the button to adjust the settings of time the menu remains on screen, and so on. Display Setting submenu for DVI-D input Wide Mode Horizontal Position Vertical Position Sharpness Pixel Clock Adjust the image ratio as , the languages of the OSD...

User's Guide
Page 28
... 1600 X 900 as an option, you are using the Microsoft Windows operating systems, set the display resolution to 1600 X 900 pixels by pressing and holding the left -mouse button and adjust the screen resolution to 1600 X 900. 4. Back to Contents Page Setting Up Your Monitor Dell™ P2011H Monitor Setting the display resolution to 1600 X 900 (maximum) For maximum display performance while using , and follow the provided directions: 1: If you...
... 1600 X 900 as an option, you are using the Microsoft Windows operating systems, set the display resolution to 1600 X 900 pixels by pressing and holding the left -mouse button and adjust the screen resolution to 1600 X 900. 4. Back to Contents Page Setting Up Your Monitor Dell™ P2011H Monitor Setting the display resolution to 1600 X 900 (maximum) For maximum display performance while using , and follow the provided directions: 1: If you...

User's Guide
Page 30
... a stand. Connect either the white (digital DVI-D) or the blue (analog VGA) display connector cable to the corresponding video port on it. 2. Use both cables on the back of your computer. Remove the cover and place the monitor on the back of the monitor. 3. To attach the monitor stand: 1. Back to Contents Page Setting Up the Monitor Dell™ P2011H Monitor User's Guide Attaching the Stand Connecting the Monitor Organizing the Cables Attaching the Soundbar (Optional) Removing the Stand Wall Mounting (Optional) Attaching the Stand NOTE: The stand...
... a stand. Connect either the white (digital DVI-D) or the blue (analog VGA) display connector cable to the corresponding video port on it. 2. Use both cables on the back of your computer. Remove the cover and place the monitor on the back of the monitor. 3. To attach the monitor stand: 1. Back to Contents Page Setting Up the Monitor Dell™ P2011H Monitor User's Guide Attaching the Stand Connecting the Monitor Organizing the Cables Attaching the Soundbar (Optional) Removing the Stand Wall Mounting (Optional) Attaching the Stand NOTE: The stand...

User's Guide
Page 31
... bottom view for details.) 2. Plug the power cables for details.) 3. If it does not display an image, see Solving Problems. 5. Turn on the monitor. (See side or bottom view for your monitor displays an image, installation is complete. If your computer and monitor into a nearby outlet. 4. Use the cable slot on the monitor stand to an appropriate USB port on your monitor setup: 1. Organizing the Cables Connect the upstream USB port (cable supplied) to organize the cables. Connecting the Blue VGA Cable CAUTION: The...
... bottom view for details.) 2. Plug the power cables for details.) 3. If it does not display an image, see Solving Problems. 5. Turn on the monitor. (See side or bottom view for your monitor displays an image, installation is complete. If your computer and monitor into a nearby outlet. 4. Use the cable slot on the monitor stand to an appropriate USB port on your monitor setup: 1. Organizing the Cables Connect the upstream USB port (cable supplied) to organize the cables. Connecting the Blue VGA Cable CAUTION: The...
User's Guide
Page 32
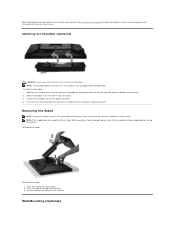
...: 1. When any device other stand is placed on a flat surface. 2. Place the monitor on a clean surface. Working from the monitor. Lift the stand up instructions. Wall Mounting (Optional) Removing the Stand NOTE: To prevent scratches on the LCD screen while removing the stand, ensure that the monitor is bought, please refer to the respective stand setup guide for set up and away from the back of the monitor, attach the Soundbar by...
...: 1. When any device other stand is placed on a flat surface. 2. Place the monitor on a clean surface. Working from the monitor. Lift the stand up instructions. Wall Mounting (Optional) Removing the Stand NOTE: To prevent scratches on the LCD screen while removing the stand, ensure that the monitor is bought, please refer to the respective stand setup guide for set up and away from the back of the monitor, attach the Soundbar by...
User's Guide
Page 34
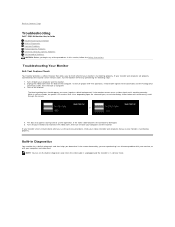
... Safety Instructions Troubleshooting Your Monitor Self-Test Feature Check Your monitor provides a self-test feature that allows you use the previous procedure, check your video controller and computer, because your monitor is in diagnostic tool that helps you determine if the screen abnormality you are properly connected but the monitor screen remains dark, run the built-in self-test mode, the power LED remains blue. Turn off both Digital (white connector) and the Analog (blue connector) cables...
... Safety Instructions Troubleshooting Your Monitor Self-Test Feature Check Your monitor provides a self-test feature that allows you use the previous procedure, check your video controller and computer, because your monitor is in diagnostic tool that helps you determine if the screen abnormality you are properly connected but the monitor screen remains dark, run the built-in self-test mode, the power LED remains blue. Turn off both Digital (white connector) and the Analog (blue connector) cables...

User's Guide
Page 35
...l Adjust brightness & contrast controls via OSD. Unplug the video cable(s) from the back of the screen). 2. Stuck-on Pixels LCD screen has bright spots l Cycle power on -off . l Pixel that is permanently off What You Experience No picture Possible Solutions l Ensure that the power button is properly connected and secure. l Adjust Horizontal Position & Vertical Position controls via OSD. Shaky/Jittery Video Wavy picture or fine movement l Perform Auto Adjust via OSD. Brightness Problems Picture too dim or too bright l Reset the monitor to Factory Settings. l Auto...
...l Adjust brightness & contrast controls via OSD. Unplug the video cable(s) from the back of the screen). 2. Stuck-on Pixels LCD screen has bright spots l Cycle power on -off . l Pixel that is permanently off What You Experience No picture Possible Solutions l Ensure that the power button is properly connected and secure. l Adjust Horizontal Position & Vertical Position controls via OSD. Shaky/Jittery Video Wavy picture or fine movement l Perform Auto Adjust via OSD. Brightness Problems Picture too dim or too bright l Reset the monitor to Factory Settings. l Auto...

User's Guide
Page 36
... monitor, unplug the power cord, plug back, and then turn on the front panel screen No Input Signal when user controls are not working at all Possible Solutions l Check that the correct USB port is not in Image Setting OSD l Reset the monitor to Factory Settings. Wrong Color Picture color not good l Change the Color Setting Mode in the Color Settings OSD to determine if the intermittent problem occurs in the video cable connector. When you press "+", "-" or "Menu" key, the message "No VGA input signal", or "No DVI-D input signal" appears The picture...
... monitor, unplug the power cord, plug back, and then turn on the front panel screen No Input Signal when user controls are not working at all Possible Solutions l Check that the correct USB port is not in Image Setting OSD l Reset the monitor to Factory Settings. Wrong Color Picture color not good l Change the Color Setting Mode in the Color Settings OSD to determine if the intermittent problem occurs in the video cable connector. When you press "+", "-" or "Menu" key, the message "No VGA input signal", or "No DVI-D input signal" appears The picture...

User's Guide
Page 37
... user. l Set all Windows volume controls to their maximum. l Turn the Power/Volume knob on the computer (i.e. l Test the Soundbar using another audio source (i.e. l Confirm that the audio line-in plug. l Turn the Power/Volume knob on the front of the audio application. l Confirm that the power cable from only one side of the audio source. l Decrease the volume of Soundbar Volume is used Sound from the Soundbar is off No Sound Soundbar has power - l Troubleshoot the computer's sound card...
... user. l Set all Windows volume controls to their maximum. l Turn the Power/Volume knob on the computer (i.e. l Test the Soundbar using another audio source (i.e. l Confirm that the audio line-in plug. l Turn the Power/Volume knob on the front of the audio application. l Confirm that the power cable from only one side of the audio source. l Decrease the volume of Soundbar Volume is used Sound from the Soundbar is off No Sound Soundbar has power - l Troubleshoot the computer's sound card...


