
Setup and Quick Reference Guide
Page 4
...proprietary interest in this document to change without the written permission of Dell Computer Corporation is subject to Microsoft® Windows® operating systems are trademarks of Dell Computer Corporation; Other trademarks and trade names may be used in ..., or death. Information in this text: Dell, OptiPlex, and the DELL logo are not applicable. Microsoft and Windows are registered trademarks of your computer. Dell Computer Corporation disclaims any manner whatsoever without notice. © 2002-2003 Dell Computer Corporation. Notes, Notices, and Cautions ...
...proprietary interest in this document to change without the written permission of Dell Computer Corporation is subject to Microsoft® Windows® operating systems are trademarks of Dell Computer Corporation; Other trademarks and trade names may be used in ..., or death. Information in this text: Dell, OptiPlex, and the DELL logo are not applicable. Microsoft and Windows are registered trademarks of your computer. Dell Computer Corporation disclaims any manner whatsoever without notice. © 2002-2003 Dell Computer Corporation. Notes, Notices, and Cautions ...

Setup and Quick Reference Guide
Page 5
... Devices 16 Attaching the Cable Cover 17 Attaching the Stand to the Mounting Plate 19 Finding Information and Assistance 21 Solving Problems 23 Using the Dell Drivers and Utilities CD 24 Running the Dell Diagnostics 24 Running the Dell IDE Hard-Drive Diagnostics 26 Regulatory Information 26 Class A 27 Class B 27 Contents 3
... Devices 16 Attaching the Cable Cover 17 Attaching the Stand to the Mounting Plate 19 Finding Information and Assistance 21 Solving Problems 23 Using the Dell Drivers and Utilities CD 24 Running the Dell Diagnostics 24 Running the Dell IDE Hard-Drive Diagnostics 26 Regulatory Information 26 Class A 27 Class B 27 Contents 3

Setup and Quick Reference Guide
Page 6
Only 32 Limited Warranty Terms for Canada 33 "Total Satisfaction" Return Policy 36 Dell Software and Peripherals 37 One-Year End-User Manufacturer Guarantee (Latin America and the Caribbean Only 38 Intel® Warranty Statement for the U.S 29 "Total Satisfaction" Return Policy (U.S. and Canada Only 39 4 Contents Limited Warranties and Return Policy 29 Limited Warranty for Pentium® and Celeron® Processors Only (U.S.
Only 32 Limited Warranty Terms for Canada 33 "Total Satisfaction" Return Policy 36 Dell Software and Peripherals 37 One-Year End-User Manufacturer Guarantee (Latin America and the Caribbean Only 38 Intel® Warranty Statement for the U.S 29 "Total Satisfaction" Return Policy (U.S. and Canada Only 39 4 Contents Limited Warranties and Return Policy 29 Limited Warranty for Pentium® and Celeron® Processors Only (U.S.
Setup and Quick Reference Guide
Page 7
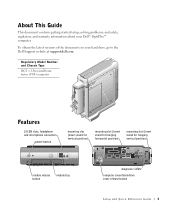
.../hard-drive cover release button Setup and Quick Reference Guide 5 and safety, regulatory, and warranty information about your hard drive, go to the Dell Support website at support.dell.com. To obtain the latest versions of the documents on your Dell™ OptiPlex™ computer. About This Guide This document contains getting started/setup;
.../hard-drive cover release button Setup and Quick Reference Guide 5 and safety, regulatory, and warranty information about your hard drive, go to the Dell Support website at support.dell.com. To obtain the latest versions of the documents on your Dell™ OptiPlex™ computer. About This Guide This document contains getting started/setup;

Setup and Quick Reference Guide
Page 8
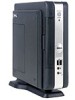
www.dell.com | support.dell.com cable cover hard-drive cover (open cover to access module device locking switch) module bay computer cover power adapter chassis-stand mounting plate computer stand 6 Setup and Quick Reference Guide
www.dell.com | support.dell.com cable cover hard-drive cover (open cover to access module device locking switch) module bay computer cover power adapter chassis-stand mounting plate computer stand 6 Setup and Quick Reference Guide

Setup and Quick Reference Guide
Page 9
Do not use adapter plugs or remove the grounding prong from the electrical outlet. Clean your computer with a soft cloth dampened with 3-prong plugs to help ensure proper grounding. These cables are a trained service technician. If you must use an extension cable, use a 3-wire cable with a minimum wire size of electric shock, do not connect or disconnect any cables or perform maintenance or reconfiguration of this product during an electrical storm. • If your computer, disconnect the computer from a cable. CAUTION: Safety Instructions Use the following safety guidelines to ...
Do not use adapter plugs or remove the grounding prong from the electrical outlet. Clean your computer with a soft cloth dampened with 3-prong plugs to help ensure proper grounding. These cables are a trained service technician. If you must use an extension cable, use a 3-wire cable with a minimum wire size of electric shock, do not connect or disconnect any cables or perform maintenance or reconfiguration of this product during an electrical storm. • If your computer, disconnect the computer from a cable. CAUTION: Safety Instructions Use the following safety guidelines to ...
Setup and Quick Reference Guide
Page 10
... a ventilated area, such as a desk top or on the floor. • The AC adapter may become hot during normal operation of your computer. www.dell.com | support.dell.com CAUTION: Safety Instructions (continued) • To avoid shorting out your computer when disconnecting a network cable, first unplug the cable from the network adapter...
... a ventilated area, such as a desk top or on the floor. • The AC adapter may become hot during normal operation of your computer. www.dell.com | support.dell.com CAUTION: Safety Instructions (continued) • To avoid shorting out your computer when disconnecting a network cable, first unplug the cable from the network adapter...

Setup and Quick Reference Guide
Page 11
A fixed-voltage power supply - A manual voltage selection switch - NOTICE: To help prevent electric shock or system board damage. Also, ensure that most closely matches the AC power available in Japan is connected to operate at only one of the computer for the voltage that your monitor and attached devices are electrically rated to operate with the AC power available in your location. • Before working inside the computer, unplug the computer to the 115-V position even though the AC power available in your computer, observe the following : - An auto-sensing ...
A fixed-voltage power supply - A manual voltage selection switch - NOTICE: To help prevent electric shock or system board damage. Also, ensure that most closely matches the AC power available in Japan is connected to operate at only one of the computer for the voltage that your monitor and attached devices are electrically rated to operate with the AC power available in your location. • Before working inside the computer, unplug the computer to the 115-V position even though the AC power available in your computer, observe the following : - An auto-sensing ...

Setup and Quick Reference Guide
Page 12
... to the computer. 3 Ground yourself by touching an unpainted metal surface on the locking tabs before touching anything inside your online Dell™ documentation or in the sequence indicated. if you are correctly oriented and aligned. • Handle components and cards with ...injury or shock. Also, before removing a component from the system board or disconnecting a device from their electrical outlets. www.dell.com | support.dell.com When Using Your Computer (continued) When Working Inside Your Computer Before you open the computer cover, perform the following steps...
... to the computer. 3 Ground yourself by touching an unpainted metal surface on the locking tabs before touching anything inside your online Dell™ documentation or in the sequence indicated. if you are correctly oriented and aligned. • Handle components and cards with ...injury or shock. Also, before removing a component from the system board or disconnecting a device from their electrical outlets. www.dell.com | support.dell.com When Using Your Computer (continued) When Working Inside Your Computer Before you open the computer cover, perform the following steps...

Setup and Quick Reference Guide
Page 13
As you touch any static charge your computer's electronic components, such as the microprocessor. You can do so by touching an unpainted metal surface on the computer chassis. CAUTION: Viewing the monitor screen for the address of your body may have accumulated. Battery Disposal Your computer uses a lithium coin-cell battery. Do not dispose of time may result in a static-safe area. Contact your computer. Setup and Quick Reference Guide 11 To prevent static damage, discharge static electricity from your body before unwrapping the antistatic packaging, discharge static ...
As you touch any static charge your computer's electronic components, such as the microprocessor. You can do so by touching an unpainted metal surface on the computer chassis. CAUTION: Viewing the monitor screen for the address of your body may have accumulated. Battery Disposal Your computer uses a lithium coin-cell battery. Do not dispose of time may result in a static-safe area. Contact your computer. Setup and Quick Reference Guide 11 To prevent static damage, discharge static electricity from your body before unwrapping the antistatic packaging, discharge static ...

Setup and Quick Reference Guide
Page 14
... to the Mounting Plate" on the computer. NOTICE: To ensure proper ventilation, do not place your monitor on page 19. To order this bracket, contact Dell. NOTICE: In a high-vibration environment or when installing the computer overhead, use the optional wall-mount bracket instead of the chassis stand. www...
... to the Mounting Plate" on the computer. NOTICE: To ensure proper ventilation, do not place your monitor on page 19. To order this bracket, contact Dell. NOTICE: In a high-vibration environment or when installing the computer overhead, use the optional wall-mount bracket instead of the chassis stand. www...

Setup and Quick Reference Guide
Page 15
module device locking switch Setup and Quick Reference Guide 13 To install a CD, DVD, or second hard drive in the module bay. 2 Installing a Device in the Module Bay Your Dell computer ships with either a floppy drive or an airbay installed in the module bay, first remove the airbay and then install the device. NOTE: To locate the module device locking switch, remove the harddrive cover.
module device locking switch Setup and Quick Reference Guide 13 To install a CD, DVD, or second hard drive in the module bay. 2 Installing a Device in the Module Bay Your Dell computer ships with either a floppy drive or an airbay installed in the module bay, first remove the airbay and then install the device. NOTE: To locate the module device locking switch, remove the harddrive cover.

Setup and Quick Reference Guide
Page 16
... light when the adapter is properly plugged into a wall outlet and into one of three mounting slots on the back of the computer stand. www.dell.com | support.dell.com NOTE: If you are installing the computer under a desktop or tabletop and is in place, tighten the screw.
... light when the adapter is properly plugged into a wall outlet and into one of three mounting slots on the back of the computer stand. www.dell.com | support.dell.com NOTE: If you are installing the computer under a desktop or tabletop and is in place, tighten the screw.

Setup and Quick Reference Guide
Page 17
grounding source metal ground connector 4 Connect the AC power cable to your computer can occur (see the following figure). CAUTION: If you decide not to connect the green ground wire to an electrical outlet, go to step 4. 3 Connect the metal ground connector to the grounding source on the outlet (see the following figure): a Loosen the grounding source. b Slide the metal ground connector behind the grounding source, and then tighten the grounding source. If you decide to connect the green ground wire to an electrical outlet, do not permit contact between the green ground wire ...
grounding source metal ground connector 4 Connect the AC power cable to your computer can occur (see the following figure). CAUTION: If you decide not to connect the green ground wire to an electrical outlet, go to step 4. 3 Connect the metal ground connector to the grounding source on the outlet (see the following figure): a Loosen the grounding source. b Slide the metal ground connector behind the grounding source, and then tighten the grounding source. If you decide to connect the green ground wire to an electrical outlet, do not permit contact between the green ground wire ...

Setup and Quick Reference Guide
Page 18
www.dell.com | support.dell.com NOTE: Connect only one keyboard and one mouse. 5 Connecting External Devices CAUTION: To help prevent electric shock, use only the power adapter and power cable provided, and ensure that they are plugged into a properly grounded power source. 16 Setup and Quick Re ference Guide
www.dell.com | support.dell.com NOTE: Connect only one keyboard and one mouse. 5 Connecting External Devices CAUTION: To help prevent electric shock, use only the power adapter and power cable provided, and ensure that they are plugged into a properly grounded power source. 16 Setup and Quick Re ference Guide

Setup and Quick Reference Guide
Page 19
6 Attaching the Cable Cover NOTICE: If you use the stand on your computer, attach the stand before attaching the cable cover. security cable slot Do not place the computer facedown on page 19). Doing so may press the power button and may scratch the face of the computer. 1 Attach all of the cables to the Mounting Plate" on the bezel NOTICE: When attaching the cable cover, do not place the computer facedown so that the surface comes in the computer's back panel. Setup and Quick Reference Guide 17 NOTICE: If you are installing the computer under a desktop or tabletop, do not attach...
6 Attaching the Cable Cover NOTICE: If you use the stand on your computer, attach the stand before attaching the cable cover. security cable slot Do not place the computer facedown on page 19). Doing so may press the power button and may scratch the face of the computer. 1 Attach all of the cables to the Mounting Plate" on the bezel NOTICE: When attaching the cable cover, do not place the computer facedown so that the surface comes in the computer's back panel. Setup and Quick Reference Guide 17 NOTICE: If you are installing the computer under a desktop or tabletop, do not attach...

Setup and Quick Reference Guide
Page 20
www.dell.com | support.dell.com 5 Insert the tabs into the slots and slide the piece toward the diagnostic lights (see the illustration). 6 Install a security device in the security cable ...
www.dell.com | support.dell.com 5 Insert the tabs into the slots and slide the piece toward the diagnostic lights (see the illustration). 6 Install a security device in the security cable ...

Setup and Quick Reference Guide
Page 21
screw holes (4) mounting-plate slot release-lever tab solid surface with a 1-inch (2.5 cm) minimum thickness 1 Using the four #6 wood screws (0.625 inch; 15.88 mm) provided, attach the mounting plate to a solid surface with how the stand will be bumped by a user's legs or chair. NOTICE: Make sure that you snap the release-lever tab securely into the mounting-plate slot. NOTE: Before attaching the mounting plate to a surface, first orient yourself with a minimum thickness of 1 inch (2.5 cm). 2 Orient the computer and stand under the mounting plate approximately 1 inch (2.5 cm) from ...
screw holes (4) mounting-plate slot release-lever tab solid surface with a 1-inch (2.5 cm) minimum thickness 1 Using the four #6 wood screws (0.625 inch; 15.88 mm) provided, attach the mounting plate to a solid surface with how the stand will be bumped by a user's legs or chair. NOTICE: Make sure that you snap the release-lever tab securely into the mounting-plate slot. NOTE: Before attaching the mounting plate to a surface, first orient yourself with a minimum thickness of 1 inch (2.5 cm). 2 Orient the computer and stand under the mounting plate approximately 1 inch (2.5 cm) from ...

Setup and Quick Reference Guide
Page 22
...! NOTICE: When completing your computer setup, secure all cables toward the back of your system setup. 20 Setup and Quick Re ference Guide www.dell.com | support.dell.com 3 Lift the computer and stand, insert the stand into the mounting bracket, and slide the stand until the release-lever tab is inserted...
...! NOTICE: When completing your computer setup, secure all cables toward the back of your system setup. 20 Setup and Quick Re ference Guide www.dell.com | support.dell.com 3 Lift the computer and stand, insert the stand into the mounting bracket, and slide the stand until the release-lever tab is inserted...

Setup and Quick Reference Guide
Page 23
Finding Information and Assistance What Are You Looking For? • A diagnostic program for my computer • Drivers for my computer • My computer documentation • My device documentation Find it Here Drivers and Utilities CD (also known as the ResourceCD) You can use this CD to access documentation, reinstall drivers, or run diagnostics tools. • Express Service Code and Service Tag Number • Microsoft® Windows® License Label Express Service Code and Product Key Located on your computer. • How to remove and replace parts • Technical ...
Finding Information and Assistance What Are You Looking For? • A diagnostic program for my computer • Drivers for my computer • My computer documentation • My device documentation Find it Here Drivers and Utilities CD (also known as the ResourceCD) You can use this CD to access documentation, reinstall drivers, or run diagnostics tools. • Express Service Code and Service Tag Number • Microsoft® Windows® License Label Express Service Code and Product Key Located on your computer. • How to remove and replace parts • Technical ...
