

User's Guide
Page 5
... Only 83 Removing the Expansion-Card Cage 83 Replacing the Expansion-Card Cage 84 TAPI 86 Installing a TAPI Device 86 Installing a TAPI Sound Card 87 Memory 88 Installing DIMMs 88 Removing DIMMs 90 Microprocessor 91 Removing the Heat Sink or Heat-Sink/Blower Assembly . . . . 93 Removing the Microprocessor 97 Installing the...
... Only 83 Removing the Expansion-Card Cage 83 Replacing the Expansion-Card Cage 84 TAPI 86 Installing a TAPI Device 86 Installing a TAPI Sound Card 87 Memory 88 Installing DIMMs 88 Removing DIMMs 90 Microprocessor 91 Removing the Heat Sink or Heat-Sink/Blower Assembly . . . . 93 Removing the Microprocessor 97 Installing the...

User's Guide
Page 7
... 182 Repairing a Dropped or Damaged Computer 183 Hardware Conflicts 184 Computer Memory Problems 184 System Board Problems 185 Resetting a Damaged System Board 187 Dell Diagnostics 187 When to Use the Dell Diagnostics 187 Features 187 Before You Start Testing 188 Running the Dell Diagnostics 188 Advanced Testing 190 Advanced Testing Help Menu 192 Messages...
... 182 Repairing a Dropped or Damaged Computer 183 Hardware Conflicts 184 Computer Memory Problems 184 System Board Problems 185 Resetting a Damaged System Board 187 Dell Diagnostics 187 When to Use the Dell Diagnostics 187 Features 187 Before You Start Testing 188 Running the Dell Diagnostics 188 Advanced Testing 190 Advanced Testing Help Menu 192 Messages...

User's Guide
Page 8
... of Korea Only 244 Polish Center for Warranty Repair or Credit 214 Before You Call 215 Contacting Dell 217 8 Additional Information Regulatory Notices 236 FCC Notices (U.S. Device Drivers 208 Memory-Resident Programs 208 Program Conflicts 209 Memory Address Conflicts 209 Interrupt Assignment Conflicts 209 7 Getting Help Technical Assistance 212 Online Services 212 AutoTech...
... of Korea Only 244 Polish Center for Warranty Repair or Credit 214 Before You Call 215 Contacting Dell 217 8 Additional Information Regulatory Notices 236 FCC Notices (U.S. Device Drivers 208 Memory-Resident Programs 208 Program Conflicts 209 Memory Address Conflicts 209 Interrupt Assignment Conflicts 209 7 Getting Help Technical Assistance 212 Online Services 212 AutoTech...
User's Guide
Page 31
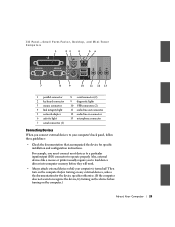
... 13 microphone connector Connecting Devices When you connect external devices to your computer is turned off. For example, you to load device drivers into computer memory before they will work. • Always attach external devices while your computer's back panel, follow these guidelines: • Check the documentation that accompanied the device...
... 13 microphone connector Connecting Devices When you connect external devices to your computer is turned off. For example, you to load device drivers into computer memory before they will work. • Always attach external devices while your computer's back panel, follow these guidelines: • Check the documentation that accompanied the device...
User's Guide
Page 39
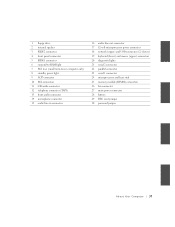
...) 19 keyboard (lower) and mouse (upper) connectors 20 diagnostic lights 21 serial 2 connector 22 parallel connector 23 serial 1 connector 24 microprocessor and heat sink 25 memory module (DIMM) connectors 26 fan connector 27 main power connector 28 battery 29 RTC reset jumper 30 password jumper A bout Yo ur Computer 37
...) 19 keyboard (lower) and mouse (upper) connectors 20 diagnostic lights 21 serial 2 connector 22 parallel connector 23 serial 1 connector 24 microprocessor and heat sink 25 memory module (DIMM) connectors 26 fan connector 27 main power connector 28 battery 29 RTC reset jumper 30 password jumper A bout Yo ur Computer 37

User's Guide
Page 40
www.dell.com | support.dell.com System Board Labels Connector or Socket Description AUDIO Line-in, line-out, and microphone jacks AUX_PWR Standby power light BATTERY Battery socket STR Suspend-to-RAM light CD_IN CD drive audio cable connector DIAG_LED Diagnostic lights DIMM A and DIMM B Dual in-line memory module (DIMM) sockets DSKT Floppy...
www.dell.com | support.dell.com System Board Labels Connector or Socket Description AUDIO Line-in, line-out, and microphone jacks AUX_PWR Standby power light BATTERY Battery socket STR Suspend-to-RAM light CD_IN CD drive audio cable connector DIAG_LED Diagnostic lights DIMM A and DIMM B Dual in-line memory module (DIMM) sockets DSKT Floppy...
User's Guide
Page 50
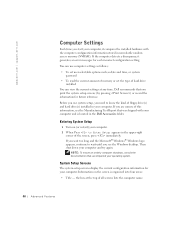
...can view the current settings at the top of this information, see the Windows desktop. the box at any time. www.dell.com | support.dell.com Computer Settings Each time you start your computer. If you are unsure of all screens lists the computer name. 48 Advanced...continue to know the kind of the screen, press immediately. Entering System Setup 1 Turn on the screen is located in nonvolatile random access memory (NVRAM). NOTE: To ensure an orderly computer shutdown, consult the documentation that you see the Manufacturing Test Report that was shipped with the...
...can view the current settings at the top of this information, see the Windows desktop. the box at any time. www.dell.com | support.dell.com Computer Settings Each time you start your computer. If you are unsure of all screens lists the computer name. 48 Advanced...continue to know the kind of the screen, press immediately. Entering System Setup 1 Turn on the screen is located in nonvolatile random access memory (NVRAM). NOTE: To ensure an orderly computer shutdown, consult the documentation that you see the Manufacturing Test Report that was shipped with the...
User's Guide
Page 55
... your computer boots. If the computer is off when AC power is lost , the computer starts up to ten characters long into nonvolatile random-access memory (NVRAM). • Auto Power On allows you can use American English, press .) - when AC power is lost , the computer remains off your software support utilities...
... your computer boots. If the computer is off when AC power is lost , the computer starts up to ten characters long into nonvolatile random-access memory (NVRAM). • Auto Power On allows you can use American English, press .) - when AC power is lost , the computer remains off your software support utilities...

User's Guide
Page 58
... card is set to ECP. With Auto (the default) selected, the computer turns off the integrated floppy drive controller; www.dell.com | support.dell.com DMA Channel: This option determines the direct memory access (DMA) channel used to use of this setting is disabled. IDE Drive Interface: enables or disables the computer's integrated...
... card is set to ECP. With Auto (the default) selected, the computer turns off the integrated floppy drive controller; www.dell.com | support.dell.com DMA Channel: This option determines the direct memory access (DMA) channel used to use of this setting is disabled. IDE Drive Interface: enables or disables the computer's integrated...

User's Guide
Page 59
...confirm that may occur when you use when the computer boots. When Auto is Off. Then select the device whose IRQ line you add memory, check this option to PCI devices unless a particular device, device driver, or operating system requires a specific IRQ line already in use ...whether your computer boots with the Num Lock mode activated on your computer, the computer memory speed, the amount of video memory, and the size of each key. • Memory Information indicates the amount of installed memory detected in the computer. When AGP (the default) is recognized by the computer. ...
...confirm that may occur when you use when the computer boots. When Auto is Off. Then select the device whose IRQ line you add memory, check this option to PCI devices unless a particular device, device driver, or operating system requires a specific IRQ line already in use ...whether your computer boots with the Num Lock mode activated on your computer, the computer memory speed, the amount of video memory, and the size of each key. • Memory Information indicates the amount of installed memory detected in the computer. When AGP (the default) is recognized by the computer. ...

User's Guide
Page 62
...modify start-up files automatically. 60 Advanced Features unjumpered Software Installation and Configuration When you can quickly use all available computer memory, damage or destroy data stored on the hard drive, and permanently affect the performance of the programs they infect. ...its documentation to successfully run the program. Always read its defaults are available for troubleshooting purposes. www.dell.com | support.dell.com System-Board Jumper Settings Jumper Setting Description PSWD (default) Password features are disabled. RTCRST jumpered Password features are ...
...modify start-up files automatically. 60 Advanced Features unjumpered Software Installation and Configuration When you can quickly use all available computer memory, damage or destroy data stored on the hard drive, and permanently affect the performance of the programs they infect. ...its documentation to successfully run the program. Always read its defaults are available for troubleshooting purposes. www.dell.com | support.dell.com System-Board Jumper Settings Jumper Setting Description PSWD (default) Password features are disabled. RTCRST jumpered Password features are ...
User's Guide
Page 79
... from its electrical outlet. NOTE: After you open and close the cover, the chassis intrusion detector causes the following message to use the same resources: memory, I/O addresses, and IRQs. Cover was previously removed. 14 Reset the chassis intrusion detector by someone else, contact your network administrator for information on the I/O panel...
... from its electrical outlet. NOTE: After you open and close the cover, the chassis intrusion detector causes the following message to use the same resources: memory, I/O addresses, and IRQs. Cover was previously removed. 14 Reset the chassis intrusion detector by someone else, contact your network administrator for information on the I/O panel...

User's Guide
Page 90
...to 1 gigabyte (GB) by using synchronous dynamic random-access memory (SDRAM) dual in socket B. See the manufacturer's documentation and your Microsoft® Windows® documentation for the TAPI devices. For optimum operation, Dell recommends that occupy sockets in either be the same type of ...the memory module with the ridges inside the socket. 88 Installing Upgrades b Align the slots on the system ...
...to 1 gigabyte (GB) by using synchronous dynamic random-access memory (SDRAM) dual in socket B. See the manufacturer's documentation and your Microsoft® Windows® documentation for the TAPI devices. For optimum operation, Dell recommends that occupy sockets in either be the same type of ...the memory module with the ridges inside the socket. 88 Installing Upgrades b Align the slots on the system ...

User's Guide
Page 91
... cover, the chassis intrusion detector causes the following message to appear on . Cover was previously removed. Installing Upgrades 89 NOTICE: To avoid damage to the memory module, press the module straight down into the socket until the securing clips snap into the socket with equal force applied at the next computer...
... cover, the chassis intrusion detector causes the following message to appear on . Cover was previously removed. Installing Upgrades 89 NOTICE: To avoid damage to the memory module, press the module straight down into the socket until the securing clips snap into the socket with equal force applied at the next computer...

User's Guide
Page 92
...and devices from the socket. 90 Installing Upgrades If it is correct, skip to make sure that the memory modules are seated properly in "CAUTION: Safety Instructions." www.dell.com | support.dell.com You need to Enabled or Enabled-Silent. Strike the F1 key to continue, F2 to run ... new total. Open the computer cover, and check the installed DIMMs to step 7. 6 If the memory total is correct, press to exit system setup. 9 Run the Dell Diagnostics to reflect the newly installed memory. To remove a DIMM, press the securing clips at each end of the socket. NOTICE: To ...
...and devices from the socket. 90 Installing Upgrades If it is correct, skip to make sure that the memory modules are seated properly in "CAUTION: Safety Instructions." www.dell.com | support.dell.com You need to Enabled or Enabled-Silent. Strike the F1 key to continue, F2 to run ... new total. Open the computer cover, and check the installed DIMMs to step 7. 6 If the memory total is correct, press to exit system setup. 9 Run the Dell Diagnostics to reflect the newly installed memory. To remove a DIMM, press the securing clips at each end of the socket. NOTICE: To ...
User's Guide
Page 149
If the date and time are not correct in a special section of memory. See Primary Drive n and Secondary Drive n for a few hours, and then reconnect the computer, turn it on the system board maintains system configuration, date, and ... (0 or 1) under Drives: Secondary to run SETUP program or Strike the F1 key to continue, F2 to Auto. 9 Update your configuration information by running the Dell Diagnostics.
If the date and time are not correct in a special section of memory. See Primary Drive n and Secondary Drive n for a few hours, and then reconnect the computer, turn it on the system board maintains system configuration, date, and ... (0 or 1) under Drives: Secondary to run SETUP program or Strike the F1 key to continue, F2 to Auto. 9 Update your configuration information by running the Dell Diagnostics.

User's Guide
Page 158
...static random-access memory (SRAM) 2.2-2.6 GHz processors: 512-KB SRAM Math coprocessor internal to microprocessor Memory Architecture 133-megahertz (MHz) synchronous dynamic random-access memory (SDRAM) Dual in-line memory module (DIMM) ...-ECC DIMM capacities 64-, 128-, 256-, and 512-megabyte (MB) Minimum random-access memory 64 MB (128 MB when running Windows 2000 (RAM) or Windows XP) Maximum RAM...chip set Intel 845 Data bus width 64 bits Address bus width 32 bits Direct memory access (DMA) four channels Interrupts 15 Computer BIOS Desktop Management Interface (DMI) 2.0sand...
...static random-access memory (SRAM) 2.2-2.6 GHz processors: 512-KB SRAM Math coprocessor internal to microprocessor Memory Architecture 133-megahertz (MHz) synchronous dynamic random-access memory (SDRAM) Dual in-line memory module (DIMM) ...-ECC DIMM capacities 64-, 128-, 256-, and 512-megabyte (MB) Minimum random-access memory 64 MB (128 MB when running Windows 2000 (RAM) or Windows XP) Maximum RAM...chip set Intel 845 Data bus width 64 bits Address bus width 32 bits Direct memory access (DMA) four channels Interrupts 15 Computer BIOS Desktop Management Interface (DMI) 2.0sand...
User's Guide
Page 167
... the following steps: 1 Click My Drivers in the Topic pull-down menu. To access the Dell OptiPlex ResourceCD Guide, click User's Guides in the Topic pull-down menu and click Dell OptiPlex ResourceCD. Solving Problems Hardware devices conflict Computer memory amount is not correct System board malfunctions System board is displayed on the screen. If...
... the following steps: 1 Click My Drivers in the Topic pull-down menu. To access the Dell OptiPlex ResourceCD Guide, click User's Guides in the Topic pull-down menu and click Dell OptiPlex ResourceCD. Solving Problems Hardware devices conflict Computer memory amount is not correct System board malfunctions System board is displayed on the screen. If...
User's Guide
Page 186
... characters printed on the same computer resources when those resources cannot be shared between the devices. www.dell.com | support.dell.com No. Symptoms: • Computer hangs or locks up, particularly while using a specific device. • Memory parity errors occur on parity-enabled computers. • Noise or other problems from the number of...
... characters printed on the same computer resources when those resources cannot be shared between the devices. www.dell.com | support.dell.com No. Symptoms: • Computer hangs or locks up, particularly while using a specific device. • Memory parity errors occur on parity-enabled computers. • Noise or other problems from the number of...
User's Guide
Page 187
...8226; Restart the computer. CAUTION: Before you perform the following steps. The problem is resolved. Did any of memory installed in the computer? Yes. Contact Dell for technical assistance. Yes. Go to their electrical outlets, wait 10 to 20 seconds, and then open the... amount of the diagnostics tests fail? The problem is resolved. Contact Dell for technical assistance. No. Does the RAM count displayed correctly match the actual amount of memory installed in the Dell Diagnostics. The memory module(s) were defective. No. No. Solving Problems 185 If the...
...8226; Restart the computer. CAUTION: Before you perform the following steps. The problem is resolved. Did any of memory installed in the computer? Yes. Contact Dell for technical assistance. Yes. Go to their electrical outlets, wait 10 to 20 seconds, and then open the... amount of the diagnostics tests fail? The problem is resolved. Contact Dell for technical assistance. No. Does the RAM count displayed correctly match the actual amount of memory installed in the Dell Diagnostics. The memory module(s) were defective. No. No. Solving Problems 185 If the...


