
User Manual
Page 2
...: A NOTE indicates important information that may be included are AU1361203N (Elementech International Co. Information in this text: Dell™, the DELL logo, and OptiPlex™ are not followed. Trademarks used in this publication to refer to hardware or loss of these materials in any... Regulatory Type: D05U001 March 2011 Rev. Reproduction of data if instructions are trademarks of Dell Inc. Power adapter models that helps you make better use of your thin client CAUTION: A CAUTION indicates potential damage to either the entities claiming the marks and names...
...: A NOTE indicates important information that may be included are AU1361203N (Elementech International Co. Information in this text: Dell™, the DELL logo, and OptiPlex™ are not followed. Trademarks used in this publication to refer to hardware or loss of these materials in any... Regulatory Type: D05U001 March 2011 Rev. Reproduction of data if instructions are trademarks of Dell Inc. Power adapter models that helps you make better use of your thin client CAUTION: A CAUTION indicates potential damage to either the entities claiming the marks and names...

User Manual
Page 3
If anything is shipped with the following items: 1 Power Cord 2 Adapter 3 Terminal Stand (pre-installed) 4 Quick Setup Guide 5 Warranty and Support Information 6 End User License Agreement 7 CD Containing Open Source Code 8 Safety, Environmental, and Regulatory Information 9 DVI-VGA Adapter NOTE: Inspect all parts visually for best performance. Dell™ OptiPlex™ FX130 Quick Setup Guide Before Setting Up Your FX130 NOTE: Place the thin client in its vertical orientation for damage. Your FX130 terminal is damaged, please contact Dell immediately to report the issue. | 3
If anything is shipped with the following items: 1 Power Cord 2 Adapter 3 Terminal Stand (pre-installed) 4 Quick Setup Guide 5 Warranty and Support Information 6 End User License Agreement 7 CD Containing Open Source Code 8 Safety, Environmental, and Regulatory Information 9 DVI-VGA Adapter NOTE: Inspect all parts visually for best performance. Dell™ OptiPlex™ FX130 Quick Setup Guide Before Setting Up Your FX130 NOTE: Place the thin client in its vertical orientation for damage. Your FX130 terminal is damaged, please contact Dell immediately to report the issue. | 3

User Manual
Page 10
CAUTION: To prevent overheating, and thus voiding your warranty, do not place anything on or over the thin client. | 10 5 Plug the power cord into a surge-protected AC outlet.
CAUTION: To prevent overheating, and thus voiding your warranty, do not place anything on or over the thin client. | 10 5 Plug the power cord into a surge-protected AC outlet.

User Manual
Page 11
... can damage the unit. Failure to do so may make the unit appear as if is important to not interrupt the power to the thin client while executing a firmware upgrade. Loss of power can result in a damaged operating system. | 11 CAUTION: It is not functioning properly. Do not ...shut the thin client down by removing the power cord. Adjust the equalizer to increase or decrease the earphones' and headphones' sound pressure levels. Loss of power can cause ...
... can damage the unit. Failure to do so may make the unit appear as if is important to not interrupt the power to the thin client while executing a firmware upgrade. Loss of power can result in a damaged operating system. | 11 CAUTION: It is not functioning properly. Do not ...shut the thin client down by removing the power cord. Adjust the equalizer to increase or decrease the earphones' and headphones' sound pressure levels. Loss of power can cause ...

User Manual
Page 12
Environmental Temperature: Operating Storage Relative humidity Altitude: Operating Storage 32° to 95° F (0° to 35° C) -4° to 140° F (-20° to 60° C) 20% to 80% non-condensing -15.2 to 2000 m (-50 to 6561.7 ft) -15.2 to 10,665 m (-50 to support.dell.com. For a complete and current listing of the specifications for your thin client. Specifications NOTE: The following specifications are only those required by law to ship with your thin client, go to 35,000 ft) | 12
Environmental Temperature: Operating Storage Relative humidity Altitude: Operating Storage 32° to 95° F (0° to 35° C) -4° to 140° F (-20° to 60° C) 20% to 80% non-condensing -15.2 to 2000 m (-50 to 6561.7 ft) -15.2 to 10,665 m (-50 to support.dell.com. For a complete and current listing of the specifications for your thin client. Specifications NOTE: The following specifications are only those required by law to ship with your thin client, go to 35,000 ft) | 12

User Manual
Page 13
Finding More Information and Resources See the safety and regulatory documents that shipped with your thin client and the regulatory compliance website at www.dell.com/regulatory_compliance for more information on: Safety best practices Warranty Terms and Conditions Regulatory Ergonomics End User License Agreement | 13
Finding More Information and Resources See the safety and regulatory documents that shipped with your thin client and the regulatory compliance website at www.dell.com/regulatory_compliance for more information on: Safety best practices Warranty Terms and Conditions Regulatory Ergonomics End User License Agreement | 13

VESA Mount Manual
Page 2
... to hardware or loss of your thin client. Dell Inc. disclaims any manner whatsoever without notice. © 2011 Dell Inc. A00 CAUTION: A CAUTION indicates potential damage to change without the written permission of these materials in any proprietary interest in this text: Dell™, the DELL logo, and OptiPlex™. March 2011 Rev. All rights reserved...
... to hardware or loss of your thin client. Dell Inc. disclaims any manner whatsoever without notice. © 2011 Dell Inc. A00 CAUTION: A CAUTION indicates potential damage to change without the written permission of these materials in any proprietary interest in this text: Dell™, the DELL logo, and OptiPlex™. March 2011 Rev. All rights reserved...
VESA Mount Manual
Page 3
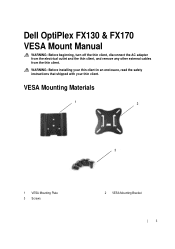
VESA Mounting Materials 1 2 1 VESA Mounting Plate 3 Screws 3 2 VESA Mounting Bracket | 3 Dell OptiPlex FX130 & FX170 VESA Mount Manual WARNING: Before beginning, turn off the thin client, disconnect the AC adapter from the electrical outlet and the thin client, and remove any other external cables from the thin client. WARNING: Before installing your thin client in an enclosure, read the safety instructions that shipped with your thin client.
VESA Mounting Materials 1 2 1 VESA Mounting Plate 3 Screws 3 2 VESA Mounting Bracket | 3 Dell OptiPlex FX130 & FX170 VESA Mount Manual WARNING: Before beginning, turn off the thin client, disconnect the AC adapter from the electrical outlet and the thin client, and remove any other external cables from the thin client. WARNING: Before installing your thin client in an enclosure, read the safety instructions that shipped with your thin client.
VESA Mount Manual
Page 4
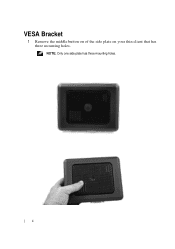
NOTE: Only one side plate has three mounting holes. | 4 VESA Bracket 1 Remove the middle button on of the side plate on your thin client that has three mounting holes.
NOTE: Only one side plate has three mounting holes. | 4 VESA Bracket 1 Remove the middle button on of the side plate on your thin client that has three mounting holes.

VESA Mount Manual
Page 5
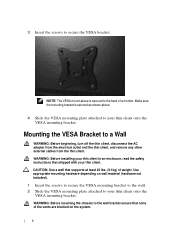
2 Place the VESA mounting plate on the thin client's side plate chassis and insert the screws to secure the mounting plate to the thin client. | 5
2 Place the VESA mounting plate on the thin client's side plate chassis and insert the screws to secure the mounting plate to the thin client. | 5
VESA Mount Manual
Page 6
... to the wall bracket ensure that supports at least 20 lbs. (9.1kg) of a monitor. WARNING: Before mounting the chassis to your thin client onto the VESA mounting bracket. NOTE: The VESA mount above . 4 Slide the VESA mounting plate attached to the back of weight. Use ...| 6 Make sure the mounting bracket is secured as shown above is secured to your thin client. WARNING: Before installing your thin client in an enclosure, read the safety instructions that shipped with your thin client onto the VESA mounting bracket. 3 Insert the screws to a Wall WARNING: Before beginning, ...
... to the wall bracket ensure that supports at least 20 lbs. (9.1kg) of a monitor. WARNING: Before mounting the chassis to your thin client onto the VESA mounting bracket. NOTE: The VESA mount above . 4 Slide the VESA mounting plate attached to the back of weight. Use ...| 6 Make sure the mounting bracket is secured as shown above is secured to your thin client. WARNING: Before installing your thin client in an enclosure, read the safety instructions that shipped with your thin client onto the VESA mounting bracket. 3 Insert the screws to a Wall WARNING: Before beginning, ...