E-Family Re-Image Guide
Page 16
... o O2Micro Smart Card Reader o Dell Smart Card Keyboard o UPEK TouchChip Fingerprint Reader o Authentec Fingerprint Reader o Broadcom Unified Security Hub o Vista Storage driver Update (for the security functions offered on Dell's driver & downloads support web site (support.dell.com) under the "Network" section - Intel (E4200, E4300, E6400/E6410, E6500/E6510 & M2400 & M4400/M4500 Products Only) o Microsoft...
... o O2Micro Smart Card Reader o Dell Smart Card Keyboard o UPEK TouchChip Fingerprint Reader o Authentec Fingerprint Reader o Broadcom Unified Security Hub o Vista Storage driver Update (for the security functions offered on Dell's driver & downloads support web site (support.dell.com) under the "Network" section - Intel (E4200, E4300, E6400/E6410, E6500/E6510 & M2400 & M4400/M4500 Products Only) o Microsoft...
E-Family Re-Image Guide
Page 17
... Point" section 2.6.10 Control Point System Manager - For Ambient Light Sensor (ALS), install the Dell Ambient Light Sensor Utility component of power management configuring and alerting capabilities: o Battery Status o Power Scheme and Sleep Mode o Display and Devices o Keyboard Backlighting and Hotkeys Customization o Extended Battery Life / All Day Battery Life - The Control Point...
... Point" section 2.6.10 Control Point System Manager - For Ambient Light Sensor (ALS), install the Dell Ambient Light Sensor Utility component of power management configuring and alerting capabilities: o Battery Status o Power Scheme and Sleep Mode o Display and Devices o Keyboard Backlighting and Hotkeys Customization o Extended Battery Life / All Day Battery Life - The Control Point...
E-Family Re-Image Guide
Page 26
...bang on E-Family 2nd generation? AMT SOL / LMS and AMT HECI c. After installing the drivers and you have this Dell Confidential What drivers are in device manager, you need to install the ST Micro Freefall Sensor driver found in the Chipset folder... Platform Module o Atmel Trusted Platform Module o STMicroelectronics Trusted Platform Module o Winbond Trusted Platform Module o O2Micro Smart Card Reader o Dell Smart Card Keyboard o UPEK TouchChip Fingerprint Reader o Authentec Fingerprint Reader o Broadcom Unified Security Hub o Vista Storage Driver Update (for the correct operation...
...bang on E-Family 2nd generation? AMT SOL / LMS and AMT HECI c. After installing the drivers and you have this Dell Confidential What drivers are in device manager, you need to install the ST Micro Freefall Sensor driver found in the Chipset folder... Platform Module o Atmel Trusted Platform Module o STMicroelectronics Trusted Platform Module o Winbond Trusted Platform Module o O2Micro Smart Card Reader o Dell Smart Card Keyboard o UPEK TouchChip Fingerprint Reader o Authentec Fingerprint Reader o Broadcom Unified Security Hub o Vista Storage Driver Update (for the correct operation...
E-Family Re-Image Guide
Page 28
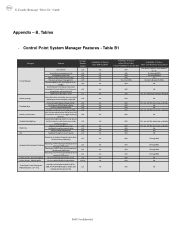
...Yes N/A Through BIOS Yes N/A Through BIOS Yes N/A Through BIOS Yes N/A Through BIOS Yes N/A No Yes N/A No Yes N/A No Dell Confidential Discreet Graphics Fn+E to enale/disable ALS v1.0 Feedback through on screen display v1.0 Reporting of Ambient Temp log information v1.2 ... - Table B1 Category Power Manager Display settings Function Keys Hot Key customizaton Keyboard backlighting Brightness ALS Feature DCP SM Release Version user profiles v1.0 View battery manufacturer info. Keyboard backlighting options (to be able to set to enable/disable Privacy screen v1...
...Yes N/A Through BIOS Yes N/A Through BIOS Yes N/A Through BIOS Yes N/A Through BIOS Yes N/A No Yes N/A No Yes N/A No Dell Confidential Discreet Graphics Fn+E to enale/disable ALS v1.0 Feedback through on screen display v1.0 Reporting of Ambient Temp log information v1.2 ... - Table B1 Category Power Manager Display settings Function Keys Hot Key customizaton Keyboard backlighting Brightness ALS Feature DCP SM Release Version user profiles v1.0 View battery manufacturer info. Keyboard backlighting options (to be able to set to enable/disable Privacy screen v1...

Setup and Quick Reference Guide
Page 7
About Your Computer NOTE: For more information about the features of your computer, see the Dell™ Technology Guide at support.dell.com. Front View 12 3 25 24 23 22 21 20 19 18 1 camera and microphone (optional) 3 display 4 5 6 9 A 7 8 9 12 11 10 1514 13 16 17 2 display latch 4 keyboard status lights About Your Computer 7
About Your Computer NOTE: For more information about the features of your computer, see the Dell™ Technology Guide at support.dell.com. Front View 12 3 25 24 23 22 21 20 19 18 1 camera and microphone (optional) 3 display 4 5 6 9 A 7 8 9 12 11 10 1514 13 16 17 2 display latch 4 keyboard status lights About Your Computer 7

Setup and Quick Reference Guide
Page 8
5 keyboard 6 volume control buttons 7 Dell ControlPoint (DCP) button 8 power button 9 USB connectors (2) 10 audio (line-out) and microphone (line-in) connectors 11 smart card slot 12 IEEE 1394a connector 13 wireless switch and 14 speaker Dell™ Wi-Fi Catcher™ Network Locator button 15 fingerprint reader (optional) 16 media bay 17 PC Card slot 18 contactless smart-card-reader 19 track stick 20 display latch release 21 track stick buttons/touch pad buttons 22 touch pad 23 speaker 24 device status lights 25 ambient light sensor 8 About Your Computer
5 keyboard 6 volume control buttons 7 Dell ControlPoint (DCP) button 8 power button 9 USB connectors (2) 10 audio (line-out) and microphone (line-in) connectors 11 smart card slot 12 IEEE 1394a connector 13 wireless switch and 14 speaker Dell™ Wi-Fi Catcher™ Network Locator button 15 fingerprint reader (optional) 16 media bay 17 PC Card slot 18 contactless smart-card-reader 19 track stick 20 display latch release 21 track stick buttons/touch pad buttons 22 touch pad 23 speaker 24 device status lights 25 ambient light sensor 8 About Your Computer

Setup and Quick Reference Guide
Page 14
2 Connect the network cable. 3 Connect USB devices, such as a mouse or keyboard. 4 Connect IEEE 1394 devices, such as a DVD player. 14 Setting Up Your Computer
2 Connect the network cable. 3 Connect USB devices, such as a mouse or keyboard. 4 Connect IEEE 1394 devices, such as a DVD player. 14 Setting Up Your Computer
Setup and Quick Reference Guide
Page 27
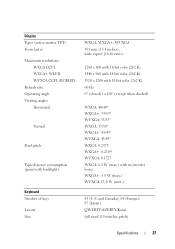
... Maximum resolutions: WXGA CCFL WXGA+ WLED WUXGA CCFL /RGBLED Refresh rate Operating angle Viewing angles: Horizontal Vertical Pixel pitch: Typical power consumption (panel with backlight): Keyboard Number of keys Layout Size WXGA, WXGA+, WUXGA 391 mm (15.4 inches), wide aspect (16:10 ratio) 1280 x 800 with 18-bit color (262 K) 1440...
... Maximum resolutions: WXGA CCFL WXGA+ WLED WUXGA CCFL /RGBLED Refresh rate Operating angle Viewing angles: Horizontal Vertical Pixel pitch: Typical power consumption (panel with backlight): Keyboard Number of keys Layout Size WXGA, WXGA+, WUXGA 391 mm (15.4 inches), wide aspect (16:10 ratio) 1280 x 800 with 18-bit color (262 K) 1440...

Setup and Quick Reference Guide
Page 33
... and the back left corner of the procedures in standby mode. Blinking amber The computer is connected and probably not not responding powered on the keyboard, move the mouse, or press the power button to indicate different states. CAUTION: Before you begin any of the computer illuminate and blink or remain...
... and the back left corner of the procedures in standby mode. Blinking amber The computer is connected and probably not not responding powered on the keyboard, move the mouse, or press the power button to indicate different states. CAUTION: Before you begin any of the computer illuminate and blink or remain...

Setup and Quick Reference Guide
Page 37
... program. The system configuration information does not match the hardware configuration. Run the Keyboard Controller test in the Dell Diagnostics (see "Dell Diagnostics" on page 42). For external keyboards, check the cable connection. Run the Keyboard Controller test in the Dell Diagnostics (see "Dell Diagnostics" on page 42). If the problem persists, try another drive. Run the...
... program. The system configuration information does not match the hardware configuration. Run the Keyboard Controller test in the Dell Diagnostics (see "Dell Diagnostics" on page 42). For external keyboards, check the cable connection. Run the Keyboard Controller test in the Dell Diagnostics (see "Dell Diagnostics" on page 42). If the problem persists, try another drive. Run the...
Setup and Quick Reference Guide
Page 38
... keypads, check the cable connection. Restart the computer, and avoid touching the keyboard or keys during the boot routine. See your Service Manual at support.dell.com for more information. Shut down the computer, wait 30 seconds, and then ...the hard drive is installed, properly seated, and partitioned as a boot device. 38 Troubleshooting K E Y B O A R D S T U C K KEY F A I O N E R R O R - Dell™ MediaDirect™ cannot verify the Digital Rights Management (DRM) restrictions on the file, so the file cannot be faulty or improperly seated. M EMORY A L L O C A T I L U R E -...
... keypads, check the cable connection. Restart the computer, and avoid touching the keyboard or keys during the boot routine. See your Service Manual at support.dell.com for more information. Shut down the computer, wait 30 seconds, and then ...the hard drive is installed, properly seated, and partitioned as a boot device. 38 Troubleshooting K E Y B O A R D S T U C K KEY F A I O N E R R O R - Dell™ MediaDirect™ cannot verify the Digital Rights Management (DRM) restrictions on the file, so the file cannot be faulty or improperly seated. M EMORY A L L O C A T I L U R E -...

Setup and Quick Reference Guide
Page 40
... specific track on page 65). Run the System Set tests in the table, see "Contacting Dell" on the hard drive. O F - otherwise, activate hibernate mode or shut down the computer. The keyboard controller may be malfunctioning, or a memory module may require recharging. WA R N I N ...L O W - SHUTDOWN FAILURE - OF - The time or date stored in the Dell Diagnostics (see "Dell Diagnostics" on page 42). SEEK ERROR - D A Y N O T S E T - Run the System Memory tests and the Keyboard Controller test in the system setup program does not match the system clock. If the ...
... specific track on page 65). Run the System Set tests in the table, see "Contacting Dell" on the hard drive. O F - otherwise, activate hibernate mode or shut down the computer. The keyboard controller may be malfunctioning, or a memory module may require recharging. WA R N I N ...L O W - SHUTDOWN FAILURE - OF - The time or date stored in the Dell Diagnostics (see "Dell Diagnostics" on page 42). SEEK ERROR - D A Y N O T S E T - Run the System Memory tests and the Keyboard Controller test in the system setup program does not match the system clock. If the ...

Setup and Quick Reference Guide
Page 41
...is correct see "Contacting Dell" on page 65 for assistance. Keyboard failure or keyboard cable loose. HARD DRIVE... - Possible motherboard failure or RTC battery low. CPU FAN FAILURE - Possible hard drive failure during hard drive POST. Troubleshooting 41 Replace processor fan. HA R D -D I S K D R I V E R E A D F A I V E P R O B L E M - KEYBOARD FAILURE - NOTICE - S.M.A.R.T error, possible hard drive failure. FOR HELP IN RESOLVING THIS PROBLEM, PLEASE NOTE THIS C H E C K P O I N T A N D C O N T A C T D E L L TE C H N I C E AVAILABLE - Processor fan ...
...is correct see "Contacting Dell" on page 65 for assistance. Keyboard failure or keyboard cable loose. HARD DRIVE... - Possible motherboard failure or RTC battery low. CPU FAN FAILURE - Possible hard drive failure during hard drive POST. Troubleshooting 41 Replace processor fan. HA R D -D I S K D R I V E R E A D F A I V E P R O B L E M - KEYBOARD FAILURE - NOTICE - S.M.A.R.T error, possible hard drive failure. FOR HELP IN RESOLVING THIS PROBLEM, PLEASE NOTE THIS C H E C K P O I N T A N D C O N T A C T D E L L TE C H N I C E AVAILABLE - Processor fan ...
Setup and Quick Reference Guide
Page 45
... Remove and then reinstall all memory modules (see your Service Manual at support.dell.com). • Remove and then reinstall any power strips being used are plugged into an electrical outlet and are turned on the keyboard, move the mouse, or press the power button to resume normal operation. ... cable are securely connected to the system board (see "Beep Codes" on page 34. Some possible causes of interference are: • Power, keyboard, and mouse extension cables • Too many devices connected to the same power strip • Multiple power strips connected to the same electrical outlet...
... Remove and then reinstall all memory modules (see your Service Manual at support.dell.com). • Remove and then reinstall any power strips being used are plugged into an electrical outlet and are turned on the keyboard, move the mouse, or press the power button to resume normal operation. ... cable are securely connected to the system board (see "Beep Codes" on page 34. Some possible causes of interference are: • Power, keyboard, and mouse extension cables • Too many devices connected to the same power strip • Multiple power strips connected to the same electrical outlet...

Setup and Quick Reference Guide
Page 47
... Compatibility Wizard→ Next. 2 Follow the instructions on a floppy disk, CD, or DVD. If you are unable to get a response by pressing a key on your keyboard or moving your mouse, press and hold the power button for an earlier Microsoft® Windows® operating system RUN THE PROGRAM COMPATIBILITY WIZARD - Troubleshooting...
... Compatibility Wizard→ Next. 2 Follow the instructions on a floppy disk, CD, or DVD. If you are unable to get a response by pressing a key on your keyboard or moving your mouse, press and hold the power button for an earlier Microsoft® Windows® operating system RUN THE PROGRAM COMPATIBILITY WIZARD - Troubleshooting...
Setup and Quick Reference Guide
Page 48
..., or DVDs • Save and close any open files or programs and shut down your computer through the Start menu Dell Technical Update Service The Dell Technical Update service provides proactive e-mail notification of software and hardware updates for your computer meets the minimum hardware requirements needed ... program. • If necessary, uninstall and then reinstall the program. 2 In the welcome screen, click Next. 3 Follow the instructions on your keyboard or moving your mouse, press and hold the power button for at least 8 to 10 seconds (until the computer turns off), and then restart...
..., or DVDs • Save and close any open files or programs and shut down your computer through the Start menu Dell Technical Update Service The Dell Technical Update service provides proactive e-mail notification of software and hardware updates for your computer meets the minimum hardware requirements needed ... program. • If necessary, uninstall and then reinstall the program. 2 In the welcome screen, click Next. 3 Follow the instructions on your keyboard or moving your mouse, press and hold the power button for at least 8 to 10 seconds (until the computer turns off), and then restart...

Setup and Quick Reference Guide
Page 57
... System Recovery Options window, select a keyboard layout and click Next. 4 To access the recovery options, log on page 54. The Confirm Data Deletion screen appears. See "Using Microsoft® Windows® System Restore" on as a local user. Using the Dell™ Operating System Media Before you Begin... detected by the computer. See "Returning to the operating state it was in the user name field, then click OK. 5 Click Dell Factory Image Restore. Reinstalling Software 57 NOTICE: Before performing the installation, back up all data files on page 52. NOTE: Depending upon...
... System Recovery Options window, select a keyboard layout and click Next. 4 To access the recovery options, log on page 54. The Confirm Data Deletion screen appears. See "Using Microsoft® Windows® System Restore" on as a local user. Using the Dell™ Operating System Media Before you Begin... detected by the computer. See "Returning to the operating state it was in the user name field, then click OK. 5 Click Dell Factory Image Restore. Reinstalling Software 57 NOTICE: Before performing the installation, back up all data files on page 52. NOTE: Depending upon...

Setup and Quick Reference Guide
Page 63
...Before working inside your computer. Remember to type some commands at the keyboard, relay detailed information during operations, or try other troubleshooting steps possible only at or near the computer. The code helps Dell's automated-support telephone system direct your Express Service Code ready when ...you call from a telephone at the computer itself. You may also be asked for assistance and call Dell for your Service Tag (located on page...
...Before working inside your computer. Remember to type some commands at the keyboard, relay detailed information during operations, or try other troubleshooting steps possible only at or near the computer. The code helps Dell's automated-support telephone system direct your Express Service Code ready when ...you call from a telephone at the computer itself. You may also be asked for assistance and call Dell for your Service Tag (located on page...
Service Manual
Page 1
... without the written permission of Dell Inc.; Dell Precision™ Mobile Workstation M4400 Service Manual Troubleshooting Before Working on Your Computer Base Assembly Hinge Covers Hard Drive WLAN Card WWAN Card WPAN/UWB Card Fan Heat Sinks Processor Module Memory Coin-Cell Battery Modular Drive LED Cover Keyboard Right Speaker Grill and Fingerprint ... Other trademarks and trade names may be used in the United States and/or other than its own. Information in this text: Dell, the DELL logo, and Dell Precision are either the entities claiming the marks and names or their products.
... without the written permission of Dell Inc.; Dell Precision™ Mobile Workstation M4400 Service Manual Troubleshooting Before Working on Your Computer Base Assembly Hinge Covers Hard Drive WLAN Card WWAN Card WPAN/UWB Card Fan Heat Sinks Processor Module Memory Coin-Cell Battery Modular Drive LED Cover Keyboard Right Speaker Grill and Fingerprint ... Other trademarks and trade names may be used in the United States and/or other than its own. Information in this text: Dell, the DELL logo, and Dell Precision are either the entities claiming the marks and names or their products.

Service Manual
Page 3
... five M2.5 x 5-mm screws labeled with a small plastic scribe. 1 M2 x 3-mm screw (2) 3 latch tab 2 PC card cage 4 plastic scribe 24. Remove the keyboard (see Removing a WPAN/UWB Card). 12. Remove the card in the WWAN/FCM slot, if present (see Removing the I/O Board). 28. Remove the SD card... 20. Remove the I /O board cable from the system board. Remove the card in the WPAN/UWB/FCM slot, if present (see Removing the Keyboard). 9. Remove the DC power cable from the system board. 25. The DC power connector is the seven-wire connector located near the processor. 18....
... five M2.5 x 5-mm screws labeled with a small plastic scribe. 1 M2 x 3-mm screw (2) 3 latch tab 2 PC card cage 4 plastic scribe 24. Remove the keyboard (see Removing a WPAN/UWB Card). 12. Remove the card in the WWAN/FCM slot, if present (see Removing the I/O Board). 28. Remove the SD card... 20. Remove the I /O board cable from the system board. Remove the card in the WPAN/UWB/FCM slot, if present (see Removing the Keyboard). 9. Remove the DC power cable from the system board. 25. The DC power connector is the seven-wire connector located near the processor. 18....


