E-Family Re-Image Guide
Page 15
...generation only, the Audio driver must be installed prior to be installed on Dell E-Family products: 1st Generation 2nd Generation E4200 E4300 E5400 E5500 E6400 E6400 ATG E6500 M2400 M4400 M6400 E6410 E6410 ATG E6510 M4500 M6500 Intel nVidia GM45/GE45/GS 45 QM57...criteria: o nVidia or ATI discrete graphics cards o Core i7 and i5 Dual Core CPUs - Intel Turbo Boost driver is required to installing the graphics driver. The following table lists the various graphics solutions' offerings on platforms meeting both of following driver provided by Dell. E-Family Reimage "How-To" ...
...generation only, the Audio driver must be installed prior to be installed on Dell E-Family products: 1st Generation 2nd Generation E4200 E4300 E5400 E5500 E6400 E6400 ATG E6500 M2400 M4400 M6400 E6410 E6410 ATG E6510 M4500 M6500 Intel nVidia GM45/GE45/GS 45 QM57...criteria: o nVidia or ATI discrete graphics cards o Core i7 and i5 Dual Core CPUs - Intel Turbo Boost driver is required to installing the graphics driver. The following table lists the various graphics solutions' offerings on platforms meeting both of following driver provided by Dell. E-Family Reimage "How-To" ...
E-Family Re-Image Guide
Page 28
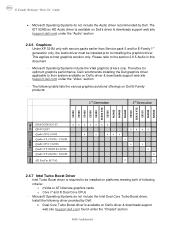
UMA Graphics Fn+E to toggle display by v1.0 default). v1.0 View battery health info. v1.0 (ADBL) Dell Enhanced Performance Plans (User Selectable Thermal Tables for sRGB, Pro Photo RGB/Kodak or Adobe color v1.3 RGB LED Displays (17" only) settings (... (PWS only) Reporting of ECC Alerts log information at OS presence (PWS only) Privacy Screen - v1.0 battery charge enable/disable status v1.0 Network card power management v1.0 Extended Battery Life/ All Day Battery Life. Yes, through BIOS Yes, through on screen display v1.0 Ability to enable/disable Privacy ...
UMA Graphics Fn+E to toggle display by v1.0 default). v1.0 View battery health info. v1.0 (ADBL) Dell Enhanced Performance Plans (User Selectable Thermal Tables for sRGB, Pro Photo RGB/Kodak or Adobe color v1.3 RGB LED Displays (17" only) settings (... (PWS only) Reporting of ECC Alerts log information at OS presence (PWS only) Privacy Screen - v1.0 battery charge enable/disable status v1.0 Network card power management v1.0 Extended Battery Life/ All Day Battery Life. Yes, through BIOS Yes, through on screen display v1.0 Ability to enable/disable Privacy ...

Setup and Quick Reference Guide
Page 33
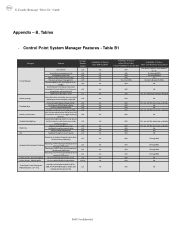
... or remain solid to resume normal operation. Steady blue and the computer is The display is receiving electrical power, a device such as a memory module or graphics card might be a power problem or an internal device malfunction. Steady amber There may be malfunctioning or incorrectly installed. Troubleshooting CAUTION: To guard against the likelihood...
... or remain solid to resume normal operation. Steady blue and the computer is The display is receiving electrical power, a device such as a memory module or graphics card might be a power problem or an internal device malfunction. Steady amber There may be malfunctioning or incorrectly installed. Troubleshooting CAUTION: To guard against the likelihood...
Setup and Quick Reference Guide
Page 45
... - • Ensure that the display is connected and powered on. • If the display is connected and powered on, see your Service Manual at support.dell.com). I F T H E P O W E R L I G H T I S B L I N K I S S T E A D Y A M B E R - I F T H E P O W E R L I G H T I N G A M B E R - The computer is in standby mode. The computer is receiving ...to resume normal operation. ELIMINATE INTERFERENCE - • Ensure that any expansion cards, including graphics cards (see your Service Manual at support.dell.com). I F T H E P O W E R L I G H T I S B L I N K I N G B L U E -
... - • Ensure that the display is connected and powered on. • If the display is connected and powered on, see your Service Manual at support.dell.com). I F T H E P O W E R L I G H T I S B L I N K I S S T E A D Y A M B E R - I F T H E P O W E R L I G H T I N G A M B E R - The computer is in standby mode. The computer is receiving ...to resume normal operation. ELIMINATE INTERFERENCE - • Ensure that any expansion cards, including graphics cards (see your Service Manual at support.dell.com). I F T H E P O W E R L I G H T I S B L I N K I N G B L U E -

Service Manual
Page 3
...see Removing the Discrete Graphics Heat Sink). 16. Remove the discrete graphics heat sink (see Removing a WLAN Card). 11. Disconnect the DC power cable from the system board. 25. Remove the palm rest assembly (see Removing the SD Card Reader). 20. Remove the SD card reader assembly (see ... Assembly). 19. Remove the five M2.5 x 5-mm screws labeled with a small plastic scribe. 1 M2 x 3-mm screw (2) 3 latch tab 2 PC card cage 4 plastic scribe 24. Remove the I/O board (see Removing the Processor Heat Sink). Remove the processor heat sink (see Removing the I /O board cable ...
...see Removing the Discrete Graphics Heat Sink). 16. Remove the discrete graphics heat sink (see Removing a WLAN Card). 11. Disconnect the DC power cable from the system board. 25. Remove the palm rest assembly (see Removing the SD Card Reader). 20. Remove the SD card reader assembly (see ... Assembly). 19. Remove the five M2.5 x 5-mm screws labeled with a small plastic scribe. 1 M2 x 3-mm screw (2) 3 latch tab 2 PC card cage 4 plastic scribe 24. Remove the I/O board (see Removing the Processor Heat Sink). Remove the processor heat sink (see Removing the I /O board cable ...

Service Manual
Page 4
...). 11. Replace the display assembly (see Replacing the System Board Assembly). 5. Replace the discrete graphics heat sink (see Replacing the Modem). 21. Replace the modem (see Replacing the Discrete Graphics Heat Sink). 14. Replace the bottom of the Base Assembly). 22. Replace the modular drive ... Palm Rest Assembly). 9. Replace the palm rest assembly and thermal plate (see Replacing the Express Card Cage). 6. Replace the processor heat sink (see Replacing the Fan). 16. Replace the PC card cage. Replace the fan (see Replacing the Processor Heat Sink). 15. Replace the hard drive...
...). 11. Replace the display assembly (see Replacing the System Board Assembly). 5. Replace the discrete graphics heat sink (see Replacing the Modem). 21. Replace the modem (see Replacing the Discrete Graphics Heat Sink). 14. Replace the bottom of the Base Assembly). 22. Replace the modular drive ... Palm Rest Assembly). 9. Replace the palm rest assembly and thermal plate (see Replacing the Express Card Cage). 6. Replace the processor heat sink (see Replacing the Fan). 16. Replace the PC card cage. Replace the fan (see Replacing the Processor Heat Sink). 15. Replace the hard drive...
Service Manual
Page 47
... top, left corner of the Base Assembly). 6. Close the display and turn the computer over. 3. Remove the discrete graphics heat sink (see Removing the Express Card Cage). 16. Remove three M2.5 x 5-mm screws labeled with your computer. For additional safety best practices information, see... the Regulatory Compliance Homepage on Your Computer. 2. Remove the modular drive (see Removing the Bottom of the base assembly to Contents Page DC Power Cable Dell Precision...
... top, left corner of the Base Assembly). 6. Close the display and turn the computer over. 3. Remove the discrete graphics heat sink (see Removing the Express Card Cage). 16. Remove three M2.5 x 5-mm screws labeled with your computer. For additional safety best practices information, see... the Regulatory Compliance Homepage on Your Computer. 2. Remove the modular drive (see Removing the Bottom of the base assembly to Contents Page DC Power Cable Dell Precision...
Service Manual
Page 48
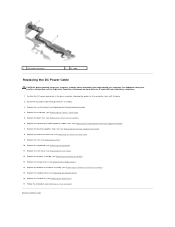
...the Hinge Covers). 14. Replace the hinge covers (see Replacing the Processor Heat Sink). 9. Follow the procedure After Working on www.dell.com at: www.dell.com/regulatory_compliance. 1. Replace the bottom of the base assembly (see Replacing the Palm Rest Assembly). 6. Replace the palm rest (see ...Your Computer. Replace the display assembly (see Replacing the System Board Assembly). 4. Replace the hard drive (see Replacing the Express Card Cage). 5. 1 DC power connector 2 DC cable Replacing the DC Power Cable CAUTION: Before working inside your computer. Back to Contents Page ...
...the Hinge Covers). 14. Replace the hinge covers (see Replacing the Processor Heat Sink). 9. Follow the procedure After Working on www.dell.com at: www.dell.com/regulatory_compliance. 1. Replace the bottom of the base assembly (see Replacing the Palm Rest Assembly). 6. Replace the palm rest (see ...Your Computer. Replace the display assembly (see Replacing the System Board Assembly). 4. Replace the hard drive (see Replacing the Express Card Cage). 5. 1 DC power connector 2 DC cable Replacing the DC Power Cable CAUTION: Before working inside your computer. Back to Contents Page ...

Service Manual
Page 53
... a WLAN Card). 9. Remove the modular drive (see Removing a WWAN Card). 8. Remove the card in the WLAN/WiMax slot, if present (see the Regulatory Compliance Homepage on www.dell.com at: www.dell.com/regulatory_compliance. 1. Remove the processor heat sink (see Removing the Discrete Graphics Heat Sink).... (see Removing a WPAN/UWB Card). 11. Disconnect the SD card cable from the system board. 22. Remove the fan (see Removing the Battery). 4. The replacement kit for transferring the Service Tag to Contents Page System Board Assembly Dell Precision™ Service Manual Removing the ...
... a WLAN Card). 9. Remove the modular drive (see Removing a WWAN Card). 8. Remove the card in the WLAN/WiMax slot, if present (see the Regulatory Compliance Homepage on www.dell.com at: www.dell.com/regulatory_compliance. 1. Remove the processor heat sink (see Removing the Discrete Graphics Heat Sink).... (see Removing a WPAN/UWB Card). 11. Disconnect the SD card cable from the system board. 22. Remove the fan (see Removing the Battery). 4. The replacement kit for transferring the Service Tag to Contents Page System Board Assembly Dell Precision™ Service Manual Removing the ...
Service Manual
Page 55
Connect the Express card cable to the system board. 12. Replace the discrete graphics heat sink (see Replacing the Processor Heat Sink). 23. Replace the processor heat sink (see Replacing the Discrete Graphics Heat Sink). 21. Replace the bottom of the base assembly (see the Dell™ Technology Guide on your computer on the system...
Connect the Express card cable to the system board. 12. Replace the discrete graphics heat sink (see Replacing the Processor Heat Sink). 23. Replace the processor heat sink (see Replacing the Discrete Graphics Heat Sink). 21. Replace the bottom of the base assembly (see the Dell™ Technology Guide on your computer on the system...
Service Manual
Page 57
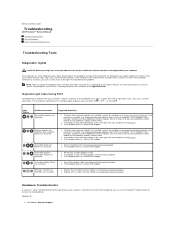
... Memory). l Reseat the processor (see Removing the Display Assembly). A possible graphics card/video failure has occurred. Back to Contents Page Troubleshooting Dell Precision™ Service Manual Troubleshooting Tools Solving Problems Dell™ Technical Update Service Troubleshooting Tools Diagnostic Lights CAUTION: Before you begin any installed graphics cards. If the computer malfunctions the individual lights display a status of...
... Memory). l Reseat the processor (see Removing the Display Assembly). A possible graphics card/video failure has occurred. Back to Contents Page Troubleshooting Dell Precision™ Service Manual Troubleshooting Tools Solving Problems Dell™ Technical Update Service Troubleshooting Tools Diagnostic Lights CAUTION: Before you begin any installed graphics cards. If the computer malfunctions the individual lights display a status of...
Service Manual
Page 66
... muted. If you receive notifications. Click Start® Control Panel® Appearance and Themes. 2. Turn on your graphics card, go to support.dell.com/technicalupdate. The service is free and can be defective. See the Dell™ Technology Guide on the computer and the monitor and adjust the monitor brightness and contrast controls. Check...
... muted. If you receive notifications. Click Start® Control Panel® Appearance and Themes. 2. Turn on your graphics card, go to support.dell.com/technicalupdate. The service is free and can be defective. See the Dell™ Technology Guide on the computer and the monitor and adjust the monitor brightness and contrast controls. Check...


