
User Guide
Page 6
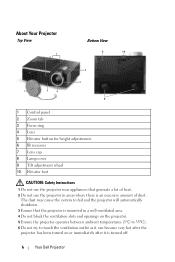
About Your Projector Top View 1 6 Bottom View 8 10 2 3 7 5 4 9 1 Control panel 2 Zoom tab 3 Focus ring 4 Lens 5 Elevator button for height adjustments 6 IR receivers 7 Lens cap 8 Lamp cover 9 Tilt adjustment wheel 10 Elevator foot CAUTION: Safety Instructions 1 Do not use the ... turned on or immediately after it is an excessive amount of heat. 2 Do not use the projector in areas where there is turned off. 6 Your Dell Projector The dust may cause the system to fail and the projector will automatically shutdown. 3 Ensure that generate a lot of dust.
About Your Projector Top View 1 6 Bottom View 8 10 2 3 7 5 4 9 1 Control panel 2 Zoom tab 3 Focus ring 4 Lens 5 Elevator button for height adjustments 6 IR receivers 7 Lens cap 8 Lamp cover 9 Tilt adjustment wheel 10 Elevator foot CAUTION: Safety Instructions 1 Do not use the ... turned on or immediately after it is an excessive amount of heat. 2 Do not use the projector in areas where there is turned off. 6 Your Dell Projector The dust may cause the system to fail and the projector will automatically shutdown. 3 Ensure that generate a lot of dust.
User Guide
Page 16
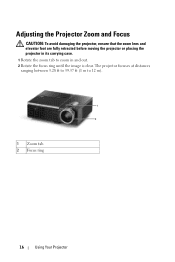
The projector focuses at distances ranging between 3.28 ft to 39.37 ft (1 m to zoom in its carrying case. 1 Rotate the zoom tab to 12 m). 1 2 1 Zoom tab 2 Focus ring 16 Using Your Projector Adjusting the Projector Zoom and Focus CAUTION: To avoid damaging the projector, ensure that the zoom lens and elevator foot are fully retracted before moving the projector or placing the projector in and out. 2 Rotate the focus ring until the image is clear.
The projector focuses at distances ranging between 3.28 ft to 39.37 ft (1 m to zoom in its carrying case. 1 Rotate the zoom tab to 12 m). 1 2 1 Zoom tab 2 Focus ring 16 Using Your Projector Adjusting the Projector Zoom and Focus CAUTION: To avoid damaging the projector, ensure that the zoom lens and elevator foot are fully retracted before moving the projector or placing the projector in and out. 2 Rotate the focus ring until the image is clear.
User Guide
Page 42
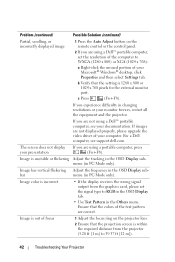
... of your Microsoft® Windows® desktop, click Properties and then select Settings tab. If you are not using a Dell™ portable computer, see support.dell.com. Ensure that the setting is unstable or flickering Adjust the tracking in the OSD Display submenu (in changing resolutions or your...set the resolution of the computer to WXGA (1280 x 800) or XGA (1024 x 768): a Right-click the unused portion of focus 1 Adjust the focus ring on the remote control or the control panel. 2 If you are not displayed properly, please upgrade the video driver of the test pattern ...
... of your Microsoft® Windows® desktop, click Properties and then select Settings tab. If you are not using a Dell™ portable computer, see support.dell.com. Ensure that the setting is unstable or flickering Adjust the tracking in the OSD Display submenu (in changing resolutions or your...set the resolution of the computer to WXGA (1280 x 800) or XGA (1024 x 768): a Right-click the unused portion of focus 1 Adjust the focus ring on the remote control or the control panel. 2 If you are not displayed properly, please upgrade the video driver of the test pattern ...
User Guide
Page 57
... Image 15 Adjusting the Projector Height 15 lower the projector Elevator button 15 Elevator foot 15 Tilt adjustment wheel 15 Adjusting the Projector Zoom and Focus 16 Focus ring 16 Zoom tab 16 Audio 8 Audio Input 36 Audio Settings 35 Cable 10 HDMI cable 13 Power cord 9, 10, 11, 12, 13 S-video... Composite video cable 11 Connecting with a Component Cable 12 Connecting with a Composite Cable 11 Connecting with an HDMI Cable 13 Connecting with an S-video D Dell contacting 53 M Main Unit 6 Control panel 6 Elevator button 6 Focus ring 6 IR receiver 6 Lens 6 Zoom tab 6 Menu Position 34 Index 57
... Image 15 Adjusting the Projector Height 15 lower the projector Elevator button 15 Elevator foot 15 Tilt adjustment wheel 15 Adjusting the Projector Zoom and Focus 16 Focus ring 16 Zoom tab 16 Audio 8 Audio Input 36 Audio Settings 35 Cable 10 HDMI cable 13 Power cord 9, 10, 11, 12, 13 S-video... Composite video cable 11 Connecting with a Component Cable 12 Connecting with a Composite Cable 11 Connecting with an HDMI Cable 13 Connecting with an S-video D Dell contacting 53 M Main Unit 6 Control panel 6 Elevator button 6 Focus ring 6 IR receiver 6 Lens 6 Zoom tab 6 Menu Position 34 Index 57

