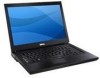
E-Family Re-Image Guide
Page 10
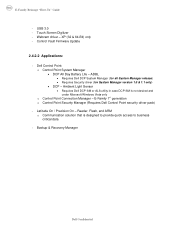
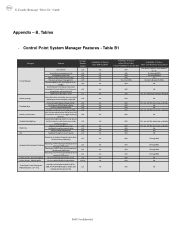
...: o Control Point System Manager • DCP All Day Battery Life - Reader, Flash, and ARM o Communication solution that is not desired and under Microsoft Windows Vista only o Control Point Connection Manager - Touch Screen Digitizer - Latitude On / Precision On - E-Family 1st generation o Control Point Security Manager (Requires Dell Control Point security driver pack) - USB 3.0 - ADBL...
...: o Control Point System Manager • DCP All Day Battery Life - Reader, Flash, and ARM o Communication solution that is not desired and under Microsoft Windows Vista only o Control Point Connection Manager - Touch Screen Digitizer - Latitude On / Precision On - E-Family 1st generation o Control Point Security Manager (Requires Dell Control Point security driver pack) - USB 3.0 - ADBL...
E-Family Re-Image Guide
Page 11
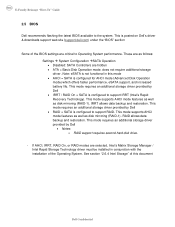
... features as well as disk mirroring (RAID-1). This mode supports AHCI mode features as well as disk mirroring (RAID-1). E-Family Reimage "How-To" Guide 2.5 BIOS Dell recommends flashing the latest BIOS available to Operating System performance. These are as follows: Settings System Configuration SATA Operation • Disabled: SATA Controllers... settings are critical to the system. Note: eSATA is configured for AHCI mode (Advanced Disk Operation mode) which offers faster performance, eSATA support, and increased battery life.
... features as well as disk mirroring (RAID-1). This mode supports AHCI mode features as well as disk mirroring (RAID-1). E-Family Reimage "How-To" Guide 2.5 BIOS Dell recommends flashing the latest BIOS available to Operating System performance. These are as follows: Settings System Configuration SATA Operation • Disabled: SATA Controllers... settings are critical to the system. Note: eSATA is configured for AHCI mode (Advanced Disk Operation mode) which offers faster performance, eSATA support, and increased battery life.
E-Family Re-Image Guide
Page 17
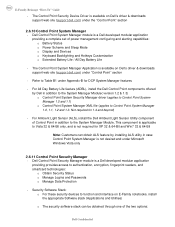
... Point System Manager is applicable to function and interface on Dell's driver & downloads support web site (support.dell.com) under "Control Point" section - For Ambient Light Sensor (ALS), install the Dell Ambient Light Sensor Utility component of power management configuring and alerting capabilities: o Battery Status o Power Scheme and Sleep Mode o Display and Devices o Keyboard...
... Point System Manager is applicable to function and interface on Dell's driver & downloads support web site (support.dell.com) under "Control Point" section - For Ambient Light Sensor (ALS), install the Dell Ambient Light Sensor Utility component of power management configuring and alerting capabilities: o Battery Status o Power Scheme and Sleep Mode o Display and Devices o Keyboard...
E-Family Re-Image Guide
Page 28
...settings Function Keys Hot Key customizaton Keyboard backlighting Brightness ALS Feature DCP SM Release Version user profiles v1.0 View battery manufacturer info. v1.0 (ADBL) Dell Enhanced Performance Plans (User Selectable Thermal Tables for Desktops presence (PWS only) Reporting of SMART Alerts log information ... only) settings (certain panels only) Availablity of Feature when only Windows OS installed? Fn+F2 to enable Battery Charge disable v1.0 Fn+F3 launch DCP w/ Battery Status v1.0 Fn+F7 to enable/disable DCP v1.0 Fn+F8 to switch between display settings v1.0 User...
...settings Function Keys Hot Key customizaton Keyboard backlighting Brightness ALS Feature DCP SM Release Version user profiles v1.0 View battery manufacturer info. v1.0 (ADBL) Dell Enhanced Performance Plans (User Selectable Thermal Tables for Desktops presence (PWS only) Reporting of SMART Alerts log information ... only) settings (certain panels only) Availablity of Feature when only Windows OS installed? Fn+F2 to enable Battery Charge disable v1.0 Fn+F3 launch DCP w/ Battery Status v1.0 Fn+F7 to enable/disable DCP v1.0 Fn+F8 to switch between display settings v1.0 User...
Replacing the System Board
Page 3
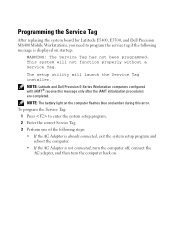
...Dell Precision M6400 Mobile Workstations, you need to enter the system setup program. 2 Enter the correct Service Tag. 3 Perform one of the following message is not connected, turn the computer off, connect the AC adapter, and then turn the computer back on. This system will launch the Service Tag installer. NOTE: The battery... light on startup: WARNING: The Service Tag has not been programmed. The setup utility will not function properly without a Service Tag. NOTE: Latitude and Dell Precision E-Series Workstation computers configured with iAMT®...
...Dell Precision M6400 Mobile Workstations, you need to enter the system setup program. 2 Enter the correct Service Tag. 3 Perform one of the following message is not connected, turn the computer off, connect the AC adapter, and then turn the computer back on. This system will launch the Service Tag installer. NOTE: The battery... light on startup: WARNING: The Service Tag has not been programmed. The setup utility will not function properly without a Service Tag. NOTE: Latitude and Dell Precision E-Series Workstation computers configured with iAMT®...

Setup and Quick Reference Guide
Page 3
Contents 1 About Your Computer 7 Front View 7 Back View 9 Bottom View 10 Battery Removal 10 Wireless Switch and Dell™ Wi-Fi Catcher™ Network Locator 11 2 Setting Up Your Computer 13 Quick Setup 13 Connecting to the Internet 16 Setting Up Your Internet Connection 16 Transferring Information to a New Computer 17 Microsoft® Windows Vista® Operating System 17 Microsoft Windows® XP 18 Contents 3
Contents 1 About Your Computer 7 Front View 7 Back View 9 Bottom View 10 Battery Removal 10 Wireless Switch and Dell™ Wi-Fi Catcher™ Network Locator 11 2 Setting Up Your Computer 13 Quick Setup 13 Connecting to the Internet 16 Setting Up Your Internet Connection 16 Transferring Information to a New Computer 17 Microsoft® Windows Vista® Operating System 17 Microsoft Windows® XP 18 Contents 3

Setup and Quick Reference Guide
Page 9
... the airflow can damage the computer or cause a fire. Do not store your Dell™ computer in the air vents. The computer turns on the fan when the computer gets hot. Back View 1 2 10 3 4 5 9 8 67 1 RJ-11 connector (optional) 3 battery/power lights 5 AC adapter 7 video connector 9 USB PowerShare connector 2 RJ-45 network...
... the airflow can damage the computer or cause a fire. Do not store your Dell™ computer in the air vents. The computer turns on the fan when the computer gets hot. Back View 1 2 10 3 4 5 9 8 67 1 RJ-11 connector (optional) 3 battery/power lights 5 AC adapter 7 video connector 9 USB PowerShare connector 2 RJ-45 network...

Setup and Quick Reference Guide
Page 10
... wall connector and computer, and remove any of fire or explosion. CAUTION: Using an incompatible battery may increase the risk of the procedures in this section, follow the safety instructions that shipped with your computer. Bottom... View 2 1 3 5 4 1 battery charge gauge 3 battery latch release 5 docking device connector 2 air vents 4 battery Battery Removal CAUTION: Before you begin any other computers with your Dell™ computer. The battery is designed to work with a compatible battery purchased from other external cables from the computer. 10...
... wall connector and computer, and remove any of fire or explosion. CAUTION: Using an incompatible battery may increase the risk of the procedures in this section, follow the safety instructions that shipped with your computer. Bottom... View 2 1 3 5 4 1 battery charge gauge 3 battery latch release 5 docking device connector 2 air vents 4 battery Battery Removal CAUTION: Before you begin any other computers with your Dell™ computer. The battery is designed to work with a compatible battery purchased from other external cables from the computer. 10...

Setup and Quick Reference Guide
Page 26
... Height Width Dimensions 9-cell lithium-ion batteries: Depth Height Width Dimensions 12-cell lithium-ion slice batteries: Depth Height Width Weight: 6-cell Primary battery 9-cell high capacity battery 12-cell slice battery Voltage: 6-cell and 9-cell 12-cell slice battery 12-cell "smart" lithium ion prismatic slice (84 Whr) 9-cell "smart" lithium ion (85 Whr) 6-cell...
... Height Width Dimensions 9-cell lithium-ion batteries: Depth Height Width Dimensions 12-cell lithium-ion slice batteries: Depth Height Width Weight: 6-cell Primary battery 9-cell high capacity battery 12-cell slice battery Voltage: 6-cell and 9-cell 12-cell slice battery 12-cell "smart" lithium ion prismatic slice (84 Whr) 9-cell "smart" lithium ion (85 Whr) 6-cell...

Setup and Quick Reference Guide
Page 27
...off Approximately 1 hour to 80% in Dell™ ExpressCharge™ mode Life span (approximate) 1 year Temperature range: Operating 0° to 40°C (32° to 104°F) Storage -10° to 65°C (14° to 149°F) Coin-cell battery CR-2032 AC Adapter Input voltage Input ... to 149°F) 19.5 V DC 3.34 A 15 mm (0.6 inches) 66 mm (2.6 inches) 127 mm (5.0 inches) 0.29 kg (0.64 lb) Specifications 27 Battery (continued) NOTE: Battery operating time varies depending on operating conditions and can be significantly reduced under certain power-intensive conditions.
...off Approximately 1 hour to 80% in Dell™ ExpressCharge™ mode Life span (approximate) 1 year Temperature range: Operating 0° to 40°C (32° to 104°F) Storage -10° to 65°C (14° to 149°F) Coin-cell battery CR-2032 AC Adapter Input voltage Input ... to 149°F) 19.5 V DC 3.34 A 15 mm (0.6 inches) 66 mm (2.6 inches) 127 mm (5.0 inches) 0.29 kg (0.64 lb) Specifications 27 Battery (continued) NOTE: Battery operating time varies depending on operating conditions and can be significantly reduced under certain power-intensive conditions.

Setup and Quick Reference Guide
Page 28
... active capacitive pixel-sensing technology 26.3 mm (1.035 inches) 335 mm (13.189 inches) 238.3 mm (9.382 inches) 2.18 kg (4.8 lb) with discrete graphics, 6-cell battery, and optical drive 28 Specifications
... active capacitive pixel-sensing technology 26.3 mm (1.035 inches) 335 mm (13.189 inches) 238.3 mm (9.382 inches) 2.18 kg (4.8 lb) with discrete graphics, 6-cell battery, and optical drive 28 Specifications

Setup and Quick Reference Guide
Page 33
...N T R O L L E R F A I A R Y DEVICE FAILURE - The hard drive cannot read the data. Troubleshooting 33 battery failure or 2 If the problem persists, contact Dell. Contact Dell (see "Contacting Dell" on page 40). Reinstall the memory modules and, if necessary, replace them. If the message is not listed, see the documentation for more...the computer. Code Description (repetitive short beeps) Suggested Remedy 5 Real-time clock 1 Replace the battery (see your Service Manual at support.dell.com for the operating system or the program that was running when the message appeared. DI S ...
...N T R O L L E R F A I A R Y DEVICE FAILURE - The hard drive cannot read the data. Troubleshooting 33 battery failure or 2 If the problem persists, contact Dell. Contact Dell (see "Contacting Dell" on page 40). Reinstall the memory modules and, if necessary, replace them. If the message is not listed, see the documentation for more...the computer. Code Description (repetitive short beeps) Suggested Remedy 5 Real-time clock 1 Replace the battery (see your Service Manual at support.dell.com for the operating system or the program that was running when the message appeared. DI S ...

Setup and Quick Reference Guide
Page 37
...System Set tests in the Dell Diagnostics (see "Dell Diagnostics" on the hard drive. O F- System configuration settings are trying to charge the battery. Contact Dell (see your computer to ... system cannot find a specific track on the system board may have a defective sector or corrupted FAT on page 40). OP E R A T I R E D . Reinstall the hard drive (see "Dell Diagnostics" on the hard drive. OPTIONAL R O M B A D CHECKSUM - A R E Q U I N G S YS T E M N O T F O U N D - D L L F I L E W A S N O T F O U N D - Remove and then reinstall the program. SHUTDOWN FAILURE - ...
...System Set tests in the Dell Diagnostics (see "Dell Diagnostics" on the hard drive. O F- System configuration settings are trying to charge the battery. Contact Dell (see your computer to ... system cannot find a specific track on the system board may have a defective sector or corrupted FAT on page 40). OP E R A T I R E D . Reinstall the hard drive (see "Dell Diagnostics" on the hard drive. OPTIONAL R O M B A D CHECKSUM - A R E Q U I N G S YS T E M N O T F O U N D - D L L F I L E W A S N O T F O U N D - Remove and then reinstall the program. SHUTDOWN FAILURE - ...

Setup and Quick Reference Guide
Page 38
....dell.com). Run the System Memory tests and the Keyboard Controller test in the Dell Diagnostics (see "Dell Diagnostics" on page 40). X : \ I S N O T A C C E S S I N P R O T E C T E D M O D E - The battery ... T U P P R O G R A M - U N E X P E C T E D I N T E R R U P T I B L E . Replace the battery, or connect the computer to charge the battery. ALERT! The reserve battery that was running out of charge. See your Service Manual at support.dell.com or see the documentation for more information. WA R N I N G : B A T T E R Y I S C R I T I L E D - PREVIOUS ATTEMPTS AT BOOTING...
....dell.com). Run the System Memory tests and the Keyboard Controller test in the Dell Diagnostics (see "Dell Diagnostics" on page 40). X : \ I S N O T A C C E S S I N P R O T E C T E D M O D E - The battery ... T U P P R O G R A M - U N E X P E C T E D I N T E R R U P T I B L E . Replace the battery, or connect the computer to charge the battery. ALERT! The reserve battery that was running out of charge. See your Service Manual at support.dell.com or see the documentation for more information. WA R N I N G : B A T T E R Y I S C R I T I L E D - PREVIOUS ATTEMPTS AT BOOTING...

Service Manual
Page 8
... that the device is incorrectly installed. Insert a disk into the drive and try again - CAUTION: Before you begin any of a new battery exploding if it is properly connected. • If an error message appears on the screen, write down the exact message. Drive Problems Insert...try again. If so, run the program that you want to the manufacturer's instructions. Contact Dell Support. This message may have to restart your computer: • If you want to use first. Battery Problems CAUTION: There is a danger of the procedures in a program, see the program's...
... that the device is incorrectly installed. Insert a disk into the drive and try again - CAUTION: Before you begin any of a new battery exploding if it is properly connected. • If an error message appears on the screen, write down the exact message. Drive Problems Insert...try again. If so, run the program that you want to the manufacturer's instructions. Contact Dell Support. This message may have to restart your computer: • If you want to use first. Battery Problems CAUTION: There is a danger of the procedures in a program, see the program's...

Service Manual
Page 19
... system board, you must remove the battery from the network wall jack. 4. NOTICE: To disconnect a network cable, first unplug the cable from your computer, and then unplug it from the battery bay before you cannot shut down . 6. Slide the battery release latches toward each other to lock... them in a power management mode. Disconnect your computer. Slide the battery out of the battery bay. 1 battery 2 battery release latches (2) Disconnect any telephone or network cables from their electrical outlets. Turn the computer upside down the computer...
... system board, you must remove the battery from the network wall jack. 4. NOTICE: To disconnect a network cable, first unplug the cable from your computer, and then unplug it from the battery bay before you cannot shut down . 6. Slide the battery release latches toward each other to lock... them in a power management mode. Disconnect your computer. Slide the battery out of the battery bay. 1 battery 2 battery release latches (2) Disconnect any telephone or network cables from their electrical outlets. Turn the computer upside down the computer...

Service Manual
Page 20
...the E-Port Plus User's Guide onsupport.dell.com. • To remove a battery slice, see the documentation that shipped with your battery slice or onsupport.dell.com. • To remove a cool slice, see the Dell™ Technology Guide on your cool slice or onsupport.dell.com. • To remove a ...cover from the E6400 ATG, lift up , open the display, and press the power button to the computer, use only the battery designed for this particular Dell 8. After Working on Your Computer After you have completed the replacement procedures, ensure you connect the external devices, cards, cables, ...
...the E-Port Plus User's Guide onsupport.dell.com. • To remove a battery slice, see the documentation that shipped with your battery slice or onsupport.dell.com. • To remove a cool slice, see the Dell™ Technology Guide on your cool slice or onsupport.dell.com. • To remove a ...cover from the E6400 ATG, lift up , open the display, and press the power button to the computer, use only the battery designed for this particular Dell 8. After Working on Your Computer After you have completed the replacement procedures, ensure you connect the external devices, cards, cables, ...

Service Manual
Page 21
... to remove the bottom of the base assembly. Base Assembly Dell™ Latitude™ E6400 and E6400 ATG and Mobile Workstation Precision™ M2400 Service Manual Removing the Bottom of the Base Assembly Replacing the Bottom of the computer. 3. Replace the battery. Slide the battery into the battery bay until it clicks into the connectors on Your Computer...
... to remove the bottom of the base assembly. Base Assembly Dell™ Latitude™ E6400 and E6400 ATG and Mobile Workstation Precision™ M2400 Service Manual Removing the Bottom of the Base Assembly Replacing the Bottom of the computer. 3. Replace the battery. Slide the battery into the battery bay until it clicks into the connectors on Your Computer...

Service Manual
Page 23
...Assembly). 8. Remove the display assembly (see Removing the System Board Assembly). 18. Remove the system board (see Removing the Display Assembly (E6400 and M2400) or Removing the Display Assembly (E6400 ATG)). 11. Remove the right speaker grill (see Replacing the System Board Assembly). 5. Replace the system board ... Reader Assembly). Replace the right speaker grill (see Replacing the Card Cage). 7. Replace the modem (see Replacing the Coin-Cell Battery). 6. Replace the coin-cell battery (see Replacing the Modem). 4. Remove the keyboard (see Removing the I /O Card). 2.
...Assembly). 8. Remove the display assembly (see Removing the System Board Assembly). 18. Remove the system board (see Removing the Display Assembly (E6400 and M2400) or Removing the Display Assembly (E6400 ATG)). 11. Remove the right speaker grill (see Replacing the System Board Assembly). 5. Replace the system board ... Reader Assembly). Replace the right speaker grill (see Replacing the Card Cage). 7. Replace the modem (see Replacing the Coin-Cell Battery). 6. Replace the coin-cell battery (see Replacing the Modem). 4. Remove the keyboard (see Removing the I /O Card). 2.

Service Manual
Page 62
... release the double-stick adhesive tape on Your Computer. 2. Coin-Cell Battery Dell™ Latitude™ E6400 and E6400 ATG and Mobile Workstation Precision™ M2400 Service Manual Removing the Coin-Cell Battery Replacing the Coin-Cell Battery Removing the Coin-Cell Battery CAUTION: Before you begin any of the procedures in Before Working on the bottom of the...
... release the double-stick adhesive tape on Your Computer. 2. Coin-Cell Battery Dell™ Latitude™ E6400 and E6400 ATG and Mobile Workstation Precision™ M2400 Service Manual Removing the Coin-Cell Battery Replacing the Coin-Cell Battery Removing the Coin-Cell Battery CAUTION: Before you begin any of the procedures in Before Working on the bottom of the...


