E-Family Re-Image Guide
Page 9
...-To" Guide 2.4.2 Installation Sequence & Features at a Glance: 2.4.2.1 BIOS, Drivers and Firmware: - E-Family 1st generation o Intel Rapid Storage Technology - E-Family 2nd generation - Networking & Communication o Wireless Local Area Network Adapters (WLAN) - Enables and enhances the UWB or Bluetooth Adapter o Mobile Broadband Wireless Wide Area Network Adapter (WWAN) - Enhances the pointing device features - Helps Windows control system board components and controllers. - Graphics: o Enhances and optimizes video performance o Enables & provides additional functionality that...
...-To" Guide 2.4.2 Installation Sequence & Features at a Glance: 2.4.2.1 BIOS, Drivers and Firmware: - E-Family 1st generation o Intel Rapid Storage Technology - E-Family 2nd generation - Networking & Communication o Wireless Local Area Network Adapters (WLAN) - Enables and enhances the UWB or Bluetooth Adapter o Mobile Broadband Wireless Wide Area Network Adapter (WWAN) - Enhances the pointing device features - Helps Windows control system board components and controllers. - Graphics: o Enhances and optimizes video performance o Enables & provides additional functionality that...
E-Family Re-Image Guide
Page 13
... Dell's driver & downloads support web site (support.dell.com) under the "Chipset" section 2.6.4 Intel Storage - The Intel IMSM or IRST application must be installed - The SATA operation modes are available through the Dell System Software utility posted on Dell's driver & downloads support web site (support.dell.com) under the "System Utilities" section 2.6.3 PCMCIA / Smartcard Controller - Dell recommends installing all of the latest available fixes specific to the BIOS section 2.5 - Install the following order: 2.6.1 Intel Mobile Chipset - If SATA configuration mode...
... Dell's driver & downloads support web site (support.dell.com) under the "Chipset" section 2.6.4 Intel Storage - The Intel IMSM or IRST application must be installed - The SATA operation modes are available through the Dell System Software utility posted on Dell's driver & downloads support web site (support.dell.com) under the "System Utilities" section 2.6.3 PCMCIA / Smartcard Controller - Dell recommends installing all of the latest available fixes specific to the BIOS section 2.5 - Install the following order: 2.6.1 Intel Mobile Chipset - If SATA configuration mode...
E-Family Re-Image Guide
Page 14
... XP 32 & 64-Bit Operating Systems: • Installing the Intel IMSM driver using the Floppy Drive • Boot to Intel graphics solution only Dell Confidential This applies to the Dell Recovery DVD (RDVD) and select the Create RAID driver from the list of the A:\ Note: the latest IMSM / IRST driver can also be used, ensure the following Intel IMSM application provided by Windows Setup • After reading...
... XP 32 & 64-Bit Operating Systems: • Installing the Intel IMSM driver using the Floppy Drive • Boot to Intel graphics solution only Dell Confidential This applies to the Dell Recovery DVD (RDVD) and select the Create RAID driver from the list of the A:\ Note: the latest IMSM / IRST driver can also be used, ensure the following Intel IMSM application provided by Windows Setup • After reading...
E-Family Re-Image Guide
Page 21
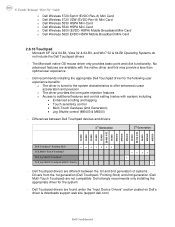
... OS mouse driver only provides basic point and click functionality. No advanced features are available with system) including: • Enhanced scrolling and tapping • Touch sensitivity control • Multi-Touch Gestures (2nd Generation) • Jog Shuttle control (M6400 & M6500) - Microsoft XP 32 & 64-Bit, Vista 32 & 64-Bit, and Win7 32 & 64-Bit Operating Systems do not include the Dell Touchpad drivers - Dell recommends installing...
... OS mouse driver only provides basic point and click functionality. No advanced features are available with system) including: • Enhanced scrolling and tapping • Touch sensitivity control • Multi-Touch Gestures (2nd Generation) • Jog Shuttle control (M6400 & M6500) - Microsoft XP 32 & 64-Bit, Vista 32 & 64-Bit, and Win7 32 & 64-Bit Operating Systems do not include the Dell Touchpad drivers - Dell recommends installing...
E-Family Re-Image Guide
Page 28
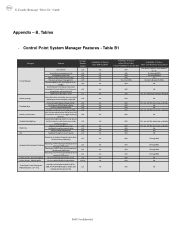
... N/A No Dell Confidential Yes, through BIOS Yes, through on screen display v1.0 Ability to enable/disable Privacy screen v1.2 v1.2 v1.2 v1.0 v1.2.01 Provides system level controls for NTSC, "Color Space" Panel Settings for Performance, v1.4 temperature and sound levels) Digidesign Audio/Video mode v1.3 Inactivate display and system timeouts when v1.0 activating an external display using FnF8. B, Tables - Discreet Graphics Fn+E to toggle display by v1.0 default). UMA Graphics...
... N/A No Dell Confidential Yes, through BIOS Yes, through on screen display v1.0 Ability to enable/disable Privacy screen v1.2 v1.2 v1.2 v1.0 v1.2.01 Provides system level controls for NTSC, "Color Space" Panel Settings for Performance, v1.4 temperature and sound levels) Digidesign Audio/Video mode v1.3 Inactivate display and system timeouts when v1.0 activating an external display using FnF8. B, Tables - Discreet Graphics Fn+E to toggle display by v1.0 default). UMA Graphics...

Setup and Quick Reference Guide
Page 4
... 31 Tools 31 Power Lights 31 Beep Codes 31 Error Messages 33 System Messages 38 Troubleshooting Software and Hardware Problems 39 Dell Diagnostics 40 Troubleshooting Tips 42 Power Problems 42 Memory Problems 43 Lockups and Software Problems 44 Dell Technical Update Service 46 Dell Support Utility 46 5 Reinstalling Software 49 Drivers 49 Identifying Drivers 49 Reinstalling Drivers and Utilities 50 Restoring Your Operating System 52 Using Microsoft® Windows® System Restore . . . 52 Using Dell™ Factory Image Restore 54 Using the Operating System Media 55...
... 31 Tools 31 Power Lights 31 Beep Codes 31 Error Messages 33 System Messages 38 Troubleshooting Software and Hardware Problems 39 Dell Diagnostics 40 Troubleshooting Tips 42 Power Problems 42 Memory Problems 43 Lockups and Software Problems 44 Dell Technical Update Service 46 Dell Support Utility 46 5 Reinstalling Software 49 Drivers 49 Identifying Drivers 49 Reinstalling Drivers and Utilities 50 Restoring Your Operating System 52 Using Microsoft® Windows® System Restore . . . 52 Using Dell™ Factory Image Restore 54 Using the Operating System Media 55...

Setup and Quick Reference Guide
Page 17
... Windows Vista Start button , and then click Transfer files and settings→ Start Windows Easy Transfer. 2 In the User Account Control dialog box, click Continue. 3 Click Start a new transfer or Continue a transfer in step 3, continue to step 5. Microsoft Windows® XP 1 Save and close any open files, and exit any open programs. 2 Click Start→ Internet Explorer→ Connect to the Internet. 3 In the next window, click the appropriate option...
... Windows Vista Start button , and then click Transfer files and settings→ Start Windows Easy Transfer. 2 In the User Account Control dialog box, click Continue. 3 Click Start a new transfer or Continue a transfer in step 3, continue to step 5. Microsoft Windows® XP 1 Save and close any open files, and exit any open programs. 2 Click Start→ Internet Explorer→ Connect to the Internet. 3 In the next window, click the appropriate option...

Setup and Quick Reference Guide
Page 31
... standby mode. Beep Codes Your computer might be a power problem or an internal device malfunction. If the power light is blinking amber, the computer is receiving electrical power, a device such as a memory module or graphics card might emit a series of beeps during start-up if the monitor cannot display errors or problems. This series of the computer turns on the front of beeps, called a beep code, identifies a problem. Press a key on . • If the power light is blinking...
... standby mode. Beep Codes Your computer might be a power problem or an internal device malfunction. If the power light is blinking amber, the computer is receiving electrical power, a device such as a memory module or graphics card might emit a series of beeps during start-up if the monitor cannot display errors or problems. This series of the computer turns on the front of beeps, called a beep code, identifies a problem. Press a key on . • If the power light is blinking...

Setup and Quick Reference Guide
Page 35
... another drive. K E Y B O A R D C O N T R O L L E R F A I R E C T - The system configuration information does not match the hardware configuration. Run the Keyboard Controller test in the Dell Diagnostics (see "Dell Diagnostics" on page 40). Run the Keyboard Controller test in the Dell Diagnostics (see "Dell Diagnostics" on page 40). Run the Hard Disk Drive tests in the Dell Diagnostics (see "Dell Diagnostics" on page 40). The operating system is trying to boot to occur after a memory module is...
... another drive. K E Y B O A R D C O N T R O L L E R F A I R E C T - The system configuration information does not match the hardware configuration. Run the Keyboard Controller test in the Dell Diagnostics (see "Dell Diagnostics" on page 40). Run the Keyboard Controller test in the Dell Diagnostics (see "Dell Diagnostics" on page 40). Run the Hard Disk Drive tests in the Dell Diagnostics (see "Dell Diagnostics" on page 40). The operating system is trying to boot to occur after a memory module is...

Setup and Quick Reference Guide
Page 39
... the Windows Vista Start button , and click Help and Support. 2 Type hardware troubleshooter in BIOS setup. Troubleshooting Software and Hardware Problems If a device is either not detected during the operating system setup or is correct (see "Contacting Dell" on page 65 for assistance). HA R D -DISK DRIVE FAILURE - Check cables, swap hard disks, or see "Contacting Dell" on hard drive, or the hard drive cable is loose, or no bootable device exists. • If the hard drive is your boot device, ensure that the cables are connected...
... the Windows Vista Start button , and click Help and Support. 2 Type hardware troubleshooter in BIOS setup. Troubleshooting Software and Hardware Problems If a device is either not detected during the operating system setup or is correct (see "Contacting Dell" on page 65 for assistance). HA R D -DISK DRIVE FAILURE - Check cables, swap hard disks, or see "Contacting Dell" on hard drive, or the hard drive cable is loose, or no bootable device exists. • If the hard drive is your boot device, ensure that the cables are connected...

Setup and Quick Reference Guide
Page 40
... computer cannot display a screen image, see "Lockups and Software Problems" on page 44) and run the Dell Diagnostics before you contact Dell for technical assistance. 3 In the search results, select the option that best describes the problem and follow the remaining troubleshooting steps. See your Service Manual at support.dell.com to review your hard drive or from your computer's configuration information, and ensure that the device that...
... computer cannot display a screen image, see "Lockups and Software Problems" on page 44) and run the Dell Diagnostics before you contact Dell for technical assistance. 3 In the search results, select the option that best describes the problem and follow the remaining troubleshooting steps. See your Service Manual at support.dell.com to review your hard drive or from your computer's configuration information, and ensure that the device that...

Setup and Quick Reference Guide
Page 43
... Memory Problems CAUTION: Before you begin any open programs you are securely connected to see if that the main power cable and the front panel cable are not using to the system board connector (see your computer is a power problem, a device may be malfunctioning or incorrectly installed. • Remove and then reinstall all memory modules (see your Service Manual at support.dell.com). • Remove and then reinstall any expansion cards, including graphics cards...
... Memory Problems CAUTION: Before you begin any open programs you are securely connected to see if that the main power cable and the front panel cable are not using to the system board connector (see your computer is a power problem, a device may be malfunctioning or incorrectly installed. • Remove and then reinstall all memory modules (see your Service Manual at support.dell.com). • Remove and then reinstall any expansion cards, including graphics cards...

Setup and Quick Reference Guide
Page 50
... "Restoring Your Operating System" on the computer, click Continue; Reinstalling Drivers and Utilities NOTICE: The Dell Support website at support.dell.com and your administrator to enter the Device Manager. 3 Right-click the device for which the new driver was installed and click Properties. 4 Click the Drivers tab→ Roll Back Driver. If Device Driver Rollback does not resolve the problem, then use the Drivers and Utilities media, go to a Previous Device Driver Version Windows Vista: 1 Click the Windows Vista Start button...
... "Restoring Your Operating System" on the computer, click Continue; Reinstalling Drivers and Utilities NOTICE: The Dell Support website at support.dell.com and your administrator to enter the Device Manager. 3 Right-click the device for which the new driver was installed and click Properties. 4 Click the Drivers tab→ Roll Back Driver. If Device Driver Rollback does not resolve the problem, then use the Drivers and Utilities media, go to a Previous Device Driver Version Windows Vista: 1 Click the Windows Vista Start button...

Setup and Quick Reference Guide
Page 69
... setup Internet, 16 software problems, 45 reinstalling, 49 troubleshooting, 44-45 updates, 46 specifications, 21 support, 59 contacting Dell, 65 DellConnect, 60 online services, 60 regional, 60 technical support and customer service, 60 support information, 58 System Restore, 52 enabling, 54 T Terms and Conditions, 58 transferring information to a new computer, 17 troubleshooting, 31, 58 blue screen, 45 computer not responding, 44 Dell Diagnostics, 40 error messages, 33 memory, 43 power, 42 troubleshooting (continued) power light...
... setup Internet, 16 software problems, 45 reinstalling, 49 troubleshooting, 44-45 updates, 46 specifications, 21 support, 59 contacting Dell, 65 DellConnect, 60 online services, 60 regional, 60 technical support and customer service, 60 support information, 58 System Restore, 52 enabling, 54 T Terms and Conditions, 58 transferring information to a new computer, 17 troubleshooting, 31, 58 blue screen, 45 computer not responding, 44 Dell Diagnostics, 40 error messages, 33 memory, 43 power, 42 troubleshooting (continued) power light...

Service Manual
Page 1
...the safety instructions that shipped with your computer. If the computer starts normally, continue to install additional memory modules (one module (see Memory). • If the problem persists, contact Dell Support. Troubleshooting Mobile Workstation Precision™ M2400 Service Manual Troubleshooting Tools Solving Problems Dell Technical Update Service Dell Support Utility Troubleshooting Tools Diagnostic Lights CAUTION: Before you begin any of the procedures in order from left to right (Num Lock, Caps Lock, and then Scroll Lock). If the computer starts without error. •...
...the safety instructions that shipped with your computer. If the computer starts normally, continue to install additional memory modules (one module (see Memory). • If the problem persists, contact Dell Support. Troubleshooting Mobile Workstation Precision™ M2400 Service Manual Troubleshooting Tools Solving Problems Dell Technical Update Service Dell Support Utility Troubleshooting Tools Diagnostic Lights CAUTION: Before you begin any of the procedures in order from left to right (Num Lock, Caps Lock, and then Scroll Lock). If the computer starts without error. •...

Service Manual
Page 3
... the device you want to test is active. Start the Dell Diagnostics from your hard drive or from the Drivers and Utilities media provided with your computer. Click the Windows Vista start the search. 3. Starting the Dell Diagnostics From Your Hard Drive Before running the Dell Diagnostics, enter system setup to review your computer's configuration information, and ensure that best describes the problem and follow the remaining troubleshooting steps. In the Fix a Problem section, click Hardware Troubleshooter. 4. Type hardware troubleshooter...
... the device you want to test is active. Start the Dell Diagnostics from your hard drive or from the Drivers and Utilities media provided with your computer. Click the Windows Vista start the search. 3. Starting the Dell Diagnostics From Your Hard Drive Before running the Dell Diagnostics, enter system setup to review your computer's configuration information, and ensure that best describes the problem and follow the remaining troubleshooting steps. In the Fix a Problem section, click Hardware Troubleshooter. 4. Type hardware troubleshooter...

Service Manual
Page 16
... the taskbar option is readable Connect an external monitor - 1. Accessing the Dell Support Utility Access the Dell Support Utility from the Start button. 2. If the external monitor works, the computer display or video controller may be customized for your taskbar: 1. Dell Technical Update Service The Dell Technical Update service provides proactive e-mail notification of your computing environment. Shut down your computer and available from the Dell Support, , icon on the computer and the monitor and adjust the monitor brightness and contrast controls. Ensure...
... the taskbar option is readable Connect an external monitor - 1. Accessing the Dell Support Utility Access the Dell Support Utility from the Start button. 2. If the external monitor works, the computer display or video controller may be customized for your taskbar: 1. Dell Technical Update Service The Dell Technical Update service provides proactive e-mail notification of your computing environment. Shut down your computer and available from the Dell Support, , icon on the computer and the monitor and adjust the monitor brightness and contrast controls. Ensure...

Service Manual
Page 26
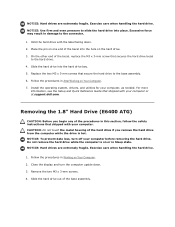
.... Close the display and turn off your computer. NOTICE: To prevent data loss, turn the computer upside down. 3. NOTICE: Hard drives are extremely fragile. Hard Drive Dell™ Latitude™ E6400 and E6400 ATG and Mobile Workstation Precision™ M2400 Service Manual Removing the Hard Drive Replacing the Hard Drive Removing the 1.8" Hard Drive (E6400 ATG) Replacing the 1.8" Hard Drive (E6400 ATG) Removing the Modular Hard Drive Replacing the Modular Hard Drive NOTE: Dell does not guarantee compatibility or provide support for hard drives obtained from...
.... Close the display and turn off your computer. NOTICE: To prevent data loss, turn the computer upside down. 3. NOTICE: Hard drives are extremely fragile. Hard Drive Dell™ Latitude™ E6400 and E6400 ATG and Mobile Workstation Precision™ M2400 Service Manual Removing the Hard Drive Replacing the Hard Drive Removing the 1.8" Hard Drive (E6400 ATG) Replacing the 1.8" Hard Drive (E6400 ATG) Removing the Modular Hard Drive Replacing the Modular Hard Drive NOTE: Dell does not guarantee compatibility or provide support for hard drives obtained from...
Service Manual
Page 28
... assembly. 6. Place the pin on Your Computer. 7. Install the operating system, drivers, and utilities for your computer or at support.dell.com. Follow the procedures in After Working on one end of the bezel into the hard drive bay. 5. NOTICE: Use firm and even pressure to the connector. 1. For more information, see the Setup and Quick Reference Guide that secure the hard drive to the hard drive. 4.
... assembly. 6. Place the pin on Your Computer. 7. Install the operating system, drivers, and utilities for your computer or at support.dell.com. Follow the procedures in After Working on one end of the bezel into the hard drive bay. 5. NOTICE: Use firm and even pressure to the connector. 1. For more information, see the Setup and Quick Reference Guide that secure the hard drive to the hard drive. 4.

Service Manual
Page 59
...). 4. See "Specifications" in After Working on the system board. Follow the procedures in your computer memory by turning the cam screw clockwise to secure the processor module to the processor when turning the cam screw. 2. Memory Dell™ Latitude™ E6400 and E6400 ATG and Mobile Workstation Precision™ M2400 Service Manual Removing a Memory Module Replacing a Memory Module Your computer has two user-accessible SODIMM sockets. You can increase your Setup and Quick 1 ZIF socket...
...). 4. See "Specifications" in After Working on the system board. Follow the procedures in your computer memory by turning the cam screw clockwise to secure the processor module to the processor when turning the cam screw. 2. Memory Dell™ Latitude™ E6400 and E6400 ATG and Mobile Workstation Precision™ M2400 Service Manual Removing a Memory Module Replacing a Memory Module Your computer has two user-accessible SODIMM sockets. You can increase your Setup and Quick 1 ZIF socket...


