Service Manual
Page 55
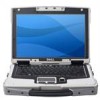
DellTM XFR D630 Fully Rugged Notebook Service Manual b. As the computer boots, it . No error message indicates this failure. 1 tab 2 notch 5. Replace the memory module cover, and use the 4 screws to view your computer information and diagnose problems -> My Computer Information. 10 Display...electrical outlet. 7. Forcing the cover to close , remove the module and reinstall it clicks into the battery bay, or connect the AC adapter to close may not boot properly. Insert the battery into place. To confirm the amount of memory installed in the computer, click Start -> Help and ...
DellTM XFR D630 Fully Rugged Notebook Service Manual b. As the computer boots, it . No error message indicates this failure. 1 tab 2 notch 5. Replace the memory module cover, and use the 4 screws to view your computer information and diagnose problems -> My Computer Information. 10 Display...electrical outlet. 7. Forcing the cover to close , remove the module and reinstall it clicks into the battery bay, or connect the AC adapter to close may not boot properly. Insert the battery into place. To confirm the amount of memory installed in the computer, click Start -> Help and ...
Service Manual
Page 76
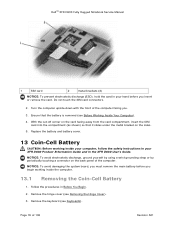
...removed (see Before Working Inside Your Computer). 158H 4. Remove the keyboard (see Removing the Hinge Cover). 160H 3. Replace the battery and battery cover. 13 Coin-Cell Battery CAUTION: Before working inside your computer, follow the safety instructions in your hand before you . 3. Follow the ...inside the computer. 13.1 Removing the Coin-Cell Battery 1. Remove the hinge cover (see Keyboards). 16H Page 76 of the computer facing you insert or remove the card. Do not touch the SIM card connectors. 2. DellTM XFR D630 Fully Rugged Notebook Service Manual 1 SIM card 2 ...
...removed (see Before Working Inside Your Computer). 158H 4. Remove the keyboard (see Removing the Hinge Cover). 160H 3. Replace the battery and battery cover. 13 Coin-Cell Battery CAUTION: Before working inside your computer, follow the safety instructions in your hand before you . 3. Follow the ...inside the computer. 13.1 Removing the Coin-Cell Battery 1. Remove the hinge cover (see Keyboards). 16H Page 76 of the computer facing you insert or remove the card. Do not touch the SIM card connectors. 2. DellTM XFR D630 Fully Rugged Notebook Service Manual 1 SIM card 2 ...

Service Manual
Page 78
...Rugged Notebook Service Manual 14 Palm Rest CAUTION: Before working inside your computer, follow the safety instructions in the XFR D630 Product Information Guide and in Before You Begin. 164H 2. Disconnect the coin-cell battery from the top of the palm rest. Remove the hinge cover (see Removing the Display Assembly). 168H 6. NOTICE... by using a wrist grounding strap or by periodically touching an unpainted metal surface (such as a connector on the palm rest) unless you are installing a replacement palm rest, in which case you need to remove the coin-cell battery and place it in the...
...Rugged Notebook Service Manual 14 Palm Rest CAUTION: Before working inside your computer, follow the safety instructions in the XFR D630 Product Information Guide and in Before You Begin. 164H 2. Disconnect the coin-cell battery from the top of the palm rest. Remove the hinge cover (see Removing the Display Assembly). 168H 6. NOTICE... by using a wrist grounding strap or by periodically touching an unpainted metal surface (such as a connector on the palm rest) unless you are installing a replacement palm rest, in which case you need to remove the coin-cell battery and place it in the...
Service Manual
Page 80
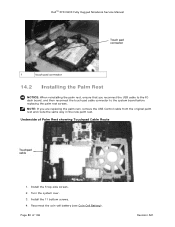
...battery (see Coin-Cell Battery). 172H Page 80 of Palm Rest showing Touchpad Cable Route Touchpad cable 1. Install the 5 top-side screws. 2. NOTE: If you reconnect the USB cable to the IO dash board, and then reconnect the touch pad cable connector to the system board before replacing the palm rest screws. DellTM XFR D630... Fully Rugged Notebook Service Manual Touch pad connector 1 touch pad connector 14.2 Installing the Palm Rest NOTICE: When reinstalling the palm rest, ensure that you are replacing the palm rest,...
...battery (see Coin-Cell Battery). 172H Page 80 of Palm Rest showing Touchpad Cable Route Touchpad cable 1. Install the 5 top-side screws. 2. NOTE: If you reconnect the USB cable to the IO dash board, and then reconnect the touch pad cable connector to the system board before replacing the palm rest screws. DellTM XFR D630... Fully Rugged Notebook Service Manual Touch pad connector 1 touch pad connector 14.2 Installing the Palm Rest NOTICE: When reinstalling the palm rest, ensure that you are replacing the palm rest,...
Service Manual
Page 81
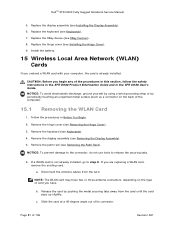
...battery. 15 Wireless Local Area Network (WLAN) Cards If you have two or three antenna connectors, depending on the back of the procedures in this section, follow the safety instructions in the XFR D630 Product Information Guide and in Before You Begin. 17H 6. DellTM XFR D630 Fully Rugged Notebook Service Manual 5. CAUTION: Before you are replacing... a WLAN card, remove the existing card: a. Follow the procedures in the XFR D630 ...
...battery. 15 Wireless Local Area Network (WLAN) Cards If you have two or three antenna connectors, depending on the back of the procedures in this section, follow the safety instructions in the XFR D630 Product Information Guide and in Before You Begin. 17H 6. DellTM XFR D630 Fully Rugged Notebook Service Manual 5. CAUTION: Before you are replacing... a WLAN card, remove the existing card: a. Follow the procedures in the XFR D630 ...
Service Manual
Page 84
...battery before you begin working inside the computer (see Installing the Palm Rest). 182H 5. Remove the hinge cover (see Removing the Palm Rest). 192H 7. Remove the palm rest (see Removing the Hinge Cover). 18H 3. Page 84 of the computer). DellTM XFR D630 Fully Rugged Notebook Service Manual 4. Replace... see Keyboards). 184H 7. Remove any installed media bay device (see Removing the Display Assembly). 19H 6. Replace the keyboard (see the safety instructions in the XFR D630 Product Information Guide and in Before You Begin. 187H 2. Pull up on the pull-tab to the ...
...battery before you begin working inside the computer (see Installing the Palm Rest). 182H 5. Remove the hinge cover (see Removing the Palm Rest). 192H 7. Remove the palm rest (see Removing the Hinge Cover). 18H 3. Page 84 of the computer). DellTM XFR D630 Fully Rugged Notebook Service Manual 4. Replace... see Keyboards). 184H 7. Remove any installed media bay device (see Removing the Display Assembly). 19H 6. Replace the keyboard (see the safety instructions in the XFR D630 Product Information Guide and in Before You Begin. 187H 2. Pull up on the pull-tab to the ...
Service Manual
Page 88
... a connector on the thermalcooling assembly. 7. Remove the display assembly (see Keyboards). 206H 11. Replace the keyboard (see Removing the Display Assembly). 213H 6. Follow the instructions in the XFR D630 User's Guide. Remove the palm rest (see Coin-Cell Battery) before you replace 204H the keyboard. 9. The new processor thermal-cooling assembly has new pads already...
... a connector on the thermalcooling assembly. 7. Remove the display assembly (see Keyboards). 206H 11. Replace the keyboard (see Removing the Display Assembly). 213H 6. Follow the instructions in the XFR D630 User's Guide. Remove the palm rest (see Coin-Cell Battery) before you replace 204H the keyboard. 9. The new processor thermal-cooling assembly has new pads already...

Service Manual
Page 90
... thermal grease between the ZIF-socket cam screw and the processor when removing or replacing the processor, press to apply slight pressure to apply thermal grease in the XFR D630 User's Guide. Replace the media bay device (see Coin-Cell Battery) before you are installing the original processor, skip to the processor thermal-cooling assembly...
... thermal grease between the ZIF-socket cam screw and the processor when removing or replacing the processor, press to apply slight pressure to apply thermal grease in the XFR D630 User's Guide. Replace the media bay device (see Coin-Cell Battery) before you are installing the original processor, skip to the processor thermal-cooling assembly...
Service Manual
Page 92
... bottom chassis, continue with next steps to remove the PC Card interface board. 10. Replace the hinge cover (see XBay Devices). 234H 7. Replace the battery. 20 Speaker CAUTION: Before working inside your computer, follow the safety instructions in the XFR D630 Product Information Guide and in Before You Begin. 236H 2. Remove the display assembly (see...
... bottom chassis, continue with next steps to remove the PC Card interface board. 10. Replace the hinge cover (see XBay Devices). 234H 7. Replace the battery. 20 Speaker CAUTION: Before working inside your computer, follow the safety instructions in the XFR D630 Product Information Guide and in Before You Begin. 236H 2. Remove the display assembly (see...

Service Manual
Page 93
... 2. Install the speaker in the XFR D630 User's Guide. Replace the media bay device (see Removing the Palm Rest). 241H 7. Replace the battery. 21 Fan CAUTION: Before working inside your computer, follow the safety instructions in the XFR D630 Product Information Guide and in the ...base and attach the speaker cable to avoid damaging them. 8. DellTM XFR D630 Fully Rugged Notebook Service Manual 6. Replace the keyboard (see Coin-Cell Battery) before you replace 243H the keyboard. 3. Replace the palm rest (see...
... 2. Install the speaker in the XFR D630 User's Guide. Replace the media bay device (see Removing the Palm Rest). 241H 7. Replace the battery. 21 Fan CAUTION: Before working inside your computer, follow the safety instructions in the XFR D630 Product Information Guide and in the ...base and attach the speaker cable to avoid damaging them. 8. DellTM XFR D630 Fully Rugged Notebook Service Manual 6. Replace the keyboard (see Coin-Cell Battery) before you replace 243H the keyboard. 3. Replace the palm rest (see...
Service Manual
Page 94
... the Display Assembly). 25H 6. Remove the 3 M3 x 4-mm screws that you reconnect the coin-cell battery (see Coin-Cell Battery) before you replace 257H the keyboard. Replace the palm rest (see Removing the Hinge Cover). 249H 3. Page 94 of 106 Revision A01 Follow the ... to the system board. Replace the processor thermal-cooling assembly (see Removing the Processor Thermal254H Cooling Assembly). 8. Then attach the grommet on the fan cable to the base. 4 3 2 1 1 Fan connector 2 Fan cable 3 Fan cable grommet 4 Fan 9. DellTM XFR D630 Fully Rugged Notebook Service Manual...
... the Display Assembly). 25H 6. Remove the 3 M3 x 4-mm screws that you reconnect the coin-cell battery (see Coin-Cell Battery) before you replace 257H the keyboard. Replace the palm rest (see Removing the Hinge Cover). 249H 3. Page 94 of 106 Revision A01 Follow the ... to the system board. Replace the processor thermal-cooling assembly (see Removing the Processor Thermal254H Cooling Assembly). 8. Then attach the grommet on the fan cable to the base. 4 3 2 1 1 Fan connector 2 Fan cable 3 Fan cable grommet 4 Fan 9. DellTM XFR D630 Fully Rugged Notebook Service Manual...
Service Manual
Page 101
...29H 23 Flashing the BIOS CAUTION: Contact Dell Customer Support before inserting the CD. 2. NOTE: If you do so may result in and that the main battery is installed properly. The computer continues to enter the system setup program. 4. Insert the battery into the appropriate drive and flash the...restart the computer. 23.2 Flashing the BIOS From the Hard Drive 1. Page 101 of 106 Revision A01 NOTE: After replacing the system board, use a BIOS-update program CD to flash the BIOS, set up the computer to flash the BIOS. DellTM XFR D630 Fully Rugged Notebook Service Manual 18.
...29H 23 Flashing the BIOS CAUTION: Contact Dell Customer Support before inserting the CD. 2. NOTE: If you do so may result in and that the main battery is installed properly. The computer continues to enter the system setup program. 4. Insert the battery into the appropriate drive and flash the...restart the computer. 23.2 Flashing the BIOS From the Hard Drive 1. Page 101 of 106 Revision A01 NOTE: After replacing the system board, use a BIOS-update program CD to flash the BIOS, set up the computer to flash the BIOS. DellTM XFR D630 Fully Rugged Notebook Service Manual 18.

Service Manual
Page 105
... used to attach the modem cable to see Installing the Modem Cable). 302H 3. Replace the system board (see Installing the System Board). 305H 25.3 Removing the Modem Cable CAUTION: Before working inside your XFR D630 is equipped with the optional Touch Screen, remove the stylus, tether and clip (see..., all side and rear doors and all bottom doors except the HDD and battery doors. 1. If your computer, follow the safety instructions in the XFR D630 Product Information Guide and in Before You Begin. 306H 2. Replace the modem cable (see the proper cable routing and where to secure the ...
... used to attach the modem cable to see Installing the Modem Cable). 302H 3. Replace the system board (see Installing the System Board). 305H 25.3 Removing the Modem Cable CAUTION: Before working inside your XFR D630 is equipped with the optional Touch Screen, remove the stylus, tether and clip (see..., all side and rear doors and all bottom doors except the HDD and battery doors. 1. If your computer, follow the safety instructions in the XFR D630 Product Information Guide and in Before You Begin. 306H 2. Replace the modem cable (see the proper cable routing and where to secure the ...
User Guide
Page 4
... Hibernate Mode 45 Configuring Power Management Settings 46 Accessing Power Options Properties 46 Charging the Battery 47 Replacing the Battery 47 Storing a Battery 48 Battery Errors 48 5 Using the Keyboard 49 Numeric Keypad 49 Key Combinations 50 System Functions 50 Battery 50 Display Functions 50 Power Management 50 Microsoft® Windows® Logo Key Functions 51...
... Hibernate Mode 45 Configuring Power Management Settings 46 Accessing Power Options Properties 46 Charging the Battery 47 Replacing the Battery 47 Storing a Battery 48 Battery Errors 48 5 Using the Keyboard 49 Numeric Keypad 49 Key Combinations 50 System Functions 50 Battery 50 Display Functions 50 Power Management 50 Microsoft® Windows® Logo Key Functions 51...
User Guide
Page 10
...Restoring Your Operating System 144 Using Microsoft® Windows® System Restore 145 Using the Operating System Media 146 15 Adding and Replacing Parts 149 Before You Begin 149 Recommended Tools 149 Turning Off Your Computer 149 Before Working Inside Your Computer 150 Hinge Cover 152... Keyboard 153 Internal Card With Bluetooth® Wireless Technology 154 Coin-Cell Battery 156 Memory 157 Wireless Local Area Network (WLAN) Card 163 Mobile Broadband Card 166 Subscriber Identity Module (SIM) Card 169 Hard ...
...Restoring Your Operating System 144 Using Microsoft® Windows® System Restore 145 Using the Operating System Media 146 15 Adding and Replacing Parts 149 Before You Begin 149 Recommended Tools 149 Turning Off Your Computer 149 Before Working Inside Your Computer 150 Hinge Cover 152... Keyboard 153 Internal Card With Bluetooth® Wireless Technology 154 Coin-Cell Battery 156 Memory 157 Wireless Local Area Network (WLAN) Card 163 Mobile Broadband Card 166 Subscriber Identity Module (SIM) Card 169 Hard ...
User Guide
Page 32
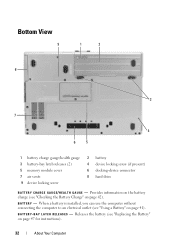
... 7 air vents 9 device locking screw 2 battery 4 device locking screw (if present) 6 docking-device connector 8 hard drive B A T T E R Y C H A R G E G A U G E / H E A L T H G A U G E - When a battery is installed, you can use the computer without connecting the computer to an electrical outlet (see "Replacing the Battery" on page 42). B A Y L A T C H R E L E A S E S - Provides information on the battery charge (see "Checking the Battery Charge" on page 47 for instructions...
... 7 air vents 9 device locking screw 2 battery 4 device locking screw (if present) 6 docking-device connector 8 hard drive B A T T E R Y C H A R G E G A U G E / H E A L T H G A U G E - When a battery is installed, you can use the computer without connecting the computer to an electrical outlet (see "Replacing the Battery" on page 42). B A Y L A T C H R E L E A S E S - Provides information on the battery charge (see "Checking the Battery Charge" on page 47 for instructions...
User Guide
Page 42
... Windows Power Options Properties or Dell QuickSet, which you can check the battery charge before you when the battery charge is installed, press to temperatures above 65°C (149°F). CAUTION: Using an incompatible battery may leak and cause personal injury or equipment damage. You can use a battery from children. Replace the battery only with extreme care...
... Windows Power Options Properties or Dell QuickSet, which you can check the battery charge before you when the battery charge is installed, press to temperatures above 65°C (149°F). CAUTION: Using an incompatible battery may leak and cause personal injury or equipment damage. You can use a battery from children. Replace the battery only with extreme care...
User Guide
Page 43
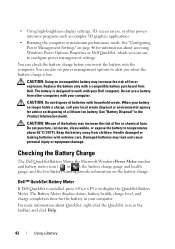
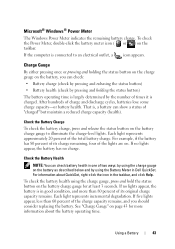
... at least 3 seconds. If the computer is in Dell QuickSet. Using a Battery 43 For information about the battery operating time. If no lights appear, the battery has no lights appear, the battery is connected to illuminate the charge-level lights. Check the Battery Health NOTE: You can show a status of "charged..., less than 80 percent of two ways: by pressing and holding the status button on the charge gauge on the battery, you should consider replacing the battery. That is charged. Microsoft® Windows® Power Meter The Windows Power Meter indicates the remaining...
... at least 3 seconds. If the computer is in Dell QuickSet. Using a Battery 43 For information about the battery operating time. If no lights appear, the battery has no lights appear, the battery is connected to illuminate the charge-level lights. Check the Battery Health NOTE: You can show a status of "charged..., less than 80 percent of two ways: by pressing and holding the status button on the charge gauge on the battery, you should consider replacing the battery. That is charged. Microsoft® Windows® Power Meter The Windows Power Meter indicates the remaining...
User Guide
Page 47
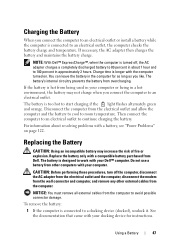
...outlet and allow the computer and the battery to cool to 100 percent in a hot environment, the battery may increase the risk of fire or explosion. For information about 1 hour and to room temperature. Replace the battery only with a battery, see "Power Problems" on . Then... connect the computer to an electrical outlet to a docking device (docked), undock it. Disconnect the computer from Dell. The battery is turned off the computer, disconnect the AC...
...outlet and allow the computer and the battery to cool to 100 percent in a hot environment, the battery may increase the risk of fire or explosion. For information about 1 hour and to room temperature. Replace the battery only with a battery, see "Power Problems" on . Then... connect the computer to an electrical outlet to a docking device (docked), undock it. Disconnect the computer from Dell. The battery is turned off the computer, disconnect the AC...
User Guide
Page 48
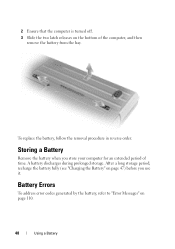
... Battery Remove the battery when you use it. To replace the battery, follow the removal procedure in reverse order. After a long storage period, recharge the battery fully (see "Charging the Battery" on page 47) before you store your computer for an extended period of the computer, and then remove the battery ...from the bay. 2 Ensure that the computer is turned off. 3 Slide the two latch releases on the bottom of time. A battery discharges during prolonged storage. Battery Errors To address error codes generated by the battery, refer to "Error Messages" ...
... Battery Remove the battery when you use it. To replace the battery, follow the removal procedure in reverse order. After a long storage period, recharge the battery fully (see "Charging the Battery" on page 47) before you store your computer for an extended period of the computer, and then remove the battery ...from the bay. 2 Ensure that the computer is turned off. 3 Slide the two latch releases on the bottom of time. A battery discharges during prolonged storage. Battery Errors To address error codes generated by the battery, refer to "Error Messages" ...


