Latitude E7240 Owners Manual
Page 3
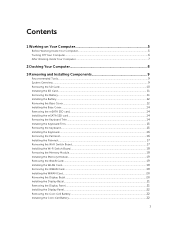
... Installing Components 9 Recommended Tools...9 System Overview...9 Removing the SD Card...10 Installing the SD Card...11 Removing the Battery...11 Installing the Battery...12 Removing the Base Cover...12 Installing the Base Cover...14 Removing the mSATA SSD card...14 Installing the mSATA SSD card...14 Removing the Keyboard Trim...14 Installing...
... Installing Components 9 Recommended Tools...9 System Overview...9 Removing the SD Card...10 Installing the SD Card...11 Removing the Battery...11 Installing the Battery...12 Removing the Base Cover...12 Installing the Base Cover...14 Removing the mSATA SSD card...14 Installing the mSATA SSD card...14 Removing the Keyboard Trim...14 Installing...
Latitude E7240 Owners Manual
Page 12
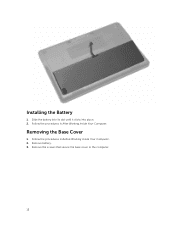
Follow the procedures in Before Working Inside Your Computer. 2. Remove battery. 3. Remove the screws that secure the base cover to the computer. 12 Slide the battery into its slot until it clicks into place. 2. Follow the procedures in After Working Inside Your Computer. Installing the Battery 1. Removing the Base Cover 1.
Follow the procedures in Before Working Inside Your Computer. 2. Remove battery. 3. Remove the screws that secure the base cover to the computer. 12 Slide the battery into its slot until it clicks into place. 2. Follow the procedures in After Working Inside Your Computer. Installing the Battery 1. Removing the Base Cover 1.
Latitude E7240 Owners Manual
Page 42
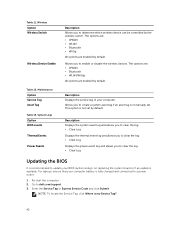
... Re-start the computer. 2. Go to determine which wireless device can be controlled by default. Wireless Option Wireless Switch Wireless Device Enable Table 12. System Logs Option BIOS events Thermal Events Power Events Description Allows you to a power outlet 1. The options are: • WWAN •... are: • WWAN • WLAN • Bluetooth • WiGig All options are enabled by the wireless switch. Allows you to dell.com/support. 3. Maintenance Option Service Tag Asset Tag Table 13. Description Displays the service tag of your BIOS (system setup), on replacing ...
... Re-start the computer. 2. Go to determine which wireless device can be controlled by default. Wireless Option Wireless Switch Wireless Device Enable Table 12. System Logs Option BIOS events Thermal Events Power Events Description Allows you to a power outlet 1. The options are: • WWAN •... are: • WWAN • WLAN • Bluetooth • WiGig All options are enabled by the wireless switch. Allows you to dell.com/support. 3. Maintenance Option Service Tag Asset Tag Table 13. Description Displays the service tag of your BIOS (system setup), on replacing ...
Latitude E7240 Owners Manual
Page 43
... the Drivers and Downloads screen, under the Operating System drop-down list, select BIOS. 9. Select your preferred download method in the Please select your computer. 12. Click Save to install the updated BIOS settings on screen. 4. In the System Security screen, verify that you must enter to log on to your...
... the Drivers and Downloads screen, under the Operating System drop-down list, select BIOS. 9. Select your preferred download method in the Please select your computer. 12. Click Save to install the updated BIOS settings on screen. 4. In the System Security screen, verify that you must enter to log on to your...
Latitude E7240 Owners Manual
Page 50
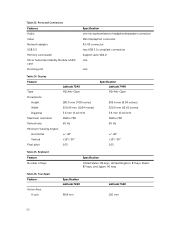
... 86 keys, United Kingdom: 87 keys, Brazil: 87 keys, and Japan: 90 keys Table 26. Touchpad Feature Active Area: X-axis Specification Latitude 7240 98.8 mm Latitude 7440 100 mm 50 Ports and Connectors Features Audio Video Network adapter USB 3.0 Memory card reader Micro Subscriber Identity Module (uSIM) card Docking port...300.90 mm (11.84 inches) 3.6 mm (0.14 inch) 1366 x 768 60 Hz +/-40° +15°/-30° 1.05 Specification Latitude 7440 HD Anti-Glare 205.6 mm (8.09 inches) 320.9 mm (12.63 inches) 3.6 mm (0.14 inch) 1366 x 768 60 Hz +/-40° +15°/-30° 1.05 Table 25.
... 86 keys, United Kingdom: 87 keys, Brazil: 87 keys, and Japan: 90 keys Table 26. Touchpad Feature Active Area: X-axis Specification Latitude 7240 98.8 mm Latitude 7440 100 mm 50 Ports and Connectors Features Audio Video Network adapter USB 3.0 Memory card reader Micro Subscriber Identity Module (uSIM) card Docking port...300.90 mm (11.84 inches) 3.6 mm (0.14 inch) 1366 x 768 60 Hz +/-40° +15°/-30° 1.05 Specification Latitude 7440 HD Anti-Glare 205.6 mm (8.09 inches) 320.9 mm (12.63 inches) 3.6 mm (0.14 inch) 1366 x 768 60 Hz +/-40° +15°/-30° 1.05 Table 25.
Latitude E7240 Owners Manual
Page 51
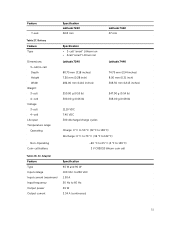
... Hz to 149 °F) 3 V CR2032 lithium coin cell Table 28. Feature Y-axis Specification Latitude 7240 60.8 mm Latitude 7440 47 mm Table 27. Battery Feature Type Dimensions: 3-cell/4-cell Depth Height Width Weight: ... Temperature range: Operating Specification • 3-cell "smart" Lithium ion • 4cell "smart" Lithium ion Latitude 7240 Latitude 7440 80.75 mm (3.18 inches) 7.20 mm (0.28 inch) 282.00 mm (11.10 inches)... 74.75 mm (2.94 inches) 8.00 mm (0.31 inch) 308.50 mm (12.15 inches) 250.00 g (0.55 ...
... Hz to 149 °F) 3 V CR2032 lithium coin cell Table 28. Feature Y-axis Specification Latitude 7240 60.8 mm Latitude 7440 47 mm Table 27. Battery Feature Type Dimensions: 3-cell/4-cell Depth Height Width Weight: ... Temperature range: Operating Specification • 3-cell "smart" Lithium ion • 4cell "smart" Lithium ion Latitude 7240 Latitude 7440 80.75 mm (3.18 inches) 7.20 mm (0.28 inch) 282.00 mm (11.10 inches)... 74.75 mm (2.94 inches) 8.00 mm (0.31 inch) 308.50 mm (12.15 inches) 250.00 g (0.55 ...
Latitude E7240 Owners Manual
Page 52
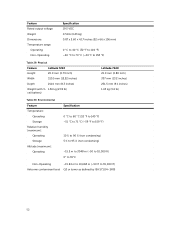
... -15.24 m to 10,668 m (-50 ft to 158 °F) Table 29. Physical Feature Latitude 7240 Height 20.0 mm (0.79 inch) Width 310.5 mm (12.22 inches) Depth 211.0 mm (8.3 inches) Weight (with 3- 1.36 kg (2.99 lb) cell battery) Latitude 7440 21.0 mm (0.80 inch) 337 mm (13.2 inches) 231.5 mm (9.1 inches) 1.63...
... -15.24 m to 10,668 m (-50 ft to 158 °F) Table 29. Physical Feature Latitude 7240 Height 20.0 mm (0.79 inch) Width 310.5 mm (12.22 inches) Depth 211.0 mm (8.3 inches) Weight (with 3- 1.36 kg (2.99 lb) cell battery) Latitude 7440 21.0 mm (0.80 inch) 337 mm (13.2 inches) 231.5 mm (9.1 inches) 1.63...
Latitude E7240/E7440Series Setup and Features Information
Page 2
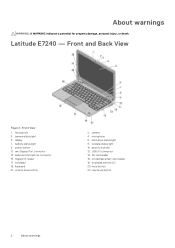
...-card reader 18. microphone 3. battery status light 9. wireless status light 10. touchpad buttons (2) 20. display 7. USB 3.0 connector 14. Latitude E7240 - power button 11. audio and microphone connector 15. SD card reader 16. mute button 22. volume up button 2 About warnings Front View... 1. camera 4. security lock slot 12. mini Display Port connector 13. fingerprint reader 17. About warnings WARNING: A WARNING indicates a potential for property damage, personal injury,...
...-card reader 18. microphone 3. battery status light 9. wireless status light 10. touchpad buttons (2) 20. display 7. USB 3.0 connector 14. Latitude E7240 - power button 11. audio and microphone connector 15. SD card reader 16. mute button 22. volume up button 2 About warnings Front View... 1. camera 4. security lock slot 12. mini Display Port connector 13. fingerprint reader 17. About warnings WARNING: A WARNING indicates a potential for property damage, personal injury,...

Latitude E7240/E7440Series Setup and Features Information
Page 4
... 15. touchpad buttons (2) 19. camera 4. hard-drive status light 8. security lock slot 12. touchpad 18. microphone 3. contactless smart-card reader 17. volume up button 2. audio and microphone connector 14. fingerprint reader 16. keyboard 22. volume down button 4 About warnings Latitude E7440 - Front and Back View Figure 4. wireless status light 10. microphone 6. camera...
... 15. touchpad buttons (2) 19. camera 4. hard-drive status light 8. security lock slot 12. touchpad 18. microphone 3. contactless smart-card reader 17. volume up button 2. audio and microphone connector 14. fingerprint reader 16. keyboard 22. volume down button 4 About warnings Latitude E7440 - Front and Back View Figure 4. wireless status light 10. microphone 6. camera...
Latitude E7240/E7440Series Setup and Features Information
Page 7
... 2013 Dell Inc. Trademarks used in compliance with the requirements of the official Mexican standards (NOM). About warnings 7 Physical Height Width Depth Weight (with 3-cell battery) Latitude 7240 20.0mm (0.79 inch) 310.5 mm (12.2 inches) 211.0 mm (8.3 inches) 1.36 kg (2.99 lbs) Latitude 7440 ...device described in this document in this text: Dell™, the DELL logo, Dell Precision™, Precision ON™,ExpressCharge™, Latitude™, Latitude ON™, OptiPlex™, Vostro™, and Wi-Fi Catcher™ are trademarks of Dell Inc. only) • End User License ...
... 2013 Dell Inc. Trademarks used in compliance with the requirements of the official Mexican standards (NOM). About warnings 7 Physical Height Width Depth Weight (with 3-cell battery) Latitude 7240 20.0mm (0.79 inch) 310.5 mm (12.2 inches) 211.0 mm (8.3 inches) 1.36 kg (2.99 lbs) Latitude 7440 ...device described in this document in this text: Dell™, the DELL logo, Dell Precision™, Precision ON™,ExpressCharge™, Latitude™, Latitude ON™, OptiPlex™, Vostro™, and Wi-Fi Catcher™ are trademarks of Dell Inc. only) • End User License ...
Desktop and Notebooks Users Guide
Page 2
...Shipped with Your Computer and Available Online 9 Product Information...10 My Dell Support Center...10 2 Using The Battery...11 Checking the Battery Charge...11 Dell Battery Information Utility...12 Conserving Battery Power...12 Storing a Battery...12 3 Using the Display...13 Switching the Image From Computer Display to......16 ...16 Setting Up Local Area Network (LAN) and Wireless Local Area Network (WLAN 17 Connecting to a WLAN...17 Dell QuickSet Utilities/Dell ControlPoint...18 Mobile Broadband or Wireless Wide Area Network (WWAN 18 6 Connect to a Device...19 Connecting the Computer to a...
...Shipped with Your Computer and Available Online 9 Product Information...10 My Dell Support Center...10 2 Using The Battery...11 Checking the Battery Charge...11 Dell Battery Information Utility...12 Conserving Battery Power...12 Storing a Battery...12 3 Using the Display...13 Switching the Image From Computer Display to......16 ...16 Setting Up Local Area Network (LAN) and Wireless Local Area Network (WLAN 17 Connecting to a WLAN...17 Dell QuickSet Utilities/Dell ControlPoint...18 Mobile Broadband or Wireless Wide Area Network (WWAN 18 6 Connect to a Device...19 Connecting the Computer to a...
Desktop and Notebooks Users Guide
Page 3
... (TPM)...30 11 Drivers...32 Identifying Drivers...32 Reinstalling Drivers...32 12 Restoring Your Operating System 33 13 My Dell Downloads...34 14 My Dell Support Center...35 15 Smart Settings...36 16 Dell Digital Delivery...37 17 Windows Live Essentials 2011...38 18 Dell Webcam Manager...39 19 Using a Touchscreen Display (For Tablet PC...
... (TPM)...30 11 Drivers...32 Identifying Drivers...32 Reinstalling Drivers...32 12 Restoring Your Operating System 33 13 My Dell Downloads...34 14 My Dell Support Center...35 15 Smart Settings...36 16 Dell Digital Delivery...37 17 Windows Live Essentials 2011...38 18 Dell Webcam Manager...39 19 Using a Touchscreen Display (For Tablet PC...
Desktop and Notebooks Users Guide
Page 12
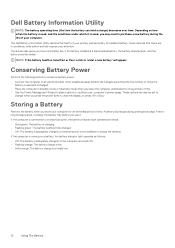
... is turned off). • Flashing orange: The battery charge is low. • Solid orange: The battery charge is critically low. 12 Using The Battery Conserving Battery Power Perform the following actions to conserve battery power: • Connect the computer to an electrical outlet when possible... the display, or press Storing a Battery Remove the battery when you leave the computer unattended for an extended period of time. The Dell Battery Information Utility denotes the health of your attention. This screen also gives you more information like, if the battery installed is used ...
... is turned off). • Flashing orange: The battery charge is low. • Solid orange: The battery charge is critically low. 12 Using The Battery Conserving Battery Power Perform the following actions to conserve battery power: • Connect the computer to an electrical outlet when possible... the display, or press Storing a Battery Remove the battery when you leave the computer unattended for an extended period of time. The Dell Battery Information Utility denotes the health of your attention. This screen also gives you more information like, if the battery installed is used ...

Desktop and Notebooks Users Guide
Page 33
12 Restoring Your Operating System You can restore your operating system by performing any of the following: • Microsoft Windows System Restore • Restoring your computer • Undoing the system restore • Restoring to Dell Factory Image • Restoring to factory settings • Using the Operating System Restoring Your Operating System 33
12 Restoring Your Operating System You can restore your operating system by performing any of the following: • Microsoft Windows System Restore • Restoring your computer • Undoing the system restore • Restoring to Dell Factory Image • Restoring to factory settings • Using the Operating System Restoring Your Operating System 33
Desktop and Notebooks Users Guide
Page 42
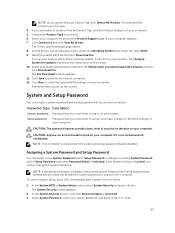
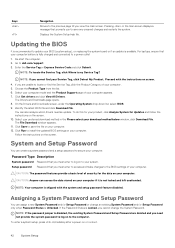
Keys Navigation Moves to dell.com/support. 3. Displays the System Setup help file. Password Type Description System password Password that your Service Tag, click Detect My Product. CAUTION: The password features provide a basic level of your computer. 12. Assigning a System Password and Setup Password You can access the data stored on or re...
Keys Navigation Moves to dell.com/support. 3. Displays the System Setup help file. Password Type Description System password Password that your Service Tag, click Detect My Product. CAUTION: The password features provide a basic level of your computer. 12. Assigning a System Password and Setup Password You can access the data stored on or re...

Desktop and Notebooks Users Guide
Page 44
Go to the system setup, and assign a new system or setup password. 44 System Setup Remove the cover. 9. Power-on the pins. 10. Replace the jumper on the computer. 13. Power-off the computer and disconnect the power cable from the electrical outlet. 8. Install the cover. 11. Follow the procedures in After Working Inside Your Computer. 12. 7.
Go to the system setup, and assign a new system or setup password. 44 System Setup Remove the cover. 9. Power-on the pins. 10. Replace the jumper on the computer. 13. Power-off the computer and disconnect the power cable from the electrical outlet. 8. Install the cover. 11. Follow the procedures in After Working Inside Your Computer. 12. 7.


