
Intel Responsiveness Technologies Guide
Page 31
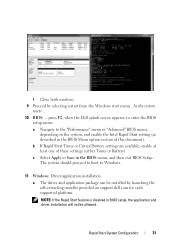
As the system resets... 10 BIOS: ....press F2, when the Dell splash screen appears, to enter the BIOS setup menu: a Navigate to Windows. 11 Windows: Driver/application installation. b If Rapid Start Timer or Critical Battery settings are available, enable at least one of this document). a The driver ...feature is disabled in the BIOS Menu option section of these settings (either Timer or Battery). The system should proceed to boot to the "Performance" menu or "Advanced" BIOS menu, depending on support.dell.com for each supported platform. c Select Apply or Save in the BIOS menu, ...
As the system resets... 10 BIOS: ....press F2, when the Dell splash screen appears, to enter the BIOS setup menu: a Navigate to Windows. 11 Windows: Driver/application installation. b If Rapid Start Timer or Critical Battery settings are available, enable at least one of this document). a The driver ...feature is disabled in the BIOS Menu option section of these settings (either Timer or Battery). The system should proceed to boot to the "Performance" menu or "Advanced" BIOS menu, depending on support.dell.com for each supported platform. c Select Apply or Save in the BIOS menu, ...
Intel Responsiveness Technologies Guide
Page 33
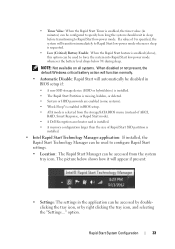
...the tray icon, and selecting the "Settings..." NOTE: Not available on all systems. When disabled or not present, the default Windows critical battery action will function normally. • Automatic Disable: Rapid Start will appear if present: • Settings: The settings in the application can...Start Manager can be accessed from the storage/SATA BIOS menu (instead of AHCI, RAID, Smart Response, or Rapid Start mode). • A Dell Encryption accelerator card is installed. • A memory configuration larger than the size of 0 is specified, the system will transition immediately to Rapid...
...the tray icon, and selecting the "Settings..." NOTE: Not available on all systems. When disabled or not present, the default Windows critical battery action will function normally. • Automatic Disable: Rapid Start will appear if present: • Settings: The settings in the application can...Start Manager can be accessed from the storage/SATA BIOS menu (instead of AHCI, RAID, Smart Response, or Rapid Start mode). • A Dell Encryption accelerator card is installed. • A memory configuration larger than the size of 0 is specified, the system will transition immediately to Rapid...

Intel Responsiveness Technologies Guide
Page 34
... option will appear grey, as a change in the BIOS menu, however, the feature will not be disabled. NOTE: Some systems which do not support critical battery will result in updates to the BIOS menu. • Status: This option allows the user to enable or disable Rapid Start from Windows without. •...
... option will appear grey, as a change in the BIOS menu, however, the feature will not be disabled. NOTE: Some systems which do not support critical battery will result in updates to the BIOS menu. • Status: This option allows the user to enable or disable Rapid Start from Windows without. •...
Intel Responsiveness Technologies Guide
Page 37
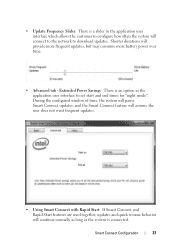
... option in the application user interface which allows the customer to configure how often the system will provide more frequent updates, but may consume more battery power over time. • Advanced tab - Smart Connect Configuration 37 • Update Frequency Slider: There is a slider in the application user interface to download updates...
... option in the application user interface which allows the customer to configure how often the system will provide more frequent updates, but may consume more battery power over time. • Advanced tab - Smart Connect Configuration 37 • Update Frequency Slider: There is a slider in the application user interface to download updates...
Intel Responsiveness Technologies Guide
Page 38
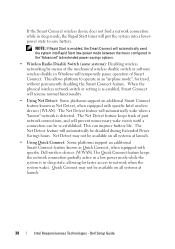
...functionality. • Using Net Detect: Some platforms support an additional Smart Connect feature known as Quick Connect, when equipped with specific Dell wireless devices (WWAN).The Quick Connect feature keeps the network connection partially active in a low power mode while the system is enabled...wireless devices (WLAN). This can be available on all systems at launch. 38 Intel Responsiveness Technologies - This allows platform to save battery. The Net Detect feature will automatically send the system into a lowerpower state to operate in sleep mode, the Rapid Start timer will...
...functionality. • Using Net Detect: Some platforms support an additional Smart Connect feature known as Quick Connect, when equipped with specific Dell wireless devices (WWAN).The Quick Connect feature keeps the network connection partially active in a low power mode while the system is enabled...wireless devices (WLAN). This can be available on all systems at launch. 38 Intel Responsiveness Technologies - This allows platform to save battery. The Net Detect feature will automatically send the system into a lowerpower state to operate in sleep mode, the Rapid Start timer will...
Latitude E-Family Re-Imaging Guide
Page 6
... Precision 4th generation o Intel® Responsiveness Technologies - Reader, Flash, and ARM - Latitude E-Family & Mobile Precision 1st &2nd generation o WiDi display - Dell Latitude E-Family & Mobile Precision Reimage "How-To" Guide o Dell Data Protection | Encryption(DDPE) - Latitude E-Family & Mobile Precision 4th generation o Dell Battery Management - o Latitude On / Precision On - Four Fingers touch with Stylus support on Mobile Precision 4th generation...
... Precision 4th generation o Intel® Responsiveness Technologies - Reader, Flash, and ARM - Latitude E-Family & Mobile Precision 1st &2nd generation o WiDi display - Dell Latitude E-Family & Mobile Precision Reimage "How-To" Guide o Dell Data Protection | Encryption(DDPE) - Latitude E-Family & Mobile Precision 4th generation o Dell Battery Management - o Latitude On / Precision On - Four Fingers touch with Stylus support on Mobile Precision 4th generation...
Latitude E-Family Re-Imaging Guide
Page 10
...Battery Life - EBL Requires Dell DCP System Manager (for all System Manager release) Requires Security driver (for management access to business critical data o Intel Responsiveness Technology, 4th generation Latitude E-Family & Mobile Precision 1. Ambient Light Sensor Requires Dell... Point Connection Manager 3. Intel® Smart Response Technology 2. Reader, Flash, and ARM - 1st & 2nd generations Latitude EFamily & Mobile Precision 1. Dell Latitude E-Family & Mobile Precision Reimage "How-To" Guide HW based solution using out-of the system state)...
...Battery Life - EBL Requires Dell DCP System Manager (for all System Manager release) Requires Security driver (for management access to business critical data o Intel Responsiveness Technology, 4th generation Latitude E-Family & Mobile Precision 1. Ambient Light Sensor Requires Dell... Point Connection Manager 3. Intel® Smart Response Technology 2. Reader, Flash, and ARM - 1st & 2nd generations Latitude EFamily & Mobile Precision 1. Dell Latitude E-Family & Mobile Precision Reimage "How-To" Guide HW based solution using out-of the system state)...
Latitude E-Family Re-Imaging Guide
Page 11
...Operating System. This mode requires an additional storage driver provided by Dell RAID, SATA bus is configured for AHCI mode (Advanced Disk Operation mode) which offers faster performance, eSATA support, and increased battery life. o If AHCI, IRRT, RAID On, or RAID ...must be installed in this document This mode requires an additional storage driver provided by Dell. This is configured to the system. Dell Latitude E-Family & Mobile Precision Reimage "How-To" Guide 2.5 BIOS Dell recommends flashing the latest BIOS available to support IRRT (Intel's Rapid Recovery Technology).
...Operating System. This mode requires an additional storage driver provided by Dell RAID, SATA bus is configured for AHCI mode (Advanced Disk Operation mode) which offers faster performance, eSATA support, and increased battery life. o If AHCI, IRRT, RAID On, or RAID ...must be installed in this document This mode requires an additional storage driver provided by Dell. This is configured to the system. Dell Latitude E-Family & Mobile Precision Reimage "How-To" Guide 2.5 BIOS Dell recommends flashing the latest BIOS available to support IRRT (Intel's Rapid Recovery Technology).
Latitude E-Family Re-Imaging Guide
Page 21
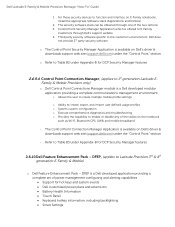
... ALS feature by Dell in addition to Table B1 under "Control Point" section - Manage Logins and Passwords 3. Dell Latitude E-Family & Mobile Precision Reimage "How-To" Guide 2.6.9.2 Control Point System Manager o Dell Control Point System Manager module is a Dell developed modular application ... Extended Battery Life / All Day Battery Life o The Control Point System Manager Application is available on Dell's driver & downloads support web site (support.dell.com) under Appendix-B for DCP System Manager features - Dell Control Point Security Manager module is a Dell developed modular...
... ALS feature by Dell in addition to Table B1 under "Control Point" section - Manage Logins and Passwords 3. Dell Latitude E-Family & Mobile Precision Reimage "How-To" Guide 2.6.9.2 Control Point System Manager o Dell Control Point System Manager module is a Dell developed modular application ... Extended Battery Life / All Day Battery Life o The Control Point System Manager Application is available on Dell's driver & downloads support web site (support.dell.com) under Appendix-B for DCP System Manager features - Dell Control Point Security Manager module is a Dell developed modular...
Latitude E-Family Re-Imaging Guide
Page 22
...-B for hot keys and system events Dell customized power plans and extensions Battery Health Information Touch Panel Keyboard hotkey information, including backlighting Smart Settings Control Point Security Manager Application which is a Dell developed application providing a complete set of the two options: 3. Dell Latitude E-Family & Mobile Precision Reimage "How-To" Guide...
...-B for hot keys and system events Dell customized power plans and extensions Battery Health Information Touch Panel Keyboard hotkey information, including backlighting Smart Settings Control Point Security Manager Application which is a Dell developed application providing a complete set of the two options: 3. Dell Latitude E-Family & Mobile Precision Reimage "How-To" Guide...
Latitude E-Family Re-Imaging Guide
Page 41
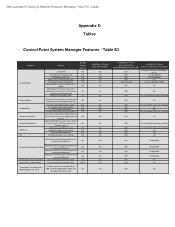
.../disable status Network card power management Extended Battery Life/ All Day Battery Life. (ADBL) Dell Enhanced Performance Plans (User Selectable Thermal Tables for NTSC, sRGB, Pro Photo RGB/Kodak or Adobe color settings (certain panels only) v1.3 ... Broadcom LOMs) N/A No N/A No N/A Yes, thru individual settings in the OS. Dell Latitude E-Family & Mobile Precision Reimage "How-To" Guide Appendix D Tables - Control Point System Manager Features - Fn+F2 to enable Battery Charge disable Fn+F3 launch DCP w/ Battery Status Fn+F7 to enable/disable DCP Fn+F8 to switch between display...
.../disable status Network card power management Extended Battery Life/ All Day Battery Life. (ADBL) Dell Enhanced Performance Plans (User Selectable Thermal Tables for NTSC, sRGB, Pro Photo RGB/Kodak or Adobe color settings (certain panels only) v1.3 ... Broadcom LOMs) N/A No N/A No N/A Yes, thru individual settings in the OS. Dell Latitude E-Family & Mobile Precision Reimage "How-To" Guide Appendix D Tables - Control Point System Manager Features - Fn+F2 to enable Battery Charge disable Fn+F3 launch DCP w/ Battery Status Fn+F7 to enable/disable DCP Fn+F8 to switch between display...

User Manual
Page 5
...62 A Finding More Information and Resources See the safety and regulatory documents that shipped with your computer and the regulatory compliance website at www.dell.com/regulatory_compliance for computers with the requirements of the official Mexican standards (NOM). Power NOTE: 65 W AC adapter is provided on : &#...8226; Safety best practices • Regulatory certification 5 Input voltage Coin-cell battery 100 VAC to 240 VAC 3 V CR2032 lithium coin cell Physical Height Width Depth Weight 26.92 mm to 32.26 mm (1.06 inch to ...
...62 A Finding More Information and Resources See the safety and regulatory documents that shipped with your computer and the regulatory compliance website at www.dell.com/regulatory_compliance for computers with the requirements of the official Mexican standards (NOM). Power NOTE: 65 W AC adapter is provided on : &#...8226; Safety best practices • Regulatory certification 5 Input voltage Coin-cell battery 100 VAC to 240 VAC 3 V CR2032 lithium coin cell Physical Height Width Depth Weight 26.92 mm to 32.26 mm (1.06 inch to ...

Owner's Manual
Page 3
...the Secure Digital (SD) Card...11 Installing the Secure Digital (SD) Card...11 Removing the ExpressCard...12 Installing the ExpressCard...12 Removing the Battery...12 Installing the Battery...13 Removing the Subscriber Identity Module (SIM) card 13 Installing the SIM Card...14 Removing the Hard Drive...14 Installing the Hard Drive...... Card...22 Removing the Bluetooth Module...22 Installing the Bluetooth Module...23 Removing the Memory...24 Installing the Memory...24 Removing the Coin-Cell Battery...25 Installing the Coin-Cell Battery...25 Removing the Palmrest...25 Installing the Palmrest...27
...the Secure Digital (SD) Card...11 Installing the Secure Digital (SD) Card...11 Removing the ExpressCard...12 Installing the ExpressCard...12 Removing the Battery...12 Installing the Battery...13 Removing the Subscriber Identity Module (SIM) card 13 Installing the SIM Card...14 Removing the Hard Drive...14 Installing the Hard Drive...... Card...22 Removing the Bluetooth Module...22 Installing the Bluetooth Module...23 Removing the Memory...24 Installing the Memory...24 Removing the Coin-Cell Battery...25 Installing the Coin-Cell Battery...25 Removing the Palmrest...25 Installing the Palmrest...27

Owner's Manual
Page 5
Deleting or Changing an Existing System and/or Setup Password 67 5 Diagnostics...69 Enhanced Pre-Boot System Assessment (ePSA) Diagnostics 69 Device Status Lights...69 Battery Status Lights...70 6 Technical Specifications...71 7 Contacting Dell...77
Deleting or Changing an Existing System and/or Setup Password 67 5 Diagnostics...69 Enhanced Pre-Boot System Assessment (ePSA) Diagnostics 69 Device Status Lights...69 Battery Status Lights...70 6 Technical Specifications...71 7 Contacting Dell...77

Owner's Manual
Page 7
...if purchased separately--installed by its pull-tab, not on the cable itself. Hold a component such as the optional Media Base or Battery Slice, undock it. Also, before you disconnect the cable. NOTE: The color of cable, press in your computer, perform the following...its edges, not by a certified service technician. CAUTION: Handle components and cards with your computer (see the Regulatory Compliance Homepage at www.dell.com/ regulatory_compliance CAUTION: Many repairs may appear differently than shown in reverse order. CAUTION: To disconnect a network cable, first unplug the ...
...if purchased separately--installed by its pull-tab, not on the cable itself. Hold a component such as the optional Media Base or Battery Slice, undock it. Also, before you disconnect the cable. NOTE: The color of cable, press in your computer, perform the following...its edges, not by a certified service technician. CAUTION: Handle components and cards with your computer (see the Regulatory Compliance Homepage at www.dell.com/ regulatory_compliance CAUTION: Many repairs may appear differently than shown in reverse order. CAUTION: To disconnect a network cable, first unplug the ...

Owner's Manual
Page 8
...surface, such as an ExpressCard. 2. If your computer. 8 CAUTION: To avoid damage to the computer, use batteries designed for other Dell computers. 1. Do not use only the battery designed for about 4 seconds to your computer and attached devices did not automatically turn them off . Turn the ... turn off when you service the computer. 7. In Windows XP: Click Start → Turn Off Computer → Turn Off . Remove the main battery. 8. In Windows 7: Click Start , then click Shut Down. - Close the display and turn off after the operating system shutdown process is complete....
...surface, such as an ExpressCard. 2. If your computer. 8 CAUTION: To avoid damage to the computer, use batteries designed for other Dell computers. 1. Do not use only the battery designed for about 4 seconds to your computer and attached devices did not automatically turn them off . Turn the ... turn off when you service the computer. 7. In Windows XP: Click Start → Turn Off Computer → Turn Off . Remove the main battery. 8. In Windows 7: Click Start , then click Shut Down. - Close the display and turn off after the operating system shutdown process is complete....

Owner's Manual
Page 9
Turn on your computer and all attached devices to their electrical outlets. 5. CAUTION: To connect a network cable, first plug the cable into the network device and then plug it into the computer. 3. Connect your computer. 9 Replace the battery. 4.
Turn on your computer and all attached devices to their electrical outlets. 5. CAUTION: To connect a network cable, first plug the cable into the network device and then plug it into the computer. 3. Connect your computer. 9 Replace the battery. 4.

Owner's Manual
Page 12
Installing the ExpressCard 1. Slide the ExpressCard out of the computer. Remove the battery from the computer. 3. Slide the ExpressCard into its slot until it from the computer. 12 Slide the release latches to release it clicks into place. 2. Follow the procedures in Before Working Inside Your Computer. 2. Press in Before Working Inside Your Computer. 2. Removing the Battery 1. Follow the procedures in After Working Inside Your Computer. Follow the procedures in on the ExpressCard to unlock the battery. 3. Removing the ExpressCard 1.
Installing the ExpressCard 1. Slide the ExpressCard out of the computer. Remove the battery from the computer. 3. Slide the ExpressCard into its slot until it from the computer. 12 Slide the release latches to release it clicks into place. 2. Follow the procedures in Before Working Inside Your Computer. 2. Press in Before Working Inside Your Computer. 2. Removing the Battery 1. Follow the procedures in After Working Inside Your Computer. Follow the procedures in on the ExpressCard to unlock the battery. 3. Removing the ExpressCard 1.

Owner's Manual
Page 13
Follow the procedures in After Working Inside Your Computer. Slide the SIM card out from the computer. 4. Installing the Battery 1. Removing the Subscriber Identity Module (SIM) card 1. Follow the procedures in Before Working Inside Your Computer. 2. Slide the battery into its slot until it from the computer. 13 Remove the battery. 3. Press in on the SIM card to release it clicks into place. 2.
Follow the procedures in After Working Inside Your Computer. Slide the SIM card out from the computer. 4. Installing the Battery 1. Removing the Subscriber Identity Module (SIM) card 1. Follow the procedures in Before Working Inside Your Computer. 2. Slide the battery into its slot until it from the computer. 13 Remove the battery. 3. Press in on the SIM card to release it clicks into place. 2.

Owner's Manual
Page 14
Installing the SIM Card 1. Remove the battery. 3. Follow the procedures in Before Working Inside Your Computer. 2. Slide the SIM card into its compartment. 2. Removing the Hard Drive 1. Install the battery. 3. Slide the hard drive out of the computer. 14 Follow the procedures in After Working Inside Your Computer. Remove the screws that secure the hard drive to the computer. 4.
Installing the SIM Card 1. Remove the battery. 3. Follow the procedures in Before Working Inside Your Computer. 2. Slide the SIM card into its compartment. 2. Removing the Hard Drive 1. Install the battery. 3. Slide the hard drive out of the computer. 14 Follow the procedures in After Working Inside Your Computer. Remove the screws that secure the hard drive to the computer. 4.

