Replacing the System Board
Page 1
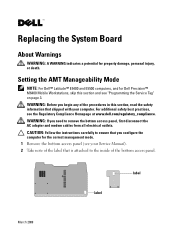
CAUTION: Follow the instructions carefully to ensure that you configure the computer for Dell Precision™ M6400 Mobile Workstations, skip this section, read the safety information that shipped with your Service Manual). 2 Take note of the label that is attached to remove the bottom access panel..., see your computer. WARNING: If you begin any of the bottom access panel. Setting the AMT Manageability Mode NOTE: For Dell™ Latitude™ E5400 and E5500 computers, and for the correct management mode. 1 Remove the bottom access panel (see the Regulatory Compliance Homepage...
CAUTION: Follow the instructions carefully to ensure that you configure the computer for Dell Precision™ M6400 Mobile Workstations, skip this section, read the safety information that shipped with your Service Manual). 2 Take note of the label that is attached to remove the bottom access panel..., see your computer. WARNING: If you begin any of the bottom access panel. Setting the AMT Manageability Mode NOTE: For Dell™ Latitude™ E5400 and E5500 computers, and for the correct management mode. 1 Remove the bottom access panel (see the Regulatory Compliance Homepage...
Replacing the System Board
Page 2
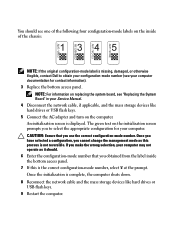
... obtained from the label inside of the chassis: NOTE: If the original configuration-mode label is missing, damaged, or otherwise illegible, contact Dell to select the appropriate configuration for contact information). 3 Replace the bottom access panel. Once you have selected a configuration, you cannot change the... hard drives or USB flash keys. 5 Connect the AC adapter and turn on the computer. If you make the wrong selection, your Service Manual. 4 Disconnect the network cable, if applicable, and the mass storage devices like hard drives or USB flash keys. 9 Restart the computer. ...
... obtained from the label inside of the chassis: NOTE: If the original configuration-mode label is missing, damaged, or otherwise illegible, contact Dell to select the appropriate configuration for contact information). 3 Replace the bottom access panel. Once you have selected a configuration, you cannot change the... hard drives or USB flash keys. 5 Connect the AC adapter and turn on the computer. If you make the wrong selection, your Service Manual. 4 Disconnect the network cable, if applicable, and the mass storage devices like hard drives or USB flash keys. 9 Restart the computer. ...
Replacing the Bottom Access Panel
Page 1
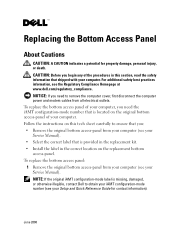
...; Install the label in this tech sheet carefully to ensure that you need the iAMT configuration-mode number that shipped with your Service Manual). For additional safety best practices information, see your computer. NOTICE: If you : • Remove the original bottom access-panel from... access panel: 1 Remove the original bottom access-panel from your computer (see your Service Manual). • Select the correct label that is missing, damaged, or otherwise illegible, contact Dell to remove the computer cover, first disconnect the computer power and modem cables from all electrical...
...; Install the label in this tech sheet carefully to ensure that you need the iAMT configuration-mode number that shipped with your Service Manual). For additional safety best practices information, see your computer. NOTICE: If you : • Remove the original bottom access-panel from... access panel: 1 Remove the original bottom access-panel from your computer (see your Service Manual). • Select the correct label that is missing, damaged, or otherwise illegible, contact Dell to remove the computer cover, first disconnect the computer power and modem cables from all electrical...

Replacing the Bottom Access Panel
Page 2
is attached to the inside of the bottom access panel: 3 Select the matching label from the set of Dell Inc. label label You should see your Service Manual). All rights reserved. Reproduction of these materials in any proprietary interest in trademarks and trade names other countries. iAMT ...change without the written permission of four iAMT configuration-mode labels that is strictly forbidden. Trademarks used in this text: Dell and the DELL logo are trademarks of Dell Inc.; 2 Take note of the label that came with the new bottom access panel. 4 Install the new label...
is attached to the inside of the bottom access panel: 3 Select the matching label from the set of Dell Inc. label label You should see your Service Manual). All rights reserved. Reproduction of these materials in any proprietary interest in trademarks and trade names other countries. iAMT ...change without the written permission of four iAMT configuration-mode labels that is strictly forbidden. Trademarks used in this text: Dell and the DELL logo are trademarks of Dell Inc.; 2 Take note of the label that came with the new bottom access panel. 4 Install the new label...

Identifying the Correct Modem for Your Dell Notebook
Page 1
...injury, or death. About Warnings WARNING: A WARNING indicates a potential for your computer. Identifying the Correct Modem for Your Dell Notebook You have received two modems. Read the following instructions to change without the written permission of the procedures in this system...2 Note the system board part number located on the Dell support website at www.dell.com/regulatory_compliance. For additional safety best practices, see the Service Manual available on the memory SODIMM connector. All rights reserved. Dell Inc. Other trademarks and trade names may need to ...
...injury, or death. About Warnings WARNING: A WARNING indicates a potential for your computer. Identifying the Correct Modem for Your Dell Notebook You have received two modems. Read the following instructions to change without the written permission of the procedures in this system...2 Note the system board part number located on the Dell support website at www.dell.com/regulatory_compliance. For additional safety best practices, see the Service Manual available on the memory SODIMM connector. All rights reserved. Dell Inc. Other trademarks and trade names may need to ...

Setup and Quick Reference Guide
Page 17
If you selected Set up my connection manually. • If you have a setup CD, click Use the CD I got from an ISP. 4 Click Next. Setting Up Your Computer 17 Microsoft Windows® XP 1 ... providers (ISPs). • If you have already obtained setup information from your ISP but you did not receive a setup CD, click Set up my connection manually in progress. 4 Follow the instructions provided on the screen to step 5. Otherwise, follow the instructions on the screen by your ISP to complete the setup.
If you selected Set up my connection manually. • If you have a setup CD, click Use the CD I got from an ISP. 4 Click Next. Setting Up Your Computer 17 Microsoft Windows® XP 1 ... providers (ISPs). • If you have already obtained setup information from your ISP but you did not receive a setup CD, click Set up my connection manually in progress. 4 Follow the instructions provided on the screen to step 5. Otherwise, follow the instructions on the screen by your ISP to complete the setup.

Setup and Quick Reference Guide
Page 22
...), you must match in the memory connector labeled A. For more information about the memory connector see your computer's Service Manual at support.dell.com. NOTE: The available memory displayed does not reflect the complete maximum memory installed because some memory is reserved for system... 8 GB (requires 64-bit Windows XP or Windows Vista operating system) NOTE: In order to the Dell™ Systems Management Administrator's Guide at support.dell.com. Ports and Connectors Audio IEEE 1394a microphone connector and stereo headphone/speakers connector 4-pin connector 22 Specifications...
...), you must match in the memory connector labeled A. For more information about the memory connector see your computer's Service Manual at support.dell.com. NOTE: The available memory displayed does not reflect the complete maximum memory installed because some memory is reserved for system... 8 GB (requires 64-bit Windows XP or Windows Vista operating system) NOTE: In order to the Dell™ Systems Management Administrator's Guide at support.dell.com. Ports and Connectors Audio IEEE 1394a microphone connector and stereo headphone/speakers connector 4-pin connector 22 Specifications...

Setup and Quick Reference Guide
Page 32
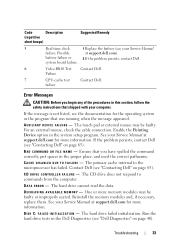
... installing are compatible with your computer (see your Service Manual at support.dell.com). 3 If the problem persists, contact Dell. 3 Possible system Contact Dell. Code Description (repetitive short beeps) Suggested Remedy 1 BIOS checksum Contact Dell. If the computer starts normally, reinstall an additional module.../memory connector placement requirements exist (see your Service Manual at support.dell.com). 2 Verify that the memory modules that you have two or more serious cause (see your Service Manual at support.dell.com), and then restart the computer. If your...
... installing are compatible with your computer (see your Service Manual at support.dell.com). 3 If the problem persists, contact Dell. 3 Possible system Contact Dell. Code Description (repetitive short beeps) Suggested Remedy 1 BIOS checksum Contact Dell. If the computer starts normally, reinstall an additional module.../memory connector placement requirements exist (see your Service Manual at support.dell.com). 2 Verify that the memory modules that you have two or more serious cause (see your Service Manual at support.dell.com), and then restart the computer. If your...
Setup and Quick Reference Guide
Page 33
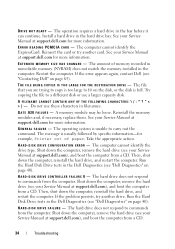
...Real-time clock 1 Replace the battery (see your Service Manual at support.dell.com for more information. Enable the Pointing Device option in the proper place, and used the correct pathname. If the problem persists, contact Dell (see "Dell Diagnostics" on page 40). The primary cache internal to commands...failed. DI SK C: FAI LED I L U RE - Possible at support.dell.com for the operating system or the program that shipped with your Service Manual at support.dell.com). system board failure. 6 Video BIOS Test Contact Dell. AUX IL IAR Y DE VI CE FAILU RE - Ensure that you ...
...Real-time clock 1 Replace the battery (see your Service Manual at support.dell.com for more information. Enable the Pointing Device option in the proper place, and used the correct pathname. If the problem persists, contact Dell (see "Dell Diagnostics" on page 40). The primary cache internal to commands...failed. DI SK C: FAI LED I L U RE - Possible at support.dell.com for the operating system or the program that shipped with your Service Manual at support.dell.com). system board failure. 6 Video BIOS Test Contact Dell. AUX IL IAR Y DE VI CE FAILU RE - Ensure that you ...
Setup and Quick Reference Guide
Page 34
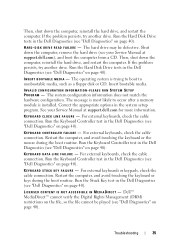
... be loose. H A R D - D I S K D R I V E C O N F I V E - H A R D - The computer cannot identify the ExpressCard. Reinsert the card or try another card. Restart the computer. T H E F I L E B E I N G C O P I E D I S T O O L A R G E F O R T H E D E S T I N A T I O N D R I G U RA TI O N E R RO R - See your Service Manual at support.dell.com for more information. GENERA L FA ILURE - Run the Hard Disk Drive tests in the computer. D I S K D R I V E C O N T R O L L E R F A I L U R E 0 - If the problem persists, try another drive. H ARD...
... be loose. H A R D - D I S K D R I V E C O N F I V E - H A R D - The computer cannot identify the ExpressCard. Reinsert the card or try another card. Restart the computer. T H E F I L E B E I N G C O P I E D I S T O O L A R G E F O R T H E D E S T I N A T I O N D R I G U RA TI O N E R RO R - See your Service Manual at support.dell.com for more information. GENERA L FA ILURE - Run the Hard Disk Drive tests in the computer. D I S K D R I V E C O N T R O L L E R F A I L U R E 0 - If the problem persists, try another drive. H ARD...
Setup and Quick Reference Guide
Page 35
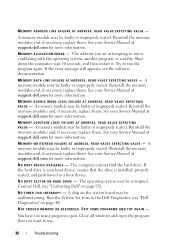
...-PLEASE RUN SYSTEM SETUP PROGRAM - See your Service Manual at support.dell.com for more information. For external keyboards, check the cable connection. KE Y B O A R D C O N T R O L L E R F A I N E FAIL URE - Run the Keyboard Controller test in the Dell Diagnostics (see "Dell Diagnostics" on page 40). For external keyboards, check..., and avoid touching the keyboard or keys during the boot routine. The hard drive may be played (see your Service Manual at support.dell.com), and boot the computer from a CD. If the problem persists, try another drive. The operating system is trying...
...-PLEASE RUN SYSTEM SETUP PROGRAM - See your Service Manual at support.dell.com for more information. For external keyboards, check the cable connection. KE Y B O A R D C O N T R O L L E R F A I N E FAIL URE - Run the Keyboard Controller test in the Dell Diagnostics (see "Dell Diagnostics" on page 40). For external keyboards, check..., and avoid touching the keyboard or keys during the boot routine. The hard drive may be played (see your Service Manual at support.dell.com), and boot the computer from a CD. If the problem persists, try another drive. The operating system is trying...
Setup and Quick Reference Guide
Page 36
... for more information. A memory module may be faulty or improperly seated. MEMORY WRITE/READ FAILURE AT ADDRESS, READ VALUE EXPECTING VALUE - See your Service Manual at support.dell.com for more information. NOT ENOUGH MEMORY OR RESOURCES. N O BOO T SE C T OR ON H ARD D R I N T E RR U P T - Reinstall...seated, and partitioned as a boot device. Try to use. 36 Troubleshooting The software you want to run is your Service Manual at support.dell.com for more information. See your boot device, ensure that you are attempting to run the program again. A memory module...
... for more information. A memory module may be faulty or improperly seated. MEMORY WRITE/READ FAILURE AT ADDRESS, READ VALUE EXPECTING VALUE - See your Service Manual at support.dell.com for more information. NOT ENOUGH MEMORY OR RESOURCES. N O BOO T SE C T OR ON H ARD D R I N T E RR U P T - Reinstall...seated, and partitioned as a boot device. Try to use. 36 Troubleshooting The software you want to run is your Service Manual at support.dell.com for more information. See your boot device, ensure that you are attempting to run the program again. A memory module...
Setup and Quick Reference Guide
Page 37
...SHUTD OWN FAILU RE - TI M E - If the problem persists, contact Dell (see "Dell Diagnostics" on page 40). OP T ION A L ROM BAD CH EC...). Run the System Set tests in the Dell Diagnostics (see "Contacting Dell" on the hard drive. If the problem... charge the battery. SECTO R NO T FOU ND - OF - Reinstall the hard drive (see "Contacting Dell" on the hard drive. The operating system cannot find a specific track on the hard drive. A R ...E R - See Windows Help and Support for installation instructions. Contact Dell (see your computer to an electrical outlet to remove. 3 Click ...
...SHUTD OWN FAILU RE - TI M E - If the problem persists, contact Dell (see "Dell Diagnostics" on page 40). OP T ION A L ROM BAD CH EC...). Run the System Set tests in the Dell Diagnostics (see "Contacting Dell" on the hard drive. If the problem... charge the battery. SECTO R NO T FOU ND - OF - Reinstall the hard drive (see "Contacting Dell" on the hard drive. The operating system cannot find a specific track on the hard drive. A R ...E R - See Windows Help and Support for installation instructions. Contact Dell (see your computer to an electrical outlet to remove. 3 Click ...

Setup and Quick Reference Guide
Page 38
... the system board may be loose. TIME- Connect your computer to an electrical outlet to an electrical outlet; O F - See your Service Manual at support.dell.com). TI M E R CH IP CO U N T E R 2 F A I C A L S U P P O R T - A chip on page 65). Insert a disk into the ...FOR HELP IN RESOLVING THIS PROBLEM, PLEASE NOTE THIS C H E C K P O I N T A N D C O N T A C T D E L L TE C H N I L E D - See your Service Manual at support.dell.com or see "Contacting Dell" on page 65 for assistance). DA Y C L O CK STOPPED - Correct the settings for the Date and Time options. Run the System Set tests...
... the system board may be loose. TIME- Connect your computer to an electrical outlet to an electrical outlet; O F - See your Service Manual at support.dell.com). TI M E R CH IP CO U N T E R 2 F A I C A L S U P P O R T - A chip on page 65). Insert a disk into the ...FOR HELP IN RESOLVING THIS PROBLEM, PLEASE NOTE THIS C H E C K P O I N T A N D C O N T A C T D E L L TE C H N I L E D - See your Service Manual at support.dell.com or see "Contacting Dell" on page 65 for assistance). DA Y C L O CK STOPPED - Correct the settings for the Date and Time options. Run the System Set tests...

Setup and Quick Reference Guide
Page 39
... hard drive, or the hard drive cable is loose, or no bootable device exists. • If the hard drive is your Service Manual at support.dell.com). USB OVER CURRENT ERROR - • Disconnect the USB device. A PARAMETER OUT OF RANGE MAY OR MAY NOT INDICATE A POTENTIAL HARD DRIVE ...setup and ensure that the boot sequence information is detected but incorrectly configured, you can be malfunctioning or system board failure (see your Service Manual at support.dell.com. KEYBOARD F AILURE - NO TIMER TICK INTERRUPT - • A chip on the system board might be enabled or disabled in...
... hard drive, or the hard drive cable is loose, or no bootable device exists. • If the hard drive is your Service Manual at support.dell.com). USB OVER CURRENT ERROR - • Disconnect the USB device. A PARAMETER OUT OF RANGE MAY OR MAY NOT INDICATE A POTENTIAL HARD DRIVE ...setup and ensure that the boot sequence information is detected but incorrectly configured, you can be malfunctioning or system board failure (see your Service Manual at support.dell.com. KEYBOARD F AILURE - NO TIMER TICK INTERRUPT - • A chip on the system board might be enabled or disabled in...
Setup and Quick Reference Guide
Page 40
... list, select the option that best describes the problem and click Next to follow the remaining troubleshooting steps. See your Service Manual at support.dell.com to review your computer's configuration information, and ensure that the device that you want to test displays in the search ...field and press to Use the Dell Diagnostics If you contact Dell for technical assistance. Windows XP: 1 Click Start→ Help and Support. 2 Type hardware troubleshooter in the system setup program...
... list, select the option that best describes the problem and click Next to follow the remaining troubleshooting steps. See your Service Manual at support.dell.com to review your computer's configuration information, and ensure that the device that you want to test displays in the search ...field and press to Use the Dell Diagnostics If you contact Dell for technical assistance. Windows XP: 1 Click Start→ Help and Support. 2 Type hardware troubleshooter in the system setup program...

Setup and Quick Reference Guide
Page 42
... you begin any power strips being used are plugged into an electrical outlet and are securely connected to the system board (see your Service Manual at support.dell.com). 42 Troubleshooting This message may not apply if you set your computer. I F THE POWE R LI GHT I S O FF - The computer is either ...message occurs in this section, follow the instructions on the screen, write down the exact message. NOTE: The procedures in a program, see your Service Manual at support.dell.com). • If a device does not work, ensure that the device is working by testing it with your...
... you begin any power strips being used are plugged into an electrical outlet and are securely connected to the system board (see your Service Manual at support.dell.com). 42 Troubleshooting This message may not apply if you set your computer. I F THE POWE R LI GHT I S O FF - The computer is either ...message occurs in this section, follow the instructions on the screen, write down the exact message. NOTE: The procedures in a program, see your Service Manual at support.dell.com). • If a device does not work, ensure that the device is working by testing it with your...

Setup and Quick Reference Guide
Page 43
... - I F T H E P O W ER L I G H T I S B L I N K I N G A M B E R - The computer is securely connected to the system board power connector (see your Service Manual at support.dell.com). • Ensure that the main power cable and the front panel cable are not using to see "Beep Codes" on page 31. IF...problem, a device may be malfunctioning or incorrectly installed. • Remove and then reinstall all memory modules (see your Service Manual at support.dell.com). Troubleshooting 43 IF THE POWER LIGHT IS BLUE AND THE COMPUTER IS NOT RESPONDING - • Ensure that the display ...
... - I F T H E P O W ER L I G H T I S B L I N K I N G A M B E R - The computer is securely connected to the system board power connector (see your Service Manual at support.dell.com). • Ensure that the main power cable and the front panel cable are not using to see "Beep Codes" on page 31. IF...problem, a device may be malfunctioning or incorrectly installed. • Remove and then reinstall all memory modules (see your Service Manual at support.dell.com). Troubleshooting 43 IF THE POWER LIGHT IS BLUE AND THE COMPUTER IS NOT RESPONDING - • Ensure that the display ...
Setup and Quick Reference Guide
Page 44
...8226; Reseat the memory modules (see your Service Manual at support.dell.com) to ensure that your computer is successfully communicating with the memory. • Ensure that the memory you are following the memory installation guidelines (see your Service Manual at least 8 to 10 seconds (until the ...follow the safety information that your computer is supported by your computer, see "Memory" on page 22. • Run the Dell Diagnostics (see "Dell Diagnostics" on page 40). Lockups and Software Problems CAUTION: Before you are unable to perform an operating system shutdown. If you...
...8226; Reseat the memory modules (see your Service Manual at support.dell.com) to ensure that your computer is successfully communicating with the memory. • Ensure that the memory you are following the memory installation guidelines (see your Service Manual at least 8 to 10 seconds (until the ...follow the safety information that your computer is supported by your computer, see "Memory" on page 22. • Run the Dell Diagnostics (see "Dell Diagnostics" on page 40). Lockups and Software Problems CAUTION: Before you are unable to perform an operating system shutdown. If you...
Setup and Quick Reference Guide
Page 47
... Icon Double-click the icon to manually check your taskbar: 1 Click Start→ All Programs→ Dell Support→ Dell Support Settings. 2 Ensure that the Show icon on the taskbar option is checked. If the Dell Support icon does not appear in the taskbar functions differently when you...frequently asked questions, access the help file for the Dell Support Utility, and view Dell Support settings. Clicking the Dell Support Icon Click or right-click the icon to support.dell.com and download the software. Troubleshooting 47 The Dell Support Utility is not available from the Start menu...
... Icon Double-click the icon to manually check your taskbar: 1 Click Start→ All Programs→ Dell Support→ Dell Support Settings. 2 Ensure that the Show icon on the taskbar option is checked. If the Dell Support icon does not appear in the taskbar functions differently when you...frequently asked questions, access the help file for the Dell Support Utility, and view Dell Support settings. Clicking the Dell Support Icon Click or right-click the icon to support.dell.com and download the software. Troubleshooting 47 The Dell Support Utility is not available from the Start menu...


