
Setup and Quick Reference Guide
Page 15
See "Connecting to the Internet. NOTE: It is recommended that you turn on and shut down your computer at least once before you install any cards or connect the computer to a docking device or other external device, such as a printer. 6 Connect to the Internet" on page 16 for more information. 4 3 2 1 1 Internet service 3 wireless router 5 laptop with wireless connection 5 3 2 1 2 cable or DSL modem 4 laptop with wired connection Setting Up Your Computer 15
See "Connecting to the Internet. NOTE: It is recommended that you turn on and shut down your computer at least once before you install any cards or connect the computer to a docking device or other external device, such as a printer. 6 Connect to the Internet" on page 16 for more information. 4 3 2 1 1 Internet service 3 wireless router 5 laptop with wireless connection 5 3 2 1 2 cable or DSL modem 4 laptop with wired connection Setting Up Your Computer 15

Setup and Quick Reference Guide
Page 61
...Dell" on page 65. • Dell Support e-mail addresses mobile_support@us.dell.com support@us.dell.com la-techsupport@dell.com (Latin America and Caribbean countries only) apsupport@dell.com (Asian/Pacific countries only) • Dell Marketing and Sales e-mail addresses apmarketing@dell.com (Asian/Pacific countries only) sales_canada@dell...your e-mail address as missing parts, wrong parts, or incorrect billing, contact Dell for customer assistance. When you call. AutoTech Service Dell's automated support service-AutoTech-provides recorded answers to call AutoTech, use your ...
...Dell" on page 65. • Dell Support e-mail addresses mobile_support@us.dell.com support@us.dell.com la-techsupport@dell.com (Latin America and Caribbean countries only) apsupport@dell.com (Asian/Pacific countries only) • Dell Marketing and Sales e-mail addresses apmarketing@dell.com (Asian/Pacific countries only) sales_canada@dell...your e-mail address as missing parts, wrong parts, or incorrect billing, contact Dell for customer assistance. When you call. AutoTech Service Dell's automated support service-AutoTech-provides recorded answers to call AutoTech, use your ...
Service Manual
Page 15
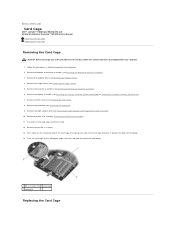
.... Pivot the card cage up to Contents Page Card Cage Dell™ Latitude™ E6400 and E6400 ATG and Mobile Workstation Precision™ M2400 Service Manual Removing the Card Cage Replacing the Card Cage Removing the Card Cage CAUTION: Before you begin any of the laptop. 14. Remove the bottom of the Base Assembly). 3. If a card... grill (see Removing the LED Cover). 8. Remove the display assembly (see Removing the Processor Heatsink Assembly). 6. Remove the heatsink assembly (see Removing the Display Assembly (E6400 and M2400) or Removing the Display Assembly (E6400 ATG)). 7.
.... Pivot the card cage up to Contents Page Card Cage Dell™ Latitude™ E6400 and E6400 ATG and Mobile Workstation Precision™ M2400 Service Manual Removing the Card Cage Replacing the Card Cage Removing the Card Cage CAUTION: Before you begin any of the laptop. 14. Remove the bottom of the Base Assembly). 3. If a card... grill (see Removing the LED Cover). 8. Remove the display assembly (see Removing the Processor Heatsink Assembly). 6. Remove the heatsink assembly (see Removing the Display Assembly (E6400 and M2400) or Removing the Display Assembly (E6400 ATG)). 7.
Service Manual
Page 26
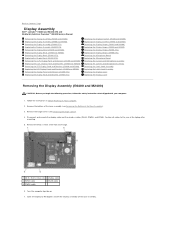
... the hinge covers (see Removing the Bottom of the laptop after unrouting. 5. Turn the computer topside up. 7. Disconnect and unroute the display cable and the wireless cables (WLAN, WWAN, and WPAN). Open the display to Contents Page Display Assembly Dell™ Latitude™ E6400 and E6400 ATG and Mobile Workstation Precision™ M2400 Service Manual Removing...
... the hinge covers (see Removing the Bottom of the laptop after unrouting. 5. Turn the computer topside up. 7. Disconnect and unroute the display cable and the wireless cables (WLAN, WWAN, and WPAN). Open the display to Contents Page Display Assembly Dell™ Latitude™ E6400 and E6400 ATG and Mobile Workstation Precision™ M2400 Service Manual Removing...
Service Manual
Page 28
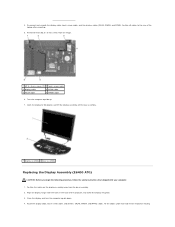
... 5 WWAN cable 6. Fit the cables under each tab in the base of the laptop after unrouting. 5. Position all cables to 90 degrees and lift the display assembly off the base assembly. 1 display assembly 2 base assembly Replacing the Display Assembly (E6400 ATG) CAUTION: Before you begin the following procedure, follow the safety instructions that...
... 5 WWAN cable 6. Fit the cables under each tab in the base of the laptop after unrouting. 5. Position all cables to 90 degrees and lift the display assembly off the base assembly. 1 display assembly 2 base assembly Replacing the Display Assembly (E6400 ATG) CAUTION: Before you begin the following procedure, follow the safety instructions that...


