
Setup and Quick Reference Guide
Page 15
See "Connecting to the Internet. NOTE: It is recommended that you turn on and shut down your computer at least once before you install any cards or connect the computer to a docking device or other external device, such as a printer. 6 Connect to the Internet" on page 16 for more information. 4 3 2 1 1 Internet service 3 wireless router 5 laptop with wireless connection 5 3 2 1 2 cable or DSL modem 4 laptop with wired connection Setting Up Your Computer 15
See "Connecting to the Internet. NOTE: It is recommended that you turn on and shut down your computer at least once before you install any cards or connect the computer to a docking device or other external device, such as a printer. 6 Connect to the Internet" on page 16 for more information. 4 3 2 1 1 Internet service 3 wireless router 5 laptop with wireless connection 5 3 2 1 2 cable or DSL modem 4 laptop with wired connection Setting Up Your Computer 15

Setup and Quick Reference Guide
Page 61
...you have ordered, you can call AutoTech, use your e-mail address as your region, see "Contacting Dell" on page 65. A recording prompts you can go to support.dell.com, or you for customer assistance. Getting Help 61 Automated Order-Status Service To check on the ...dell.com (Canada only) • Anonymous file transfer protocol (FTP) ftp.dell.com Log in as user: anonymous, and use your touch-tone telephone to select the subjects that you have a problem with your questions. For the telephone number to the questions most frequently asked by Dell customers about their laptop...
...you have ordered, you can call AutoTech, use your e-mail address as your region, see "Contacting Dell" on page 65. A recording prompts you can go to support.dell.com, or you for customer assistance. Getting Help 61 Automated Order-Status Service To check on the ...dell.com (Canada only) • Anonymous file transfer protocol (FTP) ftp.dell.com Log in as user: anonymous, and use your touch-tone telephone to select the subjects that you have a problem with your questions. For the telephone number to the questions most frequently asked by Dell customers about their laptop...
Service Manual
Page 15
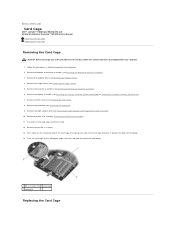
...lift it towards the back of the laptop. 14. Remove the right speaker grill (see Removing the Display Assembly (E6400 and M2400) or Removing the Display Assembly (E6400 ATG)). 7. Pivot the card cage up to Contents Page Card Cage Dell™ Latitude™ E6400 and E6400 ATG and Mobile Workstation Precision™ M2400... Working on the connector-end of the card cage, then grasp each side of the card cage and push it up from the connector and laptop. 1 M2 x 3 screws (2) 2 card cage 3 connector Replacing the Card Cage Remove the bottom of the Base Assembly). 3. Follow the ...
...lift it towards the back of the laptop. 14. Remove the right speaker grill (see Removing the Display Assembly (E6400 and M2400) or Removing the Display Assembly (E6400 ATG)). 7. Pivot the card cage up to Contents Page Card Cage Dell™ Latitude™ E6400 and E6400 ATG and Mobile Workstation Precision™ M2400... Working on the connector-end of the card cage, then grasp each side of the card cage and push it up from the connector and laptop. 1 M2 x 3 screws (2) 2 card cage 3 connector Replacing the Card Cage Remove the bottom of the Base Assembly). 3. Follow the ...
Service Manual
Page 26
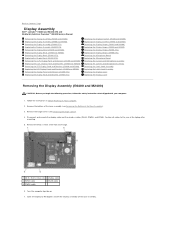
... Display Assembly Dell™ Latitude™ E6400 and E6400 ATG and Mobile Workstation Precision™ M2400 Service Manual Removing the Display Assembly (E6400 and M2400) Replacing the Display Assembly (E6400 and M2400) Removing the Display Assembly (E6400 ATG) Replacing the Display Assembly (E6400 ATG) Removing the Display Bezel (E6400 and M2400) Replacing the Display Bezel (E6400 and M2400) Removing the Display Bezel (E6400 ATG) Replacing...
... Display Assembly Dell™ Latitude™ E6400 and E6400 ATG and Mobile Workstation Precision™ M2400 Service Manual Removing the Display Assembly (E6400 and M2400) Replacing the Display Assembly (E6400 and M2400) Removing the Display Assembly (E6400 ATG) Replacing the Display Assembly (E6400 ATG) Removing the Display Bezel (E6400 and M2400) Replacing the Display Bezel (E6400 and M2400) Removing the Display Bezel (E6400 ATG) Replacing...
Service Manual
Page 28
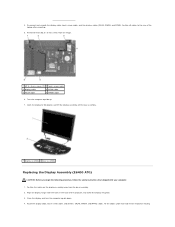
... your computer. 1. 4. Position all cables to 90 degrees and lift the display assembly off the base assembly. 1 display assembly 2 base assembly Replacing the Display Assembly (E6400 ATG) CAUTION: Before you begin the following procedure, follow the safety instructions that shipped with the holes in their respective routing Position the cables on the... the computer upside down. 4. Remove the two M2.5 x 5-mm screws from the base assembly. 2. Fit the cables under each tab in the base of the laptop after unrouting. 5.
... your computer. 1. 4. Position all cables to 90 degrees and lift the display assembly off the base assembly. 1 display assembly 2 base assembly Replacing the Display Assembly (E6400 ATG) CAUTION: Before you begin the following procedure, follow the safety instructions that shipped with the holes in their respective routing Position the cables on the... the computer upside down. 4. Remove the two M2.5 x 5-mm screws from the base assembly. 2. Fit the cables under each tab in the base of the laptop after unrouting. 5.


