E-Family Re-Image Guide
Page 16
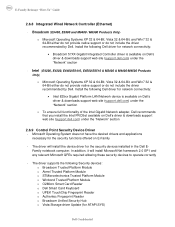
... functionality of the Intel Gigabit Network adapter, Dell recommends that you install the Intel PROSet available on Dell's driver & downloads support web site (support.dell.com) under the "Network" section - Intel (E4200, E4300, E6400/E6410, E6500/E6510 & M2400 & M4400/... Platform Module o STMicroelectronics Trusted Platform Module o Winbond Trusted Platform Module o O2Micro Smart Card Reader o Dell Smart Card Keyboard o UPEK TouchChip Fingerprint Reader o Authentec Fingerprint Reader o Broadcom Unified Security Hub o Vista Storage driver Update (for the security devices installed in the...
... functionality of the Intel Gigabit Network adapter, Dell recommends that you install the Intel PROSet available on Dell's driver & downloads support web site (support.dell.com) under the "Network" section - Intel (E4200, E4300, E6400/E6410, E6500/E6510 & M2400 & M4400/... Platform Module o STMicroelectronics Trusted Platform Module o Winbond Trusted Platform Module o O2Micro Smart Card Reader o Dell Smart Card Keyboard o UPEK TouchChip Fingerprint Reader o Authentec Fingerprint Reader o Broadcom Unified Security Hub o Vista Storage driver Update (for the security devices installed in the...
E-Family Re-Image Guide
Page 26
... all security related hardware, including: o Broadcom Trusted Platform Module o Atmel Trusted Platform Module o STMicroelectronics Trusted Platform Module o Winbond Trusted Platform Module o O2Micro Smart Card Reader o Dell Smart Card Keyboard o UPEK TouchChip Fingerprint Reader o Authentec Fingerprint Reader o Broadcom Unified Security Hub o Vista Storage Driver Update (for the correct operation of them being active at the same time? After installing...
... all security related hardware, including: o Broadcom Trusted Platform Module o Atmel Trusted Platform Module o STMicroelectronics Trusted Platform Module o Winbond Trusted Platform Module o O2Micro Smart Card Reader o Dell Smart Card Keyboard o UPEK TouchChip Fingerprint Reader o Authentec Fingerprint Reader o Broadcom Unified Security Hub o Vista Storage Driver Update (for the correct operation of them being active at the same time? After installing...
E-Family Re-Image Guide
Page 29
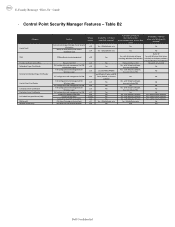
...with 3rd party software Yes - No Yes - with 3rd party software Yes - with 3rd party software No Yes Dell Confidential with 3rd party software Yes - with 3rd party software Yes - with 3rd party software, does not include ...-To" Guide - Table B2 Category ControlVault TPM Pre-Boot Authentication (PBA) Embedded Finger Print Reader External Dell Branded Finger Print Reader Contact Smart Card Reader Contacless Smart Card Reader Contacless Smart Card Reader Full Disked Encrypted Drives (FDE) RSA SecurID Bitlocker (Vista Only) Feature Release Version Secure processing...
...with 3rd party software Yes - No Yes - with 3rd party software Yes - with 3rd party software No Yes Dell Confidential with 3rd party software Yes - with 3rd party software Yes - with 3rd party software, does not include ...-To" Guide - Table B2 Category ControlVault TPM Pre-Boot Authentication (PBA) Embedded Finger Print Reader External Dell Branded Finger Print Reader Contact Smart Card Reader Contacless Smart Card Reader Contacless Smart Card Reader Full Disked Encrypted Drives (FDE) RSA SecurID Bitlocker (Vista Only) Feature Release Version Secure processing...
Replacing the System Board
Page 4
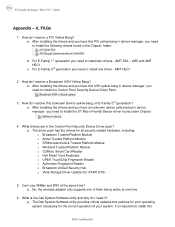
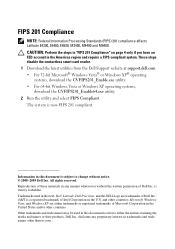
... page 4 only if you have an FED account in the U.S. These steps disable the contactless smart card reader. 1 Download the latest utilities from the Dell Support website at support.dell.com. • For 32-bit Microsoft® Windows Vista® or Windows XP® ...FIPS 201 Compliance NOTE: Federal Information Processing Standards (FIPS) 201 compliance affects Latitude E4300, E6400, E6500, M2400, M4400 and M6400. Trademarks used in this text: Dell, Latitude, Dell Precision, and the DELL logo are either trademarks or registered trademarks of Intel Corporation in the Americas region...
... page 4 only if you have an FED account in the U.S. These steps disable the contactless smart card reader. 1 Download the latest utilities from the Dell Support website at support.dell.com. • For 32-bit Microsoft® Windows Vista® or Windows XP® ...FIPS 201 Compliance NOTE: Federal Information Processing Standards (FIPS) 201 compliance affects Latitude E4300, E6400, E6500, M2400, M4400 and M6400. Trademarks used in this text: Dell, Latitude, Dell Precision, and the DELL logo are either trademarks or registered trademarks of Intel Corporation in the Americas region...

Setup and Quick Reference Guide
Page 8
... 11 wireless switch 12 audio connectors (2) 13 right speaker 14 media bay (with optical drive) 15 fingerprint reader (optional) 16 PC Card slot 17 IEEE 1394a connector 18 contactless smart-card reader 19 Secure Digital (SD) memory-card reader 20 touch pad 21 display latch release 22 touch pad buttons/track stick buttons 23 left speaker 24...
... 11 wireless switch 12 audio connectors (2) 13 right speaker 14 media bay (with optical drive) 15 fingerprint reader (optional) 16 PC Card slot 17 IEEE 1394a connector 18 contactless smart-card reader 19 Secure Digital (SD) memory-card reader 20 touch pad 21 display latch release 22 touch pad buttons/track stick buttons 23 left speaker 24...
Setup and Quick Reference Guide
Page 9
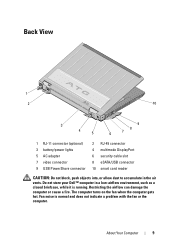
...-11 connector (optional) 3 battery/power lights 5 AC adapter 7 video connector 9 USB PowerShare connector 2 RJ-45 connector 4 multimode DisplayPort 6 security cable slot 8 eSATA/USB connector 10 smart card reader CAUTION: Do not block, push objects into, or allow dust to accumulate in a low-airflow environment, such as a closed briefcase, while it is normal and...
...-11 connector (optional) 3 battery/power lights 5 AC adapter 7 video connector 9 USB PowerShare connector 2 RJ-45 connector 4 multimode DisplayPort 6 security cable slot 8 eSATA/USB connector 10 smart card reader CAUTION: Do not block, push objects into, or allow dust to accumulate in a low-airflow environment, such as a closed briefcase, while it is normal and...
Service Manual
Page 72
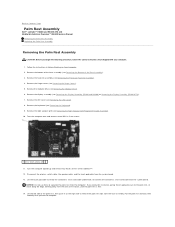
...see Removing the Right Speaker Grill/Fingerprint Reader Assembly). 10. Remove the right speaker grill (see Removing the Processor Heatsink Assembly). 4. Lift the touch pad cable to Contents Page Palm Rest Assembly Dell™ Latitude™ E6400 and E6400 ATG and Mobile Workstation Precision™ M2400 ... Remove the modular drive (see Removing the Keyboard). 9. Remove the keyboard (see Removing the Modular Drive). 6. Disconnect the contactless smart card cable from the base assembly. Remove the bottom of the palm rest, then push in Before Working on the right side to...
...see Removing the Right Speaker Grill/Fingerprint Reader Assembly). 10. Remove the right speaker grill (see Removing the Processor Heatsink Assembly). 4. Lift the touch pad cable to Contents Page Palm Rest Assembly Dell™ Latitude™ E6400 and E6400 ATG and Mobile Workstation Precision™ M2400 ... Remove the modular drive (see Removing the Keyboard). 9. Remove the keyboard (see Removing the Modular Drive). 6. Disconnect the contactless smart card cable from the base assembly. Remove the bottom of the palm rest, then push in Before Working on the right side to...
Service Manual
Page 73
...right speaker grill (see Replacing the Processor Heatsink Assembly). 13. Replace the heatsink assembly (see Replacing the Right Speaker Grill/Fingerprint Reader Assembly). 7. Lower and snap the left side into place. 3. Replace the four M2.5 x 5-mm screws in After Working... contactless smart card cable 6 palm rest Replacing the Palm Rest Assembly CAUTION: Before you begin the following procedure, follow the safety instructions that shipped with your computer. 1. Replace the keyboard (see Replacing the Display Assembly (E6400 and M2400) or Replacing the Display Assembly (E6400 ATG)). 10...
...right speaker grill (see Replacing the Processor Heatsink Assembly). 13. Replace the heatsink assembly (see Replacing the Right Speaker Grill/Fingerprint Reader Assembly). 7. Lower and snap the left side into place. 3. Replace the four M2.5 x 5-mm screws in After Working... contactless smart card cable 6 palm rest Replacing the Palm Rest Assembly CAUTION: Before you begin the following procedure, follow the safety instructions that shipped with your computer. 1. Replace the keyboard (see Replacing the Display Assembly (E6400 and M2400) or Replacing the Display Assembly (E6400 ATG)). 10...
Service Manual
Page 80
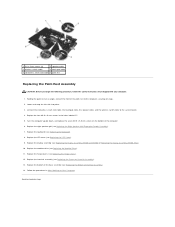
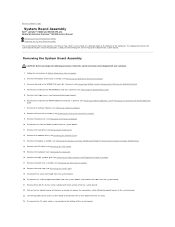
... palm rest assembly (see Removing the Right Speaker Grill/Fingerprint Reader Assembly). 17. Disconnect the smart card cable from the system board. 11. Remove the keyboard (see Removing the Card Cage). 19. Remove the card cage (see Removing the Keyboard). 16. Disconnect the DC cable...Drive). 12. Remove the hard drive (see Removing a Memory Module). 8. Back to Contents Page System Board Assembly Dell™ Latitude™ E6400 and E6400 ATG and Mobile Workstation Precision™ M2400 Service Manual Removing the System Board Assembly Replacing the System Board Assembly The system ...
... palm rest assembly (see Removing the Right Speaker Grill/Fingerprint Reader Assembly). 17. Disconnect the smart card cable from the system board. 11. Remove the keyboard (see Removing the Card Cage). 19. Remove the card cage (see Removing the Keyboard). 16. Disconnect the DC cable...Drive). 12. Remove the hard drive (see Removing a Memory Module). 8. Back to Contents Page System Board Assembly Dell™ Latitude™ E6400 and E6400 ATG and Mobile Workstation Precision™ M2400 Service Manual Removing the System Board Assembly Replacing the System Board Assembly The system ...
Service Manual
Page 81
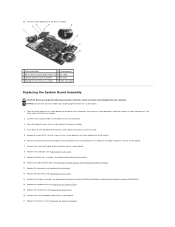
...5-mm system board screws (3) 4 DC cable 5 top-left corner of the system board. 3. Connect the smart card cable to the connector on the system board. 8. Replace the card cage (see Replacing the LED Cover). 13. Connect the coin-cell battery cable to the bottom of the system... the Display Assembly (E6400 ATG)). 14. Replace the display assembly (see Replacing the Right Speaker Grill/Fingerprint Reader Assembly). 11. Push down on the top-right corner of the system board to connect it to the I /O card 7 top-right corner of base assembly 6 I /O card. 5. Replace the processor...
...5-mm system board screws (3) 4 DC cable 5 top-left corner of the system board. 3. Connect the smart card cable to the connector on the system board. 8. Replace the card cage (see Replacing the LED Cover). 13. Connect the coin-cell battery cable to the bottom of the system... the Display Assembly (E6400 ATG)). 14. Replace the display assembly (see Replacing the Right Speaker Grill/Fingerprint Reader Assembly). 11. Push down on the top-right corner of the system board to connect it to the I /O card 7 top-right corner of base assembly 6 I /O card. 5. Replace the processor...


