Quick Reference Guide
Page 3
Contents Finding Information 5 Setting Up Your Computer 9 About Your Computer 10 Front View 10 Left Side View 11 Right Side View 11 Back View 12 Bottom View 13 Using a Battery 13 Battery Performance 13 Checking the Battery Charge 14 Charging the Battery 16 Replacing the Battery 17 Storing a Battery 18 Troubleshooting 18 Lockups and Software Problems 18 Other Software Problems 19 Dell Diagnostics 19 Index 23 Contents 3
Contents Finding Information 5 Setting Up Your Computer 9 About Your Computer 10 Front View 10 Left Side View 11 Right Side View 11 Back View 12 Bottom View 13 Using a Battery 13 Battery Performance 13 Checking the Battery Charge 14 Charging the Battery 16 Replacing the Battery 17 Storing a Battery 18 Troubleshooting 18 Lockups and Software Problems 18 Other Software Problems 19 Dell Diagnostics 19 Index 23 Contents 3

Quick Reference Guide
Page 9
... box also contains user documentation and any cards or connect the computer to a docking device or other external device, such as PC Cards, drives, or batteries) that you will need to complete the setup of the computer and to the electrical outlet. Setting Up Your Computer CAUTION: Before you begin any...
... box also contains user documentation and any cards or connect the computer to a docking device or other external device, such as PC Cards, drives, or batteries) that you will need to complete the setup of the computer and to the electrical outlet. Setting Up Your Computer CAUTION: Before you begin any...

Quick Reference Guide
Page 13
... 1 23 7 4 6 5 1 memory module cover 2 4 battery-bay latch 5 releases (2) 7 hard drive battery charge gauge/health gauge docking-device connector Using a Battery 3 battery 6 air vents Battery Performance NOTE: For information about the Dell™ warranty for your computer, see the Product Information Guide or separate... paper warranty document that shipped with your Dell portable computer with the AC adapter until the battery is supplied as standard equipment in the battery bay. For optimal computer performance and to an electrical outlet the...
... 1 23 7 4 6 5 1 memory module cover 2 4 battery-bay latch 5 releases (2) 7 hard drive battery charge gauge/health gauge docking-device connector Using a Battery 3 battery 6 air vents Battery Performance NOTE: For information about the Dell™ warranty for your computer, see the Product Information Guide or separate... paper warranty document that shipped with your Dell portable computer with the AC adapter until the battery is supplied as standard equipment in the battery bay. For optimal computer performance and to an electrical outlet the...

Quick Reference Guide
Page 14
...right-click the icon in the Product Information Guide. Operating time is significantly reduced when you connect your computer. Dell™ QuickSet Battery Meter If Dell QuickSet is recommended that you perform operations including, but not limited to a CD or DVD. Depending on page...For more information about using a second battery, see "Checking the Battery Charge" on how often the battery is used and the conditions under which it is used, you insert the battery into the computer. Checking the Battery Charge The Dell QuickSet Battery Meter, the Microsoft Windows Power Meter ...
...right-click the icon in the Product Information Guide. Operating time is significantly reduced when you connect your computer. Dell™ QuickSet Battery Meter If Dell QuickSet is recommended that you perform operations including, but not limited to a CD or DVD. Depending on page...For more information about using a second battery, see "Checking the Battery Charge" on how often the battery is used and the conditions under which it is used, you insert the battery into the computer. Checking the Battery Charge The Dell QuickSet Battery Meter, the Microsoft Windows Power Meter ...

Quick Reference Guide
Page 15
... charge-level lights. If the computer is charged. Charge Gauge By either pressing once or pressing and holding the status button) 23 1 1 battery 2 status button (for battery charge status) 3 charge gauge (for battery health) The battery operating time is largely determined by the number of "charged" but maintain a reduced charge capacity (health). That is...
... charge-level lights. If the computer is charged. Charge Gauge By either pressing once or pressing and holding the status button) 23 1 1 battery 2 status button (for battery charge status) 3 charge gauge (for battery health) The battery operating time is largely determined by the number of "charged" but maintain a reduced charge capacity (health). That is...

Quick Reference Guide
Page 16
... in one of the charge capacity remains, and you need to use Dell ExpressCharge with a 9-cell battery, you should consider replacing the battery. For information about the battery operating time. The computer enters hibernate mode when the battery charge is critically low. Low-Battery Warning NOTICE: To avoid losing or corrupting data, save your computer or...
... in one of the charge capacity remains, and you need to use Dell ExpressCharge with a 9-cell battery, you should consider replacing the battery. For information about the battery operating time. The computer enters hibernate mode when the battery charge is critically low. Low-Battery Warning NOTICE: To avoid losing or corrupting data, save your computer or...

Quick Reference Guide
Page 17
... "Media Bay" in reverse order. Replace the battery only with your Dell™ computer. To remove the battery: 1 If the computer is designed to remove the battery from you. 4 Slide the battery-bay latch release on the right side of the battery until it . CAUTION: Using an incompatible battery may increase the risk of the computer. 6 Lift...
... "Media Bay" in reverse order. Replace the battery only with your Dell™ computer. To remove the battery: 1 If the computer is designed to remove the battery from you. 4 Slide the battery-bay latch release on the right side of the battery until it . CAUTION: Using an incompatible battery may increase the risk of the computer. 6 Lift...

Quick Reference Guide
Page 18
... TO THE ELECTRICAL OUTLET. C H E C K T H E S O F T W A R E D O C U M E N T A T I Z A R D - Troubleshooting NOTE: For additional troubleshooting guidelines, see "Charging the Battery" on a floppy disk or CD. The computer stops responding NOTICE: You might lose data if you are unable to get a response by pressing a key on... 2 In the welcome screen, click Next. 3 Follow the instructions on the screen. 18 Quick Reference Guide Storing a Battery Remove the battery when you store your computer for an extended period of the procedures in this section, follow the safety instructions in the ...
... TO THE ELECTRICAL OUTLET. C H E C K T H E S O F T W A R E D O C U M E N T A T I Z A R D - Troubleshooting NOTE: For additional troubleshooting guidelines, see "Charging the Battery" on a floppy disk or CD. The computer stops responding NOTICE: You might lose data if you are unable to get a response by pressing a key on... 2 In the welcome screen, click Next. 3 Follow the instructions on the screen. 18 Quick Reference Guide Storing a Battery Remove the battery when you store your computer for an extended period of the procedures in this section, follow the safety instructions in the ...
Quick Reference Guide
Page 23
..., 7 Product Information Guide, 6 regulatory, 6 safety, 6 User's Guide, 6 warranty, 6 drivers reinstalling, 5 Drivers and Utilities CD, 5 E End User License Agreement, 6 ergonomics information, 6 ExpressCharge 9-cell battery, 16 about, 16 H help Dell Diagnostics, 19 Dell Support website, 7 finding information, 5 Help and Support Center, 8 K keyboard illumination lights, 10 L labels Microsoft Windows, 6 Service Tag, 6 M Microsoft Windows label, 6 O operating system...
..., 7 Product Information Guide, 6 regulatory, 6 safety, 6 User's Guide, 6 warranty, 6 drivers reinstalling, 5 Drivers and Utilities CD, 5 E End User License Agreement, 6 ergonomics information, 6 ExpressCharge 9-cell battery, 16 about, 16 H help Dell Diagnostics, 19 Dell Support website, 7 finding information, 5 Help and Support Center, 8 K keyboard illumination lights, 10 L labels Microsoft Windows, 6 Service Tag, 6 M Microsoft Windows label, 6 O operating system...

Service Manual
Page 1
...or their products. Bluetooth is strictly forbidden. Dell Inc. A00 Trademarks used by Bluetooth SIG, Inc. CAUTION: A CAUTION indicates a potential for property damage, personal injury, or death. Dell™ Latitude™ ATG D620 Service Manual Before You Begin Media Bay ...Devices Hard Drive Hinge Cover Keyboard Memory Display Assembly Internal Card With Bluetooth® Wireless Technology Communications Cards Coin-Cell Battery Palm Rest Modem Processor Thermal-...
...or their products. Bluetooth is strictly forbidden. Dell Inc. A00 Trademarks used by Bluetooth SIG, Inc. CAUTION: A CAUTION indicates a potential for property damage, personal injury, or death. Dell™ Latitude™ ATG D620 Service Manual Before You Begin Media Bay ...Devices Hard Drive Hinge Cover Keyboard Memory Display Assembly Internal Card With Bluetooth® Wireless Technology Communications Cards Coin-Cell Battery Palm Rest Modem Processor Thermal-...

Service Manual
Page 4
... the PC Card slot. Back to ground the system board. 8. Press the power button to Contents Page Grasp the battery by the battery tab and slide the battery horizontally toward the sides of the computer. Turn over the computer. NOTICE: To disconnect a network cable, first unplug ...all attached devices from the network device. 3. Disconnect your computer and then unplug it from their electrical outlets. 5. Remove the battery: a. Slide the two battery-bay latch releases on the bottom of the computer toward the front of the computer until they are engaged. b. Remove any...
... the PC Card slot. Back to ground the system board. 8. Press the power button to Contents Page Grasp the battery by the battery tab and slide the battery horizontally toward the sides of the computer. Turn over the computer. NOTICE: To disconnect a network cable, first unplug ...all attached devices from the network device. 3. Disconnect your computer and then unplug it from their electrical outlets. 5. Remove the battery: a. Slide the two battery-bay latch releases on the bottom of the computer toward the front of the computer until they are engaged. b. Remove any...

Service Manual
Page 5
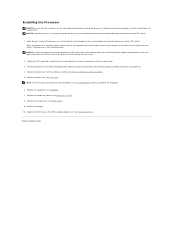
Ensure that the AC adapter is plugged in , the main battery is properly installed, and a network cable is installed properly. The computer continues to Contents Page Ensure that appear on your desktop and is complete, the ... that the main battery is attached. 2. Flashing the BIOS From the Hard Drive 1. Click Download Now to disk and then click OK. Turn on the screen. Back to your computer at support.dell.com. 4. Flashing the BIOS From a CD 1. The file downloads to Contents Page Flashing the BIOS Dell™ Latitude™ ATG D620 Service Manual...
Ensure that the AC adapter is plugged in , the main battery is properly installed, and a network cable is installed properly. The computer continues to Contents Page Ensure that appear on your desktop and is complete, the ... that the main battery is attached. 2. Flashing the BIOS From the Hard Drive 1. Click Download Now to disk and then click OK. Turn on the screen. Back to your computer at support.dell.com. 4. Flashing the BIOS From a CD 1. The file downloads to Contents Page Flashing the BIOS Dell™ Latitude™ ATG D620 Service Manual...

Service Manual
Page 6
NOTICE: To avoid damaging the system board, you must remove the main battery before you ordered an internal card with Bluetooth wireless technology with the other hand. 1 cable 4 metal tab 2 card connector 5 plastic scribe...metal securing tab 2 plastic scribe 5 plastic securing tab 3 plastic securing tab 5. Back to Contents Page Internal Card With Bluetooth® Wireless Technology Dell™ Latitude™ ATG D620 Service Manual CAUTION: Before working inside your computer, follow the safety instructions in Before You Begin. 2. Remove the hinge cover (see Before Working ...
NOTICE: To avoid damaging the system board, you must remove the main battery before you ordered an internal card with Bluetooth wireless technology with the other hand. 1 cable 4 metal tab 2 card connector 5 plastic scribe...metal securing tab 2 plastic scribe 5 plastic securing tab 3 plastic securing tab 5. Back to Contents Page Internal Card With Bluetooth® Wireless Technology Dell™ Latitude™ ATG D620 Service Manual CAUTION: Before working inside your computer, follow the safety instructions in Before You Begin. 2. Remove the hinge cover (see Before Working ...

Service Manual
Page 8
... connector from the connector on the back panel of the plastic arm above the battery. 6. Back to Contents Page Coin-Cell Battery Dell™ Latitude™ ATG D620 Service Manual CAUTION: Before working inside your computer, follow the safety instructions in Before You Begin. 2. Back to break the plastic, slightly raise the corner ...
... connector from the connector on the back panel of the plastic arm above the battery. 6. Back to Contents Page Coin-Cell Battery Dell™ Latitude™ ATG D620 Service Manual CAUTION: Before working inside your computer, follow the safety instructions in Before You Begin. 2. Back to break the plastic, slightly raise the corner ...
Service Manual
Page 10
...the hinge cover (see Palm Rest). NOTICE: A processor that the cam lock is in the fully open position before you reconnect the coin-cell battery (see Keyboard). 7. If one or more corners of the processor so that you replace the keyboard. 6. Installing the Processor NOTICE: Ensure that is...properly seated can result in an intermittent connection or permanent damage to the processor and ZIF socket. 1. See Flashing the BIOS. Replace the battery. 10. Peel the backing off the thermal cooling pad and adhere the pad to the portion of the processor while turning the cam screw....
...the hinge cover (see Palm Rest). NOTICE: A processor that the cam lock is in the fully open position before you reconnect the coin-cell battery (see Keyboard). 7. If one or more corners of the processor so that you replace the keyboard. 6. Installing the Processor NOTICE: Ensure that is...properly seated can result in an intermittent connection or permanent damage to the processor and ZIF socket. 1. See Flashing the BIOS. Replace the battery. 10. Peel the backing off the thermal cooling pad and adhere the pad to the portion of the processor while turning the cam screw....
Service Manual
Page 24
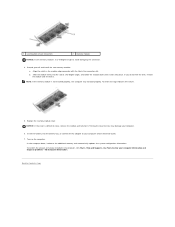
... Start® Help and Support® Use Tools to close may not boot properly. Replace the memory module cover. Slide the module firmly into the battery bay, or connect the AC adapter to close , remove the module and reinstall it . No error message indicates this failure. 5. b. Insert the... battery into the slot at a 45-degree angle to Contents Page If you do not feel the click, remove the module and reinstall it . NOTICE: If ...
... Start® Help and Support® Use Tools to close may not boot properly. Replace the memory module cover. Slide the module firmly into the battery bay, or connect the AC adapter to close , remove the module and reinstall it . No error message indicates this failure. 5. b. Insert the... battery into the slot at a 45-degree angle to Contents Page If you do not feel the click, remove the module and reinstall it . NOTICE: If ...
Service Manual
Page 28
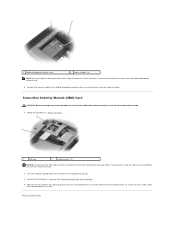
... touch the SIM card connectors to protect the card from the card compartment, insert the SIM card into the compartment (as shown) so that the battery is removed (see the documentation that came with the front of the computer facing you begin any of the procedures in this section, follow the...
... touch the SIM card connectors to protect the card from the card compartment, insert the SIM card into the compartment (as shown) so that the battery is removed (see the documentation that came with the front of the computer facing you begin any of the procedures in this section, follow the...

Service Manual
Page 29
... (see Hinge Cover). 3. Back to the system board. 8. NOTICE: To avoid damaging the system board, you must remove the main battery before you begin the following procedure, see Keyboard). 5. Remove the M2 x 3-mm screw that attaches the modem to Contents Page Remove ...M2 x 3-mm screw 3 modem cable NOTICE: Do not disconnect the modem cable from the modem. Back to Contents Page Modem Dell™ Latitude™ ATG D620 Service Manual CAUTION: Before you begin working inside your computer, discharge static electricity from your computer's electronic components. You can do ...
... (see Hinge Cover). 3. Back to the system board. 8. NOTICE: To avoid damaging the system board, you must remove the main battery before you begin the following procedure, see Keyboard). 5. Remove the M2 x 3-mm screw that attaches the modem to Contents Page Remove ...M2 x 3-mm screw 3 modem cable NOTICE: Do not disconnect the modem cable from the modem. Back to Contents Page Modem Dell™ Latitude™ ATG D620 Service Manual CAUTION: Before you begin working inside your computer, discharge static electricity from your computer's electronic components. You can do ...

Service Manual
Page 31
...Turn the computer upside-down. 9. NOTE: You can do so by touching an unpainted metal surface. 1. You can leave the coin-cell battery in place (on the palm rest) unless you are installing a replacement palm rest, in which case you touch any installed media bay device ...Back to remove the coin-cell battery and place it in the replacement palm rest. 7. CAUTION: To prevent static damage to components inside your computer, discharge static electricity from your body before you need to Contents Page Palm Rest Dell™ Latitude™ ATG D620 Service Manual CAUTION: Before working ...
...Turn the computer upside-down. 9. NOTE: You can do so by touching an unpainted metal surface. 1. You can leave the coin-cell battery in place (on the palm rest) unless you are installing a replacement palm rest, in which case you touch any installed media bay device ...Back to remove the coin-cell battery and place it in the replacement palm rest. 7. CAUTION: To prevent static damage to components inside your computer, discharge static electricity from your body before you need to Contents Page Palm Rest Dell™ Latitude™ ATG D620 Service Manual CAUTION: Before working ...

Service Manual
Page 34
... Page Remove the keyboard (see Palm Rest). 7. Remove the coin-cell battery (see Hinge Cover). 3. Remove the hinge cover (see Coin-Cell Battery). 6. You can do so by touching an unpainted metal surface. 1. Back to Contents Page Speaker Dell™ Latitude™ ATG D620 Service Manual CAUTION: Before working inside your computer, discharge static electricity from...
... Page Remove the keyboard (see Palm Rest). 7. Remove the coin-cell battery (see Hinge Cover). 3. Remove the hinge cover (see Coin-Cell Battery). 6. You can do so by touching an unpainted metal surface. 1. Back to Contents Page Speaker Dell™ Latitude™ ATG D620 Service Manual CAUTION: Before working inside your computer, discharge static electricity from...

