
Comprehensive Specifications
Page 1
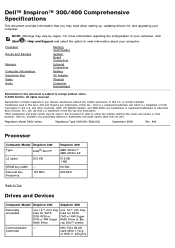
... trade names other countries; Blu-ray Disc is a trademark of Dell Inc. NOTE: Offerings may vary by region. is subject to Top Drives and Devices Computer Model Inspiron 300 Inspiron 400 Externally accessible one 12.7-mm tray load for SATA DVD-ROM or.... Regulatory Model D02U series Regulatory Type D02U001/D02U002 September 2009 Rev. Dell Inc. Dell™ Inspiron™ 300/400 Comprehensive Specifications This document provides information that you may need when setting up, updating drivers for SATA DVD+/-RW Super Multi Drive or Bluray Disc™ combo...
... trade names other countries; Blu-ray Disc is a trademark of Dell Inc. NOTE: Offerings may vary by region. is subject to Top Drives and Devices Computer Model Inspiron 300 Inspiron 400 Externally accessible one 12.7-mm tray load for SATA DVD-ROM or.... Regulatory Model D02U series Regulatory Type D02U001/D02U002 September 2009 Rev. Dell Inc. Dell™ Inspiron™ 300/400 Comprehensive Specifications This document provides information that you may need when setting up, updating drivers for SATA DVD+/-RW Super Multi Drive or Bluray Disc™ combo...
Service Manual
Page 2
... Disconnect all fasteners installed before connecting to the power source. Back to Contents Page Before You Begin Dell™ Inspiron™ 300/400 Service Manual Recommended Tools Turning Off Your Computer Safety Instructions This manual provides procedures for complete information about... You have read the safety information that the following tools: l Small Phillips screwdriver l Hex nut driver l Flash BIOS executable update program at www.dell.com/regulatory_compliance. Unless otherwise noted, each procedure assumes that shipped with your computer, and protecting against ...
... Disconnect all fasteners installed before connecting to the power source. Back to Contents Page Before You Begin Dell™ Inspiron™ 300/400 Service Manual Recommended Tools Turning Off Your Computer Safety Instructions This manual provides procedures for complete information about... You have read the safety information that the following tools: l Small Phillips screwdriver l Hex nut driver l Flash BIOS executable update program at www.dell.com/regulatory_compliance. Unless otherwise noted, each procedure assumes that shipped with your computer, and protecting against ...
Service Manual
Page 16
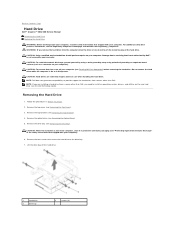
... hard drive is hot, do not touch the metal housing of the hard drive. Back to Contents Page Hard Drive Dell™ Inspiron™ 300/400 Service Manual Removing the Hard Drive Replacing the Hard Drive WARNING: Before working inside your computer, read the safety information that... the drive bay. 7. Remove the top bracket (see the Regulatory Compliance Homepage at www.dell.com/regulatory_compliance. Damage due to servicing that secure the hard drive to install an operating system, drivers, and utilities on your warranty. CAUTION: Hard drives are installing a hard drive from ...
... hard drive is hot, do not touch the metal housing of the hard drive. Back to Contents Page Hard Drive Dell™ Inspiron™ 300/400 Service Manual Removing the Hard Drive Replacing the Hard Drive WARNING: Before working inside your computer, read the safety information that... the drive bay. 7. Remove the top bracket (see the Regulatory Compliance Homepage at www.dell.com/regulatory_compliance. Damage due to servicing that secure the hard drive to install an operating system, drivers, and utilities on your warranty. CAUTION: Hard drives are installing a hard drive from ...
Service Manual
Page 22
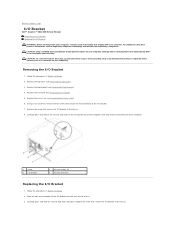
... by using a wrist grounding strap or by your computer). Remove the top bracket (see Removing the I/O Bezel). 5. Using a hex nut driver, remove the two screws that secure the VGA connector to the chassis. 8. Follow the procedures in Before You Begin. 2. Slide the tabs on... Fan). 6. Carefully press and slide the security lock latch into the slots on your warranty. Back to Contents Page I/O Bracket Dell™ Inspiron™ 300/400 Service Manual Removing the I/O Bracket Replacing the I/O Bracket WARNING: Before working inside your computer, read the safety information that shipped ...
... by using a wrist grounding strap or by your computer). Remove the top bracket (see Removing the I/O Bezel). 5. Using a hex nut driver, remove the two screws that secure the VGA connector to the chassis. 8. Follow the procedures in Before You Begin. 2. Slide the tabs on... Fan). 6. Carefully press and slide the security lock latch into the slots on your warranty. Back to Contents Page I/O Bracket Dell™ Inspiron™ 300/400 Service Manual Removing the I/O Bracket Replacing the I/O Bracket WARNING: Before working inside your computer, read the safety information that shipped ...
Service Manual
Page 45
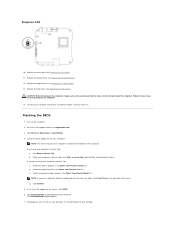
...the Select Your Product Model list. b. Click BIOS. 6. Click Save to download the latest BIOS file. Click Drivers & Downloads® Select Model. 4. Click Download Now to save the file on . Inspiron 400 10. Connect your computer's Service Tag: a. Enter your computer's Service Tag in the Enter a service tag...Replace the drive bay (see Replacing the Optical Drive). 12. Select the product brand in damage to your computer is located at support.dell.com. 3. Locate the BIOS update file for your computer: NOTE: The Service Tag for your desktop. Replace the optical drive (see...
...the Select Your Product Model list. b. Click BIOS. 6. Click Save to download the latest BIOS file. Click Drivers & Downloads® Select Model. 4. Click Download Now to save the file on . Inspiron 400 10. Connect your computer's Service Tag: a. Enter your computer's Service Tag in the Enter a service tag...Replace the drive bay (see Replacing the Optical Drive). 12. Select the product brand in damage to your computer is located at support.dell.com. 3. Locate the BIOS update file for your computer: NOTE: The Service Tag for your desktop. Replace the optical drive (see...

