
Comprehensive Specifications
Page 1
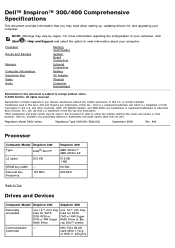
... 12.7-mm tray load for , and upgrading your computer. For more information regarding the configuration of Dell Inc. Dell™ Inspiron™ 300/400 Comprehensive Specifications This document provides information that you may need when setting up, updating drivers for SATA DVD+/-RW Super Multi Drive or Bluray Disc™ combo Communication - (optional) Mini...
... 12.7-mm tray load for , and upgrading your computer. For more information regarding the configuration of Dell Inc. Dell™ Inspiron™ 300/400 Comprehensive Specifications This document provides information that you may need when setting up, updating drivers for SATA DVD+/-RW Super Multi Drive or Bluray Disc™ combo Communication - (optional) Mini...
Service Manual
Page 2
... performed the steps in this document may require the following tools: l Small Phillips screwdriver l Hex nut driver l Flash BIOS executable update program at www.dell.com/regulatory_compliance. Ensure that the following safety guidelines to help protect your computer from potential damage and to ...and exit all power sources before opening the enclosure to the power source. Back to Contents Page Before You Begin Dell™ Inspiron™ 300/400 Service Manual Recommended Tools Turning Off Your Computer Safety Instructions This manual provides procedures for complete information ...
... performed the steps in this document may require the following tools: l Small Phillips screwdriver l Hex nut driver l Flash BIOS executable update program at www.dell.com/regulatory_compliance. Ensure that the following safety guidelines to help protect your computer from potential damage and to ...and exit all power sources before opening the enclosure to the power source. Back to Contents Page Before You Begin Dell™ Inspiron™ 300/400 Service Manual Recommended Tools Turning Off Your Computer Safety Instructions This manual provides procedures for complete information ...
Service Manual
Page 16
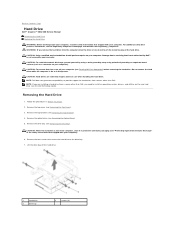
... (see Removing the Top Cover). 3. Remove the four screws that secure the hard drive to install an operating system, drivers, and utilities on your warranty. Back to Contents Page Hard Drive Dell™ Inspiron™ 300/400 Service Manual Removing the Hard Drive Replacing the Hard Drive WARNING: Before working inside your computer...
... (see Removing the Top Cover). 3. Remove the four screws that secure the hard drive to install an operating system, drivers, and utilities on your warranty. Back to Contents Page Hard Drive Dell™ Inspiron™ 300/400 Service Manual Removing the Hard Drive Replacing the Hard Drive WARNING: Before working inside your computer...
Service Manual
Page 17
Connect your computer and all screws and ensure that secure the hard drive to the computer. 9. Install the drivers and utilities for your computer, as needed . Replace the top cover (see Replacing the Top Bracket). 8. See "Restoring Your Operating System" ... Replacing the Top Cover). CAUTION: Before turning on the computer, replace all attached devices to Contents Page Replace the optical drive (see the Dell Technology Guide. Install the operating system for storing or shipping the hard drive. 3. For more information, see Replacing the Optical Drive). 7. Replacing...
Connect your computer and all screws and ensure that secure the hard drive to the computer. 9. Install the drivers and utilities for your computer, as needed . Replace the top cover (see Replacing the Top Bracket). 8. See "Restoring Your Operating System" ... Replacing the Top Cover). CAUTION: Before turning on the computer, replace all attached devices to Contents Page Replace the optical drive (see the Dell Technology Guide. Install the operating system for storing or shipping the hard drive. 3. For more information, see Replacing the Optical Drive). 7. Replacing...
Service Manual
Page 22
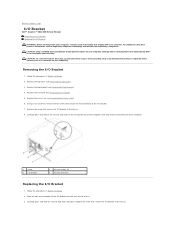
... top bracket (see Removing the Chassis Fan). 6. Remove the chassis fan (see Removing the Top Bracket). 4. Using a hex nut driver, remove the two screws that shipped with your computer. CAUTION: Only a certified service technician should perform repairs on your computer). Remove ...the I/O bezel (see Removing the Top Cover). 3. Back to Contents Page I/O Bracket Dell™ Inspiron™ 300/400 Service Manual Removing the I/O Bracket Replacing the I/O Bracket WARNING: Before working inside your computer, read the safety ...
... top bracket (see Removing the Chassis Fan). 6. Remove the chassis fan (see Removing the Top Bracket). 4. Using a hex nut driver, remove the two screws that shipped with your computer. CAUTION: Only a certified service technician should perform repairs on your computer). Remove ...the I/O bezel (see Removing the Top Cover). 3. Back to Contents Page I/O Bracket Dell™ Inspiron™ 300/400 Service Manual Removing the I/O Bracket Replacing the I/O Bracket WARNING: Before working inside your computer, read the safety ...

Service Manual
Page 23
... and all screws and ensure that secure the VGA connector to the computer. 9. Replace the top cover (see Replacing the Top Bracket). 8. Using a hex nut driver, replace the two screws that no stray screws remain inside the computer. CAUTION: Before turning on . Back to electrical outlets, and turn them on the...
... and all screws and ensure that secure the VGA connector to the computer. 9. Replace the top cover (see Replacing the Top Bracket). 8. Using a hex nut driver, replace the two screws that no stray screws remain inside the computer. CAUTION: Before turning on . Back to electrical outlets, and turn them on the...
Service Manual
Page 43
... tests, the previous boot sequence is restored. 1. The Boot Device Menu appears, listing all available boot devices. 4. NOTE: To boot to run the Dell Diagnostics on the Drivers and Utilities media. Removable; CD/DVD; Disabled (Removable by default) Specifies the boot device priority sequence from the available hard disk drives Specifies the...
... tests, the previous boot sequence is restored. 1. The Boot Device Menu appears, listing all available boot devices. 4. NOTE: To boot to run the Dell Diagnostics on the Drivers and Utilities media. Removable; CD/DVD; Disabled (Removable by default) Specifies the boot device priority sequence from the available hard disk drives Specifies the...
Service Manual
Page 45
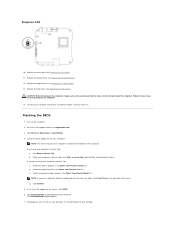
... inside the computer. b. Failure to do not have your computer's Service Tag: a. Flashing the BIOS 1. Enter your computer is located at support.dell.com. 3. Select the product brand in the Select Your Product Model list. d. Go to electrical outlets, and turn them on. Click Enter a...click Start Over on the top right of results appear on your desktop. CAUTION: Before turning on the computer. 2. Click Drivers & Downloads® Select Model. 4. Click Confirm. 5. Inspiron 400 10. Click BIOS. 6. Replace the drive bay (see Replacing the Optical Drive). 12.
... inside the computer. b. Failure to do not have your computer's Service Tag: a. Flashing the BIOS 1. Enter your computer is located at support.dell.com. 3. Select the product brand in the Select Your Product Model list. d. Go to electrical outlets, and turn them on. Click Enter a...click Start Over on the top right of results appear on your desktop. CAUTION: Before turning on the computer. 2. Click Drivers & Downloads® Select Model. 4. Click Confirm. 5. Inspiron 400 10. Click BIOS. 6. Replace the drive bay (see Replacing the Optical Drive). 12.

SETUP GUIDE
Page 15
Setting Up Your Inspiron Desktop CAUTION: Do not interrupt the operating system's setup process. Set Up the Operating System Your Dell computer is recommended that shipped with the operating system you selected at support.dell.com. Doing so may take you will need to complete. The... NOTE: For optimal performance of purchase. See the Ubuntu Quick Start Guide that you download and install the latest BIOS and drivers for your computer unusable and you through several procedures including accepting license agreements, setting preferences, and setting up an Internet connection....
Setting Up Your Inspiron Desktop CAUTION: Do not interrupt the operating system's setup process. Set Up the Operating System Your Dell computer is recommended that shipped with the operating system you selected at support.dell.com. Doing so may take you will need to complete. The... NOTE: For optimal performance of purchase. See the Ubuntu Quick Start Guide that you download and install the latest BIOS and drivers for your computer unusable and you through several procedures including accepting license agreements, setting preferences, and setting up an Internet connection....
SETUP GUIDE
Page 39
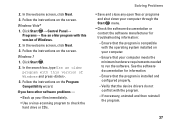
... screen. See the software documentation for troubleshooting information: --Ensure that your computer. --Ensure that the program is installed and configured properly. --Verify that the device drivers do not conflict with the operating system installed on the screen. Click Start → Control Panel→ Programs→ Use an older program with this...
... screen. See the software documentation for troubleshooting information: --Ensure that your computer. --Ensure that the program is installed and configured properly. --Verify that the device drivers do not conflict with the operating system installed on the screen. Click Start → Control Panel→ Programs→ Use an older program with this...

SETUP GUIDE
Page 43
... the device that you begin. Type hardware troubleshooter in the Service Manual to test displays in "Lockups and Software Problems" on Dell computers. NOTE: The Drivers and Utilities disc is optional and may not ship with your computer, perform the checks in the system setup program and is ...active. Start the Dell Diagnostics from your hard drive or from the Drivers and Utilities disc. 41 To start the search. 3. Click Start → Help and Support. 2. It is recommended ...
... the device that you begin. Type hardware troubleshooter in the Service Manual to test displays in "Lockups and Software Problems" on Dell computers. NOTE: The Drivers and Utilities disc is optional and may not ship with your computer, perform the checks in the system setup program and is ...active. Start the Dell Diagnostics from your hard drive or from the Drivers and Utilities disc. 41 To start the search. 3. Click Start → Help and Support. 2. It is recommended ...
SETUP GUIDE
Page 44
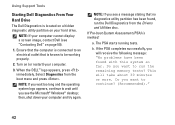
...the remaining memory tests? NOTE: If your computer cannot display a screen image, contact Dell (see a message stating that is known to continue? (Recommended)." 42 Select Diagnostics from the Drivers and Utilities disc. If the PSA completes successfully, you want to be working properly.... 2. Using Support Tools Starting Dell Diagnostics From Your Hard Drive The Dell Diagnostics is located on a hidden diagnostic utility partition...
...the remaining memory tests? NOTE: If your computer cannot display a screen image, contact Dell (see a message stating that is known to continue? (Recommended)." 42 Select Diagnostics from the Drivers and Utilities disc. If the PSA completes successfully, you want to be working properly.... 2. Using Support Tools Starting Dell Diagnostics From Your Hard Drive The Dell Diagnostics is located on a hidden diagnostic utility partition...
SETUP GUIDE
Page 45
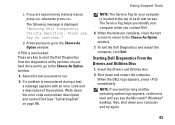
... are complete, close the test screen to return to run. 5. Starting Dell Diagnostics From the Drivers and Utilities Disc 1. Insert the Drivers and Utilities disc. 2. If you contact Dell. 6. If PSA is displayed "Booting Dell Diagnostic Utility Partition. Shut down the error code and problem description and contact Dell (see the Microsoft® Windows® desktop;
... are complete, close the test screen to return to run. 5. Starting Dell Diagnostics From the Drivers and Utilities Disc 1. Insert the Drivers and Utilities disc. 2. If you contact Dell. 6. If PSA is displayed "Booting Dell Diagnostic Utility Partition. Shut down the error code and problem description and contact Dell (see the Microsoft® Windows® desktop;

SETUP GUIDE
Page 46
... boots according to the Choose An Option window. 10. When the tests are listed, select the version appropriate for one time only. To exit the Dell Diagnostics and restart the computer, click Exit. 11. Select the Boot from CD-ROM option from the numbered list. If a problem is located at the... Tools NOTE: The next steps change the boot sequence for your computer. 7. On the next start the CD menu and press to run. 8. Remove the Drivers and Utilities disc. 44 Write down the error code and problem description and contact...
... boots according to the Choose An Option window. 10. When the tests are listed, select the version appropriate for one time only. To exit the Dell Diagnostics and restart the computer, click Exit. 11. Select the Boot from CD-ROM option from the numbered list. If a problem is located at the... Tools NOTE: The next steps change the boot sequence for your computer. 7. On the next start the CD menu and press to run. 8. Remove the Drivers and Utilities disc. 44 Write down the error code and problem description and contact...

SETUP GUIDE
Page 50
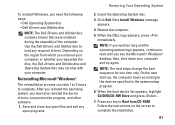
...photos, music files, and so on the hard drive and removes any programs or drivers installed after you see the Microsoft® Windows® desktop; If possible, back up all data on . Use Dell Factory Image Restore only as the last method to the operating state it was in... possible, back up the data before using this option. The System Recovery Options window appears. 48 Restoring Your Operating System Dell Factory Image Restore CAUTION: Using Dell Factory Image Restore permanently deletes all data before using Factory Image Restore. NOTE: If you wait too long and the operating...
...photos, music files, and so on the hard drive and removes any programs or drivers installed after you see the Microsoft® Windows® desktop; If possible, back up all data on . Use Dell Factory Image Restore only as the last method to the operating state it was in... possible, back up the data before using this option. The System Recovery Options window appears. 48 Restoring Your Operating System Dell Factory Image Restore CAUTION: Using Dell Factory Image Restore permanently deletes all data before using Factory Image Restore. NOTE: If you wait too long and the operating...

SETUP GUIDE
Page 52
...installed, and click Properties. 5. See "System Restore" on your operating system to correct a problem with a newly installed driver, first try using Windows Device Driver Rollback. Click Start . 2. CAUTION: Before performing the installation, back up all data files on page 46. Click Properties...→ Hardware→ Device Manager. 4. Click the Drivers tab→ Roll Back Driver. To roll back the device driver: Windows XP 1. Restoring Your Operating System Operating System Reinstallation Before You Begin If you installed the new...
...installed, and click Properties. 5. See "System Restore" on your operating system to correct a problem with a newly installed driver, first try using Windows Device Driver Rollback. Click Start . 2. CAUTION: Before performing the installation, back up all data files on page 46. Click Properties...→ Hardware→ Device Manager. 4. Click the Drivers tab→ Roll Back Driver. To roll back the device driver: Windows XP 1. Restoring Your Operating System Operating System Reinstallation Before You Begin If you installed the new...
SETUP GUIDE
Page 53
... appears, press immediately. On the next start-up, the computer boots according to wait until you requested the disc, the Dell Drivers and Utilities disc and Operating System disc may not ship with your computer and try again. When the boot device list appears, highlight CD/DVD/...CD-RW Drive and press . 7. Follow the instructions on the region from CD-ROM. Use the Dell Drivers and Utilities disc to complete the installation. 51 NOTE: The next steps change the boot sequence for one time only. Depending on the screen to...
... appears, press immediately. On the next start-up, the computer boots according to wait until you requested the disc, the Dell Drivers and Utilities disc and Operating System disc may not ship with your computer and try again. When the boot device list appears, highlight CD/DVD/...CD-RW Drive and press . 7. Follow the instructions on the region from CD-ROM. Use the Dell Drivers and Utilities disc to complete the installation. 51 NOTE: The next steps change the boot sequence for one time only. Depending on the screen to...
SETUP GUIDE
Page 62
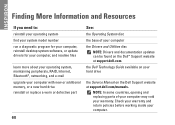
... of your hard drive the Service Manual on the Dell™ Support website at support.dell.com/manuals. the Dell Technology Guide available on your computer the Drivers and Utilities disc NOTE: Drivers and documentation updates can be found on the Dell Support website at support.dell.com. INSPIRON Finding More Information and Resources If you need to...
... of your hard drive the Service Manual on the Dell™ Support website at support.dell.com/manuals. the Dell Technology Guide available on your computer the Drivers and Utilities disc NOTE: Drivers and documentation updates can be found on the Dell Support website at support.dell.com. INSPIRON Finding More Information and Resources If you need to...

SETUP GUIDE
Page 63
You must use the Service Tag to identify your computer on support.dell.com or to contact technical support find drivers and downloads access technical support and product help check on your order status for new purchases find solutions and answers to...users See: the safety information that is shipped with your computer, before working inside your computer. the base of your computer the Dell Support website at www.dell.com/regulatory_compliance. only), Safety instructions, Regulatory information, Ergonomics information, and End User License Agreement find your Service Tag/Express Service Code...
You must use the Service Tag to identify your computer on support.dell.com or to contact technical support find drivers and downloads access technical support and product help check on your order status for new purchases find solutions and answers to...users See: the safety information that is shipped with your computer, before working inside your computer. the base of your computer the Dell Support website at www.dell.com/regulatory_compliance. only), Safety instructions, Regulatory information, Ergonomics information, and End User License Agreement find your Service Tag/Express Service Code...
SETUP GUIDE
Page 64
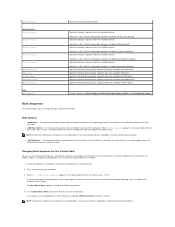
INSPIRON Basic Specifications This section provides information that you may vary by region. For more detailed specifications, see the Comprehensive Specifications on the Dell Support website at support.dell.com/manuals. For more information regarding the configuration of your computer, click Start → Help and Support and select the option to view information about your computer. NOTE: Offerings may need when setting up, updating drivers for, and upgrading your computer. 62
INSPIRON Basic Specifications This section provides information that you may vary by region. For more detailed specifications, see the Comprehensive Specifications on the Dell Support website at support.dell.com/manuals. For more information regarding the configuration of your computer, click Start → Help and Support and select the option to view information about your computer. NOTE: Offerings may need when setting up, updating drivers for, and upgrading your computer. 62


