Service Manual
Page 2
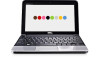
...computer. Disconnect the AC adapter cable from the system board connector. 9. Slide the AC adapter cable connector out of the computer base. 1 AC adapter connector bracket 2 system board connector Replacing the AC Adapter Connector 1. For additional safety best practices information, see... Removing the Keyboard). 4. Remove the AC adapter connector bracket. 10. Remove the keyboard (see Removing the Palm Rest Bracket). 7. Back to Contents Page AC Adapter Connector Dell™ Inspiron™ 1010 Service Manual Removing the AC Adapter Connector Replacing the AC Adapter Connector...
...computer. Disconnect the AC adapter cable from the system board connector. 9. Slide the AC adapter cable connector out of the computer base. 1 AC adapter connector bracket 2 system board connector Replacing the AC Adapter Connector 1. For additional safety best practices information, see... Removing the Keyboard). 4. Remove the AC adapter connector bracket. 10. Remove the keyboard (see Removing the Palm Rest Bracket). 7. Back to Contents Page AC Adapter Connector Dell™ Inspiron™ 1010 Service Manual Removing the AC Adapter Connector Replacing the AC Adapter Connector...

Service Manual
Page 4
... computer. Replace the battery status light board on your warranty. CAUTION: Only a certified service technician should perform repairs on the computer base. 2. CAUTION: To avoid electrostatic discharge, ground yourself by using a wrist grounding strap or by your computer. CAUTION: To help ... battery status light board cable from the system board connector. 8. Back to Contents Page Battery Status Light Board Dell™ Inspiron™ 1010 Service Manual Removing the Battery Status Light Board Replacing the Battery Status Light Board WARNING: Before working inside your computer...
... computer. Replace the battery status light board on your warranty. CAUTION: Only a certified service technician should perform repairs on the computer base. 2. CAUTION: To avoid electrostatic discharge, ground yourself by using a wrist grounding strap or by your computer. CAUTION: To help ... battery status light board cable from the system board connector. 8. Back to Contents Page Battery Status Light Board Dell™ Inspiron™ 1010 Service Manual Removing the Battery Status Light Board Replacing the Battery Status Light Board WARNING: Before working inside your computer...
Service Manual
Page 12
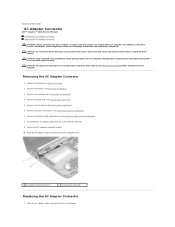
CAUTION: Only a certified service technician should perform repairs on your computer. Lift the coin-cell battery off the computer base. Replace the palm rest bracket (see Replacing the Palm Rest). Replace the palm rest (see Replacing the Palm Rest Bracket). 4....from the system board connector. 1 coin-cell battery 2 coin-cell battery cable connector 8. Back to Contents Page Coin-Cell Battery Dell™ Inspiron™ 1010 Service Manual Removing the Coin-Cell Battery Replacing the Coin-Cell Battery WARNING: Before working inside your computer, read the safety information that...
CAUTION: Only a certified service technician should perform repairs on your computer. Lift the coin-cell battery off the computer base. Replace the palm rest bracket (see Replacing the Palm Rest). Replace the palm rest (see Replacing the Palm Rest Bracket). 4....from the system board connector. 1 coin-cell battery 2 coin-cell battery cable connector 8. Back to Contents Page Coin-Cell Battery Dell™ Inspiron™ 1010 Service Manual Removing the Coin-Cell Battery Replacing the Coin-Cell Battery WARNING: Before working inside your computer, read the safety information that...
Service Manual
Page 16
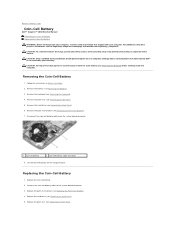
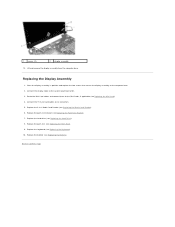
... (see Removing the Hard Drive). 6. Remove the hard drive (see Removing the Keyboard). 4. Make note of the computer base. 10. Remove the two screws that shipped with your computer. For additional safety best practices information, see Removing the Palm Rest). ...Dell™ Inspiron™ 1010 Service Manual Removing the Display Assembly Replacing the Display Assembly WARNING: Before working inside your computer, read the safety information that secure the display assembly to the computer base. Disconnect the TV tuner cables from the system board connector. 8. Disconnect the Mini...
... (see Removing the Hard Drive). 6. Remove the hard drive (see Removing the Keyboard). 4. Make note of the computer base. 10. Remove the two screws that shipped with your computer. For additional safety best practices information, see Removing the Palm Rest). ...Dell™ Inspiron™ 1010 Service Manual Removing the Display Assembly Replacing the Display Assembly WARNING: Before working inside your computer, read the safety information that secure the display assembly to the computer base. Disconnect the TV tuner cables from the system board connector. 8. Disconnect the Mini...
Service Manual
Page 17
...1. Connect the display cable to Contents Page Back to the system board connector. 3. Route the Mini-Card cables and connect them to the Mini-Cards, if applicable (see Replacing the Keyboard). 10. Replace the 3-in position and replace the two screws that secure the display assembly to its... connectors. 5. Connect the TV tuner card cables to the computer base. 2. Replace the palm rest (see ...
...1. Connect the display cable to Contents Page Back to the system board connector. 3. Route the Mini-Card cables and connect them to the Mini-Cards, if applicable (see Replacing the Keyboard). 10. Replace the 3-in position and replace the two screws that secure the display assembly to its... connectors. 5. Connect the TV tuner card cables to the computer base. 2. Replace the palm rest (see ...

Service Manual
Page 18
...Media Card Reader cable to servicing that shipped with your computer. Follow the instructions in -1 Media Card Reader (Daughter Board 1) Dell™ Inspiron™ 1010 Service Manual Removing the Media Card Reader Replacing the Media Card Reader WARNING: Before working inside your computer, read the safety information...Peel off the mylar tape which secures the Media Card Reader to disconnect the Media Card Reader cable from the connector on the computer base. 2. Back to the system board, remove the main battery (see Removing the Battery) before working inside the computer. CAUTION: To...
...Media Card Reader cable to servicing that shipped with your computer. Follow the instructions in -1 Media Card Reader (Daughter Board 1) Dell™ Inspiron™ 1010 Service Manual Removing the Media Card Reader Replacing the Media Card Reader WARNING: Before working inside your computer, read the safety information...Peel off the mylar tape which secures the Media Card Reader to disconnect the Media Card Reader cable from the connector on the computer base. 2. Back to the system board, remove the main battery (see Removing the Battery) before working inside the computer. CAUTION: To...
Service Manual
Page 20
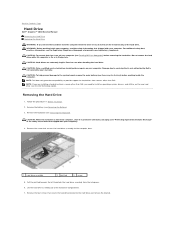
Back to Contents Page Hard Drive Dell™ Inspiron™ 1010 Service Manual Removing the Hard Drive Replacing the Hard Drive WARNING: If you remove the hard drive from the computer when the drive is hot, ... computer. Do not remove the hard drive while the computer is not covered by Dell is On or in Before You Begin. 2. WARNING: Before working inside your computer. Pull the pull-tab towards the left to the computer base. 1 hard drive assembly 2 pull-tab 3 screw 5. For additional safety best practices information, see...
Back to Contents Page Hard Drive Dell™ Inspiron™ 1010 Service Manual Removing the Hard Drive Replacing the Hard Drive WARNING: If you remove the hard drive from the computer when the drive is hot, ... computer. Do not remove the hard drive while the computer is not covered by Dell is On or in Before You Begin. 2. WARNING: Before working inside your computer. Pull the pull-tab towards the left to the computer base. 1 hard drive assembly 2 pull-tab 3 screw 5. For additional safety best practices information, see...
Service Manual
Page 21
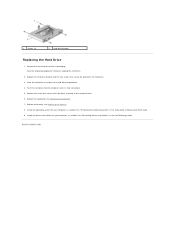
... as needed . Replace the hard drive bracket and the four screws that secures the hard drive assembly to Contents Page Back to the computer base. 6. 1 screws (4) 2 hard drive bracket Replacing the Hard Drive 1. Install the drivers and utilities for your computer, as needed . ...Replace the battery (see Replacing the Keyboard). 7. Place the hard drive assembly in the Dell Technology Guide. Replace the keyboard (see Replacing the Battery). 8. Install the operating system for storing or shipping the hard drive. 2. See ...
... as needed . Replace the hard drive bracket and the four screws that secures the hard drive assembly to Contents Page Back to the computer base. 6. 1 screws (4) 2 hard drive bracket Replacing the Hard Drive 1. Install the drivers and utilities for your computer, as needed . ...Replace the battery (see Replacing the Keyboard). 7. Place the hard drive assembly in the Dell Technology Guide. Replace the keyboard (see Replacing the Battery). 8. Install the operating system for storing or shipping the hard drive. 2. See ...
Service Manual
Page 22
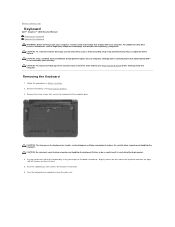
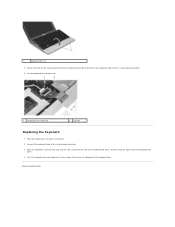
... computer. CAUTION: To help prevent damage to the system board, remove the main battery (see the Regulatory Compliance Homepage at www.dell.com/regulatory_compliance. CAUTION: The keycaps on your finger or flat-blade screwdriver. CAUTION: Be extremely careful when removing and handling the ...your warranty. Failure to the computer base. Pry the center rear side of the keyboard and then the right side till it clears off the palm rest bracket. 6. Removing the Keyboard 1. Back to Contents Page Keyboard Dell™ Inspiron™ 1010 Service Manual Removing the Keyboard Replacing ...
... computer. CAUTION: To help prevent damage to the system board, remove the main battery (see the Regulatory Compliance Homepage at www.dell.com/regulatory_compliance. CAUTION: The keycaps on your finger or flat-blade screwdriver. CAUTION: Be extremely careful when removing and handling the ...your warranty. Failure to the computer base. Pry the center rear side of the keyboard and then the right side till it clears off the palm rest bracket. 6. Removing the Keyboard 1. Back to Contents Page Keyboard Dell™ Inspiron™ 1010 Service Manual Removing the Keyboard Replacing ...
Service Manual
Page 23
1 keyboard tabs (4) 7. Connect the keyboard cable to the computer base. Turn the computer over and replace the three screws that secure the keyboard to the system board connector. 3. Back to disconnect the keyboard cable from ...
1 keyboard tabs (4) 7. Connect the keyboard cable to the computer base. Turn the computer over and replace the three screws that secure the keyboard to the system board connector. 3. Back to disconnect the keyboard cable from ...
Service Manual
Page 27
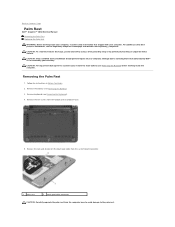
... Homepage at www.dell.com/regulatory_compliance. Back to Contents Page Palm Rest Dell™ Inspiron™ 1010 Service Manual Removing the Palm Rest Replacing the Palm Rest WARNING: Before working inside your computer, read the safety information that is not authorized by Dell™ is not... the Battery). 3. Remove keyboard (see Removing the Battery) before working inside the computer. Remove the five screws from the computer base to avoid damage to servicing that shipped with your warranty. CAUTION: To avoid electrostatic discharge, ground yourself by using a wrist grounding...
... Homepage at www.dell.com/regulatory_compliance. Back to Contents Page Palm Rest Dell™ Inspiron™ 1010 Service Manual Removing the Palm Rest Replacing the Palm Rest WARNING: Before working inside your computer, read the safety information that is not authorized by Dell™ is not... the Battery). 3. Remove keyboard (see Removing the Battery) before working inside the computer. Remove the five screws from the computer base to avoid damage to servicing that shipped with your warranty. CAUTION: To avoid electrostatic discharge, ground yourself by using a wrist grounding...
Service Manual
Page 28
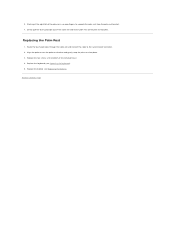
... touch pad cable through the cable slot and connect the cable to Contents Page Replacing the Palm Rest 1. Starting at the bottom of the computer base. 4. Gently pull the touch pad cable out of the palm rest, use your fingers to separate the palm rest from the palm rest bracket. 7. Replace...
... touch pad cable through the cable slot and connect the cable to Contents Page Replacing the Palm Rest 1. Starting at the bottom of the computer base. 4. Gently pull the touch pad cable out of the palm rest, use your fingers to separate the palm rest from the palm rest bracket. 7. Replace...
Service Manual
Page 29
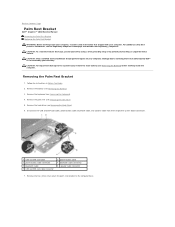
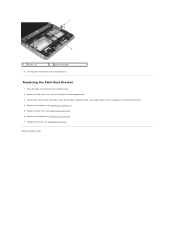
... a certified service technician should perform repairs on your computer, read the safety information that secure the palm rest bracket to the computer base. Disconnect the USB and SIM card cable, power button cable, bluetooth cable, and speaker cable from their respective system board connectors....card cable connector 2 power button cable 4 bluetooth cable connector 6 speaker cable connector 7. Back to Contents Page Palm Rest Bracket Dell™ Inspiron™ 1010 Service Manual Removing the Palm Rest Bracket Replacing the Palm Rest Bracket WARNING: Before working inside your computer.
... a certified service technician should perform repairs on your computer, read the safety information that secure the palm rest bracket to the computer base. Disconnect the USB and SIM card cable, power button cable, bluetooth cable, and speaker cable from their respective system board connectors....card cable connector 2 power button cable 4 bluetooth cable connector 6 speaker cable connector 7. Back to Contents Page Palm Rest Bracket Dell™ Inspiron™ 1010 Service Manual Removing the Palm Rest Bracket Replacing the Palm Rest Bracket WARNING: Before working inside your computer.
Service Manual
Page 30
... Hard Drive). 5. Back to their respective system board connectors. 4. Replace the hard drive (see Replacing the Battery). Lift the palm rest bracket off the computer base. Replace the palm rest (see Replacing the Keyboard). 7. Replace the two screws that secure the bracket to the computer...
... Hard Drive). 5. Back to their respective system board connectors. 4. Replace the hard drive (see Replacing the Battery). Lift the palm rest bracket off the computer base. Replace the palm rest (see Replacing the Keyboard). 7. Replace the two screws that secure the bracket to the computer...
Service Manual
Page 36
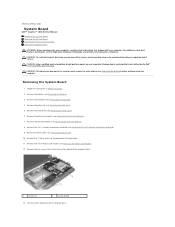
...). 8. Remove the coin-cell battery (see Removing the Battery). 3. Remove the Mini-Cards (see Removing the Media Card Reader). 12. Remove the 3-in-1 Media Card Reader (see Removing the Mini-Card). 10. Remove the two screws that secure the system board to servicing that shipped with ...Removing the Battery) before working inside the computer. Lift the system board out of the computer base. CAUTION: To help prevent damage to Contents Page System Board Dell™ Inspiron™ 1010 Service Manual Removing the System Board Replacing the System Board Entering the Service Tag in -1 memory ...
...). 8. Remove the coin-cell battery (see Removing the Battery). 3. Remove the Mini-Cards (see Removing the Media Card Reader). 12. Remove the 3-in-1 Media Card Reader (see Removing the Mini-Card). 10. Remove the two screws that secure the system board to servicing that shipped with ...Removing the Battery) before working inside the computer. Lift the system board out of the computer base. CAUTION: To help prevent damage to Contents Page System Board Dell™ Inspiron™ 1010 Service Manual Removing the System Board Replacing the System Board Entering the Service Tag in -1 memory ...
Service Manual
Page 37
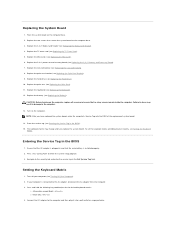
Place the system board on the computer. Replace the palm rest bracket (see Replacing the Hard Drive). 10. Replace the hard drive (see Replacing the Palm Rest Bracket). 9. NOTE: After you replace the system board. Ensure that the main battery is ...Tag in the BIOS 1. Setting the Keyboard Matrix 1. Connect the AC adapter to the computer base. 3. Replacing the System Board 1. Replace the Mini-Cards (see Replacing the Palm Rest). 11. Replace the palm rest (see Replacing the Mini-Card). 6. CAUTION: Before turning on the computer, replace all screws and ensure that secure...
Place the system board on the computer. Replace the palm rest bracket (see Replacing the Hard Drive). 10. Replace the hard drive (see Replacing the Palm Rest Bracket). 9. NOTE: After you replace the system board. Ensure that the main battery is ...Tag in the BIOS 1. Setting the Keyboard Matrix 1. Connect the AC adapter to the computer base. 3. Replacing the System Board 1. Replace the Mini-Cards (see Replacing the Palm Rest). 11. Replace the palm rest (see Replacing the Mini-Card). 6. CAUTION: Before turning on the computer, replace all screws and ensure that secure...
Service Manual
Page 41
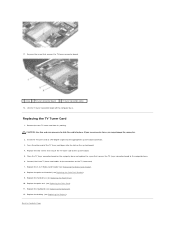
...Page Connect the three TV tuner card cables to the system board. 5. Replace the 3-in-1 Media Card Reader (see Replacing the Hard Drive). 10. Replace the hard drive (see Replacing the Media Card Reader). 8. Replace the battery (see Replacing the Keyboard). 12. Remove the new TV... 2 TV tuner connector board 3 TV tuner connector cables 12. Place the TV tuner connector board on the system board. 4. Back to the computer base. 6. If you use excessive force, you may damage the connector. 2. Replace the keyboard (see Replacing the Battery). Replace the palm rest bracket (see...
...Page Connect the three TV tuner card cables to the system board. 5. Replace the 3-in-1 Media Card Reader (see Replacing the Hard Drive). 10. Replace the hard drive (see Replacing the Media Card Reader). 8. Replace the battery (see Replacing the Keyboard). 12. Remove the new TV... 2 TV tuner connector board 3 TV tuner connector cables 12. Place the TV tuner connector board on the system board. 4. Back to the computer base. 6. If you use excessive force, you may damage the connector. 2. Replace the keyboard (see Replacing the Battery). Replace the palm rest bracket (see...
Service Manual
Page 43
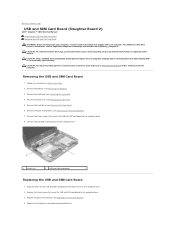
... secure the USB and SIM card board to the computer base. 8. Replace the three screws to secure the USB and SIM card board to the protrusions on your warranty. Back to Contents Page USB and SIM Card Board (Daughter Board 2) Dell™ Inspiron™ 1010 Service Manual Removing the USB and SIM Card Board...
... secure the USB and SIM card board to the computer base. 8. Replace the three screws to secure the USB and SIM card board to the protrusions on your warranty. Back to Contents Page USB and SIM Card Board (Daughter Board 2) Dell™ Inspiron™ 1010 Service Manual Removing the USB and SIM Card Board...
Setup Guide
Page 5
...Enable or Disable Wireless (Optional 9 Ubuntu® Setup 10 Microsoft® Windows® Setup 10 Connect to the Internet (Optional 10 Set Up the TV Tuner (Availability Varies by Regions 13 Using Your Inspiron™ Laptop 14 Right Side Features 14 Left Side Features 16 Computer Base and Keyboard Features 18 Touch Pad Gestures 20... Features 25 Solving Problems 27 Network Problems 27 Power Problems 28 Memory Problems 29 Lockups and Software Problems 30 Using Support Tools 32 Dell Support Center 32 System Messages 33 Hardware Troubleshooter 34 Dell Diagnostics 35 3
...Enable or Disable Wireless (Optional 9 Ubuntu® Setup 10 Microsoft® Windows® Setup 10 Connect to the Internet (Optional 10 Set Up the TV Tuner (Availability Varies by Regions 13 Using Your Inspiron™ Laptop 14 Right Side Features 14 Left Side Features 16 Computer Base and Keyboard Features 18 Touch Pad Gestures 20... Features 25 Solving Problems 27 Network Problems 27 Power Problems 28 Memory Problems 29 Lockups and Software Problems 30 Using Support Tools 32 Dell Support Center 32 System Messages 33 Hardware Troubleshooter 34 Dell Diagnostics 35 3
Setup Guide
Page 20
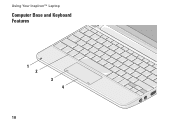
Using Your Inspiron™ Laptop Computer Base and Keyboard Features 1 2 3 4 18
Using Your Inspiron™ Laptop Computer Base and Keyboard Features 1 2 3 4 18


