
Service Manual
Page 9
... harm internal components. Touching the chassis before handling parts does not ensure adequate ESD protection on the cable itself. CAUTION: Before touching anything inside the computer, replace all power sources before connecting to the electrical outlet. CAUTION: To avoid damaging the components and cards, handle them evenly aligned to prevent ESD damage: • Use a wired ESD wrist strap that is a memory...
... harm internal components. Touching the chassis before handling parts does not ensure adequate ESD protection on the cable itself. CAUTION: Before touching anything inside the computer, replace all power sources before connecting to the electrical outlet. CAUTION: To avoid damaging the components and cards, handle them evenly aligned to prevent ESD damage: • Use a wired ESD wrist strap that is a memory...
Service Manual
Page 11
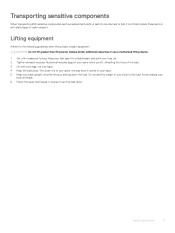
...setting down . Always obtain additional resources or use a mechanical lifting device. 1 Get a firm balanced footing. Abdominal muscles support your spine when you lift, offsetting the force of your body to your spine, the less force it exerts on your back. 5 Keep your feet apart for safe.... Avoid twisting your back. 4 Keep the load close. Safety instructions 11 Lifting equipment Adhere to set the load down the load. Transporting sensitive components When transporting ESD sensitive components such as replacement parts or parts to be returned to Dell, it is to the load.
...setting down . Always obtain additional resources or use a mechanical lifting device. 1 Get a firm balanced footing. Abdominal muscles support your spine when you lift, offsetting the force of your body to your spine, the less force it exerts on your back. 5 Keep your feet apart for safe.... Avoid twisting your back. 4 Keep the load close. Safety instructions 11 Lifting equipment Adhere to set the load down the load. Transporting sensitive components When transporting ESD sensitive components such as replacement parts or parts to be returned to Dell, it is to the load.

Service Manual
Page 51
... the tape that secures the fan cable to the BIOS using the BIOS setup program. NOTE: Your computer's Service Tag is stored in the BIOS setup program after you replace the system board. NOTE: Replacing the system board removes any changes you replace the system board. Procedure 1 Align the screw holes on the system board with your computer and follow the instructions in Before working inside your computer. For more...
... the tape that secures the fan cable to the BIOS using the BIOS setup program. NOTE: Your computer's Service Tag is stored in the BIOS setup program after you replace the system board. NOTE: Replacing the system board removes any changes you replace the system board. Procedure 1 Align the screw holes on the system board with your computer and follow the instructions in Before working inside your computer. For more...

Service Manual
Page 56
...+Tab Switch to next window Ctrl+Shift+Q Ctrl+W To access the keyboard on the side, where the Caps Lock key is on the screen and to see more shortcuts, press Ctrl+Alt+?. 56 Technology and components On a Chromebook, this key is normally located. Keys Description Decrease brightness Increase brightness Mute Decrease volume Increase volume Search applications and the web at the same time. Lock Keyboard shortcut keys Table...
...+Tab Switch to next window Ctrl+Shift+Q Ctrl+W To access the keyboard on the side, where the Caps Lock key is on the screen and to see more shortcuts, press Ctrl+Alt+?. 56 Technology and components On a Chromebook, this key is normally located. Keys Description Decrease brightness Increase brightness Mute Decrease volume Increase volume Search applications and the web at the same time. Lock Keyboard shortcut keys Table...
Service Manual
Page 66
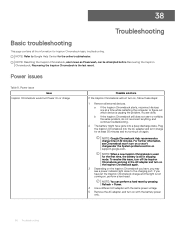
..., see a power indicator light close to figure out which device is causing the problem. Plug the Inspiron Chromebook into a deep discharge state. NOTE: When a new Inspiron Chromebook is the last resort. NOTE: Resetting the Inspiron Chromebook, also known as Powerwash, can perform a hard reset by pressing Refresh + Power. 4 Use a different AC adapter with the battery power only. 66 Troubleshooting NOTE: You can be attempted before Recovering the Inspiron Chromebook. a If the Inspiron Chromebook starts, reconnect devices one at...
..., see a power indicator light close to figure out which device is causing the problem. Plug the Inspiron Chromebook into a deep discharge state. NOTE: When a new Inspiron Chromebook is the last resort. NOTE: Resetting the Inspiron Chromebook, also known as Powerwash, can perform a hard reset by pressing Refresh + Power. 4 Use a different AC adapter with the battery power only. 66 Troubleshooting NOTE: You can be attempted before Recovering the Inspiron Chromebook. a If the Inspiron Chromebook starts, reconnect devices one at...

Service Manual
Page 68
... the Inspiron Chromebook. 2 Try disabling and re-enabling Bluetooth connectivity from the status area in from the Guest account using the tab key to navigate. 6 If users experience touch pad issues with bluetooth, try to test the keys after each troubleshooting step. 1 If the affected key is supported by pressing the power button until the device turns off, and then turn it . Touchpad and hotkeys issues Touchpad not responding Issue Top row of keys (Hotkeys) not...
... the Inspiron Chromebook. 2 Try disabling and re-enabling Bluetooth connectivity from the status area in from the Guest account using the tab key to navigate. 6 If users experience touch pad issues with bluetooth, try to test the keys after each troubleshooting step. 1 If the affected key is supported by pressing the power button until the device turns off, and then turn it . Touchpad and hotkeys issues Touchpad not responding Issue Top row of keys (Hotkeys) not...

Service Manual
Page 69
... is not the owner (primary) account, delete the user account and recreate it. 6 If none of a page to move backward to. 3 Restart the Chrome OS by holding down the power button until the device turns off the computer. 2 Disconnect all peripheral devices, and remove all USB devices and media cards. 3 Disconnect the AC adapter. 4 Press and hold the power button for more memory. 2 If issue persists...
... is not the owner (primary) account, delete the user account and recreate it. 6 If none of a page to move backward to. 3 Restart the Chrome OS by holding down the power button until the device turns off the computer. 2 Disconnect all peripheral devices, and remove all USB devices and media cards. 3 Disconnect the AC adapter. 4 Press and hold the power button for more memory. 2 If issue persists...
Service Manual
Page 70
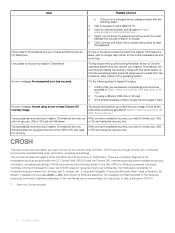
... Step2: Create the recovery USB flash drive or SD card. You successfully recovered your Inspiron Chromebook but now you After you have completed recovery, you are memory test, storage_test_1, storage_test_2, ping, and tracepath. The Chrome OS does not support ePSA, Dell BIOS, the F12 boot menu, or DellConnect. Chrome OS is based on -screen instructions to date recovery image. A detailed explanation of the operating system. Other Inspiron Chromebook lock up -to reset the password. CROSH...
... Step2: Create the recovery USB flash drive or SD card. You successfully recovered your Inspiron Chromebook but now you After you have completed recovery, you are memory test, storage_test_1, storage_test_2, ping, and tracepath. The Chrome OS does not support ePSA, Dell BIOS, the F12 boot menu, or DellConnect. Chrome OS is based on -screen instructions to date recovery image. A detailed explanation of the operating system. Other Inspiron Chromebook lock up -to reset the password. CROSH...

Service Manual
Page 72
... the network specified by . set_arpgw Turns on Pixel. set_cellular_ppp -c Clears any existing PPP username and PPP password for the specified carrier. sound record [duration] will start |stop|] Sets the chaps debug logging level. sound play /record audio samples and enable beam forming on the extra network state checking to make sure the default gateway is not specified, use when connecting to see the Bluetooth Core specification for...
... the network specified by . set_arpgw Turns on Pixel. set_cellular_ppp -c Clears any existing PPP username and PPP password for the specified carrier. sound record [duration] will start |stop|] Sets the chaps debug logging level. sound play /record audio samples and enable beam forming on the extra network state checking to make sure the default gateway is not specified, use when connecting to see the Bluetooth Core specification for...
Service Manual
Page 73
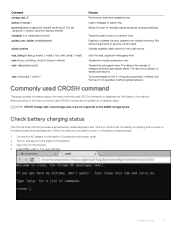
... open CROSH. This is to the Inspiron Chromebook and a power outlet. 2 Turn on the battery health and discharge rate. Follow the instruction provided to check on the battery charging status: 1 Connect the AC adapter to confirm that key. Traces the path/route to manually adjust advanced touchpad settings. wpa_debug [] [--help] [--list_valid_level] [--reset] xset m [acc_mult[/acc_div] [thr]] xset m default xset r rate [delay [rate]] xset r [keycode] < on |off]} tracepath [-n] [/port] update_over_cellular [enable|disable...
... open CROSH. This is to the Inspiron Chromebook and a power outlet. 2 Turn on the battery health and discharge rate. Follow the instruction provided to check on the battery charging status: 1 Connect the AC adapter to confirm that key. Traces the path/route to manually adjust advanced touchpad settings. wpa_debug [] [--help] [--list_valid_level] [--reset] xset m [acc_mult[/acc_div] [thr]] xset m default xset r rate [delay [rate]] xset r [keycode] < on |off]} tracepath [-n] [/port] update_over_cellular [enable|disable...
Service Manual
Page 90
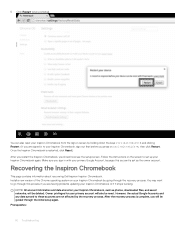
... Inspiron Chromebook, you will be deleted. 5 Click Restart when prompted. You may want to set as photos, downloaded files, and saved networks, will be reset. Once the Inspiron Chromebook is complete, you should now see the setup screen. Recovering the Inspiron Chromebook This page contains information about recovering Dell Inspiron Inspiron Chromebook. Follow the instructions on your Inspiron Chromebook again. Install a new version of the Chrome operating system on the screen to go through the recovery...
... Inspiron Chromebook, you will be deleted. 5 Click Restart when prompted. You may want to set as photos, downloaded files, and saved networks, will be reset. Once the Inspiron Chromebook is complete, you should now see the setup screen. Recovering the Inspiron Chromebook This page contains information about recovering Dell Inspiron Inspiron Chromebook. Follow the instructions on your Inspiron Chromebook again. Install a new version of the Chrome operating system on the screen to go through the recovery...

Service Manual
Page 92
... recover your Inspiron Chromebook, we recommend creating the recovery media with your Inspiron Chromebook has been cleared, you 'll see a screen with the following steps: 1 Confirm that appear on your Chrome device 3 Wait for the Inspiron Chromebook to boot up -to test your Inspiron Chromebook as specified in Step 2: Create the recovery USB flash drive or SD card above . 92 Troubleshooting Troubleshooting Tips Table 19. Operating System Instructions 1 1.Click this account will need to recover my Inspiron Chromebook An error message...
... recover your Inspiron Chromebook, we recommend creating the recovery media with your Inspiron Chromebook has been cleared, you 'll see a screen with the following steps: 1 Confirm that appear on your Chrome device 3 Wait for the Inspiron Chromebook to boot up -to test your Inspiron Chromebook as specified in Step 2: Create the recovery USB flash drive or SD card above . 92 Troubleshooting Troubleshooting Tips Table 19. Operating System Instructions 1 1.Click this account will need to recover my Inspiron Chromebook An error message...
Setup and Specifications
Page 3
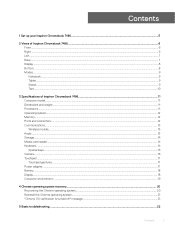
... Chromebook 7486...6 Front...6 Right...6 Left...7 Base...7 Display...8 Bottom...8 Modes...9 Notebook...9 Tablet...9 Stand...9 Tent...10 3 Specifications of Inspiron Chromebook 7486 11 Computer model...11 Dimensions and weight...11 Processors...11 Operating system...12 Memory...12 Ports and connectors...12 Communications...13 Wireless module...13 Audio...13 Storage...14 Media-card reader...14 Keyboard...14 Special keys...15 Camera...16 Touchpad...17 Touchpad gestures...17 Power adapter...17 Battery...18 Display...18 Computer environment...19 4 Chrome operating system recovery...20 Recovering...
... Chromebook 7486...6 Front...6 Right...6 Left...7 Base...7 Display...8 Bottom...8 Modes...9 Notebook...9 Tablet...9 Stand...9 Tent...10 3 Specifications of Inspiron Chromebook 7486 11 Computer model...11 Dimensions and weight...11 Processors...11 Operating system...12 Memory...12 Ports and connectors...12 Communications...13 Wireless module...13 Audio...13 Storage...14 Media-card reader...14 Keyboard...14 Special keys...15 Camera...16 Touchpad...17 Touchpad gestures...17 Power adapter...17 Battery...18 Display...18 Computer environment...19 4 Chrome operating system recovery...20 Recovering...

Setup and Specifications
Page 5
... receive a new Inspiron Chromebook, the battery is set for 30 minutes before switching on the system. Click Accept and continue. 4 The next screen enables you to register your language, keyboard layout, select a network that you ordered. 1 Connect the power adapter and press the power button. NOTE: When you proceed. 3 The next screen displays the Chrome OS terms of agreement. NOTE: To conserve battery power, the battery might enter power saving mode. Google recommends charging your...
... receive a new Inspiron Chromebook, the battery is set for 30 minutes before switching on the system. Click Accept and continue. 4 The next screen enables you to register your language, keyboard layout, select a network that you ordered. 1 Connect the power adapter and press the power button. NOTE: When you proceed. 3 The next screen displays the Chrome OS terms of agreement. NOTE: To conserve battery power, the battery might enter power saving mode. Google recommends charging your...

Setup and Specifications
Page 12
Memory specifications Slots Type Speed Minimum memory Memory per slot Configurations supported Ports and connectors Table 4. Ports and connectors specifications External: Network USB Audio Video Memory card reader Micro subscriber identity module (uSIM) card Docking port Express card Power adapter port Smart card reader Security None (Memory is integrated on the system board) DDR4 2400 MHz 4 GB Not applicable 4 GB DDR4 at 2400 MHz Not applicable • One USB 3.1 Gen 1 port • One Power adapter port/USB 3.1 Gen 1 (Type-C) port • One USB 3.1 Gen 1 (Type-C) port/DisplayPort One...
Memory specifications Slots Type Speed Minimum memory Memory per slot Configurations supported Ports and connectors Table 4. Ports and connectors specifications External: Network USB Audio Video Memory card reader Micro subscriber identity module (uSIM) card Docking port Express card Power adapter port Smart card reader Security None (Memory is integrated on the system board) DDR4 2400 MHz 4 GB Not applicable 4 GB DDR4 at 2400 MHz Not applicable • One USB 3.1 Gen 1 port • One Power adapter port/USB 3.1 Gen 1 (Type-C) port • One USB 3.1 Gen 1 (Type-C) port/DisplayPort One...

Setup and Specifications
Page 13
Legacy ports Communications Wireless module Table 5. Wireless module specifications Model number Transfer rate Frequency bands supported Wireless standards Encryption Bluetooth Audio Table 6. Audio specifications Type Controller Stereo conversion Internal interface External interface Speakers Internal speaker amplifier External volume controls Speaker output: Average Peak Not supported Intel 7265 Up to 867 Mbps Dual band 2.4 GHz/5 GHz Wi-Fi 802.11b/g/a/n/ac • 64-bit/128-bit WEP • AES-CCMP • TKIP Bluetooth 4.2 High Definition Audio Dialog...
Legacy ports Communications Wireless module Table 5. Wireless module specifications Model number Transfer rate Frequency bands supported Wireless standards Encryption Bluetooth Audio Table 6. Audio specifications Type Controller Stereo conversion Internal interface External interface Speakers Internal speaker amplifier External volume controls Speaker output: Average Peak Not supported Intel 7265 Up to 867 Mbps Dual band 2.4 GHz/5 GHz Wi-Fi 802.11b/g/a/n/ac • 64-bit/128-bit WEP • AES-CCMP • TKIP Bluetooth 4.2 High Definition Audio Dialog...

Setup and Specifications
Page 16
... the bookmark bar Search current webpage Open a new tab Open a new window Open the link you clicked in a new background tab Switch to next tab Switch to next window Ctrl+Shift+Q Ctrl+W To access the keyboard on the side, where the Caps Lock key is normally located. Camera specifications Number of cameras Type Location Sensor type Resolution: One One Full HD fixed focus Front camera CMOS sensor technology 16 Specifications of Google Account Close current tab...
... the bookmark bar Search current webpage Open a new tab Open a new window Open the link you clicked in a new background tab Switch to next tab Switch to next window Ctrl+Shift+Q Ctrl+W To access the keyboard on the side, where the Caps Lock key is normally located. Camera specifications Number of cameras Type Location Sensor type Resolution: One One Full HD fixed focus Front camera CMOS sensor technology 16 Specifications of Google Account Close current tab...

Setup and Specifications
Page 21
... the USB flash drive or SD card you might see a screen asking to recover your Inspiron Chromebook will need to the normal user mode. Make sure you will be recognized by Windows. Your USB drive or SD card should now be able to start up from the tool to download the Recovery Tool. 2 Run the tool and follow the instructions that appear on your own version of the Chrome operating system...
... the USB flash drive or SD card you might see a screen asking to recover your Inspiron Chromebook will need to the normal user mode. Make sure you will be recognized by Windows. Your USB drive or SD card should now be able to start up from the tool to download the Recovery Tool. 2 Run the tool and follow the instructions that appear on your own version of the Chrome operating system...
Setup and Specifications
Page 22
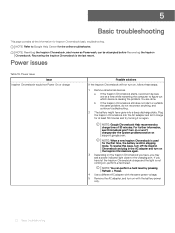
... the light is causing the problem. a If the Inspiron Chromebook starts, reconnect devices one at least 30 minutes and try turning it charge for the online troubleshooter. NOTE: Refer to Google Help Center for at a time while restarting the computer to the charging port. NOTE: Resetting the Inspiron Chromebook, also known as Powerwash, can perform a hard reset by pressing Refresh + Power. 4 Use a different AC adapter with the same power voltage. 5 Remove...
... the light is causing the problem. a If the Inspiron Chromebook starts, reconnect devices one at least 30 minutes and try turning it charge for the online troubleshooter. NOTE: Refer to Google Help Center for at a time while restarting the computer to the charging port. NOTE: Resetting the Inspiron Chromebook, also known as Powerwash, can perform a hard reset by pressing Refresh + Power. 4 Use a different AC adapter with the same power voltage. 5 Remove...

Setup and Specifications
Page 26
... card using a different USB stick or SD card. 3 If the problem persists, contact Google Chrome support team. Other Inspiron Chromebook lock up -to format your Inspiron Chromebook, we recommend creating the recovery media with the following steps to Google Help Center for recovery. If none of the operating system. You successfully recovered your Inspiron Chromebook but now you After you have completed recovery, you need to have completed recovery, you use a different PC. 3 Open an internet...
... card using a different USB stick or SD card. 3 If the problem persists, contact Google Chrome support team. Other Inspiron Chromebook lock up -to format your Inspiron Chromebook, we recommend creating the recovery media with the following steps to Google Help Center for recovery. If none of the operating system. You successfully recovered your Inspiron Chromebook but now you After you have completed recovery, you need to have completed recovery, you use a different PC. 3 Open an internet...


