
Owner's Manual
Page 25
For more information, see the Dell Inspiron Help file. Use a battery to run the computer when it is recommended that shipped with your local waste disposal or environmental agency for your Dell™ portable computer with a compatible battery purchased from other power-intensive ...access the help preserve BIOS settings, operate your computer. See "Battery Disposal" in the battery bay. Replace the battery only with the main battery installed at all times. NOTE: Batteries for your computer, see page 9. One battery is designed to , the following: • Using DVD+...
For more information, see the Dell Inspiron Help file. Use a battery to run the computer when it is recommended that shipped with your local waste disposal or environmental agency for your Dell™ portable computer with a compatible battery purchased from other power-intensive ...access the help preserve BIOS settings, operate your computer. See "Battery Disposal" in the battery bay. Replace the battery only with the main battery installed at all times. NOTE: Batteries for your computer, see page 9. One battery is designed to , the following: • Using DVD+...

Owner's Manual
Page 72
...with your computer. NOTICE: To avoid damaging the system board, you must remove the main battery before you connect a cable, ensure that both connectors are disconnecting this section, follow the safety... by its metal mounting bracket. Also, before you service the computer. 72 Adding and Replacing Parts CAUTION: Handle components and cards with locking tabs; Some cables have a connector with...network cables from being scratched. 2 Turn off your own personal safety. www.dell.com | support.dell.com Before Working Inside Your Computer Use the following steps before you begin ...
...with your computer. NOTICE: To avoid damaging the system board, you must remove the main battery before you connect a cable, ensure that both connectors are disconnecting this section, follow the safety... by its metal mounting bracket. Also, before you service the computer. 72 Adding and Replacing Parts CAUTION: Handle components and cards with locking tabs; Some cables have a connector with...network cables from being scratched. 2 Turn off your own personal safety. www.dell.com | support.dell.com Before Working Inside Your Computer Use the following steps before you begin ...

Owner's Manual
Page 73
...Adding and Replacing Parts 73 5 Disconnect your computer (see page 71) before removing the hard drive. See page 88. 7 Press the power button to ground the system board. 8 Remove any of the procedures in the section, follow the safety instructions in hibernate mode. battery-bay latch release battery 6 Remove...remove the hard drive while the computer is hot, do not touch the metal housing of the computer, and then remove the battery from sources other than Dell. NOTICE: Hard drives are extremely fragile; NOTICE: To prevent data loss, turn the computer upside down on the bottom of...
...Adding and Replacing Parts 73 5 Disconnect your computer (see page 71) before removing the hard drive. See page 88. 7 Press the power button to ground the system board. 8 Remove any of the procedures in the section, follow the safety instructions in hibernate mode. battery-bay latch release battery 6 Remove...remove the hard drive while the computer is hot, do not touch the metal housing of the computer, and then remove the battery from sources other than Dell. NOTICE: Hard drives are extremely fragile; NOTICE: To prevent data loss, turn the computer upside down on the bottom of...

Owner's Manual
Page 79
7 Insert the battery into the battery bay, or connect the AC adapter to continue. See page 73. 9 Turn on page 71. 2 Turn the computer over and loosen the captive screws from ... an electrical outlet. 8 Reinstall the hard drive. Modem CAUTION: Before you begin any of memory installed in "Before You Begin" on the computer. Adding and Replacing Parts 79 As the computer boots, it detects the additional memory and automatically updates the system configuration information. To confirm the amount of the procedures...
7 Insert the battery into the battery bay, or connect the AC adapter to continue. See page 73. 9 Turn on page 71. 2 Turn the computer over and loosen the captive screws from ... an electrical outlet. 8 Reinstall the hard drive. Modem CAUTION: Before you begin any of memory installed in "Before You Begin" on the computer. Adding and Replacing Parts 79 As the computer boots, it detects the additional memory and automatically updates the system configuration information. To confirm the amount of the procedures...

Owner's Manual
Page 83
...under the card. b Insert a scribe in the Product Information Guide. NOTICE: To avoid damaging the system board, you must remove the main battery before you begin working inside the computer. 1 Follow the procedures in your work surface. NOTICE: To avoid electrostatic discharge, ground yourself by using... a wrist grounding strap or by periodically touching an unpainted metal surface (such as a connector on both sides simultaneously. Adding and Replacing Parts 83 b Connect the antenna cables to the Mini PCI card if a wireless card is installed in "Before You Begin" on the ...
...under the card. b Insert a scribe in the Product Information Guide. NOTICE: To avoid damaging the system board, you must remove the main battery before you begin working inside the computer. 1 Follow the procedures in your work surface. NOTICE: To avoid electrostatic discharge, ground yourself by using... a wrist grounding strap or by periodically touching an unpainted metal surface (such as a connector on both sides simultaneously. Adding and Replacing Parts 83 b Connect the antenna cables to the Mini PCI card if a wireless card is installed in "Before You Begin" on the ...
Owner's Manual
Page 84
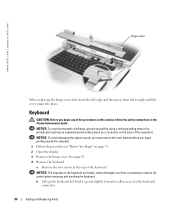
...hinge cover. b Lift up the keyboard and hold it up and slightly forward to allow access to replace. NOTICE: To avoid damaging the system board, you must remove the main battery before you begin working inside the computer. 1 Follow the procedures in the Product Information Guide. Be careful...The keycaps on the keyboard are fragile, easily dislodged, and time-consuming to the keyboard connector. 84 Adding and Replacing Parts www.dell.com | support.dell.com hinge cover When replacing the hinge cover, first insert the left edge and then press from left to right until the cover snaps ...
...hinge cover. b Lift up the keyboard and hold it up and slightly forward to allow access to replace. NOTICE: To avoid damaging the system board, you must remove the main battery before you begin working inside the computer. 1 Follow the procedures in the Product Information Guide. Be careful...The keycaps on the keyboard are fragile, easily dislodged, and time-consuming to the keyboard connector. 84 Adding and Replacing Parts www.dell.com | support.dell.com hinge cover When replacing the hinge cover, first insert the left edge and then press from left to right until the cover snaps ...
Owner's Manual
Page 85
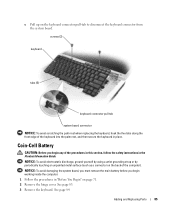
...the keyboard connector pull-tab to disconnect the keyboard connector from the system board. Coin-Cell Battery CAUTION: Before you begin any of the computer). See page 84. Adding and Replacing Parts 85 NOTICE: To avoid electrostatic discharge, ground yourself by using a wrist grounding strap or... Remove the keyboard. screws (2) keyboard tabs (5) keyboard connector pull-tab system board connector NOTICE: To avoid scratching the palm rest when replacing the keyboard, hook the five tabs along the front edge of the keyboard into the palm rest, and then secure the keyboard in ...
...the keyboard connector pull-tab to disconnect the keyboard connector from the system board. Coin-Cell Battery CAUTION: Before you begin any of the computer). See page 84. Adding and Replacing Parts 85 NOTICE: To avoid electrostatic discharge, ground yourself by using a wrist grounding strap or... Remove the keyboard. screws (2) keyboard tabs (5) keyboard connector pull-tab system board connector NOTICE: To avoid scratching the palm rest when replacing the keyboard, hook the five tabs along the front edge of the keyboard into the palm rest, and then secure the keyboard in ...

Owner's Manual
Page 86
www.dell.com | support.dell.com 4 Remove the existing battery: a Disconnect the battery cable connector from the system board. b Connect the battery cable to the connector on the side of the coin-cell battery compartment, and lift up , and then push the battery into place. Display CAUTION: Before you begin any of the computer). 86 Adding and Replacing Parts...
www.dell.com | support.dell.com 4 Remove the existing battery: a Disconnect the battery cable connector from the system board. b Connect the battery cable to the connector on the side of the coin-cell battery compartment, and lift up , and then push the battery into place. Display CAUTION: Before you begin any of the computer). 86 Adding and Replacing Parts...

Owner's Manual
Page 87
Adding and Replacing Parts 87 antenna cables 4 Remove the hinge cover. See page 83. 5 Remove the four screws securing the display. 6 Disconnect the display cable, using the pull-tab. NOTICE: To avoid damaging the system board, you must remove the main battery before you begin working inside the computer. 1 Follow the procedures in "Before You Begin" on page 71. 2 Loosen the two captive screws and remove the Mini PCI card cover. 3 Disconnect the antennae cables from the Mini PCI card.
Adding and Replacing Parts 87 antenna cables 4 Remove the hinge cover. See page 83. 5 Remove the four screws securing the display. 6 Disconnect the display cable, using the pull-tab. NOTICE: To avoid damaging the system board, you must remove the main battery before you begin working inside the computer. 1 Follow the procedures in "Before You Begin" on page 71. 2 Loosen the two captive screws and remove the Mini PCI card cover. 3 Disconnect the antennae cables from the Mini PCI card.

Owner's Manual
Page 89
...avoid damaging the system board, you must remove the main battery before you begin any of the procedures in this section, follow the safety instructions in "Before You Begin" on the back of the bay. Adding and Replacing Parts 89 NOTICE: To avoid electrostatic discharge, ground yourself... by using a wrist grounding strap or by periodically touching an unpainted metal surface (such as a connector on page 71. 2 Remove the battery. Internal Card With Bluetooth® Wireless Technology...
...avoid damaging the system board, you must remove the main battery before you begin any of the procedures in this section, follow the safety instructions in "Before You Begin" on the back of the bay. Adding and Replacing Parts 89 NOTICE: To avoid electrostatic discharge, ground yourself... by using a wrist grounding strap or by periodically touching an unpainted metal surface (such as a connector on page 71. 2 Remove the battery. Internal Card With Bluetooth® Wireless Technology...

Owner's Manual
Page 90
www.dell.com | support.dell.com 4 Pull the card out of the compartment so that you can disconnect the card from its cable and remove it into the compartment. 6 Replace the card cover and tighten the screw. 7 Replace the battery. 90 Adding and Replacing Parts cover card cable 5 To replace the card, connect the card to the cable and then carefully insert it from the computer.
www.dell.com | support.dell.com 4 Pull the card out of the compartment so that you can disconnect the card from its cable and remove it into the compartment. 6 Replace the card cover and tighten the screw. 7 Replace the battery. 90 Adding and Replacing Parts cover card cable 5 To replace the card, connect the card to the cable and then carefully insert it from the computer.

Owner's Manual
Page 119
...sequence, 97 C CardBus technology PC Cards, 39 CD drive problems, 50 CD-RW drive problems, 50 CDs using, 29 Check Disk, 51 coin-cell battery replacing, 85 computer crashes, 56-57 restore to previous operating state, 67 slow performance, 53, 58 specifications, 91 stops responding, 56 conflicts software and hardware incompatibilities..., 70 connecting audio device, 31 TV, 31 copying CDs helpful tips, 30 how to, 29 copying DVDs helpful tips, 30 how to, 29 D Dell contacting, 99, 117 support policy, 98 support site, 10 Dell Diagnostics, 47 device status lights description, 12 diagnostics...
...sequence, 97 C CardBus technology PC Cards, 39 CD drive problems, 50 CD-RW drive problems, 50 CDs using, 29 Check Disk, 51 coin-cell battery replacing, 85 computer crashes, 56-57 restore to previous operating state, 67 slow performance, 53, 58 specifications, 91 stops responding, 56 conflicts software and hardware incompatibilities..., 70 connecting audio device, 31 TV, 31 copying CDs helpful tips, 30 how to, 29 copying DVDs helpful tips, 30 how to, 29 D Dell contacting, 99, 117 support policy, 98 support site, 10 Dell Diagnostics, 47 device status lights description, 12 diagnostics...


