
Owner's Manual
Page 3
... Up a Printer 22 Printer Cable 22 Connecting a USB Printer 22 Power Protection Devices 23 Surge Protectors 23 Line Conditioners 24 Uninterruptible Power Supplies 24 3 Using a Battery Battery Performance 25 Checking the Battery Charge 26 Dell QuickSet Battery Meter 26 Microsoft Windows Power Meter 26 Charge Gauge 26 Low...
... Up a Printer 22 Printer Cable 22 Connecting a USB Printer 22 Power Protection Devices 23 Surge Protectors 23 Line Conditioners 24 Uninterruptible Power Supplies 24 3 Using a Battery Battery Performance 25 Checking the Battery Charge 26 Dell QuickSet Battery Meter 26 Microsoft Windows Power Meter 26 Charge Gauge 26 Low...

Owner's Manual
Page 4
Charging the Battery 27 Removing a Battery 27 Installing a Battery 28 Storing a Battery 28 4 Using CD, DVDs, and Other Multimedia Using CDs and DVDs 29 Copying CDs and DVDs 29 How to Copy a CD or DVD 29 Using ... Video Connection 32 Enabling the Display Settings for a TV 34 5 Using the Keyboard and Touch Pad Numeric Keypad 35 Key Combinations 36 System Functions 36 Battery 36 CD or DVD Tray 36 Display Functions 36 Radios (Including Wireless Networking and an Internal Card With Bluetooth® Wireless Technology 36 Power Management...
Charging the Battery 27 Removing a Battery 27 Installing a Battery 28 Storing a Battery 28 4 Using CD, DVDs, and Other Multimedia Using CDs and DVDs 29 Copying CDs and DVDs 29 How to Copy a CD or DVD 29 Using ... Video Connection 32 Enabling the Display Settings for a TV 34 5 Using the Keyboard and Touch Pad Numeric Keypad 35 Key Combinations 36 System Functions 36 Battery 36 CD or DVD Tray 36 Display Functions 36 Radios (Including Wireless Networking and an Internal Card With Bluetooth® Wireless Technology 36 Power Management...

Owner's Manual
Page 7
Hard Drive 73 Returning a Hard Drive to Dell 75 Memory 75 Modem 79 Mini PCI Card 81 Hinge Cover 83 Keyboard 84 Coin-Cell Battery 85 Display 86 Optical Drive 88 Internal Card With Bluetooth® Wireless Technology 89 10 Appendix Specifications 91 Using the System ...Setup Program 96 Overview 96 Viewing the System Setup Screens 97 System Setup Screens 97 Commonly Used Options 97 Dell Technical Support Policy ...
Hard Drive 73 Returning a Hard Drive to Dell 75 Memory 75 Modem 79 Mini PCI Card 81 Hinge Cover 83 Keyboard 84 Coin-Cell Battery 85 Display 86 Optical Drive 88 Internal Card With Bluetooth® Wireless Technology 89 10 Appendix Specifications 91 Using the System ...Setup Program 96 Overview 96 Viewing the System Setup Screens 97 System Setup Screens 97 Commonly Used Options 97 Dell Technical Support Policy ...

Owner's Manual
Page 12
...data. NOTICE: To avoid loss of pressing the power button. www.dell.com | support.dell.com P O W E R B U T T O N - If the computer is connected to an electrical outlet, the light operates as follows: • Off: The battery is adequately charged (or the computer is turned off the computer ... through the Start menu instead of data, never turn on a battery, the light operates as follows: • Solid green: The battery is charging. • Flashing green: The battery is running on the computer or to indicate battery charge status. Press the power button to turn off ). •...
...data. NOTICE: To avoid loss of pressing the power button. www.dell.com | support.dell.com P O W E R B U T T O N - If the computer is connected to an electrical outlet, the light operates as follows: • Off: The battery is adequately charged (or the computer is turned off the computer ... through the Start menu instead of data, never turn on a battery, the light operates as follows: • Solid green: The battery is charging. • Flashing green: The battery is running on the computer or to indicate battery charge status. Press the power button to turn off ). •...

Owner's Manual
Page 20
... through the vents, which prevents the computer from the battery bay. Releases the battery from overheating. Stores software and data. B A Y L A T C H R E L E A S E - For more information, see page 75. www.dell.com | support.dell.com Bottom View subwoofer optical-drive locking screw battery charge gauge battery-bay latch release battery hard drive fan fan memory module cover Mini PCI card...
... through the vents, which prevents the computer from the battery bay. Releases the battery from overheating. Stores software and data. B A Y L A T C H R E L E A S E - For more information, see page 75. www.dell.com | support.dell.com Bottom View subwoofer optical-drive locking screw battery charge gauge battery-bay latch release battery hard drive fan fan memory module cover Mini PCI card...

Owner's Manual
Page 24
... Line conditioners are designed to a UPS. www.dell.com | support.dell.com Many surge protectors have a telephone jack for modem connection instructions. See the surge protector documentation for modem protection. The battery charges while AC power is interrupted. Disconnect the network... Line conditioners do not protect against power fluctuations and interruptions. A UPS protects against power interruptions. NOTE: To ensure maximum battery operating time, connect only your computer to maintain AC voltage at a fairly constant level. NOTICE: Not all surge protectors offer...
... Line conditioners are designed to a UPS. www.dell.com | support.dell.com Many surge protectors have a telephone jack for modem connection instructions. See the surge protector documentation for modem protection. The battery charges while AC power is interrupted. Disconnect the network... Line conditioners do not protect against power fluctuations and interruptions. A UPS protects against power interruptions. NOTE: To ensure maximum battery operating time, connect only your computer to maintain AC voltage at a fairly constant level. NOTICE: Not all surge protectors offer...

Owner's Manual
Page 25
...Dell Inspiron Help file. Use a battery to run the computer when it is recommended that shipped with your Dell™ portable computer with household waste. Using a Battery 25 For optimal computer performance and to an electrical outlet. Battery operating time varies depending on disposing of a lithium-ion battery...year period of the limited warranty for your computer. To access the help preserve BIOS settings, operate your Dell computer. One battery is significantly reduced when you perform operations including, but not limited to, the following: • Using ...
...Dell Inspiron Help file. Use a battery to run the computer when it is recommended that shipped with your Dell™ portable computer with household waste. Using a Battery 25 For optimal computer performance and to an electrical outlet. Battery operating time varies depending on disposing of a lithium-ion battery...year period of the limited warranty for your computer. To access the help preserve BIOS settings, operate your Dell computer. One battery is significantly reduced when you perform operations including, but not limited to, the following: • Using ...

Owner's Manual
Page 26
..., see page 9. Each light represents approximately 20 percent of the total battery charge. If no lights appear, the battery has no charge. 26 Using a Battery The following icons appear in the taskbar, and click Help. To access the help file, see the Dell Inspiron Help file. Charge Gauge Press the status button on . For example...
..., see page 9. Each light represents approximately 20 percent of the total battery charge. If no lights appear, the battery has no charge. 26 Using a Battery The following icons appear in the taskbar, and click Help. To access the help file, see the Dell Inspiron Help file. Charge Gauge Press the status button on . For example...

Owner's Manual
Page 27
...: Before performing these procedures, disconnect the modem from overcharging. You can leave the battery in the Dell Inspiron Help file. If necessary, the AC adapter then charges the battery and maintains the battery charge. For more information about resolving problems with the computer turned on the bottom of power, hibernate mode begins automatically. Charging the...
...: Before performing these procedures, disconnect the modem from overcharging. You can leave the battery in the Dell Inspiron Help file. If necessary, the AC adapter then charges the battery and maintains the battery charge. For more information about resolving problems with the computer turned on the bottom of power, hibernate mode begins automatically. Charging the...

Owner's Manual
Page 28
After a long storage period, recharge the battery fully before you store your computer for an extended period of time. www.dell.com | support.dell.com battery charge gauge battery-bay latch release battery Installing a Battery 1 Slide the battery lengthwise into the bay at a 45-degree angle. 2 Press the other side down until the latch release clicks. Storing a Battery Remove the battery when you use it. 28 Using a Battery A battery discharges during prolonged storage.
After a long storage period, recharge the battery fully before you store your computer for an extended period of time. www.dell.com | support.dell.com battery charge gauge battery-bay latch release battery Installing a Battery 1 Slide the battery lengthwise into the bay at a 45-degree angle. 2 Press the other side down until the latch release clicks. Storing a Battery Remove the battery when you use it. 28 Using a Battery A battery discharges during prolonged storage.

Owner's Manual
Page 36
... brightness on the integrated display only (not on an external monitor). www.dell.com | support.dell.com Key Combinations System Functions Battery Opens the Task Manager window Enables and disables the numeric keypad Enables and ...Dell™ QuickSet Battery Meter. Highlight the desired state to switch the display to that state. and down-arrow Decreases brightness on the integrated display only (not key on an external monitor). For more information about Dell QuickSet, see the Dell Inspiron Help file. For more information about Dell QuickSet, see the Dell Inspiron...
... brightness on the integrated display only (not on an external monitor). www.dell.com | support.dell.com Key Combinations System Functions Battery Opens the Task Manager window Enables and disables the numeric keypad Enables and ...Dell™ QuickSet Battery Meter. Highlight the desired state to switch the display to that state. and down-arrow Decreases brightness on the integrated display only (not key on an external monitor). For more information about Dell QuickSet, see the Dell Inspiron Help file. For more information about Dell QuickSet, see the Dell Inspiron...

Owner's Manual
Page 60
.... A D J U S T T H E P O W E R P R O P E R T I C A L O U T L E T - See page 75. 60 Solving Problems If the computer power light turns on page 99. If the battery temperature is working by testing it with another device, such as a lamp. TE S T T H E E L E C T R I N T E R F E R E N C E - E L I M I N A T E P O S S I B L E I C A L O U T L E T - See the Dell Inspiron Help file or search for the keyword standby in the Help and Support Center. Connect the computer to...
.... A D J U S T T H E P O W E R P R O P E R T I C A L O U T L E T - See page 75. 60 Solving Problems If the computer power light turns on page 99. If the battery temperature is working by testing it with another device, such as a lamp. TE S T T H E E L E C T R I N T E R F E R E N C E - E L I M I N A T E P O S S I B L E I C A L O U T L E T - See the Dell Inspiron Help file or search for the keyword standby in the Help and Support Center. Connect the computer to...

Owner's Manual
Page 64
...it . C O N N E C T T H E C O M P U T E R D I R E C T L Y T O A N E L E C T R I C A L O U T L E T - C H E C K T H E A C A D A P T E R - Connect the computer to an electrical outlet using a battery to the display. 64 Solving Problems To access help, see page 10. Ensure that the electrical outlet is recommended that the computer turns on. Bypass...with another device, such as a lamp. S W I T C H T H E V I D E O I M A G E - www.dell.com | support.dell.com TO VERIFY THAT THE PROBLEM IS WITH THE MOUSE, CHECK THE TOUCH PAD - 1 Shut down the computer. 2 Disconnect the mouse. 3 Turn on ...
...it . C O N N E C T T H E C O M P U T E R D I R E C T L Y T O A N E L E C T R I C A L O U T L E T - C H E C K T H E A C A D A P T E R - Connect the computer to an electrical outlet using a battery to the display. 64 Solving Problems To access help, see page 10. Ensure that the electrical outlet is recommended that the computer turns on. Bypass...with another device, such as a lamp. S W I T C H T H E V I D E O I M A G E - www.dell.com | support.dell.com TO VERIFY THAT THE PROBLEM IS WITH THE MOUSE, CHECK THE TOUCH PAD - 1 Shut down the computer. 2 Disconnect the mouse. 3 Turn on ...

Owner's Manual
Page 65
.... or down your external speaker system includes a subwoofer, ensure that the system has battery power or is at least 60 cm (2 ft) away from the computer or external... 99. R O T A T E T H E C O M P U T E R T O F A C E A D I F F E R E N T D I R E C T I T O R - S E E " E R R O R M E S S A G E S " - E L I M I N A T E P O S S I B L E I G H T N E S S - See "Contacting Dell" on the computer and the monitor and adjust the monitor brightness and contrast controls. If an error message appears, see page 53. C H E C K T H E S YS T E M F O R P O W E R - Eliminate sunlight...
.... or down your external speaker system includes a subwoofer, ensure that the system has battery power or is at least 60 cm (2 ft) away from the computer or external... 99. R O T A T E T H E C O M P U T E R T O F A C E A D I F F E R E N T D I R E C T I T O R - S E E " E R R O R M E S S A G E S " - E L I M I N A T E P O S S I B L E I G H T N E S S - See "Contacting Dell" on the computer and the monitor and adjust the monitor brightness and contrast controls. If an error message appears, see page 53. C H E C K T H E S YS T E M F O R P O W E R - Eliminate sunlight...

Owner's Manual
Page 72
... mounting bracket. See the documentation that both connectors are disconnecting this section, follow the safety instructions in on a card. www.dell.com | support.dell.com Before Working Inside Your Computer Use the following steps before you service the computer. 72 Adding and Replacing Parts NOTICE: To... keep them evenly aligned to help protect your computer. NOTICE: To avoid damaging the system board, you must remove the main battery before you are correctly oriented and aligned. Damage due to servicing that the work surface is flat and clean to help ensure your...
... mounting bracket. See the documentation that both connectors are disconnecting this section, follow the safety instructions in on a card. www.dell.com | support.dell.com Before Working Inside Your Computer Use the following steps before you service the computer. 72 Adding and Replacing Parts NOTICE: To... keep them evenly aligned to help protect your computer. NOTICE: To avoid damaging the system board, you must remove the main battery before you are correctly oriented and aligned. Damage due to servicing that the work surface is flat and clean to help ensure your...

Owner's Manual
Page 73
...on a flat work surface. 10 Remove the hard drive. even a slight bump can damage the drive. battery-bay latch release battery 6 Remove the optical drive, if installed, from sources other than Dell. 5 Disconnect your computer (see page 71) before removing the hard drive. See page 88. 7 ...any of the computer, and then remove the battery from their electrical outlets, slide and hold the battery-bay latch release on , in standby mode, or in the Product Information Guide. NOTICE: Hard drives are extremely fragile; NOTE: Dell does not guarantee compatibility or provide support for hard...
...on a flat work surface. 10 Remove the hard drive. even a slight bump can damage the drive. battery-bay latch release battery 6 Remove the optical drive, if installed, from sources other than Dell. 5 Disconnect your computer (see page 71) before removing the hard drive. See page 88. 7 ...any of the computer, and then remove the battery from their electrical outlets, slide and hold the battery-bay latch release on , in standby mode, or in the Product Information Guide. NOTICE: Hard drives are extremely fragile; NOTE: Dell does not guarantee compatibility or provide support for hard...

Owner's Manual
Page 79
If prompted, press to your finger under the cover at the indentation and lift the cover open. Adding and Replacing Parts 79 7 Insert the battery into the battery bay, or connect the AC adapter to continue. As the computer boots, it detects the additional memory and automatically updates the system configuration information. To...
If prompted, press to your finger under the cover at the indentation and lift the cover open. Adding and Replacing Parts 79 7 Insert the battery into the battery bay, or connect the AC adapter to continue. As the computer boots, it detects the additional memory and automatically updates the system configuration information. To...

Owner's Manual
Page 83
Mini PCI card antenna cables 6 Replace the modem cover. NOTICE: To avoid damaging the system board, you must remove the main battery before you begin working inside the computer. 1 Follow the procedures in "Before You Begin" on the back of the procedures in this section, follow the ...
Mini PCI card antenna cables 6 Replace the modem cover. NOTICE: To avoid damaging the system board, you must remove the main battery before you begin working inside the computer. 1 Follow the procedures in "Before You Begin" on the back of the procedures in this section, follow the ...
Owner's Manual
Page 84
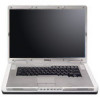
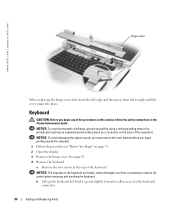
NOTICE: To avoid damaging the system board, you must remove the main battery before you begin working inside the computer. 1 Follow the procedures in the Product Information Guide. NOTICE: The keycaps on the keyboard are fragile, easily dislodged, ... careful when removing and handling the keyboard. See page 83. 4 Remove the keyboard: a Remove the two screws at the top of the computer). www.dell.com | support.dell.com hinge cover When replacing the hinge cover, first insert the left edge and then press from left to right until the cover snaps...
NOTICE: To avoid damaging the system board, you must remove the main battery before you begin working inside the computer. 1 Follow the procedures in the Product Information Guide. NOTICE: The keycaps on the keyboard are fragile, easily dislodged, ... careful when removing and handling the keyboard. See page 83. 4 Remove the keyboard: a Remove the two screws at the top of the computer). www.dell.com | support.dell.com hinge cover When replacing the hinge cover, first insert the left edge and then press from left to right until the cover snaps...
Owner's Manual
Page 85
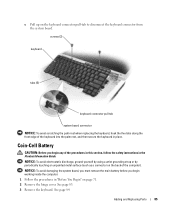
... keyboard into the palm rest, and then secure the keyboard in place. NOTICE: To avoid damaging the system board, you must remove the main battery before you begin working inside the computer. 1 Follow the procedures in the Product Information Guide. Adding and Replacing Parts 85 Coin-Cell... Battery CAUTION: Before you begin any of the procedures in this section, follow the safety instructions in "Before You Begin" on the keyboard connector pull-...
... keyboard into the palm rest, and then secure the keyboard in place. NOTICE: To avoid damaging the system board, you must remove the main battery before you begin working inside the computer. 1 Follow the procedures in the Product Information Guide. Adding and Replacing Parts 85 Coin-Cell... Battery CAUTION: Before you begin any of the procedures in this section, follow the safety instructions in "Before You Begin" on the keyboard connector pull-...


