Advanced Port Replicator User's Guide
Page 24
...this limited warranty. all parts removed from parts and components that are returned to new in accordance with product instructions, failure to a Dell system after the system is three years beginning on the hard-disk drive(s) and any other storage device(s)... in materials and workmanship. The limited warranty term is shipped from defects in the product(s). Dell owns all other locations will be made by Dell. Remove any items that are not installed in performing warranty repairs and building 1-20 Dell Inspiron...
...this limited warranty. all parts removed from parts and components that are returned to new in accordance with product instructions, failure to a Dell system after the system is three years beginning on the hard-disk drive(s) and any other storage device(s)... in materials and workmanship. The limited warranty term is shipped from defects in the product(s). Dell owns all other locations will be made by Dell. Remove any items that are not installed in performing warranty repairs and building 1-20 Dell Inspiron...
Advanced Port Replicator User's Guide
Page 27
... WITHOUT LIMITATION IMPLIED WARRANTIES AND CONDITIONS OF MERCHANTABILITY AND FITNESS FOR A PARTICULAR PURPOSE. Dell Inspiron Advanced Port Replicator User's Guide 1-23 Dell owns all parts removed from repaired products. Dell will ship parts (freight prepaid) if you of the exchange, replacement parts for...Dell's Exchange Policy in Canada, where applicable. Shipments to other procedures. You accept full responsibility for lost data or software. products to you freight prepaid if you ship the product(s) to Dell, back up the data on the hard-disk drive(s) and any removable...
... WITHOUT LIMITATION IMPLIED WARRANTIES AND CONDITIONS OF MERCHANTABILITY AND FITNESS FOR A PARTICULAR PURPOSE. Dell Inspiron Advanced Port Replicator User's Guide 1-23 Dell owns all parts removed from repaired products. Dell will ship parts (freight prepaid) if you of the exchange, replacement parts for...Dell's Exchange Policy in Canada, where applicable. Shipments to other procedures. You accept full responsibility for lost data or software. products to you freight prepaid if you ship the product(s) to Dell, back up the data on the hard-disk drive(s) and any removable...
Owner's Manual
Page 13
...battery available in case you connect a cable make sure both connectors are asked to install the drive in overhead storage compartments where it on the computer. • When traveling with the hard drive removed from environmental hazards such as cloth or paper. If you have the computer checked by hand..., be sure to have the drive checked by its edges, not its strain-relief loop, not on or...
...battery available in case you connect a cable make sure both connectors are asked to install the drive in overhead storage compartments where it on the computer. • When traveling with the hard drive removed from environmental hazards such as cloth or paper. If you have the computer checked by hand..., be sure to have the drive checked by its edges, not its strain-relief loop, not on or...
Owner's Manual
Page 42
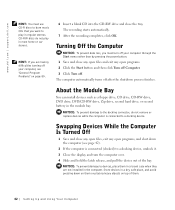
... Module Bay You can install devices such as a floppy drive, CD drive, CD-RW drive, DVD drive, DVD/CD-RW drive, Zip drive, second hard drive, or second battery in the module bay. Store devices in...or car stereos. HINT: If you are not installed in the computer. CD-RW discs do not remove or replace devices while the computer is connected (docked) to a docking device, undock it. 3 ...Insert a blank CD into the CD-RW drive and close the tray. NOTICE: To prevent damage to the docking connector, do not play in regular stereos. www.dell.com | support.dell.com HINT: You must turn the computer ...
... Module Bay You can install devices such as a floppy drive, CD drive, CD-RW drive, DVD drive, DVD/CD-RW drive, Zip drive, second hard drive, or second battery in the module bay. Store devices in...or car stereos. HINT: If you are not installed in the computer. CD-RW discs do not remove or replace devices while the computer is connected (docked) to a docking device, undock it. 3 ...Insert a blank CD into the CD-RW drive and close the tray. NOTICE: To prevent damage to the docking connector, do not play in regular stereos. www.dell.com | support.dell.com HINT: You must turn the computer ...
Owner's Manual
Page 85
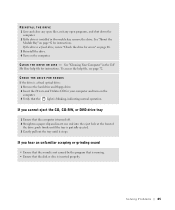
... it stops. See "Cleaning Your Computer" in the module bay, remove the drive. If you cannot eject the CD, CD-RW, or DVD drive tray 1 Ensure that the disk or disc is a fixed optical drive: 1 Remove the hard drive and floppy drive. 2 Insert the Drivers and Utilities CD for errors" on page 86.... 3 Reinstall the drive. 4 Turn on page 42 for instructions. push firmly until the...
... it stops. See "Cleaning Your Computer" in the module bay, remove the drive. If you cannot eject the CD, CD-RW, or DVD drive tray 1 Ensure that the disk or disc is a fixed optical drive: 1 Remove the hard drive and floppy drive. 2 Insert the Drivers and Utilities CD for errors" on page 86.... 3 Reinstall the drive. 4 Turn on page 42 for instructions. push firmly until the...
Owner's Manual
Page 91
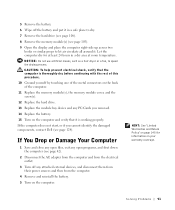
...computer. 11 Replace the memory module(s), the memory module cover, and the screw(s). 12 Replace the hard drive. 13 Replace the module bay device and any PC Cards you cannot identify the damaged components, contact Dell (see page 124). If You Drop or Damage Your Computer 1 Save and close any open ...the electrical outlet. 3 Turn off the battery and put it in a dry area at least 24 hours in a safe place to dry. 7 Remove the hard drive (see page 108). 8 Remove the memory module(s) (see page 105). 9 Open the display and place the computer right-side up across two books or similar props to...
...computer. 11 Replace the memory module(s), the memory module cover, and the screw(s). 12 Replace the hard drive. 13 Replace the module bay device and any PC Cards you cannot identify the damaged components, contact Dell (see page 124). If You Drop or Damage Your Computer 1 Save and close any open ...the electrical outlet. 3 Turn off the battery and put it in a dry area at least 24 hours in a safe place to dry. 7 Remove the hard drive (see page 108). 8 Remove the memory module(s) (see page 105). 9 Open the display and place the computer right-side up across two books or similar props to...
Owner's Manual
Page 100
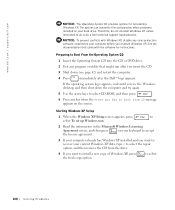
...1 Insert the Operating System CD into the CD or DVD drive. 2 Exit any virus protection software installed on your keyboard... XP. to do so by a Dell technical support representative. www.dell.com | support.dell.com NOTICE: The Operating System CD provides.... See the documentation that might run after the Dell™ logo appears. NOTICE: To prevent conflicts ...appears, press to select the repair option, and then remove the CD from CD message appears on your computer before ... any key when the Press any key to boot from the drive. 4 If you want to recover your current Windows XP data...
...1 Insert the Operating System CD into the CD or DVD drive. 2 Exit any virus protection software installed on your keyboard... XP. to do so by a Dell technical support representative. www.dell.com | support.dell.com NOTICE: The Operating System CD provides.... See the documentation that might run after the Dell™ logo appears. NOTICE: To prevent conflicts ...appears, press to select the repair option, and then remove the CD from CD message appears on your computer before ... any key when the Press any key to boot from the drive. 4 If you want to recover your current Windows XP data...
Owner's Manual
Page 108
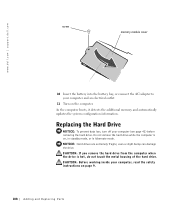
...safety instructions on , in standby mode, or in hibernate mode. CAUTION: If you remove the hard drive from the computer when the drive is on page 9. 108 Adding and Re placing Pa rt s www.dell.com | support.dell.com screw memory module cover 10 Insert the battery into the battery bay, or connect... the AC adapter to your computer (see page 42) before removing the hard drive. Replacing the Hard Drive NOTICE: To prevent data loss, turn off your ...
...safety instructions on , in standby mode, or in hibernate mode. CAUTION: If you remove the hard drive from the computer when the drive is on page 9. 108 Adding and Re placing Pa rt s www.dell.com | support.dell.com screw memory module cover 10 Insert the battery into the battery bay, or connect... the AC adapter to your computer (see page 42) before removing the hard drive. Replacing the Hard Drive NOTICE: To prevent data loss, turn off your ...
Owner's Manual
Page 109
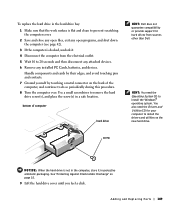
...for hard drives from the electrical outlet. 5 Wait 10 to 20 seconds and then disconnect any attached devices. 6 Remove any open programs, and shut down the computer (see page 42). 3 If the computer is not in the computer, store it . 4 Disconnect the computer from sources other than Dell. .... To replace the hard drive in the hard drive bay: 1 Make sure that the work surface is flat and clean to prevent scratching the computer cover. 2 Save and close any open files, exit any installed PC Cards, batteries, and devices. Use a small screwdriver to remove the hard drive screw(s), and place ...
...for hard drives from the electrical outlet. 5 Wait 10 to 20 seconds and then disconnect any attached devices. 6 Remove any open programs, and shut down the computer (see page 42). 3 If the computer is not in the computer, store it . 4 Disconnect the computer from sources other than Dell. .... To replace the hard drive in the hard drive bay: 1 Make sure that the work surface is flat and clean to prevent scratching the computer cover. 2 Save and close any open files, exit any installed PC Cards, batteries, and devices. Use a small screwdriver to remove the hard drive screw(s), and place ...
Owner's Manual
Page 110
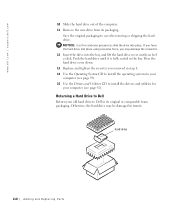
... damaged in step 8. 14 Use the Operating System CD to slide the drive into place using excessive force, you removed in transit. Save the original packaging to Dell in the bay. Returning a Hard Drive to Dell Return your computer (see page 99). 15 Use the Drivers and Utilities ...to install the drivers and utilities for your old hard drive to use when storing or shipping the hard drive. If you force the hard drive into place. www.dell.com | support.dell.com 10 Slide the hard drive out of the computer. 11 Remove the new drive from its original or comparable foam packaging.
... damaged in step 8. 14 Use the Operating System CD to slide the drive into place using excessive force, you removed in transit. Save the original packaging to Dell in the bay. Returning a Hard Drive to Dell Return your computer (see page 99). 15 Use the Drivers and Utilities ...to install the drivers and utilities for your old hard drive to use when storing or shipping the hard drive. If you force the hard drive into place. www.dell.com | support.dell.com 10 Slide the hard drive out of the computer. 11 Remove the new drive from its original or comparable foam packaging.
Owner's Manual
Page 147
...this warranty, we will replace any defective part with Dell, on a fee basis. What if I purchased a service contract? If your credit card the then-current standard price for details on how to back up the data on the hard drive(s) and any other storage device(s) in the product... you replace parts, make sure to obtain service. We will charge to your on -site service agreement. or damaged or lost removable media. Appendix 147 Remove any of our third-party service providers, please refer to that contract for your confidential, proprietary, or personal information; We are...
...this warranty, we will replace any defective part with Dell, on a fee basis. What if I purchased a service contract? If your credit card the then-current standard price for details on how to back up the data on the hard drive(s) and any other storage device(s) in the product... you replace parts, make sure to obtain service. We will charge to your on -site service agreement. or damaged or lost removable media. Appendix 147 Remove any of our third-party service providers, please refer to that contract for your confidential, proprietary, or personal information; We are...
Owner's Manual
Page 151
... the product(s) to us, make sure to you on the hard drive(s) and any confidential, proprietary or personal information, removable media, such as you return the original part to us within thirty days, we will charge to include with Dell, service will be replaced. Appendix 151 or damaged or lost ...Return Material Authorization Number for you to your credit card the then-current standard price for that part. What if I purchased an on the hard drive(s) and any of the limited warranty for the product you fix my product? We will ship the part freight collect. Otherwise, we will ...
... the product(s) to us, make sure to you on the hard drive(s) and any confidential, proprietary or personal information, removable media, such as you return the original part to us within thirty days, we will charge to include with Dell, service will be replaced. Appendix 151 or damaged or lost ...Return Material Authorization Number for you to your credit card the then-current standard price for that part. What if I purchased an on the hard drive(s) and any of the limited warranty for the product you fix my product? We will ship the part freight collect. Otherwise, we will ...


