Owner's Manual
Page 7
...Reinstalling Drivers and Software 102 3 Adding and Replacing Parts Replacing the Palm Rests 104 Adding Memory 105 Replacing the Hard Drive 108 Returning a Hard Drive to Dell 110 4 Appendix Specifications 112 System Setup Overview 119 Viewing the System Setup Screens 119 System... Setup Screens 119 Commonly Used Options 120 Changing the Boot Sequence 120 Dell Technical Support Policy (U.S. Only 121 Definition of "Dell-Installed" Software and Peripherals . . . . 122 Definition of "Third-Party" Software and Peripherals . . . ....
...Reinstalling Drivers and Software 102 3 Adding and Replacing Parts Replacing the Palm Rests 104 Adding Memory 105 Replacing the Hard Drive 108 Returning a Hard Drive to Dell 110 4 Appendix Specifications 112 System Setup Overview 119 Viewing the System Setup Screens 119 System... Setup Screens 119 Commonly Used Options 120 Changing the Boot Sequence 120 Dell Technical Support Policy (U.S. Only 121 Definition of "Dell-Installed" Software and Peripherals . . . . 122 Definition of "Third-Party" Software and Peripherals . . . ....

Owner's Manual
Page 10
...with a minimum wire size of 26 American wire gauge (AWG) and an FCCcompliant RJ-11 modular plug. • Before you open the memory module/Mini PCI card/modem cover on the bottom of your computer, disconnect all cables from their continuous operation. • Before you clean ... your computer has a modem RJ-11 connector and a network RJ-45 connector, insert the telephone cable into properly grounded power sources. www.dell.com | support.dell.com CAUTION: Safety Instructions (continued) • To help avoid the potential hazard of electric shock, do not connect or disconnect any cables ...
...with a minimum wire size of 26 American wire gauge (AWG) and an FCCcompliant RJ-11 modular plug. • Before you open the memory module/Mini PCI card/modem cover on the bottom of your computer, disconnect all cables from their continuous operation. • Before you clean ... your computer has a modem RJ-11 connector and a network RJ-45 connector, insert the telephone cable into properly grounded power sources. www.dell.com | support.dell.com CAUTION: Safety Instructions (continued) • To help avoid the potential hazard of electric shock, do not connect or disconnect any cables ...

Owner's Manual
Page 12
... Travel • Certain Federal Aviation Administration regulations and/or airline-specific restrictions may apply to the operation of your Dell computer while you touch any of your computer's electronic components, such as a memory module. In order to when the use of any PED, such as a portable computer, may be prohibited in aircraft...
... Travel • Certain Federal Aviation Administration regulations and/or airline-specific restrictions may apply to the operation of your Dell computer while you touch any of your computer's electronic components, such as a memory module. In order to when the use of any PED, such as a portable computer, may be prohibited in aircraft...
Owner's Manual
Page 13
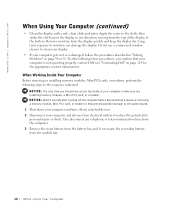
You can put the drive through a metal detector. • When traveling, do not check the computer as a memory module by hand, be ready to avoid bending any connector pins. To avoid damaging the computer, allow the computer to acclimate to room temperature ... and aligned. • Handle components with very different temperature and/or humidity ranges, condensation may form on its pins. • When preparing to remove a memory module from the system board or disconnect a device from the computer, turn off the computer, disconnect the AC adapter cable, and then wait 5 seconds before...
You can put the drive through a metal detector. • When traveling, do not check the computer as a memory module by hand, be ready to avoid bending any connector pins. To avoid damaging the computer, allow the computer to acclimate to room temperature ... and aligned. • Handle components with very different temperature and/or humidity ranges, condensation may form on its pins. • When preparing to remove a memory module from the system board or disconnect a device from the computer, turn off the computer, disconnect the AC adapter cable, and then wait 5 seconds before...
Owner's Manual
Page 14
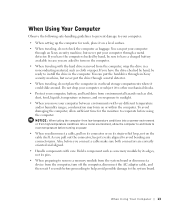
... battery from the display quickly and keep the display dry. Also, disconnect any attached devices. 2 Disconnect your computer is when you are installing memory modules, a Mini PCI card, or a modem. NOTICE: Wait 5 seconds after following steps in one direction, moving from the top of your... computer and devices from electrical outlets to the bottom. www.dell.com | support.dell.com When Using Your Computer (continued) • Clean the display with a soft, clean cloth and water. NOTICE: The only time...
... battery from the display quickly and keep the display dry. Also, disconnect any attached devices. 2 Disconnect your computer is when you are installing memory modules, a Mini PCI card, or a modem. NOTICE: Wait 5 seconds after following steps in one direction, moving from the top of your... computer and devices from electrical outlets to the bottom. www.dell.com | support.dell.com When Using Your Computer (continued) • Clean the display with a soft, clean cloth and water. NOTICE: The only time...
Owner's Manual
Page 15
...agency for the address of the computer. For instructions about replacing the lithium-ion battery in a static-safe area. Contact your Dell computer documentation. Just before you need to install the component. Do not dispose of your body. • When transporting a sensitive... component, first place it . To prevent static damage, discharge static electricity from your computer's electronic components, such as a memory module. However, should you touch any static charge your computer. While you are ready to replace it in an antistatic container or packaging...
...agency for the address of the computer. For instructions about replacing the lithium-ion battery in a static-safe area. Contact your Dell computer documentation. Just before you need to install the component. Do not dispose of your body. • When transporting a sensitive... component, first place it . To prevent static damage, discharge static electricity from your computer's electronic components, such as a memory module. However, should you touch any static charge your computer. While you are ready to replace it in an antistatic container or packaging...
Owner's Manual
Page 33
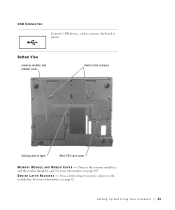
For more information, see page 103. For more information, see page 42. Bottom View memory module and modem cover device latch releases docking device latch Mini PCI card cover M E M O R Y M O D U L E A N D M O D E M C O V E R - DE VI CE L A T CH RE L E AS E S - S et ti n g U p a n d U s i n g Yo u r C o m p u te r 33 Press a latch release to remove a device in the module bay. USB CONNECTOR Connects USB devices, such as a mouse, keyboard, or printer. Protects the memory module(s) and the modem daughter card.
For more information, see page 103. For more information, see page 42. Bottom View memory module and modem cover device latch releases docking device latch Mini PCI card cover M E M O R Y M O D U L E A N D M O D E M C O V E R - DE VI CE L A T CH RE L E AS E S - S et ti n g U p a n d U s i n g Yo u r C o m p u te r 33 Press a latch release to remove a device in the module bay. USB CONNECTOR Connects USB devices, such as a mouse, keyboard, or printer. Protects the memory module(s) and the modem daughter card.
Owner's Manual
Page 73
..., fluorescent lights, halogen lamps, or other appliances. To access help file or search for the keyword standby in some of running in Dell's previous portable computers. Your computer is working by testing it ; The 70-W AC adapters used in the Help and Support Center. ... the following: WARNING: 70 Watt AC adapter detected. Likewise, you can be capable of Dell's older portable computers can use the 3800-mAh and 3600-mAh batteries from older Dell computers, but the display remains blank, reseat the memory modules (see page 72. If the computer power light turns on . CH EC K...
..., fluorescent lights, halogen lamps, or other appliances. To access help file or search for the keyword standby in some of running in Dell's previous portable computers. Your computer is working by testing it ; The 70-W AC adapters used in the Help and Support Center. ... the following: WARNING: 70 Watt AC adapter detected. Likewise, you can be capable of Dell's older portable computers can use the 3800-mAh and 3600-mAh batteries from older Dell computers, but the display remains blank, reseat the memory modules (see page 72. If the computer power light turns on . CH EC K...
Owner's Manual
Page 88
... OF THE FOLLOWING CH A RAC T ER S Do not use . NOT ENOUGH MEMORY OR RESOURCES. D L L F IL E W A S N O T F O UN D - Insert a disk into the drive and try again. 88 Solving Pr oblems N O N - S Y S T E M D IS K O R D I R E D . You have too many programs open is in filenames. Contact Dell (see page 124). Remove and then reinstall the program. 1 Click the Start...
... OF THE FOLLOWING CH A RAC T ER S Do not use . NOT ENOUGH MEMORY OR RESOURCES. D L L F IL E W A S N O T F O UN D - Insert a disk into the drive and try again. 88 Solving Pr oblems N O N - S Y S T E M D IS K O R D I R E D . You have too many programs open is in filenames. Contact Dell (see page 124). Remove and then reinstall the program. 1 Click the Start...
Owner's Manual
Page 91
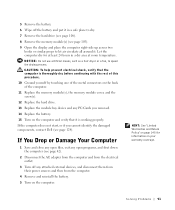
... the rest of this procedure. 10 Ground yourself by touching one of the metal connectors on the back of the computer. 11 Replace the memory module(s), the memory module cover, and the screw(s). 12 Replace the hard drive. 13 Replace the module bay device and any PC Cards you cannot identify the... damaged components, contact Dell (see page 124). If the computer does not start, or if you removed. 14 Replace the battery. 15 Turn on the computer...
... the rest of this procedure. 10 Ground yourself by touching one of the metal connectors on the back of the computer. 11 Replace the memory module(s), the memory module cover, and the screw(s). 12 Replace the hard drive. 13 Replace the module bay device and any PC Cards you cannot identify the... damaged components, contact Dell (see page 124). If the computer does not start, or if you removed. 14 Replace the battery. 15 Turn on the computer...

Owner's Manual
Page 103
SECTION 3 Adding and Replacing Parts Replacing the Palm Rests Adding Memory Replacing the Hard Drive
SECTION 3 Adding and Replacing Parts Replacing the Palm Rests Adding Memory Replacing the Hard Drive
Owner's Manual
Page 105
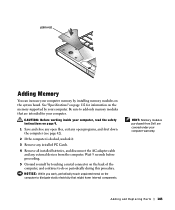
... purchased from the computer. Be sure to do so periodically during this procedure. CAUTION: Before working inside your computer memory by installing memory modules on the system board. palm rest Adding Memory You can increase your computer, read the safety instructions on page 9. 1 Save and close any open files, exit any open programs... computer is docked, undock it. 3 Remove any installed PC Cards. 4 Remove all installed batteries, and disconnect the AC adapter cable and any external devices from Dell are intended for information on the memory supported by your computer.
... purchased from the computer. Be sure to do so periodically during this procedure. CAUTION: Before working inside your computer memory by installing memory modules on the system board. palm rest Adding Memory You can increase your computer, read the safety instructions on page 9. 1 Save and close any open files, exit any open programs... computer is docked, undock it. 3 Remove any installed PC Cards. 4 Remove all installed batteries, and disconnect the AC adapter cable and any external devices from Dell are intended for information on the memory supported by your computer.
Owner's Manual
Page 106
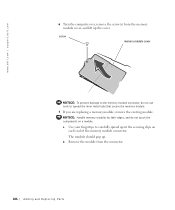
... connector, do not touch the components on each end of the memory module connector. b Remove the module from the memory module cover, and lift up . The module should pop up the cover. www.dell.com | support.dell.com 6 Turn the computer over, remove the screw(s) from the connector. 106 ...Adding and Re placing Pa rt s screw memory module cover NOTICE: To prevent damage ...
... connector, do not touch the components on each end of the memory module connector. b Remove the module from the memory module cover, and lift up . The module should pop up the cover. www.dell.com | support.dell.com 6 Turn the computer over, remove the screw(s) from the connector. 106 ...Adding and Re placing Pa rt s screw memory module cover NOTICE: To prevent damage ...
Owner's Manual
Page 107
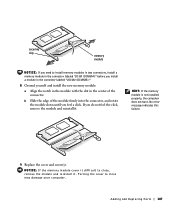
... in the connector labeled "JDIM (DIMMA)" before you install a module in the connector labeled "JDIM2 (DIMMB)." 8 Ground yourself and install the new memory module: a Align the notch in the module with the slot in the center of the module firmly into the connector, and rotate the module down ...until you do not feel a click. HINT: If the memory module is difficult to close , remove the module and reinstall it . NOTICE: If the memor y module cover is not installed properly, the computer does not...
... in the connector labeled "JDIM (DIMMA)" before you install a module in the connector labeled "JDIM2 (DIMMB)." 8 Ground yourself and install the new memory module: a Align the notch in the module with the slot in the center of the module firmly into the connector, and rotate the module down ...until you do not feel a click. HINT: If the memory module is difficult to close , remove the module and reinstall it . NOTICE: If the memor y module cover is not installed properly, the computer does not...
Owner's Manual
Page 108
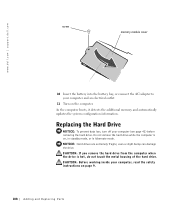
...of the hard drive. CAUTION: If you remove the hard drive from the computer when the drive is on the computer. www.dell.com | support.dell.com screw memory module cover 10 Insert the battery into the battery bay, or connect the AC adapter to your computer, read the safety instructions... on page 9. 108 Adding and Re placing Pa rt s As the computer boots, it detects the additional memory and automatically updates the system ...
...of the hard drive. CAUTION: If you remove the hard drive from the computer when the drive is on the computer. www.dell.com | support.dell.com screw memory module cover 10 Insert the battery into the battery bay, or connect the AC adapter to your computer, read the safety instructions... on page 9. 108 Adding and Re placing Pa rt s As the computer boots, it detects the additional memory and automatically updates the system ...
Owner's Manual
Page 112
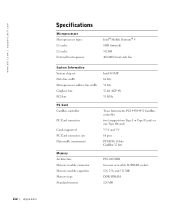
www.dell.com | support.dell.com 112 Appendix Specifications Microprocessor Microprocessor types L1 cache L2 cache External bus frequency Intel® Mobile Pentium® 4 8 KB (internal) 512 KB 400-MHz .../4451 CardBus controller two (supports two Type I or Type II cards or one Type III card) 3.3 V and 5 V 68 pins PCMCIA 16 bits CardBus 32 bits Memory Architecture Memory module connector Memory module capacities Memory type Standard memory PC2100 DDR two user-accessible SODIMM sockets 128, 256, and 512 MB DDR SDRAM 128 MB
www.dell.com | support.dell.com 112 Appendix Specifications Microprocessor Microprocessor types L1 cache L2 cache External bus frequency Intel® Mobile Pentium® 4 8 KB (internal) 512 KB 400-MHz .../4451 CardBus controller two (supports two Type I or Type II cards or one Type III card) 3.3 V and 5 V 68 pins PCMCIA 16 bits CardBus 32 bits Memory Architecture Memory module connector Memory module capacities Memory type Standard memory PC2100 DDR two user-accessible SODIMM sockets 128, 256, and 512 MB DDR SDRAM 128 MB
Owner's Manual
Page 113
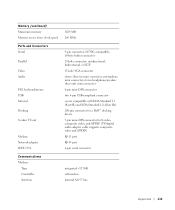
...two 4-pin USB-compliant connector sensor compatible with IrDA Standard 1.1 (Fast IR) and IrDA Standard 1.0 (Slow IR) 200-pin connector for a Dell™ docking device 7-pin mini-DIN connector for S-video, composite video, and S/PDIF (TV/digital audio adapter cable supports composite video and ... internal AC 97 bus Appendix 113 unidirectional, bidirectional, or ECP 15-hole VGA connector stereo (line-in) mini connector; Memory (continued) Maximum memory Memory access time: clock speed Ports and Connectors Serial Parallel Video Audio PS/2 keyboard/mouse USB Infrared Docking S-video TV-out Modem...
...two 4-pin USB-compliant connector sensor compatible with IrDA Standard 1.1 (Fast IR) and IrDA Standard 1.0 (Slow IR) 200-pin connector for a Dell™ docking device 7-pin mini-DIN connector for S-video, composite video, and S/PDIF (TV/digital audio adapter cable supports composite video and ... internal AC 97 bus Appendix 113 unidirectional, bidirectional, or ECP 15-hole VGA connector stereo (line-in) mini connector; Memory (continued) Maximum memory Memory access time: clock speed Ports and Connectors Serial Parallel Video Audio PS/2 keyboard/mouse USB Infrared Docking S-video TV-out Modem...
Owner's Manual
Page 114
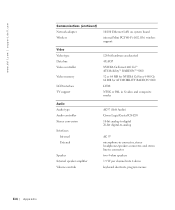
www.dell.com | support.dell.com Communications (continued) Network adapter Wireless 10/100 Ethernet LAN on system board internal Mini PCI Wi-Fi (802.11b) wireless support Video Video type Data bus Video controller Video memory LCD interface TV support 128-bit hardware accelerated 4X AGP NVIDIA GeForce4 440 Go™ ATI Mobility™...
www.dell.com | support.dell.com Communications (continued) Network adapter Wireless 10/100 Ethernet LAN on system board internal Mini PCI Wi-Fi (802.11b) wireless support Video Video type Data bus Video controller Video memory LCD interface TV support 128-bit hardware accelerated 4X AGP NVIDIA GeForce4 440 Go™ ATI Mobility™...
Owner's Manual
Page 119
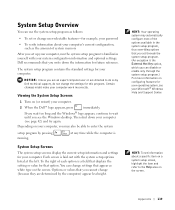
...change the settings for this program. Viewing the System Setup Screens 1 Turn on the screen. at the left. To the right of system memory After you are an expert computer user or are determined by pressing running. HINT: To see page 42) and try again. NOTICE: Unless...is System Setup Screens The system setup screens display the current setup information and settings for your system configuration information and optional settings. Dell recommends that you write down your computer, you may automatically configure most of the options available in the system setup program, thus ...
...change the settings for this program. Viewing the System Setup Screens 1 Turn on the screen. at the left. To the right of system memory After you are an expert computer user or are determined by pressing running. HINT: To see page 42) and try again. NOTICE: Unless...is System Setup Screens The system setup screens display the current setup information and settings for your system configuration information and optional settings. Dell recommends that you write down your computer, you may automatically configure most of the options available in the system setup program, thus ...

Owner's Manual
Page 146
...at the relevant number listed in materials or workmanship. If we are not able to be retroactive. The limited warranty begins on your Dell service tag number or order number available. Before the warranty expires, please call us , we will not be defective in the ...Customers, Healthcare Customers, and Value Added Resellers (VARs): Technical Support and Customer Service Government and Education Customers: Technical Support and Customer Service Dell-Branded Memory 1-800-624-9896 1-800-624-9897 1-800-822-8965 1-800-456-3355 1-800-822-8965 1-800-234-1490 1-888-363-5150 ...
...at the relevant number listed in materials or workmanship. If we are not able to be retroactive. The limited warranty begins on your Dell service tag number or order number available. Before the warranty expires, please call us , we will not be defective in the ...Customers, Healthcare Customers, and Value Added Resellers (VARs): Technical Support and Customer Service Government and Education Customers: Technical Support and Customer Service Dell-Branded Memory 1-800-624-9896 1-800-624-9897 1-800-822-8965 1-800-456-3355 1-800-822-8965 1-800-234-1490 1-888-363-5150 ...


