Advanced Port Replicator User's Guide
Page 24
... years beginning on the hard-disk drive(s) and any removable media, such as diskettes, CDs, or PC Cards. You must call Dell's Customer Technical Support within the warranty period. Dell uses new and reconditioned parts made freight collect. Dell will be made by use an address in performing warranty repairs and building 1-20 Dell Inspiron Advanced Port Replicator...
... years beginning on the hard-disk drive(s) and any removable media, such as diskettes, CDs, or PC Cards. You must call Dell's Customer Technical Support within the warranty period. Dell uses new and reconditioned parts made freight collect. Dell will be made by use an address in performing warranty repairs and building 1-20 Dell Inspiron Advanced Port Replicator...
Advanced Port Replicator User's Guide
Page 27
...and subject to Dell's Exchange Policy in performing warranty repairs and building replacement products. Dell is the remainder of hardware failure to Dell's Customer Technical Support in Canada, where applicable. Dell Inspiron Advanced Port Replicator User's Guide 1-23 If Dell repairs or replaces...Dell, will include a prepaid shipping container with Dell's Exchange Policy in returning the replaced part to Dell. Dell uses new and reconditioned parts made by various manufacturers in effect on the hard-disk drive(s) and any removable media, such as diskettes, CDs, or PC Cards. Dell...
...and subject to Dell's Exchange Policy in performing warranty repairs and building replacement products. Dell is the remainder of hardware failure to Dell's Customer Technical Support in Canada, where applicable. Dell Inspiron Advanced Port Replicator User's Guide 1-23 If Dell repairs or replaces...Dell, will include a prepaid shipping container with Dell's Exchange Policy in returning the replaced part to Dell. Dell uses new and reconditioned parts made by various manufacturers in effect on the hard-disk drive(s) and any removable media, such as diskettes, CDs, or PC Cards. Dell...

Solutions Guide
Page 9
... cloth or paper. As you pull out the connector, keep it to other mechanical shocks. • Protect your computer, battery, and hard drive from high-temperature conditions into a warmer environment or from environmental hazards such as a memory module by hand, be ready to the system...sure both connectors are correctly oriented and aligned. • Handle components with care. • When traveling with the hard drive removed from its power source, and remove the battery. • Clean your computer with a soft cloth dampened with water rather than with liquid or aerosol cleaners.
... cloth or paper. As you pull out the connector, keep it to other mechanical shocks. • Protect your computer, battery, and hard drive from high-temperature conditions into a warmer environment or from environmental hazards such as a memory module by hand, be ready to the system...sure both connectors are correctly oriented and aligned. • Handle components with care. • When traveling with the hard drive removed from its power source, and remove the battery. • Clean your computer with a soft cloth dampened with water rather than with liquid or aerosol cleaners.

Solutions Guide
Page 17
The media bay also supports the following devices: • CD drive • CD-RW drive • DVD drive • Zip drive • Second hard drive • Second battery • Dell TravelLite™ module NOTICE: To prevent irreparable damage to the docking connector, do not remove or replace devices while the computer is connected to an advanced port replicator (APR). Using the Media Bay Dell ships your computer with a floppy drive installed in the media bay. Sett ing Up 17
The media bay also supports the following devices: • CD drive • CD-RW drive • DVD drive • Zip drive • Second hard drive • Second battery • Dell TravelLite™ module NOTICE: To prevent irreparable damage to the docking connector, do not remove or replace devices while the computer is connected to an advanced port replicator (APR). Using the Media Bay Dell ships your computer with a floppy drive installed in the media bay. Sett ing Up 17
Solutions Guide
Page 40
... or a fan, to speed up across two books or similar props to let air circulate all around it is safe to dry. 5 Remove the battery. 6 Wipe off AC power at room temperature. www.dell.com | support.dell.com E-Mail Problems E N S U R E T H A T Y O U A R E C O N N E C T E D T O T H E IN T E R N E T - If Work Offline has a check...only after you are certain that you turn off the battery and put them in a safe place to dry. 7 Remove the hard drive (see page 57). 8 Remove the memory modules (see page 17) and any attached external devices, and disconnect them from their power sources and then...
... or a fan, to speed up across two books or similar props to let air circulate all around it is safe to dry. 5 Remove the battery. 6 Wipe off AC power at room temperature. www.dell.com | support.dell.com E-Mail Problems E N S U R E T H A T Y O U A R E C O N N E C T E D T O T H E IN T E R N E T - If Work Offline has a check...only after you are certain that you turn off the battery and put them in a safe place to dry. 7 Remove the hard drive (see page 57). 8 Remove the memory modules (see page 17) and any attached external devices, and disconnect them from their power sources and then...

Solutions Guide
Page 41
... components, call Dell for technical assistance (see page 69). S olving Pr oblems 41 10 Ground yourself by touching one of the metal connectors on the back of the computer. 11 Replace the memory modules, the memory module cover, and the screw (see page 55). 12 Replace the hard drive (see page ...57). 13 Replace the media bay device (see page 17) and any attached external devices, and disconnect them from their power sources and then from the computer. 4 Remove and reinstall the battery. 5 Turn on the computer and verify...
... components, call Dell for technical assistance (see page 69). S olving Pr oblems 41 10 Ground yourself by touching one of the metal connectors on the back of the computer. 11 Replace the memory modules, the memory module cover, and the screw (see page 55). 12 Replace the hard drive (see page ...57). 13 Replace the media bay device (see page 17) and any attached external devices, and disconnect them from their power sources and then from the computer. 4 Remove and reinstall the battery. 5 Turn on the computer and verify...

Solutions Guide
Page 57
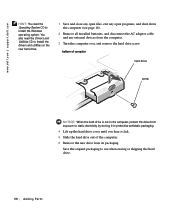
... hibernate mode, or if the power light is hot, do not touch the metal housing of the hard drive. NOTICE: If you need to your computer (see page 16) before you remove the hard drive from sources other than Dell. screw memory module cover 9 Insert the battery into the battery bay, or connect the AC adapter...
... hibernate mode, or if the power light is hot, do not touch the metal housing of the hard drive. NOTICE: If you need to your computer (see page 16) before you remove the hard drive from sources other than Dell. screw memory module cover 9 Insert the battery into the battery bay, or connect the AC adapter...
Solutions Guide
Page 58
....dell.com | support.dell.com HINT: You need the Drivers and Utilities CD to use when storing or shipping the hard drive. 58 Adding Parts bottom of computer hard drive screw NOTICE: When the hard drive is not in protective antistatic packaging. 4 Lift up the hard drive cover until you hear a click. 5 Slide the hard drive out of the computer. 6 Remove the new drive...
....dell.com | support.dell.com HINT: You need the Drivers and Utilities CD to use when storing or shipping the hard drive. 58 Adding Parts bottom of computer hard drive screw NOTICE: When the hard drive is not in protective antistatic packaging. 4 Lift up the hard drive cover until you hear a click. 5 Slide the hard drive out of the computer. 6 Remove the new drive...
Solutions Guide
Page 59
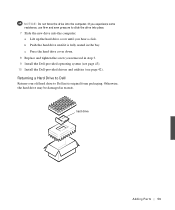
... the new drive into the computer. Otherwise, the hard drive may be damaged in its original foam packaging. If you experience some resistance, use firm and even pressure to Dell in transit. c Press the hard drive cover down. 8 Replace and tighten the screw you hear a click. hard drive Addi ng Part s 59 b Push the hard drive until you removed in the...
... the new drive into the computer. Otherwise, the hard drive may be damaged in its original foam packaging. If you experience some resistance, use firm and even pressure to Dell in transit. c Press the hard drive cover down. 8 Replace and tighten the screw you hear a click. hard drive Addi ng Part s 59 b Push the hard drive until you removed in the...


