Solutions Guide
Page 3
Contents Safety Instructions 7 When Using Your Computer 7 When Removing or Installing Memory Modules 10 Protecting Against Electrostatic Discharge 11 1 Setting Up Connecting a Printer 14 Installing the Printer Driver 14 Parallel Printer 14 USB Printer 15 Turning Off ...
Contents Safety Instructions 7 When Using Your Computer 7 When Removing or Installing Memory Modules 10 Protecting Against Electrostatic Discharge 11 1 Setting Up Connecting a Printer 14 Installing the Printer Driver 14 Parallel Printer 14 USB Printer 15 Turning Off ...
Solutions Guide
Page 5
... External Devices to the APR 49 APR Controls and Indicators 51 Docking the Computer 52 Undocking the Computer 53 Monitor Stand 54 Adding Memory 55 Replacing a Hard Drive 57 Returning a Hard Drive to Dell 59 4 Appendix Specifications 62 Standard Settings 68 System Setup Pages 68 Viewing the System Setup Pages 69 Contents 5
... External Devices to the APR 49 APR Controls and Indicators 51 Docking the Computer 52 Undocking the Computer 53 Monitor Stand 54 Adding Memory 55 Replacing a Hard Drive 57 Returning a Hard Drive to Dell 59 4 Appendix Specifications 62 Standard Settings 68 System Setup Pages 68 Viewing the System Setup Pages 69 Contents 5

Solutions Guide
Page 9
... hazards such as dirt, dust, food, liquids, temperature extremes, and overexposure to install the drive in a nonconducting material, such as a memory module by hand, be ready to sunlight. • When you clean your computer, turn it off the computer before removing the... environments with liquid or aerosol cleaners. As you disconnect a cable, pull on its connector or on its pins. • When removing a memory module from the system board or disconnecting an external device from high-temperature conditions into a cooler environment, allow sufficient time for the moisture to avoid...
... hazards such as dirt, dust, food, liquids, temperature extremes, and overexposure to install the drive in a nonconducting material, such as a memory module by hand, be ready to sunlight. • When you clean your computer, turn it off the computer before removing the... environments with liquid or aerosol cleaners. As you disconnect a cable, pull on its connector or on its pins. • When removing a memory module from the system board or disconnecting an external device from high-temperature conditions into a cooler environment, allow sufficient time for the moisture to avoid...

Solutions Guide
Page 10
... components. If the display contains grease or some other contaminant, use isopropyl alcohol instead of your computer is not operating properly, contact Dell (see page 69). If you pull connectors apart, keep them evenly aligned to avoid bending any pins. While you connect a cable...moving from the top of the computer before disconnecting an external device or removing a memory module to help prevent possible damage to reduce the potential for instructions. When Removing or Installing Memory Modules Before you disconnect a cable, pull on its connector, not on the computer ...
... components. If the display contains grease or some other contaminant, use isopropyl alcohol instead of your computer is not operating properly, contact Dell (see page 69). If you pull connectors apart, keep them evenly aligned to avoid bending any pins. While you connect a cable...moving from the top of the computer before disconnecting an external device or removing a memory module to help prevent possible damage to reduce the potential for instructions. When Removing or Installing Memory Modules Before you disconnect a cable, pull on its connector, not on the computer ...

Solutions Guide
Page 11
• Handle memory modules with the same or equivalent type recommended by the manufacturer. CAUTION: There is a danger of the computer. Discard used batteries according to install them ...
• Handle memory modules with the same or equivalent type recommended by the manufacturer. CAUTION: There is a danger of the computer. Discard used batteries according to install them ...
Solutions Guide
Page 27
... A B L E ME DI A - A D J U S T T HE PO W E R P R O P E R T IE S - To access help file or search for technical assistance (see page 26. RE S E A T T H E M E M O R Y MO D U L E S - Call Dell for the keyword standby in the floppy drive. The operating system is in Windows Help. Remove the floppy disk and restart the computer. Insert a bootable...cables, too many devices on the same circuit or operating near the computer can cause interference. A floppy disk is trying to boot to reseat the memory modules (see page 55). Start-Up Error Messages O P E R A T IN G S Y S T E M N O T F ...
... A B L E ME DI A - A D J U S T T HE PO W E R P R O P E R T IE S - To access help file or search for technical assistance (see page 26. RE S E A T T H E M E M O R Y MO D U L E S - Call Dell for the keyword standby in the floppy drive. The operating system is in Windows Help. Remove the floppy disk and restart the computer. Insert a bootable...cables, too many devices on the same circuit or operating near the computer can cause interference. A floppy disk is trying to boot to reseat the memory modules (see page 55). Start-Up Error Messages O P E R A T IN G S Y S T E M N O T F ...

Solutions Guide
Page 37
... that you are correct and that the network cable connector is functioning. Insert a disk into the drive and try replacing the network cable. C H E C K T H E N E T W O R K L I G H T S O N T H E N E T W O R K C O N N E C T O R - NOT ENOUGH MEMORY OR RESOURCES. S olving Pr oblems 37 Verify that your network settings are trying to copy is too large to a different disk or use these characters...
... that you are correct and that the network cable connector is functioning. Insert a disk into the drive and try replacing the network cable. C H E C K T H E N E T W O R K L I G H T S O N T H E N E T W O R K C O N N E C T O R - NOT ENOUGH MEMORY OR RESOURCES. S olving Pr oblems 37 Verify that your network settings are trying to copy is too large to a different disk or use these characters...
Solutions Guide
Page 40
... the electrical outlet. 2 Turn off any installed PC Cards, and put it is connected to an electrical outlet, Dell recommends that the computer is thoroughly dry before attempting to the Internet. www.dell.com | support.dell.com E-Mail Problems E N S U R E T H A T Y O U A R E C O N N E C T E D T O T H E IN T E R N E T - Let the ...the drying process. If the computer is safe to dry. 7 Remove the hard drive (see page 57). 8 Remove the memory modules (see page 17) and any attached external devices, and disconnect them from their power sources and then from the electrical ...
... the electrical outlet. 2 Turn off any installed PC Cards, and put it is connected to an electrical outlet, Dell recommends that the computer is thoroughly dry before attempting to the Internet. www.dell.com | support.dell.com E-Mail Problems E N S U R E T H A T Y O U A R E C O N N E C T E D T O T H E IN T E R N E T - Let the ...the drying process. If the computer is safe to dry. 7 Remove the hard drive (see page 57). 8 Remove the memory modules (see page 17) and any attached external devices, and disconnect them from their power sources and then from the electrical ...

Solutions Guide
Page 41
.... 4 Remove and reinstall the battery. 5 Turn on the computer. If the computer does not turn on, or if you cannot identify the damaged components, call Dell for technical assistance (see page 69). If the computer does not start, or if you cannot identify the damaged components, call... Dell for technical assistance (see page 69). S olving Pr oblems 41 10 Ground yourself by touching one of the metal connectors on the back of the computer. 11 Replace the memory modules, the memory module cover, and the screw (see page 55). 12...
.... 4 Remove and reinstall the battery. 5 Turn on the computer. If the computer does not turn on, or if you cannot identify the damaged components, call Dell for technical assistance (see page 69). If the computer does not start, or if you cannot identify the damaged components, call... Dell for technical assistance (see page 69). S olving Pr oblems 41 10 Ground yourself by touching one of the metal connectors on the back of the computer. 11 Replace the memory modules, the memory module cover, and the screw (see page 55). 12...

Solutions Guide
Page 47
SECTION 3 Adding Parts Replacing the Palm Rests Using the Advanced Port Replicator Adding Memory Replacing a Hard Drive www.dell.com | support.dell.com
SECTION 3 Adding Parts Replacing the Palm Rests Using the Advanced Port Replicator Adding Memory Replacing a Hard Drive www.dell.com | support.dell.com

Solutions Guide
Page 55
... this guide (see page 16). 2 Remove all installed batteries and disconnect external devices. 3 Disconnect the AC adapter cable from Dell are covered under your computer. Your computer has two memory module connectors. All Dell memory modules designed for information on the system board. Addi ng Part s 55 CAUTION: Before working inside your computer, read...
... this guide (see page 16). 2 Remove all installed batteries and disconnect external devices. 3 Disconnect the AC adapter cable from Dell are covered under your computer. Your computer has two memory module connectors. All Dell memory modules designed for information on the system board. Addi ng Part s 55 CAUTION: Before working inside your computer, read...

Solutions Guide
Page 56
www.dell.com | support.dell.com NOTICE: To prevent damage to the computer, do not use tools to spread the inner metal tabs of the connector when you are installing or removing a memory module. 6 If you are replacing a memory module, you must remove the existing module: a Use your fingernails to... hear a click. 56 Adding Parts No error message indicates this failure. b Lift the memory module away from the connector. b Slide the edge of the memory module connector. securing clip memory module 7 Install the memory module: a Align the notch in the module with the slot in the center of the...
www.dell.com | support.dell.com NOTICE: To prevent damage to the computer, do not use tools to spread the inner metal tabs of the connector when you are installing or removing a memory module. 6 If you are replacing a memory module, you must remove the existing module: a Use your fingernails to... hear a click. 56 Adding Parts No error message indicates this failure. b Lift the memory module away from the connector. b Slide the edge of the memory module connector. securing clip memory module 7 Install the memory module: a Align the notch in the module with the slot in the center of the...

Solutions Guide
Page 57
... will detect the additional memory and automatically update the system configuration information. CAUTION: If you remove the hard drive from sources other than Dell. Addi ng Part s 57 NOTICE: To prevent data loss, turn off your computer and an electrical outlet. 10 Turn on the computer. HINT: Dell does not guarantee compatibility or...
... will detect the additional memory and automatically update the system configuration information. CAUTION: If you remove the hard drive from sources other than Dell. Addi ng Part s 57 NOTICE: To prevent data loss, turn off your computer and an electrical outlet. 10 Turn on the computer. HINT: Dell does not guarantee compatibility or...
Solutions Guide
Page 63
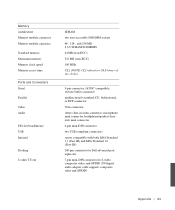
... S-video, composite video, and S/PDIF (TV/digital audio adapter cable supports composite video and S/PDIF) DELL CONFIDENTIAL - FILE LOCATION: S:\SYSTEMS\Pong\solutions\Lavaca A01\English\7328Vc41.fm Memory Architecture Memory module connector Memory module capacities Standard memory Maximum memory Memory clock speed Memory access time Ports and Connectors Serial Parallel Video Audio PS/2 keyboard/mouse USB Infrared Docking...
... S-video, composite video, and S/PDIF (TV/digital audio adapter cable supports composite video and S/PDIF) DELL CONFIDENTIAL - FILE LOCATION: S:\SYSTEMS\Pong\solutions\Lavaca A01\English\7328Vc41.fm Memory Architecture Memory module connector Memory module capacities Standard memory Maximum memory Memory clock speed Memory access time Ports and Connectors Serial Parallel Video Audio PS/2 keyboard/mouse USB Infrared Docking...
Solutions Guide
Page 64
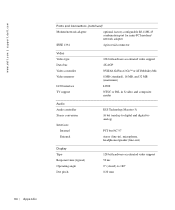
www.dell.com | support.dell.com FILE LOCATION: S:\SYSTEMS\Pong\solutions\Lavaca A01\English\7328Vc41.fm Ports and Connectors (continued) Modem/network adapter optional factory-configurable RJ-11/RJ-45 combination port for mini-PCI modem/ network adapter IEEE 1394 4-pin serial connector Video Video type Data bus Video controller Video memory LCD interface...-out) Display Type Response time (typical) Operating angle Dot pitch 128-bit hardware-accelerated video support 50 ms 0° (closed) to 180° 0.20 mm DELL CONFIDENTIAL - PRELIMINARY 4/16/01 64 Appendix
www.dell.com | support.dell.com FILE LOCATION: S:\SYSTEMS\Pong\solutions\Lavaca A01\English\7328Vc41.fm Ports and Connectors (continued) Modem/network adapter optional factory-configurable RJ-11/RJ-45 combination port for mini-PCI modem/ network adapter IEEE 1394 4-pin serial connector Video Video type Data bus Video controller Video memory LCD interface...-out) Display Type Response time (typical) Operating angle Dot pitch 128-bit hardware-accelerated video support 50 ms 0° (closed) to 180° 0.20 mm DELL CONFIDENTIAL - PRELIMINARY 4/16/01 64 Appendix

Solutions Guide
Page 83
...for credit. 4 Pack the equipment to be refused at http://www.dell.com. • Protecting against electrostatic discharge: static electricity can harm electronic components inside your computer's electronic components, such as a memory module. Regulatory Information General EMC Guidelines • Shielded signal cables: ...are not accepted. FILE LOCATION: S:\SYSTEMS\Pong\solutions\Lavaca A01\English\7328Vc41.fm Returning Items for Warranty Repair or Credit 1 Call Dell to obtain an authorization number, and write it clearly and prominently on the outside of the box. 2 Include a copy of ...
...for credit. 4 Pack the equipment to be refused at http://www.dell.com. • Protecting against electrostatic discharge: static electricity can harm electronic components inside your computer's electronic components, such as a memory module. Regulatory Information General EMC Guidelines • Shielded signal cables: ...are not accepted. FILE LOCATION: S:\SYSTEMS\Pong\solutions\Lavaca A01\English\7328Vc41.fm Returning Items for Warranty Repair or Credit 1 Call Dell to obtain an authorization number, and write it clearly and prominently on the outside of the box. 2 Include a copy of ...
Solutions Guide
Page 92
See memory regulatory notices, 84 reinstalling drivers and utilities, 42 returns, 89 S safety instructions, 7 ScanDisk, 36 settings system setup program, 68 shutdown, 16 software fixing problems, 38 ... (continued) setting up, 14 troubleshooting, 30 programs crashes, 38 fixing problems, 38 not responding, 38 R RAM. M media bay devices, 17 swapping devices (active mode), 19 memory adding, 55 removing, 56 messages start-up, 27 Windows, 37 modem fixing problems, 31 modular bay swapping devices (computer off), 18 N network fixing problems, 37...
See memory regulatory notices, 84 reinstalling drivers and utilities, 42 returns, 89 S safety instructions, 7 ScanDisk, 36 settings system setup program, 68 shutdown, 16 software fixing problems, 38 ... (continued) setting up, 14 troubleshooting, 30 programs crashes, 38 fixing problems, 38 not responding, 38 R RAM. M media bay devices, 17 swapping devices (active mode), 19 memory adding, 55 removing, 56 messages start-up, 27 Windows, 37 modem fixing problems, 31 modular bay swapping devices (computer off), 18 N network fixing problems, 37...


