Owner's Manual
Page 5
Replacing the Battery 41 Storing a Battery 42 6 Using CDs, DVDs, and Other Multimedia 43 Playing CDs or DVDs 43 Adjusting the Volume 45 Adjusting the Picture 45 Microsoft® Windows® XP 45 Using Dell Media Experience™ and Dell MediaDirect 46 If the computer is on or ... If the computer is off or in hibernate mode 46 Dell MediaDirect and Dell Media Experience Help 47 Using the Dell MediaDirect™ Repair Utility CD or the Dell MediaDirect Reinstallation CD 47 Repairing Dell MediaDirect 48 Reinstalling Dell MediaDirect 48 Connecting Your Computer to a TV or Audio ...
Replacing the Battery 41 Storing a Battery 42 6 Using CDs, DVDs, and Other Multimedia 43 Playing CDs or DVDs 43 Adjusting the Volume 45 Adjusting the Picture 45 Microsoft® Windows® XP 45 Using Dell Media Experience™ and Dell MediaDirect 46 If the computer is on or ... If the computer is off or in hibernate mode 46 Dell MediaDirect and Dell Media Experience Help 47 Using the Dell MediaDirect™ Repair Utility CD or the Dell MediaDirect Reinstallation CD 47 Repairing Dell MediaDirect 48 Reinstalling Dell MediaDirect 48 Connecting Your Computer to a TV or Audio ...
Owner's Manual
Page 9
... Hinge Cover 125 Removing the Hinge Cover 125 Replacing the Hinge Cover 127 Keyboard 127 Removing the Keyboard 127 Replacing the Keyboard 128 Internal Card With Bluetooth® Wireless Technology 128 Coin-Cell Battery 130 Removing the Coin-Cell Battery 130 Replacing the Coin-Cell Battery 130 12 Dell™ QuickSet Features 131 13 Traveling With Your...
... Hinge Cover 125 Removing the Hinge Cover 125 Replacing the Hinge Cover 127 Keyboard 127 Removing the Keyboard 127 Replacing the Keyboard 128 Internal Card With Bluetooth® Wireless Technology 128 Coin-Cell Battery 130 Removing the Coin-Cell Battery 130 Replacing the Coin-Cell Battery 130 12 Dell™ QuickSet Features 131 13 Traveling With Your...

Owner's Manual
Page 23
... pull firmly but gently to an electrical outlet. For more information, see page 115. Releases the battery from overheating. See "Replacing the Battery" on page 37. A Tour of Your Computer 23 For more information, see "Using a Battery" on page 41. Using an incompatible cable or improperly connecting the cable to create airflow through the...
... pull firmly but gently to an electrical outlet. For more information, see page 115. Releases the battery from overheating. See "Replacing the Battery" on page 37. A Tour of Your Computer 23 For more information, see "Using a Battery" on page 41. Using an incompatible cable or improperly connecting the cable to create airflow through the...
Owner's Manual
Page 37
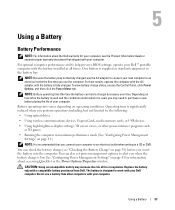
...outlet when writing to alert you connect your computer. You can hold a charge) decreases over time. Replace the battery only with a compatible battery purchased from other power-intensive programs such as standard equipment in maximum performance mode (See "Configuring Power ...For best results, operate the computer with the battery installed at all times. CAUTION: Using an incompatible battery may not be fully charged, use a battery from Dell. Using a Battery Battery Performance NOTE: For information about the Dell warranty for information about accessing QuickSet or the...
...outlet when writing to alert you connect your computer. You can hold a charge) decreases over time. Replace the battery only with a compatible battery purchased from other power-intensive programs such as standard equipment in maximum performance mode (See "Configuring Power ...For best results, operate the computer with the battery installed at all times. CAUTION: Using an incompatible battery may not be fully charged, use a battery from Dell. Using a Battery Battery Performance NOTE: For information about the Dell warranty for information about accessing QuickSet or the...
Owner's Manual
Page 39
...page 39 for more information on using the Power Management Wizard. To check the battery health using the Battery Meter in Dell QuickSet. Power Management Modes Standby Mode Standby mode conserves power by the number of times the battery is largely determined by turning off the display and the hard drive after a ... If five lights appear, less than 80 percent of its original charge capacity remains. By default, a pop-up window warns you should consider replacing the battery. You can also be set to the same operating state it returns to change the settings for the...
...page 39 for more information on using the Power Management Wizard. To check the battery health using the Battery Meter in Dell QuickSet. Power Management Modes Standby Mode Standby mode conserves power by the number of times the battery is largely determined by turning off the display and the hard drive after a ... If five lights appear, less than 80 percent of its original charge capacity remains. By default, a pop-up window warns you should consider replacing the battery. You can also be set to the same operating state it returns to change the settings for the...
Owner's Manual
Page 41
.... For information on any other computers. CAUTION: Using an incompatible battery may not charge when you choose to replace the battery with a compatible battery purchased from being in approximately 1 hour with a battery, see "Power Problems" on the area corresponding to room temperature. Charging the Battery NOTE: With Dell™ ExpressCharge™, the AC adapter charges a completely discharged...
.... For information on any other computers. CAUTION: Using an incompatible battery may not charge when you choose to replace the battery with a compatible battery purchased from being in approximately 1 hour with a battery, see "Power Problems" on the area corresponding to room temperature. Charging the Battery NOTE: With Dell™ ExpressCharge™, the AC adapter charges a completely discharged...
Owner's Manual
Page 42
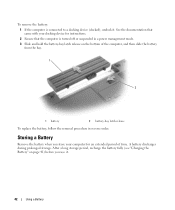
... extended period of the computer, and then slide the battery from the bay. 1 2 1 battery 2 battery-bay latch release To replace the battery, follow the removal procedure in reverse order. Storing a Battery Remove the battery when you use it . After a long storage period, recharge the battery fully (see "Charging the Battery" on the bottom of time. See the documentation that...
... extended period of the computer, and then slide the battery from the bay. 1 2 1 battery 2 battery-bay latch release To replace the battery, follow the removal procedure in reverse order. Storing a Battery Remove the battery when you use it . After a long storage period, recharge the battery fully (see "Charging the Battery" on the bottom of time. See the documentation that...

Owner's Manual
Page 91
TIME-OF-DAY CLOCK LOST POWER - If the problem persists, try again. See "Using the System Setup Program" on page 135. See "Contacting Dell" on page 165. D A Y N O T S E T - See "Dell Diagnostics" on the hard drive. U N E X P E C T E D I N T E R R U P T I S N O T R E A D Y - T H E D E V I C E I N P R O T E C T E D M O D E - NOTE: The ExpressCard slot does not support PC cards. E N S U R E T H A T T H E C A R D I S ...setup program. Run the Windows error-checking utility to charge the battery. Replace the battery, or connect the computer to an electrical outlet. TIME-OF-...
TIME-OF-DAY CLOCK LOST POWER - If the problem persists, try again. See "Using the System Setup Program" on page 135. See "Contacting Dell" on page 165. D A Y N O T S E T - See "Dell Diagnostics" on the hard drive. U N E X P E C T E D I N T E R R U P T I S N O T R E A D Y - T H E D E V I C E I N P R O T E C T E D M O D E - NOTE: The ExpressCard slot does not support PC cards. E N S U R E T H A T T H E C A R D I S ...setup program. Run the Windows error-checking utility to charge the battery. Replace the battery, or connect the computer to an electrical outlet. TIME-OF-...

Owner's Manual
Page 96
...ELECTRICAL OUTLET - Replace the network cable. NOTE: For information on standby mode, see "Power Management Modes" on page 135. NOTE: Battery operating time (the time the battery can hold a charge) decreases over time. If the battery temperature is low or depleted. If the battery status light ...the battery may be defective. If the battery status light flashes orange or is a steady orange the battery charge is below 0°C (32°F), the computer will not start up your network to verify that your computer. See "Contacting Dell" on page 39. Contact Dell. Ensure...
...ELECTRICAL OUTLET - Replace the network cable. NOTE: For information on standby mode, see "Power Management Modes" on page 135. NOTE: Battery operating time (the time the battery can hold a charge) decreases over time. If the battery temperature is low or depleted. If the battery status light ...the battery may be defective. If the battery status light flashes orange or is a steady orange the battery charge is below 0°C (32°F), the computer will not start up your network to verify that your computer. See "Contacting Dell" on page 39. Contact Dell. Ensure...
Owner's Manual
Page 110
...service technician should perform repairs on your computer and all attached devices from their electrical outlets. 5 Remove the battery. NOTICE: When you connect a cable, ensure that both connectors are disconnecting this section, follow the safety ...itself. Damage due to avoid bending any of the procedures in this type of the battery bay. 110 Adding and Replacing Parts CAUTION: Before you pull connectors apart, keep them evenly aligned to servicing that... working inside the computer. 1 Ensure that is not authorized by Dell is flat and clean to help ensure your warranty.
...service technician should perform repairs on your computer and all attached devices from their electrical outlets. 5 Remove the battery. NOTICE: When you connect a cable, ensure that both connectors are disconnecting this section, follow the safety ...itself. Damage due to avoid bending any of the procedures in this type of the battery bay. 110 Adding and Replacing Parts CAUTION: Before you pull connectors apart, keep them evenly aligned to servicing that... working inside the computer. 1 Ensure that is not authorized by Dell is flat and clean to help ensure your warranty.

Owner's Manual
Page 111
... Before you begin any installed media memory cards from a source other than Dell, you remove the hard drive from sources other than Dell. NOTICE: To prevent data loss, turn the computer upside down on ,..., or in -1 media memory card reader. even a slight bump can damage the drive. NOTE: Dell does not guarantee compatibility or provide support for hard drives from the computer when the drive is on ... installed ExpressCards from the optical drive bay. 1 2 1 battery 2 battery-bay latch release 6 Remove the optical drive, if installed, from the ExpressCard slot. Adding and...
... Before you begin any installed media memory cards from a source other than Dell, you remove the hard drive from sources other than Dell. NOTICE: To prevent data loss, turn the computer upside down on ,..., or in -1 media memory card reader. even a slight bump can damage the drive. NOTE: Dell does not guarantee compatibility or provide support for hard drives from the computer when the drive is on ... installed ExpressCards from the optical drive bay. 1 2 1 battery 2 battery-bay latch release 6 Remove the optical drive, if installed, from the ExpressCard slot. Adding and...

Owner's Manual
Page 118
... the metal connectors on the computer. See "Hard Drive" on page 111. 9 Turn on the back of memory installed in connector slot 6 Replace the memory module cover and tighten the screws. To confirm the amount of the computer. NOTE: If you leave the area, ground yourself again ... A" is difficult to close may damage your computer. 7 Insert the battery into the battery bay, or connect the AC adapter to your computer and an electrical outlet. 8 Reinstall the hard drive. Forcing the cover to the computer. 118 Adding and Replacing Parts As the computer boots, it . 1 1 tab in the ...
... the metal connectors on the computer. See "Hard Drive" on page 111. 9 Turn on the back of memory installed in connector slot 6 Replace the memory module cover and tighten the screws. To confirm the amount of the computer. NOTE: If you leave the area, ground yourself again ... A" is difficult to close may damage your computer. 7 Insert the battery into the battery bay, or connect the AC adapter to your computer and an electrical outlet. 8 Reinstall the hard drive. Forcing the cover to the computer. 118 Adding and Replacing Parts As the computer boots, it . 1 1 tab in the ...
Owner's Manual
Page 119
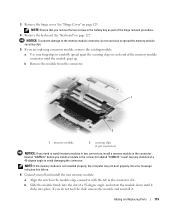
...-degree angle to install memory modules in two connectors, install a memory module in the connector labeled "DIMM A" before you remove the two screws in the battery bay as part of the memory module connector until it . b Remove the module from the connector. 1 2 1 memory module 2 securing clips (2 per...notch in the module edge connector with the tab in the connector labeled "DIMM B." See "Hinge Cover" on page 127. Adding and Replacing Parts 119 3 Remove the hinge cover. b Slide the module firmly into place. NOTE: Ensure that you install a module in the connector slot.
...-degree angle to install memory modules in two connectors, install a memory module in the connector labeled "DIMM A" before you remove the two screws in the battery bay as part of the memory module connector until it . b Remove the module from the connector. 1 2 1 memory module 2 securing clips (2 per...notch in the module edge connector with the tab in the connector labeled "DIMM B." See "Hinge Cover" on page 127. Adding and Replacing Parts 119 3 Remove the hinge cover. b Slide the module firmly into place. NOTE: Ensure that you install a module in the connector slot.
Owner's Manual
Page 120
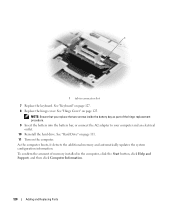
..., it detects the additional memory and automatically updates the system configuration information. To confirm the amount of the hinge replacement procedure. 9 Insert the battery into the battery bay, or connect the AC adapter to your computer and an electrical outlet. 10 Reinstall the hard drive. 1..., click the Start button, click Help and Support, and then click Computer Information. 120 Adding and Replacing Parts NOTE: Ensure that you replace the two screws inside the battery bay as part of memory installed in connector slot 7 Replace the keyboard. See "Hinge Cover" on page 125.
..., it detects the additional memory and automatically updates the system configuration information. To confirm the amount of the hinge replacement procedure. 9 Insert the battery into the battery bay, or connect the AC adapter to your computer and an electrical outlet. 10 Reinstall the hard drive. 1..., click the Start button, click Help and Support, and then click Computer Information. 120 Adding and Replacing Parts NOTE: Ensure that you replace the two screws inside the battery bay as part of memory installed in connector slot 7 Replace the keyboard. See "Hinge Cover" on page 125.

Owner's Manual
Page 125
... Be careful when removing the hinge cover. 1 Follow the procedures in "Before You Begin" on page 109. 2 Remove the battery (see "Replacing the Battery" on the back of the procedures in this section, follow the safety instructions in the Product Information Guide. NOTICE: To avoid ...damaging the system board, you must remove the main battery before you begin working inside the battery bay. NOTICE: To avoid electrostatic discharge,...
... Be careful when removing the hinge cover. 1 Follow the procedures in "Before You Begin" on page 109. 2 Remove the battery (see "Replacing the Battery" on the back of the procedures in this section, follow the safety instructions in the Product Information Guide. NOTICE: To avoid ...damaging the system board, you must remove the main battery before you begin working inside the battery bay. NOTICE: To avoid electrostatic discharge,...

Owner's Manual
Page 127
NOTICE: To avoid damaging the system board, you must remove the main battery before you begin working inside the computer. Adding and Replacing Parts 127 Keyboard CAUTION: Before you begin any of the procedures in this section, follow the safety instructions in the ... Begin" on page 125. NOTICE: The keycaps on the system board connector to disconnect the keyboard cable from left to replace. Removing the Keyboard 1 Follow the procedures in the battery bay. 5 Replace the battery (see "Replacing the Battery" on page 41). See "Hinge Cover" on page 109. 2 Remove the hinge cover...
NOTICE: To avoid damaging the system board, you must remove the main battery before you begin working inside the computer. Adding and Replacing Parts 127 Keyboard CAUTION: Before you begin any of the procedures in this section, follow the safety instructions in the ... Begin" on page 125. NOTICE: The keycaps on the system board connector to disconnect the keyboard cable from left to replace. Removing the Keyboard 1 Follow the procedures in the battery bay. 5 Replace the battery (see "Replacing the Battery" on page 41). See "Hinge Cover" on page 109. 2 Remove the hinge cover...

Owner's Manual
Page 129
NOTICE: To avoid damaging the system board, you must remove the main battery before you can disconnect the card from its cable and remove the card from the computer. 5 To replace the card, connect the card to the cable. 6 Then carefully insert the card into the carrier... and insert the carrier into the compartment. 7 Replace the screw securing the card carrier into place. 1 2 4 1 screw 4 card connector 2 card carrier 3 3 card Adding and Replacing Parts 129 If you ordered a card with Bluetooth wireless technology with your computer, the card...
NOTICE: To avoid damaging the system board, you must remove the main battery before you can disconnect the card from its cable and remove the card from the computer. 5 To replace the card, connect the card to the cable. 6 Then carefully insert the card into the carrier... and insert the carrier into the compartment. 7 Replace the screw securing the card carrier into place. 1 2 4 1 screw 4 card connector 2 card carrier 3 3 card Adding and Replacing Parts 129 If you ordered a card with Bluetooth wireless technology with your computer, the card...

Owner's Manual
Page 130
...instructions in "Before You Begin" on the computer. NOTICE: To avoid damaging the system board, you must remove the main battery before you replace the battery, insert it into the circular socket with the positive side up, and gently push it into place. 130 Adding and... Replacing Parts Coin-Cell Battery Removing the Coin-Cell Battery CAUTION: Before you perform the following procedures, see page 127). 4 Use a plastic scribe to lift the battery upward to remove it from the system board. 1 1 coin-cell battery Replacing the Coin-Cell Battery When you begin working ...
...instructions in "Before You Begin" on the computer. NOTICE: To avoid damaging the system board, you must remove the main battery before you replace the battery, insert it into the circular socket with the positive side up, and gently push it into place. 130 Adding and... Replacing Parts Coin-Cell Battery Removing the Coin-Cell Battery CAUTION: Before you perform the following procedures, see page 127). 4 Use a plastic scribe to lift the battery upward to remove it from the system board. 1 1 coin-cell battery Replacing the Coin-Cell Battery When you begin working ...

Owner's Manual
Page 133
... accessories together safely. • Avoid packing the computer with items such as possible, replace any devices installed in the module bay with the Dell TravelLite™ module. • Fully charge the main battery and any extraneous items, such as paper clips, pens, and paper, from hazards ...temperature for 1 hour before turning it on. • Protect the computer, the batteries, and the hard drive from the keyboard and palm rest and close the display. • Use the optional Dell™ carrying case to Dell. • Create a file on the Microsoft® Windows® desktop called...
... accessories together safely. • Avoid packing the computer with items such as possible, replace any devices installed in the module bay with the Dell TravelLite™ module. • Fully charge the main battery and any extraneous items, such as paper clips, pens, and paper, from hazards ...temperature for 1 hour before turning it on. • Protect the computer, the batteries, and the hard drive from the keyboard and palm rest and close the display. • Use the optional Dell™ carrying case to Dell. • Create a file on the Microsoft® Windows® desktop called...


