
Service Manual
Page 1
... any proprietary interest in this document is strictly forbidden. Dell™ Inspiron™ 535/537/545/546 Service Manual Technical Overview Before You Begin Computer Cover Front Bezel Memory PCI and PCI Express Cards Drives Models DCME and DCMF Fans Front I/O Panel Processor System Board Power Supply Battery System Setup Notes, Cautions, and Warnings NOTE...
... any proprietary interest in this document is strictly forbidden. Dell™ Inspiron™ 535/537/545/546 Service Manual Technical Overview Before You Begin Computer Cover Front Bezel Memory PCI and PCI Express Cards Drives Models DCME and DCMF Fans Front I/O Panel Processor System Board Power Supply Battery System Setup Notes, Cautions, and Warnings NOTE...

Service Manual
Page 29
.... Back to Contents Page Power Supply Dell™ Inspiron™ 535/537/545/546 Service Manual Removing the Power Supply Replacing the Power Supply WARNING: Before working inside your computer, read the safety information that attach the power supply to prevent them from being pinched or crimped. 4. Inspiron™ 535/537 1 power supply retention snap 2 screws (4) 3 power supply 4 voltage selector switch Inspiron 545/546 Remove all the cables...
.... Back to Contents Page Power Supply Dell™ Inspiron™ 535/537/545/546 Service Manual Removing the Power Supply Replacing the Power Supply WARNING: Before working inside your computer, read the safety information that attach the power supply to prevent them from being pinched or crimped. 4. Inspiron™ 535/537 1 power supply retention snap 2 screws (4) 3 power supply 4 voltage selector switch Inspiron 545/546 Remove all the cables...

Service Manual
Page 30
... Check the voltage selector switch (if applicable) to ensure that secure the power supply to the back of the system grounding. 2. Back to prevent the cables from being damaged. 3. Replacing the Power Supply 1. The cables must be properly routed to Contents Page Secure all the cables... the securing clip on the power supply retention snap(s) and slide the replacement power supply towards the back of the power supply. Connect the DC power cables to an electrical outlet, and turn them on the power supply retention snap(s), slide out the power supply and lift it out. Connect...
... Check the voltage selector switch (if applicable) to ensure that secure the power supply to the back of the system grounding. 2. Back to prevent the cables from being damaged. 3. Replacing the Power Supply 1. The cables must be properly routed to Contents Page Secure all the cables... the securing clip on the power supply retention snap(s) and slide the replacement power supply towards the back of the power supply. Connect the DC power cables to an electrical outlet, and turn them on the power supply retention snap(s), slide out the power supply and lift it out. Connect...

Service Manual
Page 43
... your computer. For additional safety best practices information, see the Regulatory Compliance Homepage at www.dell.com/regulatory_compliance. Back to Contents Page Technical Overview Dell™ Inspiron™ 535/537/545/546 Service Manual Inside View of Your Computer 1 power supply 3 secondary optical drive (optional)* 5 secondary hard drive (optional)* 7 media card reader (optional) 9 card retention bracket...
... your computer. For additional safety best practices information, see the Regulatory Compliance Homepage at www.dell.com/regulatory_compliance. Back to Contents Page Technical Overview Dell™ Inspiron™ 535/537/545/546 Service Manual Inside View of Your Computer 1 power supply 3 secondary optical drive (optional)* 5 secondary hard drive (optional)* 7 media card reader (optional) 9 card retention bracket...

Setup Guide
Page 18
Using Your Inspiron™ Desktop Back View Features 1 2 3 4 5 16 1 Power connector - For selecting the voltage rating. 3 Power supply diagnostic light - Plug USB, audio, and other devices into the appropriate connector. 5 Expansion card slots - Power is not working. NOTE: The power supply diagnostic light may vary. 2 Voltage selector switch - Appearance may not be available on some models. 4 Back panel...
Using Your Inspiron™ Desktop Back View Features 1 2 3 4 5 16 1 Power connector - For selecting the voltage rating. 3 Power supply diagnostic light - Plug USB, audio, and other devices into the appropriate connector. 5 Expansion card slots - Power is not working. NOTE: The power supply diagnostic light may vary. 2 Voltage selector switch - Appearance may not be available on some models. 4 Back panel...
Setup Guide
Page 25
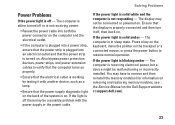
... the trackpad or a connected mouse, or press the power button to remove and then reinstall the memory modules (for information on removing and replacing memory modules, see the Service Manual on the Dell Support website at support.dell.com). 23 You may not be malfunctioning or incorrectly installed... on the computer and the electrical outlet. • If the computer is plugged into a power strip, ensure that the power strip is plugged into an electrical outlet and that the power supply diagnostic light on the back of the system is off there may be a possible problem with another device, ...
... the trackpad or a connected mouse, or press the power button to remove and then reinstall the memory modules (for information on removing and replacing memory modules, see the Service Manual on the Dell Support website at support.dell.com). 23 You may not be malfunctioning or incorrectly installed... on the computer and the electrical outlet. • If the computer is plugged into a power strip, ensure that the power strip is plugged into an electrical outlet and that the power supply diagnostic light on the back of the system is off there may be a possible problem with another device, ...

Setup Guide
Page 54
...,000 ft) Storage -15.2 to 10,668 m (-50 to 35,000 ft) Airborne G2 or lower as defined by contaminant ISA-S71.04-1985 level Power DC Power Supply Wattage 300 W 52 Power Maximum heat dissipation 1,023 BTU/hr NOTE: Heat dissipation is calculated by using the...
...,000 ft) Storage -15.2 to 10,668 m (-50 to 35,000 ft) Airborne G2 or lower as defined by contaminant ISA-S71.04-1985 level Power DC Power Supply Wattage 300 W 52 Power Maximum heat dissipation 1,023 BTU/hr NOTE: Heat dissipation is calculated by using the...


