Service Manual
Page 1
Dell™ Inspiron™ 535s/537s/545s/546s Service Manual Technical Overview Before You Begin Computer Cover Support Bracket Front Bezel Memory PCI and PCI Express Cards Drives Models DCSLE ... and Windows are either the entities claiming the marks and names or their products. Reproduction of these materials in any proprietary interest in this text: Dell, the DELL logo, and Inspiron are not followed. Trademarks used in this document to refer to hardware or loss of data if instructions are trademarks of...
Dell™ Inspiron™ 535s/537s/545s/546s Service Manual Technical Overview Before You Begin Computer Cover Support Bracket Front Bezel Memory PCI and PCI Express Cards Drives Models DCSLE ... and Windows are either the entities claiming the marks and names or their products. Reproduction of these materials in any proprietary interest in this text: Dell, the DELL logo, and Inspiron are not followed. Trademarks used in this document to refer to hardware or loss of data if instructions are trademarks of...
Service Manual
Page 2
... cable, ensure that shipped with locking tabs; Ensure that shipped with your computer (see the Regulatory Compliance Homepage at support.dell.com. For additional safety best practices information, see Turning Off Your Computer). CAUTION: To disconnect a network cable, first unplug...performing the removal procedure in Turning Off Your Computer and Safety Instructions. Back to Contents Page Before You Begin Dell™ Inspiron™ 535s/537s/545s/546s Service Manual Technical Specifications Recommended Tools Turning Off Your Computer Safety Instructions This chapter provides procedures...
... cable, ensure that shipped with locking tabs; Ensure that shipped with your computer (see the Regulatory Compliance Homepage at support.dell.com. For additional safety best practices information, see Turning Off Your Computer). CAUTION: To disconnect a network cable, first unplug...performing the removal procedure in Turning Off Your Computer and Safety Instructions. Back to Contents Page Before You Begin Dell™ Inspiron™ 535s/537s/545s/546s Service Manual Technical Specifications Recommended Tools Turning Off Your Computer Safety Instructions This chapter provides procedures...

Service Manual
Page 4
...the Computer Cover). 1 bezel inserts (3) 2 bezel clamps (3) 3 bezel grips (3) 4 bezel 3. Back to Contents Page Front Bezel Dell™ Inspiron™ 535s/537s/545s/546s Service Manual Removing the Front Bezel Replacing the Front Bezel WARNING: Before working inside your computer, read the safety information ...into place. 3. Remove the computer cover (see Replacing the Computer Cover). Grasp and lift the bezel grips one at www.dell.com/regulatory_compliance. Replacing the Front Bezel 1. WARNING: To guard against electrical shock, always unplug your computer. Back to Contents ...
...the Computer Cover). 1 bezel inserts (3) 2 bezel clamps (3) 3 bezel grips (3) 4 bezel 3. Back to Contents Page Front Bezel Dell™ Inspiron™ 535s/537s/545s/546s Service Manual Removing the Front Bezel Replacing the Front Bezel WARNING: Before working inside your computer, read the safety information ...into place. 3. Remove the computer cover (see Replacing the Computer Cover). Grasp and lift the bezel grips one at www.dell.com/regulatory_compliance. Replacing the Front Bezel 1. WARNING: To guard against electrical shock, always unplug your computer. Back to Contents ...
Service Manual
Page 5
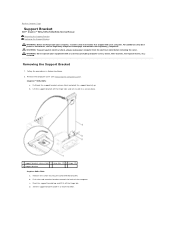
...Dell™ Inspiron™ 535s/537s/545s/546s Service Manual Removing the Support Bracket Replacing the Support Bracket WARNING: Before working inside your computer, read the safety information that shipped with any cover(s) (including computer covers, bezels, filler brackets, front-panel inserts, etc.) removed. Inspiron™ 535s... bracket. d. Removing the Support Bracket 1. Remove the computer cover (see the Regulatory Compliance Homepage at www.dell.com/regulatory_compliance. b. Set the support bracket aside in Before You Begin. 2. b. Push the card retention bracket...
...Dell™ Inspiron™ 535s/537s/545s/546s Service Manual Removing the Support Bracket Replacing the Support Bracket WARNING: Before working inside your computer, read the safety information that shipped with any cover(s) (including computer covers, bezels, filler brackets, front-panel inserts, etc.) removed. Inspiron™ 535s... bracket. d. Removing the Support Bracket 1. Remove the computer cover (see the Regulatory Compliance Homepage at www.dell.com/regulatory_compliance. b. Set the support bracket aside in Before You Begin. 2. b. Push the card retention bracket...

Service Manual
Page 7
... card-slot openings is necessary to the card. Reconnect the computer and devices to Contents Page PCI and PCI Express Cards Dell™ Inspiron™ 535s/537s/545s/546s Service Manual Removing PCI and PCI Express Cards Replacing PCI and PCI Express Cards Configuring Your Computer After Removing...the cover. For additional safety best practices information, see Removing the Computer Cover.) Remove the computer cover (see the Regulatory Compliance Homepage at www.dell.com/regulatory_compliance. l For a PCI or PCI Express x1 card, grasp the card by its top corners, and then ease it out of...
... card-slot openings is necessary to the card. Reconnect the computer and devices to Contents Page PCI and PCI Express Cards Dell™ Inspiron™ 535s/537s/545s/546s Service Manual Removing PCI and PCI Express Cards Replacing PCI and PCI Express Cards Configuring Your Computer After Removing...the cover. For additional safety best practices information, see Removing the Computer Cover.) Remove the computer cover (see the Regulatory Compliance Homepage at www.dell.com/regulatory_compliance. l For a PCI or PCI Express x1 card, grasp the card by its top corners, and then ease it out of...
Service Manual
Page 10
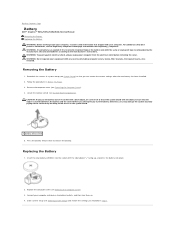
Back to Contents Page Battery Dell™ Inspiron™ 535s/537s/545s/546s Service Manual Removing the Battery Replacing the Battery WARNING: Before working inside your computer, read the safety information that you can explode ... 1. Enter system setup (see Removing the Computer Cover). 4. Connect your computer. Record all the screens in system setup (see the Regulatory Compliance Homepage at www.dell.com/regulatory_compliance. Remove the computer cover (see Entering System Setup) and restore the settings you recorded in Before You Begin. 3. For additional safety best practices...
Back to Contents Page Battery Dell™ Inspiron™ 535s/537s/545s/546s Service Manual Removing the Battery Replacing the Battery WARNING: Before working inside your computer, read the safety information that you can explode ... 1. Enter system setup (see Removing the Computer Cover). 4. Connect your computer. Record all the screens in system setup (see the Regulatory Compliance Homepage at www.dell.com/regulatory_compliance. Remove the computer cover (see Entering System Setup) and restore the settings you recorded in Before You Begin. 3. For additional safety best practices...

Service Manual
Page 12
... location. Lay your equipment with any cover(s) (including computer covers, bezels, filler brackets, front-panel inserts, etc.) removed. Back to Contents Page Computer Cover Dell™ Inspiron™ 535s/537s/545s/546s Service Manual Removing the Computer Cover Replacing the Computer Cover WARNING: Before working inside your computer, read the safety information that...
... location. Lay your equipment with any cover(s) (including computer covers, bezels, filler brackets, front-panel inserts, etc.) removed. Back to Contents Page Computer Cover Dell™ Inspiron™ 535s/537s/545s/546s Service Manual Removing the Computer Cover Replacing the Computer Cover WARNING: Before working inside your computer, read the safety information that...

Service Manual
Page 14
...heat sink assembly when you touch it from the electrical outlet before you replace the processor. 4. Inspiron™ 535s/537s/545s 1 processor cover 2 processor 3 socket 4 release lever Inspiron 546s CAUTION: Do not perform the following steps unless you are familiar with any cover(s) (including...shield, the processor fan and heat sink assembly may be very hot during normal operation. Back to Contents Page Processor Dell™ Inspiron™ 535s/537s/545s/546s Service Manual Removing the Processor Replacing the Processor WARNING: Before working inside your computer, read the ...
...heat sink assembly when you touch it from the electrical outlet before you replace the processor. 4. Inspiron™ 535s/537s/545s 1 processor cover 2 processor 3 socket 4 release lever Inspiron 546s CAUTION: Do not perform the following steps unless you are familiar with any cover(s) (including...shield, the processor fan and heat sink assembly may be very hot during normal operation. Back to Contents Page Processor Dell™ Inspiron™ 535s/537s/545s/546s Service Manual Removing the Processor Replacing the Processor WARNING: Before working inside your computer, read the ...

Service Manual
Page 18
Remove the support bracket (see Removing the Computer Cover). 3. Back to Contents Page Drives Dell™ Inspiron™ 535s/537s/545s/546s Service Manual Removing a Hard Drive Replacing a Hard Drive Removing a Media Card Reader Replacing a Media Card Reader Removing an Optical Drive Replacing an ...
Remove the support bracket (see Removing the Computer Cover). 3. Back to Contents Page Drives Dell™ Inspiron™ 535s/537s/545s/546s Service Manual Removing a Hard Drive Replacing a Hard Drive Removing a Media Card Reader Replacing a Media Card Reader Removing an Optical Drive Replacing an ...

Service Manual
Page 24
... electrical outlet before you are routed over the processor fan and heat sink assembly. Remove the processor fan and heat sink assembly. Inspiron™ 535s/537s/545s a. Loosen the four captive screws securing the processor fan and heat sink assembly and lift it straight up. 1 processor...it has had sufficient time to cool before removing the cover. This could damage the fan. 1. Back to Contents Page Fans Dell™ Inspiron™ 535s/537s/545s/546s Service Manual Removing the Processor Fan and Heat Sink Assembly Replacing the Processor Fan and Heat Sink Assembly Removing the ...
... electrical outlet before you are routed over the processor fan and heat sink assembly. Remove the processor fan and heat sink assembly. Inspiron™ 535s/537s/545s a. Loosen the four captive screws securing the processor fan and heat sink assembly and lift it straight up. 1 processor...it has had sufficient time to cool before removing the cover. This could damage the fan. 1. Back to Contents Page Fans Dell™ Inspiron™ 535s/537s/545s/546s Service Manual Removing the Processor Fan and Heat Sink Assembly Replacing the Processor Fan and Heat Sink Assembly Removing the ...

Service Manual
Page 28
Back to Contents Page Front I/O Panel Dell™ Inspiron™ 535s/537s/545s/546s Service Manual Removing the Front I/O Panel Replacing the Front I /O panel to the chassis. 8. Disconnect all cables as you remove them so that ... sliding the I/O panel into the I /O panel. 1. Remove the computer cover (see Removing a Hard Drive). Remove the support bracket (see the Regulatory Compliance Homepage at www.dell.com/regulatory_compliance. CAUTION: When sliding the I/O panel out of all the cables that are connected to the I /O Panel NOTE: Note the routing of the computer...
Back to Contents Page Front I/O Panel Dell™ Inspiron™ 535s/537s/545s/546s Service Manual Removing the Front I/O Panel Replacing the Front I /O panel to the chassis. 8. Disconnect all cables as you remove them so that ... sliding the I/O panel into the I /O panel. 1. Remove the computer cover (see Removing a Hard Drive). Remove the support bracket (see the Regulatory Compliance Homepage at www.dell.com/regulatory_compliance. CAUTION: When sliding the I/O panel out of all the cables that are connected to the I /O Panel NOTE: Note the routing of the computer...

Service Manual
Page 30
... module connector. 1 cutouts (2) 2 tab If the memory module is difficult to remove, gently ease the memory module back and forth to Contents Page Memory Dell™ Inspiron™ 535s/537s/545s/546s Service Manual Removing Memory Replacing Memory Recommended Memory Configuration Setting Up Dual Channel Memory Configuration WARNING: Before working inside your computer... bottom of the memory module connector. 1 memory module connector 2 securing clip 5. Align the notch on the system board (see the Regulatory Compliance Homepage at www.dell.com/regulatory_compliance.
... module connector. 1 cutouts (2) 2 tab If the memory module is difficult to remove, gently ease the memory module back and forth to Contents Page Memory Dell™ Inspiron™ 535s/537s/545s/546s Service Manual Removing Memory Replacing Memory Recommended Memory Configuration Setting Up Dual Channel Memory Configuration WARNING: Before working inside your computer... bottom of the memory module connector. 1 memory module connector 2 securing clip 5. Align the notch on the system board (see the Regulatory Compliance Homepage at www.dell.com/regulatory_compliance.
Service Manual
Page 33
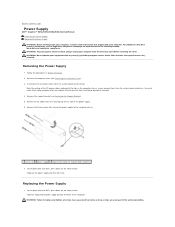
... the Computer Cover). 3. Replacing the Power Supply 1. Back to the computer chassis. 1 screws (3) 2 power supply 3 release latch (only for Inspiron 535s and 537s) 7. You must route these screws are a key part of the DC power cables underneath the tabs in Before You Begin. 2. For... Inspiron 535s and 537s, press down on the release latch. For Inspiron 535s and 537s, press down on the release latch. Remove the three screws that secure the power supply to Contents Page Power Supply Dell™ Inspiron™ 535s/537s/545s/546s Service Manual ...
... the Computer Cover). 3. Replacing the Power Supply 1. Back to the computer chassis. 1 screws (3) 2 power supply 3 release latch (only for Inspiron 535s and 537s) 7. You must route these screws are a key part of the DC power cables underneath the tabs in Before You Begin. 2. For... Inspiron 535s and 537s, press down on the release latch. For Inspiron 535s and 537s, press down on the release latch. Remove the three screws that secure the power supply to Contents Page Power Supply Dell™ Inspiron™ 535s/537s/545s/546s Service Manual ...
Service Manual
Page 35
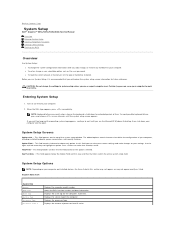
Back to Contents Page System Setup Dell™ Inspiron™ 535s/537s/545s/546s Service Manual Overview Entering System Setup... Depending on (or restart) your computer to your computer. Turn on your computer and try again. Inspiron 535s/537s System Info System BIOS Info Asset Tag Service Tag Processor Type Processor Level 2 Displays the computer model... number. Shows the BIOS version number and date information. When the DELL logo appears, press immediately. This field appears on the options selected. This field provides context sensitive help...
Back to Contents Page System Setup Dell™ Inspiron™ 535s/537s/545s/546s Service Manual Overview Entering System Setup... Depending on (or restart) your computer to your computer. Turn on your computer and try again. Inspiron 535s/537s System Info System BIOS Info Asset Tag Service Tag Processor Type Processor Level 2 Displays the computer model... number. Shows the BIOS version number and date information. When the DELL logo appears, press immediately. This field appears on the options selected. This field provides context sensitive help...
Service Manual
Page 40
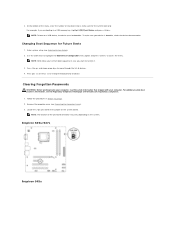
... case you are booting to a USB memory key, highlight USB Flash Device and press . Remove the computer cover (see the Regulatory Compliance Homepage at www.dell.com/regulatory_compliance. 1. Use the arrow keys to highlight the Boot Device Configuration menu option and press to move through the list of device. Press the... documentation. Clearing Forgotten Passwords WARNING: Before working inside your current boot sequence in Before You Begin. 2. Locate the 3-pin password reset jumper on the system. Inspiron 535s/537s Inspiron 545s
... case you are booting to a USB memory key, highlight USB Flash Device and press . Remove the computer cover (see the Regulatory Compliance Homepage at www.dell.com/regulatory_compliance. 1. Use the arrow keys to highlight the Boot Device Configuration menu option and press to move through the list of device. Press the... documentation. Clearing Forgotten Passwords WARNING: Before working inside your current boot sequence in Before You Begin. 2. Locate the 3-pin password reset jumper on the system. Inspiron 535s/537s Inspiron 545s
Service Manual
Page 44
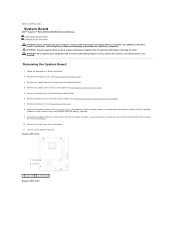
... sink assembly (see Removing the Processor). 8. Remove the processor (see Removing the Processor Fan and Heat Sink Assembly). 7. Inspiron 535s/537s 1 screws (6) 2 system board Inspiron 545s/546s Removing the System Board 1. Remove any cover(s) (including computer covers, bezels, filler brackets, front-panel inserts,... board (see Removing Memory) and document which memory module is replaced. 9. Back to Contents Page System Board Dell™ Inspiron™ 535s/537s/545s/546s Service Manual Removing the System Board Replacing the System Board WARNING: Before working inside your computer,...
... sink assembly (see Removing the Processor). 8. Remove the processor (see Removing the Processor Fan and Heat Sink Assembly). 7. Inspiron 535s/537s 1 screws (6) 2 system board Inspiron 545s/546s Removing the System Board 1. Remove any cover(s) (including computer covers, bezels, filler brackets, front-panel inserts,... board (see Removing Memory) and document which memory module is replaced. 9. Back to Contents Page System Board Dell™ Inspiron™ 535s/537s/545s/546s Service Manual Removing the System Board Replacing the System Board WARNING: Before working inside your computer,...
Service Manual
Page 47
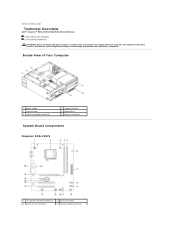
Back to Contents Page Technical Overview Dell™ Inspiron™ 535s/537s/545s/546s Service Manual Inside View of Your Computer 1 power supply 3 system board 5 media card reader (optional) 2 support bracket 4 optical drive 6 primary hard drive System Board Components Inspiron 535s/537s 1 12 V power connector (ATX12V1) 3 processor fan connector 2 processor socket 4 memory module connector Inside View...
Back to Contents Page Technical Overview Dell™ Inspiron™ 535s/537s/545s/546s Service Manual Inside View of Your Computer 1 power supply 3 system board 5 media card reader (optional) 2 support bracket 4 optical drive 6 primary hard drive System Board Components Inspiron 535s/537s 1 12 V power connector (ATX12V1) 3 processor fan connector 2 processor socket 4 memory module connector Inside View...

SETUP GUIDE
Page 7
... other sides. Before Setting Up Your Computer When positioning your computer, ensure that you leave at least 10.2 cm (4 inches) at www.dell.com/ regulatory_compliance. INSPIRON Setting Up Your Inspiron™ Desktop This section provides information about setting up your computer. You should never place your computer. WARNING: Before you begin any of... at the back of the computer and a minimum of the procedures in an enclosed space, such as a cabinet or drawer when it to place your Inspiron 535s/537s/545s/546s desktop and connecting peripherals.
... other sides. Before Setting Up Your Computer When positioning your computer, ensure that you leave at least 10.2 cm (4 inches) at www.dell.com/ regulatory_compliance. INSPIRON Setting Up Your Inspiron™ Desktop This section provides information about setting up your computer. You should never place your computer. WARNING: Before you begin any of... at the back of the computer and a minimum of the procedures in an enclosed space, such as a cabinet or drawer when it to place your Inspiron 535s/537s/545s/546s desktop and connecting peripherals.
SETUP GUIDE
Page 33
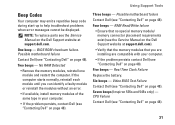
... normally, reinstall each module until you are installing are compatible with your computer. • If the problem persists, contact Dell (see "Contacting Dell" on page 48). 31 RAM Read/Write failure • Ensure that you can identify a faulty module or reinstall the... reinstall one module and restart the computer. Six beeps - Seven beeps (Inspiron 535s and 545s only) - One beep - Five beeps - Possible motherboard failure Contact Dell (see "Contacting Dell" on the Dell Support website at support.dell.com. Real Time Clock Failure Replace the battery. Four beeps - Two ...
... normally, reinstall each module until you are installing are compatible with your computer. • If the problem persists, contact Dell (see "Contacting Dell" on page 48). 31 RAM Read/Write failure • Ensure that you can identify a faulty module or reinstall the... reinstall one module and restart the computer. Six beeps - Seven beeps (Inspiron 535s and 545s only) - One beep - Five beeps - Possible motherboard failure Contact Dell (see "Contacting Dell" on the Dell Support website at support.dell.com. Real Time Clock Failure Replace the battery. Four beeps - Two ...


