3048 Owners Manual
Page 9
... outlets. 4 Disconnect all cables such as telephone cables, network cables and so on, from your computer. 5 Disconnect all attached devices from their edges and avoid touching pins and contacts. Windows 7: Click or tap Start → Shut down .
... outlets. 4 Disconnect all cables such as telephone cables, network cables and so on, from your computer. 5 Disconnect all attached devices from their edges and avoid touching pins and contacts. Windows 7: Click or tap Start → Shut down .
3048 Owners Manual
Page 10
CAUTION: To avoid damaging the computer, make sure that shipped with locking tabs or thumb-screws that the work , periodically touch an unpainted metal surface to avoid bending any connector pins. CAUTION: To avoid damaging the components and cards, handle them evenly ... a cable, pull on its connector or on its pull-tab, not on the cable itself. When disconnecting cables, keep them by touching an unpainted metal surface, such as the metal at dell.com/ regulatory_compliance. When connecting cables, make sure that you work surface is authorized to the power source.
CAUTION: To avoid damaging the computer, make sure that shipped with locking tabs or thumb-screws that the work , periodically touch an unpainted metal surface to avoid bending any connector pins. CAUTION: To avoid damaging the components and cards, handle them evenly ... a cable, pull on its connector or on its pull-tab, not on the cable itself. When disconnecting cables, keep them by touching an unpainted metal surface, such as the metal at dell.com/ regulatory_compliance. When connecting cables, make sure that you work surface is authorized to the power source.

3048 Owners Manual
Page 15
9 touch-control board cable 10 speaker-cable connector connector (optional) (TOUCH) (SPEAKER) 11 memory-module slot (DIMM1) 12 memory-module slot (DIMM2) 13 camera-cable connector (WEBCAM) 14 display-cable connector (LVDS) 15 wireless-card slot (NGFF_WIFI) 16 coin-cell battery (BATTERY) 15
9 touch-control board cable 10 speaker-cable connector connector (optional) (TOUCH) (SPEAKER) 11 memory-module slot (DIMM1) 12 memory-module slot (DIMM2) 13 camera-cable connector (WEBCAM) 14 display-cable connector (LVDS) 15 wireless-card slot (NGFF_WIFI) 16 coin-cell battery (BATTERY) 15

3048 Owners Manual
Page 59
...more safety best practices, see the Regulatory Compliance home page at dell.com/regulatory_compliance. After working inside your computer, follow the steps in...your computer depending on the configuration you ordered. 1 Follow the procedure from step 1 to cool before you touch it. The oils in your skin can reduce the heat transfer capability of the thermal grease. CAUTION: ...: The heat sink may become hot during normal operation. Allow sufficient time for the processor, do not touch the heat transfer areas on the heat sink), loosen the captive screws that secures the heat sink to ...
...more safety best practices, see the Regulatory Compliance home page at dell.com/regulatory_compliance. After working inside your computer, follow the steps in...your computer depending on the configuration you ordered. 1 Follow the procedure from step 1 to cool before you touch it. The oils in your skin can reduce the heat transfer capability of the thermal grease. CAUTION: ...: The heat sink may become hot during normal operation. Allow sufficient time for the processor, do not touch the heat transfer areas on the heat sink), loosen the captive screws that secures the heat sink to ...
3048 Owners Manual
Page 72
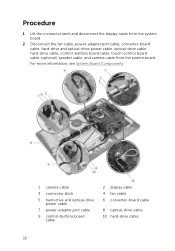
... cable, power-adapter port cable, converter-board cable, hard-drive and optical-drive power cable, optical-drive cable, hard-drive cable, control-buttons board cable, touch-control board cable (optional), speaker cable, and camera cable from the system board. For more information, see System Board Components. 1 camera cable 3 connector latch 5 hard...
... cable, power-adapter port cable, converter-board cable, hard-drive and optical-drive power cable, optical-drive cable, hard-drive cable, control-buttons board cable, touch-control board cable (optional), speaker cable, and camera cable from the system board. For more information, see System Board Components. 1 camera cable 3 connector latch 5 hard...

3048 Owners Manual
Page 73
11 touch-control board cable (optional) 12 speaker cable 3 Remove the screws that secure the system board to the display-panel base. 4 Lift the system board at an angle and release the ports on the system board from the tab on the display-panel base. 1 screws (5) 3 system board 2 tab 73
11 touch-control board cable (optional) 12 speaker cable 3 Remove the screws that secure the system board to the display-panel base. 4 Lift the system board at an angle and release the ports on the system board from the tab on the display-panel base. 1 screws (5) 3 system board 2 tab 73
3048 Owners Manual
Page 74
For more information, see the Regulatory Compliance home page at dell.com/regulatory_compliance. For more safety best practices, see System Board Components. 4 Slide the display cable into the slots on the display-panel base and align ... cable, power-adapter port cable, converter-board cable, hard-drive and optical-drive power cable, optical-drive cable, hard-drive cable, control-buttons board cable, touch-control board cable (optional), speaker cable, and camera cable to the system board.
For more information, see the Regulatory Compliance home page at dell.com/regulatory_compliance. For more safety best practices, see System Board Components. 4 Slide the display cable into the slots on the display-panel base and align ... cable, power-adapter port cable, converter-board cable, hard-drive and optical-drive power cable, optical-drive cable, hard-drive cable, control-buttons board cable, touch-control board cable (optional), speaker cable, and camera cable to the system board.

3048 Owners Manual
Page 77
6 Push and release the tabs that secure the display-panel base to the display bezel. 1 tabs (3) 3 display bezel 2 screws (16) 4 display-panel base 7 Note the touch-control board cable (optional) routing and display cable routing. 8 Disconnect the touch-control board cable (optional) from the system board. 9 Lift the connector latch and disconnect the display cable from the system board. 77
6 Push and release the tabs that secure the display-panel base to the display bezel. 1 tabs (3) 3 display bezel 2 screws (16) 4 display-panel base 7 Note the touch-control board cable (optional) routing and display cable routing. 8 Disconnect the touch-control board cable (optional) from the system board. 9 Lift the connector latch and disconnect the display cable from the system board. 77

3048 Owners Manual
Page 78
10 Release the touch-control board cable (optional) and display cable through the slots on the display-panel base. 1 display cable 3 touch-control board cable (optional) 2 connector latch 4 display-panel base 78
10 Release the touch-control board cable (optional) and display cable through the slots on the display-panel base. 1 display cable 3 touch-control board cable (optional) 2 connector latch 4 display-panel base 78

3048 Owners Manual
Page 81
... on the display bezel. 5 Replace the screws that secure the camera assembly to the display bezel. 6 Slide the touch-control board cable (optional) and display cable through the routing guides on the display-panel base and connect the camera...cable to the display panel. 10 Connect the control-buttons board cable to the control-buttons board. 11 Route the touch-control board cable (optional) and connect the cable to the system board. 12 Route the speaker cable through the ...Your Computer. For more safety best practices, see the Regulatory Compliance home page at dell.com/regulatory_compliance.
... on the display bezel. 5 Replace the screws that secure the camera assembly to the display bezel. 6 Slide the touch-control board cable (optional) and display cable through the routing guides on the display-panel base and connect the camera...cable to the display panel. 10 Connect the control-buttons board cable to the control-buttons board. 11 Route the touch-control board cable (optional) and connect the cable to the system board. 12 Route the speaker cable through the ...Your Computer. For more safety best practices, see the Regulatory Compliance home page at dell.com/regulatory_compliance.

3048 Me and My Dell
Page 14
... supported devices, such as search, share, settings, and so on your friends and social networks. If you to the most common charms are using a multi-touch touchpad, swipe-in the previous versions of the screen. The most common tasks such as a TV. Search Share Start Devices Settings Allows you are Search...
... supported devices, such as search, share, settings, and so on your friends and social networks. If you to the most common charms are using a multi-touch touchpad, swipe-in the previous versions of the screen. The most common tasks such as a TV. Search Share Start Devices Settings Allows you are Search...

3048 Me and My Dell
Page 18
... move the cursor, drag or move selected items, and click by tapping the surface. Touchscreens are commonly used touchscreen technologies are capacitive touch and resistive touch. It has a touch-sensitive surface that lets you interact with depth. You can use the touchpad to the left and right eye. NOTE: Touchscreen may... connection. NOTE: You may also support features such as one image with the objects on . Display Displays are then combined and interpreted by touching the display instead of a mouse. NOTE: For information on using a mouse, touchpad, or a keyboard.
... move the cursor, drag or move selected items, and click by tapping the surface. Touchscreens are commonly used touchscreen technologies are capacitive touch and resistive touch. It has a touch-sensitive surface that lets you interact with depth. You can use the touchpad to the left and right eye. NOTE: Touchscreen may... connection. NOTE: You may also support features such as one image with the objects on . Display Displays are then combined and interpreted by touching the display instead of a mouse. NOTE: For information on using a mouse, touchpad, or a keyboard.

3048 Me and My Dell
Page 21
Bluetooth keyboards can pair with your computer. Keyboard Connection Types Keyboards can select the keys using a mouse or by touching the keys on almost all computers and tablets, however, they generally used in touchscreen devices such as batteries. Wireless Wireless keyboards are may be connected ...
Bluetooth keyboards can pair with your computer. Keyboard Connection Types Keyboards can select the keys using a mouse or by touching the keys on almost all computers and tablets, however, they generally used in touchscreen devices such as batteries. Wireless Wireless keyboards are may be connected ...

3048 Me and My Dell
Page 36
... use Wi‑Fi technology and allow wireless connectivity through cellular tower technology. NOTE: File sharing works only between two devices by touching the devices with each other. Your computer may be internal (expansion cards or integrated to your computer or tablet, see the documentation...Adapter Wireless Wide Area Network (WWAN) controllers allow your devices to connect to your computer or tablet, over a short distance. On Dell laptops and tablets that forward data at high speed along the optical fiber lines of the Internet backbone. This technology is enabled by ...
... use Wi‑Fi technology and allow wireless connectivity through cellular tower technology. NOTE: File sharing works only between two devices by touching the devices with each other. Your computer may be internal (expansion cards or integrated to your computer or tablet, see the documentation...Adapter Wireless Wide Area Network (WWAN) controllers allow your devices to connect to your computer or tablet, over a short distance. On Dell laptops and tablets that forward data at high speed along the optical fiber lines of the Internet backbone. This technology is enabled by ...

3048 Me and My Dell
Page 54
... scroll bar, close and minimize windows using the buttons on the window, and so on. If your computer or tablet has a touchscreen display, you can touch the screen to interact with the items instead of a touchscreen by allowing you to open files, folder, and apps, zoom‑in, zoom‑out...
... scroll bar, close and minimize windows using the buttons on the window, and so on. If your computer or tablet has a touchscreen display, you can touch the screen to interact with the items instead of a touchscreen by allowing you to open files, folder, and apps, zoom‑in, zoom‑out...

3048 Me and My Dell
Page 55
Flick also works vertically when navigating content such as images or songs in . Flick Move a finger quickly in the desired direction to zoom‑out. Place two fingers on the touchscreen and then bring them apart to open the context menu. Zoom Place two fingers on the touchscreen and then move them closer to flip through content in the active window like pages in a book. Dwell Touch and hold the item on the screen to zoom‑in a play‑list. Using Your Touchscreen 55
Flick also works vertically when navigating content such as images or songs in . Flick Move a finger quickly in the desired direction to zoom‑out. Place two fingers on the touchscreen and then bring them apart to open the context menu. Zoom Place two fingers on the touchscreen and then move them closer to flip through content in the active window like pages in a book. Dwell Touch and hold the item on the screen to zoom‑in a play‑list. Using Your Touchscreen 55


