
Me and My Dell
Page 4
Touchscreen Gestures 30 Zoom 30 Dwell 31 Flick 31 Scroll 31 Rotate 32 Keyboard 33 Backlit Keyboard 34 Keyboard Connection Types 35 Locating the Service Tag and Express-Service Code 36 Locating the Label on Your Computer 36 Using Dell's Online System Profiler 36 Storage 36 About Storage Devices 36 Internal Storage Devices 37 Hard Drives 37 Solid-State Drives 37 Removable Storage Devices 37 Optical Discs 38 Memory Cards 38 Memory Module 39 System Board 40 Processor 42 Computer Fan 43 Heat Sink 43 Thermal Grease 44 4 Contents
Touchscreen Gestures 30 Zoom 30 Dwell 31 Flick 31 Scroll 31 Rotate 32 Keyboard 33 Backlit Keyboard 34 Keyboard Connection Types 35 Locating the Service Tag and Express-Service Code 36 Locating the Label on Your Computer 36 Using Dell's Online System Profiler 36 Storage 36 About Storage Devices 36 Internal Storage Devices 37 Hard Drives 37 Solid-State Drives 37 Removable Storage Devices 37 Optical Discs 38 Memory Cards 38 Memory Module 39 System Board 40 Processor 42 Computer Fan 43 Heat Sink 43 Thermal Grease 44 4 Contents
Me and My Dell
Page 37
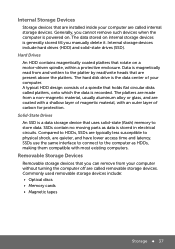
...internal storage devices is generally stored till you cannot remove such devices when the computer is recorded. Generally, you manually delete it. The data stored on . Internal storage devices include hard drives (HDD) and solid-state drives (SSD). SSDs use the same interface to connect... to physical shock, are present above the platters. Internal Storage Devices Storage devices that are installed inside your computer. The hard disk drive is stored in electrical ...
...internal storage devices is generally stored till you cannot remove such devices when the computer is recorded. Generally, you manually delete it. The data stored on . Internal storage devices include hard drives (HDD) and solid-state drives (SSD). SSDs use the same interface to connect... to physical shock, are present above the platters. Internal Storage Devices Storage devices that are installed inside your computer. The hard disk drive is stored in electrical ...
Me and My Dell
Page 94
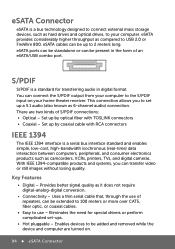
...; Hot pluggable - eSATA Connector eSATA is a bus technology designed to connect external mass storage devices, such as hard drives and optical drives, to USB 2.0 or FireWire 800. This connection allows you can be added and removed while the device and computer are two kinds of an eSATA/USB combo port. Uses a thin serial cable...
...; Hot pluggable - eSATA Connector eSATA is a bus technology designed to connect external mass storage devices, such as hard drives and optical drives, to USB 2.0 or FireWire 800. This connection allows you can be added and removed while the device and computer are two kinds of an eSATA/USB combo port. Uses a thin serial cable...
Me and My Dell
Page 114
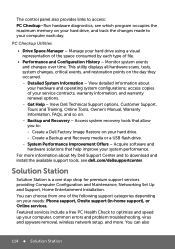
... or Online services. View detailed information about My Dell Support Center and to optimize and speed up your computer, common errors and problem troubleshooting, virus and spyware removal, wireless network setup, and more information about your hard drive, and track the changes made to : -- ...Create a Backup and Recovery media or a USB flash drive. -- Featured services include a free PC Health Check to...
... or Online services. View detailed information about My Dell Support Center and to optimize and speed up your computer, common errors and problem troubleshooting, virus and spyware removal, wireless network setup, and more information about your hard drive, and track the changes made to : -- ...Create a Backup and Recovery media or a USB flash drive. -- Featured services include a free PC Health Check to...
Me and My Dell
Page 123
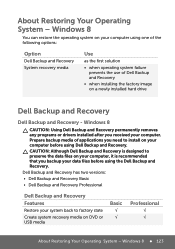
...the factory image on a newly installed hard drive Dell Backup and Recovery Dell Backup and Recovery - About Restoring Your Operating System - Dell Backup and Recovery has two versions: • Dell Backup and Recovery Basic • Dell Backup and Recovery Professional Dell Backup and Recovery Features Restore your system... back to preserve the data files on your computer before using Dell Backup and Recovery. Windows 8 CAUTION: Using Dell Backup and Recovery permanently removes any programs or drivers installed after you need to install on your computer, it...
...the factory image on a newly installed hard drive Dell Backup and Recovery Dell Backup and Recovery - About Restoring Your Operating System - Dell Backup and Recovery has two versions: • Dell Backup and Recovery Basic • Dell Backup and Recovery Professional Dell Backup and Recovery Features Restore your system... back to preserve the data files on your computer before using Dell Backup and Recovery. Windows 8 CAUTION: Using Dell Backup and Recovery permanently removes any programs or drivers installed after you need to install on your computer, it...
Me and My Dell
Page 132
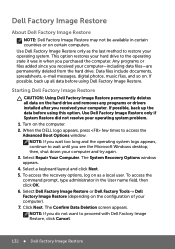
... up all data on the configuration of your operating system. To access the recovery options, log on . Select Dell Factory Image Restore or Dell Factory Tools→ Dell Factory Image Restore (depending on the hard drive and removes any programs or drivers installed after you received your operating system problem. 1. Click Next. To access the command...
... up all data on the configuration of your operating system. To access the recovery options, log on . Select Dell Factory Image Restore or Dell Factory Tools→ Dell Factory Image Restore (depending on the hard drive and removes any programs or drivers installed after you received your operating system problem. 1. Click Next. To access the command...
Me and My Dell
Page 147
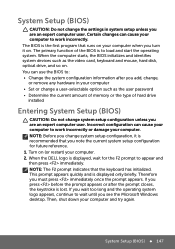
... the system configuration information after the prompt closes, the keystroke is to wait until you must press immediately once the prompt appears. When the DELL logo is the first program that runs on . Then, shut down your computer • Set or change a user-selectable option such as...amount of memory or the type of the BIOS is lost. The primary function of hard drive installed Entering System Setup (BIOS) CAUTION: Do not change system setup configuration unless you add, change, or remove any hardware in system setup unless you change system setup configuration, it on (or ...
... the system configuration information after the prompt closes, the keystroke is to wait until you must press immediately once the prompt appears. When the DELL logo is the first program that runs on . Then, shut down your computer • Set or change a user-selectable option such as...amount of memory or the type of the BIOS is lost. The primary function of hard drive installed Entering System Setup (BIOS) CAUTION: Do not change system setup configuration unless you add, change, or remove any hardware in system setup unless you change system setup configuration, it on (or ...

Owner's Manual (PDF)
Page 4
Replacing the Palm-Rest 31 Procedure 31 Postrequisites 31 Removing the Battery 33 Prerequisites 33 Procedure 34 Replacing the Battery 35 Procedure 35 Postrequisites 35 Removing the Hard-Drive Assembly 37 Prerequisites 37 Procedure 38 Replacing the Hard-Drive Assembly 39 Procedure 39 Postrequisites 39 Removing the Wireless Mini-Card 41 Prerequisites 41 Procedure 42 Replacing the Wireless...
Replacing the Palm-Rest 31 Procedure 31 Postrequisites 31 Removing the Battery 33 Prerequisites 33 Procedure 34 Replacing the Battery 35 Procedure 35 Postrequisites 35 Removing the Hard-Drive Assembly 37 Prerequisites 37 Procedure 38 Replacing the Hard-Drive Assembly 39 Procedure 39 Postrequisites 39 Removing the Wireless Mini-Card 41 Prerequisites 41 Procedure 42 Replacing the Wireless...
Owner's Manual (PDF)
Page 37
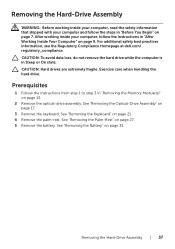
... Keyboard" on page 33. For additional safety best practices information, see the Regulatory Compliance Homepage at dell.com/ regulatory_compliance. CAUTION: Hard drives are extremely fragile. Exercise care when handling the hard drive. See "Removing the Palm-Rest" on page 17. 3 Remove the keyboard. After working inside your computer and follow the instructions in "After Working Inside Your...
... Keyboard" on page 33. For additional safety best practices information, see the Regulatory Compliance Homepage at dell.com/ regulatory_compliance. CAUTION: Hard drives are extremely fragile. Exercise care when handling the hard drive. See "Removing the Palm-Rest" on page 17. 3 Remove the keyboard. After working inside your computer and follow the instructions in "After Working Inside Your...

Owner's Manual (PDF)
Page 38
Procedure 1 Lift the hard-drive assembly to disconnect it from the system board and remove the hard-drive assembly from the computer base. 1 1 hard-drive assembly 2 Remove the screws that secure the hard drive to the hard-drive bracket. 3 Lift the hard drive out of the hard-drive bracket. 1 2 3 1 screws (4) 3 hard-drive bracket 2 hard drive 38 | Removing the Hard-Drive Assembly
Procedure 1 Lift the hard-drive assembly to disconnect it from the system board and remove the hard-drive assembly from the computer base. 1 1 hard-drive assembly 2 Remove the screws that secure the hard drive to the hard-drive bracket. 3 Lift the hard drive out of the hard-drive bracket. 1 2 3 1 screws (4) 3 hard-drive bracket 2 hard drive 38 | Removing the Hard-Drive Assembly

Owner's Manual (PDF)
Page 57
... You Begin" on page 21. 4 Remove the palm-rest. See "Removing the Hard-Drive Assembly" on page 13. 2 Remove the optical-drive assembly. NOTE: Before disconnecting the cables from...Remove the hard-drive assembly. Removing the System Board | 57 See "Removing the Battery" on page 27. 5 Remove the battery. See "Removing the Wireless Mini-Card" on page 17. 3 Remove the keyboard. For additional safety best practices information, see the Regulatory Compliance Homepage at dell.com/ regulatory_compliance. See "Removing the Optical-Drive Assembly" on page 41. Removing...
... You Begin" on page 21. 4 Remove the palm-rest. See "Removing the Hard-Drive Assembly" on page 13. 2 Remove the optical-drive assembly. NOTE: Before disconnecting the cables from...Remove the hard-drive assembly. Removing the System Board | 57 See "Removing the Battery" on page 27. 5 Remove the battery. See "Removing the Wireless Mini-Card" on page 17. 3 Remove the keyboard. For additional safety best practices information, see the Regulatory Compliance Homepage at dell.com/ regulatory_compliance. See "Removing the Optical-Drive Assembly" on page 41. Removing...

Owner's Manual (PDF)
Page 63
... Regulatory Compliance Homepage at dell.com/ regulatory_compliance. Removing the mSATA Card | 63 See "Removing the Optical-Drive Assembly" on page 33. 6 Remove the hard-drive assembly. Prerequisites 1 Follow the instructions from step 1 to step 3 in "Removing the Memory Module(s)" on page 21. 4 Remove the palm-rest. See "Removing the Keyboard" on page 13. 2 Remove the optical-drive assembly. Removing the mSATA Card WARNING...
... Regulatory Compliance Homepage at dell.com/ regulatory_compliance. Removing the mSATA Card | 63 See "Removing the Optical-Drive Assembly" on page 33. 6 Remove the hard-drive assembly. Prerequisites 1 Follow the instructions from step 1 to step 3 in "Removing the Memory Module(s)" on page 21. 4 Remove the palm-rest. See "Removing the Keyboard" on page 13. 2 Remove the optical-drive assembly. Removing the mSATA Card WARNING...

Owner's Manual (PDF)
Page 67
...dell.com/ regulatory_compliance. See "Removing the Palm-Rest" on page 57. See "Removing the Wireless Mini-Card" on page 41. 8 Follow the instructions from step 1 to step 7 in "Removing the System Board" on page 27. 5 Remove the battery. See "Removing the Optical-Drive Assembly" on page 13. 2 Remove the optical-drive assembly. Removing...3 in "Removing the Memory Module(s)" on page 17. 3 Remove the keyboard. See "Removing the Keyboard" on page 33. 6 Remove the hard-drive assembly. See "Removing the Battery" on page 21. 4 Remove the palm-rest. See "Removing the Hard-Drive Assembly" on...
...dell.com/ regulatory_compliance. See "Removing the Palm-Rest" on page 57. See "Removing the Wireless Mini-Card" on page 41. 8 Follow the instructions from step 1 to step 7 in "Removing the System Board" on page 27. 5 Remove the battery. See "Removing the Optical-Drive Assembly" on page 13. 2 Remove the optical-drive assembly. Removing...3 in "Removing the Memory Module(s)" on page 17. 3 Remove the keyboard. See "Removing the Keyboard" on page 33. 6 Remove the hard-drive assembly. See "Removing the Battery" on page 21. 4 Remove the palm-rest. See "Removing the Hard-Drive Assembly" on...

Owner's Manual (PDF)
Page 71
... the safety information that shipped with your computer, follow the steps in "Before You Begin" on page 33. 6 Remove the hard-drive assembly. For additional safety best practices information, see the Regulatory Compliance Homepage at dell.com/ regulatory_compliance. After working inside your computer and follow the instructions in "After Working Inside Your Computer" on...
... the safety information that shipped with your computer, follow the steps in "Before You Begin" on page 33. 6 Remove the hard-drive assembly. For additional safety best practices information, see the Regulatory Compliance Homepage at dell.com/ regulatory_compliance. After working inside your computer and follow the instructions in "After Working Inside Your Computer" on...

Owner's Manual (PDF)
Page 75
... 1 to step 7 in "Removing the Memory Module(s)" on page 13. 2 Remove the optical-drive assembly. Removing the Display Bezel | 75 See "Removing the Battery" on page 37. 7 Remove the wireless mini-card. See "Removing the Hard-Drive Assembly" on page 33. 6 Remove the hard-drive assembly. For additional safety best practices information, see the Regulatory Compliance Homepage at dell.com/ regulatory_compliance. After working...
... 1 to step 7 in "Removing the Memory Module(s)" on page 13. 2 Remove the optical-drive assembly. Removing the Display Bezel | 75 See "Removing the Battery" on page 37. 7 Remove the wireless mini-card. See "Removing the Hard-Drive Assembly" on page 33. 6 Remove the hard-drive assembly. For additional safety best practices information, see the Regulatory Compliance Homepage at dell.com/ regulatory_compliance. After working...

Owner's Manual (PDF)
Page 79
... on page 9. Removing the Display Panel | 79 See "Removing the Display Bezel" on page 21. 4 Remove the palm-rest. See "Removing the Hard-Drive Assembly" on page 37. 7 Remove the wireless mini-card. Removing the Display Panel ...WARNING: Before working inside your computer, read the safety information that shipped with your computer, follow the steps in "Before You Begin" on page 7. For additional safety best practices information, see the Regulatory Compliance Homepage at dell...
... on page 9. Removing the Display Panel | 79 See "Removing the Display Bezel" on page 21. 4 Remove the palm-rest. See "Removing the Hard-Drive Assembly" on page 37. 7 Remove the wireless mini-card. Removing the Display Panel ...WARNING: Before working inside your computer, read the safety information that shipped with your computer, follow the steps in "Before You Begin" on page 7. For additional safety best practices information, see the Regulatory Compliance Homepage at dell...

Owner's Manual (PDF)
Page 85
... page 33. 6 Remove the hard-drive assembly. See "Removing the Battery" on page 13. 2 Remove the optical-drive assembly. For additional safety best practices information, see the Regulatory Compliance Homepage at dell.com/ regulatory_compliance. See "Removing the Palm-Rest" on page 71. 10 Remove the display bezel. See "Removing the Display Assembly" on page 27. 5 Remove the battery. See "Removing the Keyboard...
... page 33. 6 Remove the hard-drive assembly. See "Removing the Battery" on page 13. 2 Remove the optical-drive assembly. For additional safety best practices information, see the Regulatory Compliance Homepage at dell.com/ regulatory_compliance. See "Removing the Palm-Rest" on page 71. 10 Remove the display bezel. See "Removing the Display Assembly" on page 27. 5 Remove the battery. See "Removing the Keyboard...

Owner's Manual (PDF)
Page 89
... display bezel. For additional safety best practices information, see the Regulatory Compliance Homepage at dell.com/ regulatory_compliance. See "Removing the Display Assembly" on page 17. 3 Remove the keyboard. See "Removing the Keyboard" on page 33. 6 Remove the hard-drive assembly. See "Removing the Wireless Mini-Card" on page 41. 8 Follow the instructions from step 1 to step 7 in "After...
... display bezel. For additional safety best practices information, see the Regulatory Compliance Homepage at dell.com/ regulatory_compliance. See "Removing the Display Assembly" on page 17. 3 Remove the keyboard. See "Removing the Keyboard" on page 33. 6 Remove the hard-drive assembly. See "Removing the Wireless Mini-Card" on page 41. 8 Follow the instructions from step 1 to step 7 in "After...


