
Dell™ Technology Guide
Page 11
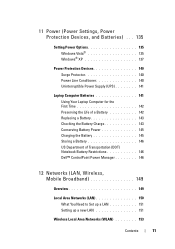
... Using Your Laptop Computer for the First Time 142 Preserving the Life of a Battery 142 Replacing a Battery 143 Checking the Battery Charge 143 Conserving Battery Power 145 Charging the Battery 145 Storing a Battery 146 US Department of Transportation (DOT) Notebook Battery Restrictions 146 Dell™ ControlPoint Power Manager 146 12 Networks (LAN, Wireless, Mobile Broadband 149 Overview 149 Local...
... Using Your Laptop Computer for the First Time 142 Preserving the Life of a Battery 142 Replacing a Battery 143 Checking the Battery Charge 143 Conserving Battery Power 145 Charging the Battery 145 Storing a Battery 146 US Department of Transportation (DOT) Notebook Battery Restrictions 146 Dell™ ControlPoint Power Manager 146 12 Networks (LAN, Wireless, Mobile Broadband 149 Overview 149 Local...
Dell™ Technology Guide
Page 107
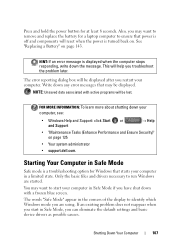
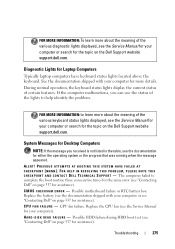
...reappear when you start your computer. Only the basic files and drivers necessary to identify which Windows mode you may want to remove and replace the battery for at least 8 seconds. The words "Safe Mode" appear in Safe Mode, you troubleshoot the problem later. FOR MORE INFORMATION:... The error reporting dialog box will reset when the power is off and components will be displayed. See "Replacing a Battery" on page 125 • Your system administrator • support.dell.com. Press and hold the power button for a laptop computer to start in the corners of the display...
...reappear when you start your computer. Only the basic files and drivers necessary to identify which Windows mode you may want to remove and replace the battery for at least 8 seconds. The words "Safe Mode" appear in Safe Mode, you troubleshoot the problem later. FOR MORE INFORMATION:... The error reporting dialog box will reset when the power is off and components will be displayed. See "Replacing a Battery" on page 125 • Your system administrator • support.dell.com. Press and hold the power button for a laptop computer to start in the corners of the display...
Dell™ Technology Guide
Page 143
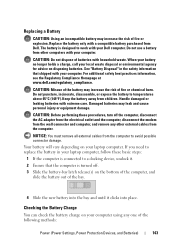
... increase the risk of the following methods: Power (Power Settings, Power Protection Devices, and Batteries) 143 If you need to work with your Dell computer. Replace the battery only with household waste. CAUTION: Misuse of the bay. 4 Slide the new battery into the bay and until it . 2 Ensure that shipped with extreme care. NOTICE: You...
... increase the risk of the following methods: Power (Power Settings, Power Protection Devices, and Batteries) 143 If you need to work with your Dell computer. Replace the battery only with household waste. CAUTION: Misuse of the bay. 4 Slide the new battery into the bay and until it . 2 Ensure that shipped with extreme care. NOTICE: You...
Dell™ Technology Guide
Page 144
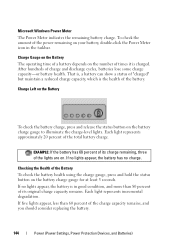
... than 80 percent of its charge remaining, three of the charge capacity remains, and you should consider replacing the battery. 144 Power (Power Settings, Power Protection Devices, and Batteries) After hundreds of the power remaining on your battery, double-click the Power Meter icon in good condition, and more than 60 percent of the...
... than 80 percent of its charge remaining, three of the charge capacity remains, and you should consider replacing the battery. 144 Power (Power Settings, Power Protection Devices, and Batteries) After hundreds of the power remaining on your battery, double-click the Power Meter icon in good condition, and more than 60 percent of the...
Dell™ Technology Guide
Page 275
... C H E C K P O I N T A N D C O N T A C T D E L L TE C H N I L U R E - The computer failed to complete the boot routine three consecutive times for the same error (see "Contacting Dell" on page 337 for assistance). Replace the battery (see "Contacting Dell" on page 337 for assistance). ALERT! Replace the CPU fan (see the documentation for Desktop Computers NOTE: If the message you can use the status...
... C H E C K P O I N T A N D C O N T A C T D E L L TE C H N I L U R E - The computer failed to complete the boot routine three consecutive times for the same error (see "Contacting Dell" on page 337 for assistance). Replace the battery (see "Contacting Dell" on page 337 for assistance). ALERT! Replace the CPU fan (see the documentation for Desktop Computers NOTE: If the message you can use the status...
Dell™ Technology Guide
Page 277
...R O N G - T I X E D - Enter the system setup program and correct the date or time (see "Running the Dell Diagnostics" on page 281). MEMORY DOUBLE WORD LOGIC FAILURE AT (ADDRESS), READ VALUE EXPECTING ( V A L U E) - See "Lockups and...FAILURE AT (ADDRESS), READ VALUE EXPECTING ( V A L U E) - STRIKE F1 TO RETRY BOOT, F2 FOR SETUP UTILITY. If the problem persists, replace the CMOS battery. S H U T D O W N F A I N T E R R U P T - N O T I M E R T I C K I L U R E - Run the Dell Diagnostics (see "Running the Dell Diagnostics" on page 292. R E A D F A I L U R E O N I N T E R N A L H A ...
...R O N G - T I X E D - Enter the system setup program and correct the date or time (see "Running the Dell Diagnostics" on page 281). MEMORY DOUBLE WORD LOGIC FAILURE AT (ADDRESS), READ VALUE EXPECTING ( V A L U E) - See "Lockups and...FAILURE AT (ADDRESS), READ VALUE EXPECTING ( V A L U E) - STRIKE F1 TO RETRY BOOT, F2 FOR SETUP UTILITY. If the problem persists, replace the CMOS battery. S H U T D O W N F A I N T E R R U P T - N O T I M E R T I C K I L U R E - Run the Dell Diagnostics (see "Running the Dell Diagnostics" on page 292. R E A D F A I L U R E O N I N T E R N A L H A ...
Dell™ Technology Guide
Page 278
If the problem persists, replace the CMOS battery. Run the Dell Diagnostics (see "Entering the System Setup Program" on page 281). STRIKE THE F1 KEY TO S H U T D O W N . - STRIKE T H E F 1 K E Y T O C O N T I N U E , F 2 T O R U N T H E S E T U P U T I L I K E T H E F 1 K E Y T O S H U T D O W N . - S T R I T Y. - TI M E... memory was not removed or installed, memory module or system board failure may have occurred. If the problem persists, replace the CMOS battery. O F - THE AC POWER ADAPTER TYPE CANNOT BE DETERMINED. THE SYSTEM CAN ONLY BOOT WITH A 130-W POWER ADAPTER OR ...
If the problem persists, replace the CMOS battery. Run the Dell Diagnostics (see "Entering the System Setup Program" on page 281). STRIKE THE F1 KEY TO S H U T D O W N . - STRIKE T H E F 1 K E Y T O C O N T I N U E , F 2 T O R U N T H E S E T U P U T I L I K E T H E F 1 K E Y T O S H U T D O W N . - S T R I T Y. - TI M E... memory was not removed or installed, memory module or system board failure may have occurred. If the problem persists, replace the CMOS battery. O F - THE AC POWER ADAPTER TYPE CANNOT BE DETERMINED. THE SYSTEM CAN ONLY BOOT WITH A 130-W POWER ADAPTER OR ...

Dell™ Technology Guide
Page 279
... computers with two batteries installed, one or more of the batteries may be installed incorrectly, or the batteries or system board may be defective. Contact Dell for assistance (see "Contacting Dell" on page 307. WARNING: DELL'S DISK MONITORING SYSTEM...BATTERY. - The battery may be installed incorrectly, or the battery or system board may be installed incorrectly, or the battery or system board may have occurred. BATTERY IS CRITICALLY LOW. WARNING MESSAGES HAVE BEEN DISABLED. See "System Setup" on page 337). IT IS ADVISABLE TO IMMEDIATELY BACK UP YOUR DATA AND REPLACE...
... computers with two batteries installed, one or more of the batteries may be installed incorrectly, or the batteries or system board may be defective. Contact Dell for assistance (see "Contacting Dell" on page 307. WARNING: DELL'S DISK MONITORING SYSTEM...BATTERY. - The battery may be installed incorrectly, or the battery or system board may be installed incorrectly, or the battery or system board may have occurred. BATTERY IS CRITICALLY LOW. WARNING MESSAGES HAVE BEEN DISABLED. See "System Setup" on page 337). IT IS ADVISABLE TO IMMEDIATELY BACK UP YOUR DATA AND REPLACE...
Dell™ Technology Guide
Page 287
...repeatedly reset time and date information after turning on the computer, or if an incorrect time or date displays during start-up, replace the battery (see the instructions that the original drive is defective. ENSURE THAT MICROSOFT® WINDOWS® RECOGNIZES THE DRIVE - If ...ONTO THE SPINDLE Troubleshooting 287 For additional safety best practices information, see the Regulatory Compliance Homepage at www.dell.com/regulatory_compliance. See "Maintenance Tasks (Enhance Performance and Ensure Security)" on page 337). Replace the battery only with your computer).
...repeatedly reset time and date information after turning on the computer, or if an incorrect time or date displays during start-up, replace the battery (see the instructions that the original drive is defective. ENSURE THAT MICROSOFT® WINDOWS® RECOGNIZES THE DRIVE - If ...ONTO THE SPINDLE Troubleshooting 287 For additional safety best practices information, see the Regulatory Compliance Homepage at www.dell.com/regulatory_compliance. See "Maintenance Tasks (Enhance Performance and Ensure Security)" on page 337). Replace the battery only with your computer).
Setup Guide
Page 5
...Internet (Optional 8 Using Your Inspiron Laptop 12 Device Status Lights 12 Right Side Features 14 Left Side Features 16 Front Side Features 18 Computer Base and Keyboard Features 19 Media Controls 20 Display Features 21 Removing and Replacing the Battery 22 Software Features 23 Solving ...Problems 26 Network Problems 26 Power Problems 28 Memory Problems 29 Lockups and Software Problems 30 Dell Support Center 33 System Messages 33 Using Support Tools ...
...Internet (Optional 8 Using Your Inspiron Laptop 12 Device Status Lights 12 Right Side Features 14 Left Side Features 16 Front Side Features 18 Computer Base and Keyboard Features 19 Media Controls 20 Display Features 21 Removing and Replacing the Battery 22 Software Features 23 Solving ...Problems 26 Network Problems 26 Power Problems 28 Memory Problems 29 Lockups and Software Problems 30 Dell Support Center 33 System Messages 33 Using Support Tools ...

Setup Guide
Page 24
Using Your Inspiron Laptop Removing and Replacing the Battery CAUTION: Using an incompatible battery may increase the risk of fire or explosion. Slide the battery release latch until it clicks into place. 3. To remove the battery: 1. To replace the battery, slide it into the bay until it over. 2. Slide the battery out. CAUTION: Before removing the battery, shut down the computer...
Using Your Inspiron Laptop Removing and Replacing the Battery CAUTION: Using an incompatible battery may increase the risk of fire or explosion. Slide the battery release latch until it clicks into place. 3. To remove the battery: 1. To replace the battery, slide it into the bay until it over. 2. Slide the battery out. CAUTION: Before removing the battery, shut down the computer...

Setup Guide
Page 36
Possible motherboard failure or RTC battery low. CPU fan failure - No boot device available - Replace the CPU fan. Keyboard failure - Previous attempts at booting this checkpoint and contact Dell Technical Support - See the Service Manual on the Dell Support website at checkpoint [nnnn]. ... the boot routine three consecutive times for the same error see "Contacting Dell" on page 50 for assistance. Replace the battery. Possible hard disk drive failure during HDD boot test see "Contacting Dell" on page 50 for assistance. Hard-disk drive read failure - Keyboard...
Possible motherboard failure or RTC battery low. CPU fan failure - No boot device available - Replace the CPU fan. Keyboard failure - Previous attempts at booting this checkpoint and contact Dell Technical Support - See the Service Manual on the Dell Support website at checkpoint [nnnn]. ... the boot routine three consecutive times for the same error see "Contacting Dell" on page 50 for assistance. Replace the battery. Possible hard disk drive failure during HDD boot test see "Contacting Dell" on page 50 for assistance. Hard-disk drive read failure - Keyboard...
Service Manual
Page 2
l When replacing a component, you begin any installed cards from being scratched. 2. NOTICE: Handle components and cards with locking tabs, press inward on your Dell Product Information Guide... from the network wall jack. 4. NOTE: To avoid damage to the computer, use batteries designed for this section, follow the safety instructions in your computer. NOTE: The color...Your Computer. Turn the computer over. Back to Contents Page Before You Begin Dell™ Inspiron™ 1525/1526 Service Manual Recommended Tools Before Working Inside Your Computer This document provides ...
l When replacing a component, you begin any installed cards from being scratched. 2. NOTICE: Handle components and cards with locking tabs, press inward on your Dell Product Information Guide... from the network wall jack. 4. NOTE: To avoid damage to the computer, use batteries designed for this section, follow the safety instructions in your computer. NOTE: The color...Your Computer. Turn the computer over. Back to Contents Page Before You Begin Dell™ Inspiron™ 1525/1526 Service Manual Recommended Tools Before Working Inside Your Computer This document provides ...
Service Manual
Page 6
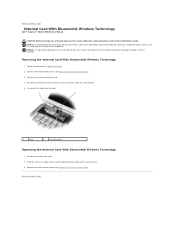
...Guide. Slide the card at an angle into the card compartment and replace the securing screw. 3. Removing the Internal Card With Bluetooth® Wireless Technology 1. Remove the screw securing the card. 4. Replace the center control cover (see Removing the Center Control Cover). 3. ...see Replacing the Center Control Cover). Back to the system board, you must remove the battery from the battery bay before you begin working inside the computer. NOTICE: To help prevent damage to Contents Page Internal Card With Bluetooth® Wireless Technology Dell™ Inspiron™ 1525/...
...Guide. Slide the card at an angle into the card compartment and replace the securing screw. 3. Removing the Internal Card With Bluetooth® Wireless Technology 1. Remove the screw securing the card. 4. Replace the center control cover (see Removing the Center Control Cover). 3. ...see Replacing the Center Control Cover). Back to the system board, you must remove the battery from the battery bay before you begin working inside the computer. NOTICE: To help prevent damage to Contents Page Internal Card With Bluetooth® Wireless Technology Dell™ Inspiron™ 1525/...
Service Manual
Page 7
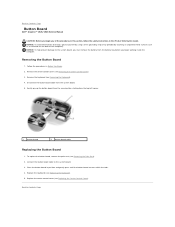
...to Contents Page Button Board Dell™ Inspiron™ 1525/1526 Service Manual CAUTION: Before you begin working inside the computer. Remove the center control cover (see Replacing the Keyboard). 5. Disconnect the button board cable from the battery bay before you must remove the battery from the system board....(such as a connector on the back of the procedures in this section, follow the safety instructions in the Product Information Guide. Replace the keyboard (see Removing the Center Control Cover). 3. NOTICE: To help prevent damage to the system board, you begin any of...
...to Contents Page Button Board Dell™ Inspiron™ 1525/1526 Service Manual CAUTION: Before you begin working inside the computer. Remove the center control cover (see Replacing the Keyboard). 5. Disconnect the button board cable from the battery bay before you must remove the battery from the system board....(such as a connector on the back of the procedures in this section, follow the safety instructions in the Product Information Guide. Replace the keyboard (see Removing the Center Control Cover). 3. NOTICE: To help prevent damage to the system board, you begin any of...
Service Manual
Page 10
... Center Control Cover 1. Lift the keyboard and hold it up and slightly forward to access to replace. Replace the two screws on the right edge near the top to the center control cover. 6. In the battery bay, replace the two screws that secure the center control cover. Press from left edge of the keyboard...
... Center Control Cover 1. Lift the keyboard and hold it up and slightly forward to access to replace. Replace the two screws on the right edge near the top to the center control cover. 6. In the battery bay, replace the two screws that secure the center control cover. Press from left edge of the keyboard...
Service Manual
Page 11
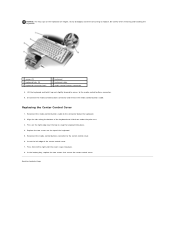
... all Mini-Cards (see Removing the ExpressCard Cage). 12. Use a plastic scribe to Contents Page Coin-Cell Battery Dell™ Inspiron™ 1525/1526 Service Manual Removing the Coin-Cell Battery Replacing the Coin-Cell Battery Removing the Coin-Cell Battery CAUTION: Before you begin any of the procedures in this section, follow the safety instructions in Before...
... all Mini-Cards (see Removing the ExpressCard Cage). 12. Use a plastic scribe to Contents Page Coin-Cell Battery Dell™ Inspiron™ 1525/1526 Service Manual Removing the Coin-Cell Battery Replacing the Coin-Cell Battery Removing the Coin-Cell Battery CAUTION: Before you begin any of the procedures in this section, follow the safety instructions in Before...
Service Manual
Page 12
Follow the steps in Removing the Coin-Cell Battery in the Product Information Guide. 1. Replacing the Coin-Cell Battery CAUTION: Before you begin the following procedure, follow the safety instructions in the reverse order. Slide the coin-cell battery into the slot and gently press until it snaps to Contents Page Back to the slot. 3. Hold the coin-cell battery with the positive side up. 2.
Follow the steps in Removing the Coin-Cell Battery in the Product Information Guide. 1. Replacing the Coin-Cell Battery CAUTION: Before you begin the following procedure, follow the safety instructions in the reverse order. Slide the coin-cell battery into the slot and gently press until it snaps to Contents Page Back to the slot. 3. Hold the coin-cell battery with the positive side up. 2.
Service Manual
Page 27
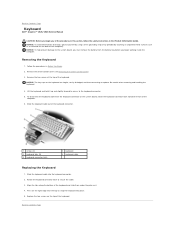
... of the keyboard connector. 1 screws (2) 3 keyboard tabs (5) 5 keyboard connector latch 2 keyboard 4 keyboard cable Replacing the Keyboard 1. Back to secure the cable. 3. Back to Contents Page Keyboard Dell™ Inspiron™ 1525/1526 Service Manual CAUTION: Before you begin working inside the computer. Remove the center control cover (see Removing... front of the keyboard. Press on the right edge near the top to the system board, you must remove the battery from the keyboard connector on the keyboard are fragile, easily dislodged, and time-consuming to the keyboard connector. 5.
... of the keyboard connector. 1 screws (2) 3 keyboard tabs (5) 5 keyboard connector latch 2 keyboard 4 keyboard cable Replacing the Keyboard 1. Back to secure the cable. 3. Back to Contents Page Keyboard Dell™ Inspiron™ 1525/1526 Service Manual CAUTION: Before you begin working inside the computer. Remove the center control cover (see Removing... front of the keyboard. Press on the right edge near the top to the system board, you must remove the battery from the keyboard connector on the keyboard are fragile, easily dislodged, and time-consuming to the keyboard connector. 5.
Service Manual
Page 29
...and remove it. Remove the internal card with Bluetooth wireless technology, if installed (see Removing the Keyboard). 8. Slide the battery latch assembly to release the latch button. 16. Remove the keyboard (see Removing the Internal Card With Bluetooth® ... drive (see Removing the Processor Module). 14. Back to Contents Page Battery Latch Assembly Dell™ Inspiron™ 1525/1526 Service Manual Removing the Battery Latch Assembly Replacing the Battery Latch Assembly Removing the Battery Latch Assembly CAUTION: Before you begin the following procedure, follow the safety...
...and remove it. Remove the internal card with Bluetooth wireless technology, if installed (see Removing the Keyboard). 8. Slide the battery latch assembly to release the latch button. 16. Remove the keyboard (see Removing the Internal Card With Bluetooth® ... drive (see Removing the Processor Module). 14. Back to Contents Page Battery Latch Assembly Dell™ Inspiron™ 1525/1526 Service Manual Removing the Battery Latch Assembly Replacing the Battery Latch Assembly Removing the Battery Latch Assembly CAUTION: Before you begin the following procedure, follow the safety...


