
Specifications
Page 2
Inspiron 7548 only: Press Fn+H to toggle this light between hard-drive/battery-status light. Specifications Front Front Views Left Right Base Display 1 1 Battery/Power-status light Indicates the battery-charge status.
Inspiron 7548 only: Press Fn+H to toggle this light between hard-drive/battery-status light. Specifications Front Front Views Left Right Base Display 1 1 Battery/Power-status light Indicates the battery-charge status.
Specifications
Page 14
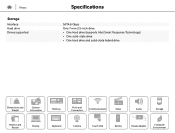
Views Storage Interface Hard drive Drives supported Specifications SATA 6 Gbps One 7 mm 2.5-inch drive • One hard drive (supports Intel Smart Response Technology) • One solid-state drive • One hard drive and solid-state hybrid drive Dimensions and Weight System Information Memory Ports and Connectors Communications Video Audio Storage Media-Card Reader Display Keyboard Camera Touch Pad Battery Power Adapter Computer Environment
Views Storage Interface Hard drive Drives supported Specifications SATA 6 Gbps One 7 mm 2.5-inch drive • One hard drive (supports Intel Smart Response Technology) • One solid-state drive • One hard drive and solid-state hybrid drive Dimensions and Weight System Information Memory Ports and Connectors Communications Video Audio Storage Media-Card Reader Display Keyboard Camera Touch Pad Battery Power Adapter Computer Environment

Specifications
Page 18
Keyboard Shortcut Keys Mute audio Decrease volume Increase volume Play previous track/chapter Play/Pause Play next track or chapter Switch to external display Search Toggle keyboard backlight Decrease brightness Increase brightness Toggle Fn-key lock Turn off/on wireless Open application menu Pause/Break Toggle status light between hard-drive and battery-status light (Inspiron 7548 only) System request Toggle scroll lock Sleep
Keyboard Shortcut Keys Mute audio Decrease volume Increase volume Play previous track/chapter Play/Pause Play next track or chapter Switch to external display Search Toggle keyboard backlight Decrease brightness Increase brightness Toggle Fn-key lock Turn off/on wireless Open application menu Pause/Break Toggle status light between hard-drive and battery-status light (Inspiron 7548 only) System request Toggle scroll lock Sleep
Specifications
Page 23
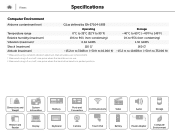
... G† 160 G‡ Altitude (maximum) -15.2 m to 3048 m (-50 ft to 10,000 ft) -15.2 m to 10,668 m (-50 ft to 35,000 ft) * Measured using a random vibration spectrum that simulates user environment. † Measured using a 2 ms half-sine pulse when the hard drive is in use. ‡ Measured using a ...2 ms half-sine pulse when the hard-drive head is in parked...
... G† 160 G‡ Altitude (maximum) -15.2 m to 3048 m (-50 ft to 10,000 ft) -15.2 m to 10,668 m (-50 ft to 35,000 ft) * Measured using a random vibration spectrum that simulates user environment. † Measured using a 2 ms half-sine pulse when the hard drive is in use. ‡ Measured using a ...2 ms half-sine pulse when the hard-drive head is in parked...

Service Manual
Page 3
Contents Before Working Inside Your Computer 7 Before You Begin 7 Safety Instructions 7 Recommended Tools 8 After Working Inside Your Computer 10 Removing the Base Cover 11 Procedure...11 Replacing the Base Cover 13 Procedure...13 Removing the Battery 14 Prerequisites...14 Procedure...14 Replacing the Battery 16 Procedure...16 Post-requisites 16 Removing the Hard Drive 17 Prerequisites...17 Procedure...17 Replacing the Hard Drive 19 Procedure...19 Post-requisites 19
Contents Before Working Inside Your Computer 7 Before You Begin 7 Safety Instructions 7 Recommended Tools 8 After Working Inside Your Computer 10 Removing the Base Cover 11 Procedure...11 Replacing the Base Cover 13 Procedure...13 Removing the Battery 14 Prerequisites...14 Procedure...14 Replacing the Battery 16 Procedure...16 Post-requisites 16 Removing the Hard Drive 17 Prerequisites...17 Procedure...17 Replacing the Hard Drive 19 Procedure...19 Post-requisites 19
Service Manual
Page 17
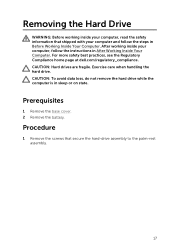
... CAUTION: To avoid data loss, do not remove the hard drive while the computer is in Before Working Inside Your Computer. For more safety best practices, see the Regulatory Compliance home page at dell.com/regulatory_compliance. Prerequisites 1 Remove the base cover. 2 ...Remove the battery. After working inside your computer, follow the steps in sleep or on state. Exercise care when handling the hard drive. CAUTION: Hard drives are fragile. Removing the Hard Drive WARNING: Before working...
... CAUTION: To avoid data loss, do not remove the hard drive while the computer is in Before Working Inside Your Computer. For more safety best practices, see the Regulatory Compliance home page at dell.com/regulatory_compliance. Prerequisites 1 Remove the base cover. 2 ...Remove the battery. After working inside your computer, follow the steps in sleep or on state. Exercise care when handling the hard drive. CAUTION: Hard drives are fragile. Removing the Hard Drive WARNING: Before working...

Service Manual
Page 18
2 Slide and lift the hard-drive assembly off the palm-rest assembly. 1 screws (4) 2 hard-drive assembly 3 Remove the screws that secure the hard-drive bracket to the hard-drive. 4 Lift the hard-drive bracket off the hard drive. 1 hard-drive bracket 3 hard drive 2 screws (4) 18
2 Slide and lift the hard-drive assembly off the palm-rest assembly. 1 screws (4) 2 hard-drive assembly 3 Remove the screws that secure the hard-drive bracket to the hard-drive. 4 Lift the hard-drive bracket off the hard drive. 1 hard-drive bracket 3 hard drive 2 screws (4) 18

Service Manual
Page 19
... fragile. Exercise care when handling the hard drive. Procedure 1 Align the screw holes on the hard-drive bracket with the screw holes on the palm-rest assembly. 4 Replace the screws that shipped with your computer and follow ...the safety information that secure the hard-drive assembly to the hard-drive. 3 Slide the hard-drive assembly into the slot on the hard drive. 2 Replace the screws that secure the hard-drive bracket to the palm-rest assembly. For more safety best practices, see the Regulatory Compliance home page at dell.com/regulatory_compliance. After working inside ...
... fragile. Exercise care when handling the hard drive. Procedure 1 Align the screw holes on the hard-drive bracket with the screw holes on the palm-rest assembly. 4 Replace the screws that shipped with your computer and follow ...the safety information that secure the hard-drive assembly to the hard-drive. 3 Slide the hard-drive assembly into the slot on the hard drive. 2 Replace the screws that secure the hard-drive bracket to the palm-rest assembly. For more safety best practices, see the Regulatory Compliance home page at dell.com/regulatory_compliance. After working inside ...

Service Manual
Page 53
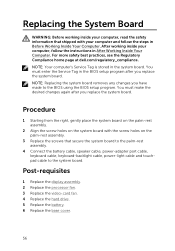
... Tag in the BIOS setup program after you replace the system board. Prerequisites 1 Remove the base cover. 2 Remove the battery. 3 Remove the hard drive. 4 Remove the video-card fan. 5 Remove the processor fan. 6 Remove the display assembly. 53 NOTE: Replacing the system board removes any ...changes you replace the system board. For more safety best practices, see the Regulatory Compliance home page at dell.com/regulatory_compliance. NOTE: Your computer's Service Tag is stored in the system board. After working inside your computer and follow the ...
... Tag in the BIOS setup program after you replace the system board. Prerequisites 1 Remove the base cover. 2 Remove the battery. 3 Remove the hard drive. 4 Remove the video-card fan. 5 Remove the processor fan. 6 Remove the display assembly. 53 NOTE: Replacing the system board removes any ...changes you replace the system board. For more safety best practices, see the Regulatory Compliance home page at dell.com/regulatory_compliance. NOTE: Your computer's Service Tag is stored in the system board. After working inside your computer and follow the ...

Service Manual
Page 56
...you replace the system board. Post-requisites 1 Replace the display assembly. 2 Replace the processor fan. 3 Replace the video-card fan. 4 Replace the hard drive. 5 Replace the battery. 6 Replace the base cover. 56 Replacing the System Board WARNING: Before working inside your computer, read the safety information that ... the steps in After Working Inside Your Computer. For more safety best practices, see the Regulatory Compliance home page at dell.com/regulatory_compliance. After working inside your computer and follow the instructions in Before Working Inside Your Computer.
...you replace the system board. Post-requisites 1 Replace the display assembly. 2 Replace the processor fan. 3 Replace the video-card fan. 4 Replace the hard drive. 5 Replace the battery. 6 Replace the base cover. 56 Replacing the System Board WARNING: Before working inside your computer, read the safety information that ... the steps in After Working Inside Your Computer. For more safety best practices, see the Regulatory Compliance home page at dell.com/regulatory_compliance. After working inside your computer and follow the instructions in Before Working Inside Your Computer.
Service Manual
Page 57
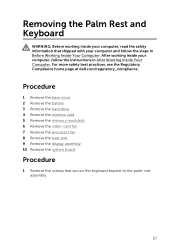
... inside your computer, follow the steps in After Working Inside Your Computer. Procedure 1 Remove the base cover. 2 Remove the battery. 3 Remove the hard drive. 4 Remove the wireless card. 5 Remove the memory module(s). 6 Remove the video-card fan. 7 Remove the processor fan. 8 Remove the heat... Remove the display assembly. 10 Remove the system board. For more safety best practices, see the Regulatory Compliance home page at dell.com/regulatory_compliance. Removing the Palm Rest and Keyboard WARNING: Before working inside your computer, read the safety information that secure the ...
... inside your computer, follow the steps in After Working Inside Your Computer. Procedure 1 Remove the base cover. 2 Remove the battery. 3 Remove the hard drive. 4 Remove the wireless card. 5 Remove the memory module(s). 6 Remove the video-card fan. 7 Remove the processor fan. 8 Remove the heat... Remove the display assembly. 10 Remove the system board. For more safety best practices, see the Regulatory Compliance home page at dell.com/regulatory_compliance. Removing the Palm Rest and Keyboard WARNING: Before working inside your computer, read the safety information that secure the ...

Service Manual
Page 60
... practices, see the Regulatory Compliance home page at dell.com/regulatory_compliance. Post-requisites 1 Replace the system board. 2 Replace the display assembly. 3 Replace the heat sink. 4 Replace the processor fan. 5 Replace the video-card fan. 6 Replace the memory module(s). 7 Replace the wireless card. 8 Replace the hard drive. 9 Replace the battery. 10 Replace the base...
... practices, see the Regulatory Compliance home page at dell.com/regulatory_compliance. Post-requisites 1 Replace the system board. 2 Replace the display assembly. 3 Replace the heat sink. 4 Replace the processor fan. 5 Replace the video-card fan. 6 Replace the memory module(s). 7 Replace the wireless card. 8 Replace the hard drive. 9 Replace the battery. 10 Replace the base...

Inspiron 15 7000 Series Service Manual
Page 3
Contents Before Working Inside Your Computer 7 Before You Begin 7 Safety Instructions 7 Recommended Tools 8 After Working Inside Your Computer 10 Removing the Base Cover 11 Procedure...11 Replacing the Base Cover 13 Procedure...13 Removing the Battery 14 Prerequisites...14 Procedure...14 Replacing the Battery 16 Procedure...16 Post-requisites 16 Removing the Hard Drive 17 Prerequisites...17 Procedure...17 Replacing the Hard Drive 19 Procedure...19 Post-requisites 19
Contents Before Working Inside Your Computer 7 Before You Begin 7 Safety Instructions 7 Recommended Tools 8 After Working Inside Your Computer 10 Removing the Base Cover 11 Procedure...11 Replacing the Base Cover 13 Procedure...13 Removing the Battery 14 Prerequisites...14 Procedure...14 Replacing the Battery 16 Procedure...16 Post-requisites 16 Removing the Hard Drive 17 Prerequisites...17 Procedure...17 Replacing the Hard Drive 19 Procedure...19 Post-requisites 19

Inspiron 15 7000 Series Service Manual
Page 17
... assembly. 17 Exercise care when handling the hard drive. Prerequisites 1 Remove the base cover. 2 Remove the battery. CAUTION: Hard drives are fragile. After working inside your computer and follow the instructions in sleep or on state. For more safety best practices, see the Regulatory Compliance home page at dell.com/regulatory_compliance. Procedure 1 Remove the screws...
... assembly. 17 Exercise care when handling the hard drive. Prerequisites 1 Remove the base cover. 2 Remove the battery. CAUTION: Hard drives are fragile. After working inside your computer and follow the instructions in sleep or on state. For more safety best practices, see the Regulatory Compliance home page at dell.com/regulatory_compliance. Procedure 1 Remove the screws...

Inspiron 15 7000 Series Service Manual
Page 18
2 Slide and lift the hard-drive assembly off the palm-rest assembly. 1 screws (4) 2 hard-drive assembly 3 Remove the screws that secure the hard-drive bracket to the hard-drive. 4 Lift the hard-drive bracket off the hard drive. 1 hard-drive bracket 3 hard drive 2 screws (4) 18
2 Slide and lift the hard-drive assembly off the palm-rest assembly. 1 screws (4) 2 hard-drive assembly 3 Remove the screws that secure the hard-drive bracket to the hard-drive. 4 Lift the hard-drive bracket off the hard drive. 1 hard-drive bracket 3 hard drive 2 screws (4) 18

Inspiron 15 7000 Series Service Manual
Page 19
... 1 Align the screw holes on the hard-drive bracket with the screw holes on the hard drive. 2 Replace the screws that secure the hard-drive bracket to the hard-drive. 3 Slide the hard-drive assembly into the slot on the palm-rest...Hard drives are fragile. After working inside your computer, follow the steps in After Working Inside Your Computer. Replacing the Hard Drive WARNING: Before working inside your computer, read the safety information that secure the hard-drive assembly to the palm-rest assembly. For more safety best practices, see the Regulatory Compliance home page at dell...
... 1 Align the screw holes on the hard-drive bracket with the screw holes on the hard drive. 2 Replace the screws that secure the hard-drive bracket to the hard-drive. 3 Slide the hard-drive assembly into the slot on the palm-rest...Hard drives are fragile. After working inside your computer, follow the steps in After Working Inside Your Computer. Replacing the Hard Drive WARNING: Before working inside your computer, read the safety information that secure the hard-drive assembly to the palm-rest assembly. For more safety best practices, see the Regulatory Compliance home page at dell...

Inspiron 15 7000 Series Service Manual
Page 53
... the safety information that you can reconnect them correctly after you replace the system board. Prerequisites 1 Remove the base cover. 2 Remove the battery. 3 Remove the hard drive. 4 Remove the video-card fan. 5 Remove the processor fan. 6 Remove the display assembly. 53 After working inside your computer, follow the steps in the system...
... the safety information that you can reconnect them correctly after you replace the system board. Prerequisites 1 Remove the base cover. 2 Remove the battery. 3 Remove the hard drive. 4 Remove the video-card fan. 5 Remove the processor fan. 6 Remove the display assembly. 53 After working inside your computer, follow the steps in the system...
Inspiron 15 7000 Series Service Manual
Page 56
Post-requisites 1 Replace the display assembly. 2 Replace the processor fan. 3 Replace the video-card fan. 4 Replace the hard drive. 5 Replace the battery. 6 Replace the base cover. 56 You must enter the Service Tag in the BIOS setup program after you replace the system board. ... working inside your computer, follow the steps in Before Working Inside Your Computer. For more safety best practices, see the Regulatory Compliance home page at dell.com/regulatory_compliance.
Post-requisites 1 Replace the display assembly. 2 Replace the processor fan. 3 Replace the video-card fan. 4 Replace the hard drive. 5 Replace the battery. 6 Replace the base cover. 56 You must enter the Service Tag in the BIOS setup program after you replace the system board. ... working inside your computer, follow the steps in Before Working Inside Your Computer. For more safety best practices, see the Regulatory Compliance home page at dell.com/regulatory_compliance.

Inspiron 15 7000 Series Service Manual
Page 57
... instructions in Before Working Inside Your Computer. For more safety best practices, see the Regulatory Compliance home page at dell.com/regulatory_compliance. Procedure 1 Remove the base cover. 2 Remove the battery. 3 Remove the hard drive. 4 Remove the wireless card. 5 Remove the memory module(s). 6 Remove the video-card fan. 7 Remove the processor fan. 8 Remove the...
... instructions in Before Working Inside Your Computer. For more safety best practices, see the Regulatory Compliance home page at dell.com/regulatory_compliance. Procedure 1 Remove the base cover. 2 Remove the battery. 3 Remove the hard drive. 4 Remove the wireless card. 5 Remove the memory module(s). 6 Remove the video-card fan. 7 Remove the processor fan. 8 Remove the...

Inspiron 15 7000 Series Service Manual
Page 60
... at dell.com/regulatory_compliance. After working inside your computer, follow the steps in After Working Inside Your Computer. Post-requisites 1 Replace the system board. 2 Replace the display assembly. 3 Replace the heat sink. 4 Replace the processor fan. 5 Replace the video-card fan. 6 Replace the memory module(s). 7 Replace the wireless card. 8 Replace the hard drive...
... at dell.com/regulatory_compliance. After working inside your computer, follow the steps in After Working Inside Your Computer. Post-requisites 1 Replace the system board. 2 Replace the display assembly. 3 Replace the heat sink. 4 Replace the processor fan. 5 Replace the video-card fan. 6 Replace the memory module(s). 7 Replace the wireless card. 8 Replace the hard drive...


