

Specifications
Page 14
Views Storage Interface Hard drive Drives supported Specifications SATA 6 Gbps • One 2.5-inch drive (supports Intel Smart Response Technology) • One solid state drive • One hard disk drive • One solid state drive • One hard drive and solid-state hybrid drive Dimensions and Weight System Information Memory Ports and Connectors Communications Video Audio Storage Media-Card Reader Display Keyboard Camera Touchpad Battery Power Adapter Computer Environment
Views Storage Interface Hard drive Drives supported Specifications SATA 6 Gbps • One 2.5-inch drive (supports Intel Smart Response Technology) • One solid state drive • One hard disk drive • One solid state drive • One hard drive and solid-state hybrid drive Dimensions and Weight System Information Memory Ports and Connectors Communications Video Audio Storage Media-Card Reader Display Keyboard Camera Touchpad Battery Power Adapter Computer Environment

Specifications
Page 22
...;F to 149°F) 0% to 95% (non-condensing) 1.30 GRMS 160 G‡ -15.2 m to 10,668 m (-50 ft to 10,000 ft) * Measured using a random vibration spectrum that simulates user environment. † Measured using a 2 ms half-sine pulse when the hard drive is in use. ‡ Measured using a 2 ms half-sine pulse when the...
...;F to 149°F) 0% to 95% (non-condensing) 1.30 GRMS 160 G‡ -15.2 m to 10,668 m (-50 ft to 10,000 ft) * Measured using a random vibration spectrum that simulates user environment. † Measured using a 2 ms half-sine pulse when the hard drive is in use. ‡ Measured using a 2 ms half-sine pulse when the...
Service Manual
Page 3
Contents Before Working Inside Your Computer 7 Before You Begin 7 Safety Instructions 7 Recommended Tools 8 After Working Inside Your Computer 9 Removing the Base Cover 10 Procedure...10 Replacing the Base Cover 11 Procedure...11 Removing the Battery 12 Prerequisites...12 Procedure...12 Replacing the Battery 14 Procedure...14 Post-requisites 14 Removing the Hard Drive 15 Prerequisites...15 Procedure...15 Replacing the Hard Drive 17 Procedure...17 Post-requisites 17
Contents Before Working Inside Your Computer 7 Before You Begin 7 Safety Instructions 7 Recommended Tools 8 After Working Inside Your Computer 9 Removing the Base Cover 10 Procedure...10 Replacing the Base Cover 11 Procedure...11 Removing the Battery 12 Prerequisites...12 Procedure...12 Replacing the Battery 14 Procedure...14 Post-requisites 14 Removing the Hard Drive 15 Prerequisites...15 Procedure...15 Replacing the Hard Drive 17 Procedure...17 Post-requisites 17
Service Manual
Page 15
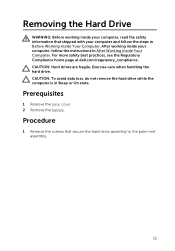
... Computer. Removing the Hard Drive WARNING: Before working inside your computer, read the safety information that secure the hard-drive assembly to the palm-rest assembly. 15 After working inside your computer and follow the instructions in Sleep or On state. For more safety best practices, see the Regulatory Compliance home page at dell.com/regulatory_compliance.
... Computer. Removing the Hard Drive WARNING: Before working inside your computer, read the safety information that secure the hard-drive assembly to the palm-rest assembly. 15 After working inside your computer and follow the instructions in Sleep or On state. For more safety best practices, see the Regulatory Compliance home page at dell.com/regulatory_compliance.

Service Manual
Page 16
2 Slide and lift the hard-drive assembly off the palm-rest assembly. 1 screws (4) 2 hard-drive assembly 3 Remove the screws that secure the hard-drive bracket to the hard-drive. 4 Lift the hard-drive bracket off the hard drive. 1 hard-drive bracket 3 hard drive 2 screws (4) 16
2 Slide and lift the hard-drive assembly off the palm-rest assembly. 1 screws (4) 2 hard-drive assembly 3 Remove the screws that secure the hard-drive bracket to the hard-drive. 4 Lift the hard-drive bracket off the hard drive. 1 hard-drive bracket 3 hard drive 2 screws (4) 16

Service Manual
Page 17
... on the hard drive. 2 Replace the screws that secure the hard-drive bracket to the hard-drive. 3 Slide the hard-drive assembly into the slot on the palm-rest assembly. 4 Replace the screws that secure the hard-drive assembly to the palm-rest assembly. For more safety best practices, see the Regulatory Compliance home page at dell.com/regulatory_compliance. CAUTION: Hard drives are...
... on the hard drive. 2 Replace the screws that secure the hard-drive bracket to the hard-drive. 3 Slide the hard-drive assembly into the slot on the palm-rest assembly. 4 Replace the screws that secure the hard-drive assembly to the palm-rest assembly. For more safety best practices, see the Regulatory Compliance home page at dell.com/regulatory_compliance. CAUTION: Hard drives are...

Service Manual
Page 51
... home page at dell.com/regulatory_compliance. You must make the desired changes again after you have made to the BIOS using the BIOS setup program. NOTE: Your computer's Service Tag is stored in After Working Inside Your Computer. Prerequisites 1 Remove the base cover. 2 Remove the battery. 3 Remove the hard drive. 4 Remove the video...
... home page at dell.com/regulatory_compliance. You must make the desired changes again after you have made to the BIOS using the BIOS setup program. NOTE: Your computer's Service Tag is stored in After Working Inside Your Computer. Prerequisites 1 Remove the base cover. 2 Remove the battery. 3 Remove the hard drive. 4 Remove the video...

Service Manual
Page 54
... best practices, see the Regulatory Compliance home page at dell.com/regulatory_compliance. After working inside your computer, follow the steps in After Working Inside Your Computer. Post-requisites 1 Replace the display assembly. 2 Replace the processor fan. 3 Replace the video-card fan. 4 Replace the hard drive. 5 Replace the battery. 6 Replace the base cover. 54...
... best practices, see the Regulatory Compliance home page at dell.com/regulatory_compliance. After working inside your computer, follow the steps in After Working Inside Your Computer. Post-requisites 1 Replace the display assembly. 2 Replace the processor fan. 3 Replace the video-card fan. 4 Replace the hard drive. 5 Replace the battery. 6 Replace the base cover. 54...

Service Manual
Page 55
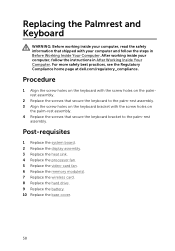
...inside your computer, follow the steps in After Working Inside Your Computer. Procedure 1 Remove the base cover. 2 Remove the battery. 3 Remove the hard drive. 4 Remove the wireless card. 5 Remove the memory module(s). 6 Remove the video-card fan. 7 Remove the processor fan. 8 Remove the heat... Remove the display assembly. 10 Remove the system board. For more safety best practices, see the Regulatory Compliance home page at dell.com/regulatory_compliance. Removing the Palmrest and Keyboard WARNING: Before working inside your computer, read the safety information that secure the keyboard ...
...inside your computer, follow the steps in After Working Inside Your Computer. Procedure 1 Remove the base cover. 2 Remove the battery. 3 Remove the hard drive. 4 Remove the wireless card. 5 Remove the memory module(s). 6 Remove the video-card fan. 7 Remove the processor fan. 8 Remove the heat... Remove the display assembly. 10 Remove the system board. For more safety best practices, see the Regulatory Compliance home page at dell.com/regulatory_compliance. Removing the Palmrest and Keyboard WARNING: Before working inside your computer, read the safety information that secure the keyboard ...
Service Manual
Page 58
... the video-card fan. 6 Replace the memory module(s). 7 Replace the wireless card. 8 Replace the hard drive. 9 Replace the battery. 10 Replace the base cover. 58 For more safety best practices, see the Regulatory Compliance home page at dell.com/regulatory_compliance. Procedure 1 Align the screw holes on the keyboard with the screw holes on...
... the video-card fan. 6 Replace the memory module(s). 7 Replace the wireless card. 8 Replace the hard drive. 9 Replace the battery. 10 Replace the base cover. 58 For more safety best practices, see the Regulatory Compliance home page at dell.com/regulatory_compliance. Procedure 1 Align the screw holes on the keyboard with the screw holes on...


